
RADIO CONTROL: PYLON RACING
Bill Hager, 4 Holly Springs Dr., Conroe, TX 77302
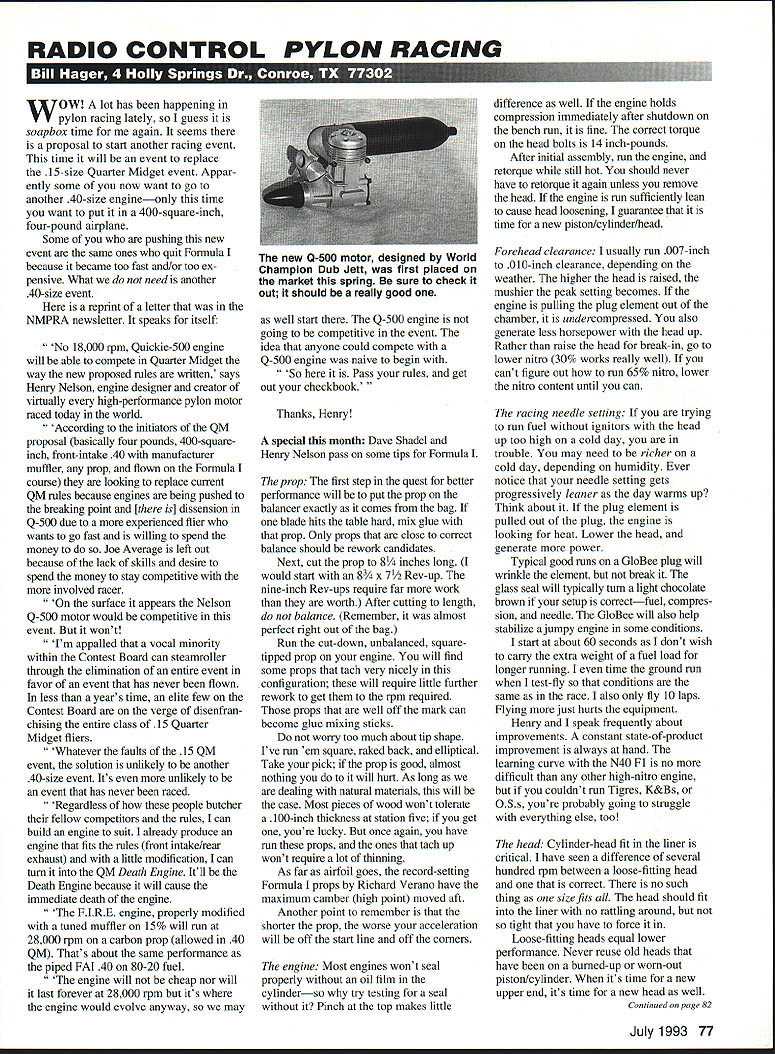
WOW! A lot has been happening in pylon racing lately, so I guess it is soapbox time for me again. It seems there is a proposal to start another racing event. This time it will be an event to replace the .15-size Quarter Midget event. Apparently some of you now want to go to another .40-size engine—only this time you want to put it in a 400-square-inch, four-pound airplane.
Some of you who are pushing this new event are the same ones who quit Formula I because it became too fast and/or too expensive. What we do not need is another .40-size event.
Reprint: Letter from Henry Nelson (from the NMPRA newsletter)
"No 18,000 rpm, Quickie-500 engine will be able to compete in Quarter Midget the way the new proposed rules are written," says Henry Nelson, engine designer and creator of virtually every high-performance pylon motor raced today in the world.
"According to the initiators of the QM proposal (basically four pounds, 400-square-inch, front-intake .40 with manufacturer muffler, any prop, and flown on the Formula I course) they are looking to replace current QM rules because engines are being pushed to the breaking point and [there is] dissension in Q-500 due to a more experienced flier who wants to go fast and is willing to spend the money to do so. Joe Average is left out because of the lack of skills and desire to spend the money to stay competitive with the more involved racer.
"On the surface it appears the Nelson Q-500 motor would be competitive in this event. But it won't!
"I'm appalled that a vocal minority within the Contest Board can steamroller through the elimination of an entire event in favor of an event that has never been flown. In less than a year's time, an elite few on the Contest Board are on the verge of disenfranchising the entire class of .15 Quarter Midget fliers.
"Whatever the faults of the .15 QM event, the solution is unlikely to be another .40-size event. It's even more unlikely to be an event that has never been raced.
"Regardless of how these people butcher their fellow competitors and the rules, I can build an engine to suit. I already produce an engine that fits the rules (front intake/rear exhaust) and with a little modification, I can turn it into the QM Death Engine. It'll be the Death Engine because it will cause the immediate death of the engine.
"The F.E.L.R.E. engine, properly modified with a tuned muffler on 15% will run at 28,000 rpm on a carbon prop (allowed in .40 QM). That's about the same performance as the piped F.A.I. .40 on 80-20 fuel.
"The engine will not be cheap nor will it last forever at 28,000 rpm but is where the engine would evolve anyway, so we make one difference as well. If the engine holds compression immediately after shutdown on the bench run, it is fine. The correct torque on the head bolts is 14 inch-pounds.
"After initial assembly, run the engine, and retorque while still hot. You should never have to retorque it again unless you remove the head. If the engine is run sufficiently lean to cause head loosening, I guarantee that it is time for a new piston/cylinder/head.
"Head clearance (piston-to-head): I usually run .007-inch to .010-inch clearance, depending on the weather. The higher the head is raised, the mushier the peak setting becomes. If the engine is pulling the plug element out of the chamber, it is undercompressed. You also generate less horsepower with the head up.
"Rather than raise the head for break-in, go to lower nitro (30% works really well). If you can't figure out how to run 65% nitro, lower the nitro content until you can."
Thanks, Henry!
A special this month: Dave Shadel and Henry Nelson pass on some tips for Formula I.
The prop
The first step in the quest for better performance will be to put the prop on the balancer exactly as it comes from the bag. If one blade hits the table hard, mix glue with that prop. Only props that are close to correct balance should be rework candidates.
Next, cut the prop to 8-1/4 inches long. (I would start with an 8-3/4 x 7-1/2 Rev-up. The nine-inch Rev-ups require far more work than they are worth.) After cutting to length, do no balance. (Remember, it was almost perfect right out of the bag.)
Run the cut-down, unbalanced, square-tipped prop on your engine. You will find some props that tach very nicely in this configuration; these will require little further rework to get them to the rpm required. Those props that are well off the mark can become glue-mixing sticks.
Do not worry too much about tip shape. I've run them square, raked back and elliptical. Take your pick; if the prop is good, almost nothing you do to it will hurt. As long as we are dealing with natural materials, this will be the case. Most pieces of wood won't tolerate a .100-inch thickness at station five; if you get one, you're lucky. But once again, you have run these props, and the ones that tach up won't require a lot of thinning.
As far as airfoil goes, the record-setting Formula I props by Richard Verano have the maximum camber (high point) moved aft.
Another point to remember is that the shorter the prop, the worse your acceleration will be off the start line and off the corners.
The engine
Most engines won't seal properly without an oil film in the cylinder—so why try testing for a seal without it? Pinch at the top makes little difference as well. If the engine holds compression immediately after shutdown on the bench run, it is fine. The correct torque on the head bolts is 14 inch-pounds.
After initial assembly, run the engine, and retorque while still hot. You should never have to retorque it again unless you remove the head. If the engine is run sufficiently lean to cause head loosening, I guarantee that it is time for a new piston/cylinder/head.
Head clearance (piston-to-head): I usually run .007-inch to .010-inch clearance, depending on the weather. The higher the head is raised, the mushier the peak setting becomes. If the engine is pulling the plug element out of the chamber, it is undercompressed. You also generate less horsepower with the head up. Rather than raise the head for break-in, go to lower nitro (30% works really well). If you can't figure out how to run 65% nitro, lower the nitro content until you can.
The racing needle setting
If you are trying to run fuel without ignitors with the head up too high on a cold day, you are in trouble. You may need to be richer on a cold day, depending on humidity. Try to notice that your needle setting gets progressively leaner as the day warms up? Think about it. If the plug element is pulled out of the plug, the engine is looking for heat. Lower the head, and generate more power.
Typical good runs on a GloBee plug will wrinkle the element a little, but not break it. The glass seal will typically turn a light chocolate brown if your setup is correct—fuel, compression, and needle. The GloBee will also help stabilize a jumpy engine in some conditions.
I start at about 60 seconds as I don't wish to carry the extra weight of a fuel load for longer running. I even time the ground run when I test-fly so that conditions are the same as in the race. I also only fly 10 laps. Flying more just hurts the equipment.
Henry and I speak frequently about improvements. A constant state-of-product improvement is always a hand. The learning curve with the N40 F1 is no more difficult than any other high-nitro engine, but if you couldn't run Tigers, K&Bs, or O.S.s, you're probably going to struggle with everything else, too!
The head
Cylinder-head fit in the liner is critical. I have seen a difference of several hundred rpm between a loose-fitting head and one that is correct. There is no such thing as one-size-fits-all. The head should fit into the liner with no rattling around, but not so tight that you have to force it in.
Loose-fitting heads equal lower performance. Never reuse old heads that have been on a burned-up or worn-out piston/cylinder. When it's time for a new upper end, it's time for a new head as well.
RC Pylon / Hager — continued
At a customer's request, I will mill the sides of the upper case and cylinder head for check/cool clearance. I don't use a file!
The plug
For Formula I use, only the standard and GloBee plugs are used. I wish that the GloBees were each only 50 cents more. In reality, they are priced as follows:
- Standard: $2.85 each
- Heavy Duty: $3.00 each
- GloBee: $4.50 each
- Plug nuts for GloBees: $5.00 each (reusable)
Correct running will yield a plug with a light tan face, depending on the oil in your fuel, and a well-scrambled element. It may or may not glow after use. If the element is frosted (white or chalky), you're too lean. I have seen plugs screwed in so tight that it pushes the plug seat into the combustion chamber. You must avoid this. The correct torque for the plug is 25 inch-pounds.
For an undercompressed setup, it may be beneficial to actually pull the element out of the plug by about 1/16 of an inch or so. This is what you are trying to accomplish by running the engine over the top anyway, but doing it prior to the run is a lot less damaging to your engine.
The liner
The smaller intake port opposite the exhaust is called the boost port. The intake ports on either side of the liner are called the main transfer ports. The reason for making the boost smaller was that the bottom of the larger port was covered by the piston at bottom dead center, and the smaller port retains velocity better.
The aluminum liners are vastly superior to the brass thus far. They must be run differently than brass for best results. An undercompressed setup with the aluminum will run much smoother than the brass version and will be more tolerant of lean runs. I have run the engine with a variety of different port heights and have found little, if any, difference. Consider the fact that .005-inch difference in port heights equals about 1.5 degrees of timing—virtually no change. So it really matters very little.
The piston
I have used two different piston alloys in production. Neither appears to be significantly better or worse than the other. I have also tried a variety of others, and none appears to be any better.
The rod
I have had fewer than 20 rod failures—all early examples. Out of a few thousand rods, I'd say that isn't too bad. Several failures were caused by a plated crankshaft in which the plating peeled, causing rod seizure. Since only a couple dozen engines had the plated crank, this problem has gone away.
The only failures I have seen recently occurred when people rise over on takeoff and shaft-run the engine or load up the engine with fuel and keep hitting it with the starter. A couple of runs later, the rod lets go, and immediately it's the rod's fault. The error is a lot more prevalent in this than are defective parts!
The backplate, rotor, and pin
Every disc valve setup in history has had the occasional chewing-the-backplate problem. SuperTigers did it badly, but most were not aware of the problem. Until we started using the colored anodize on them, almost no one knew it.
Most of the problems with materials, fits, and finishes have been solved, and the current backplate is fairly reliable. Nonetheless, fairly reliable is not good enough for me, and a new backplate/rotor/pin design, which should eliminate the problems once and for all, is nearly finished.
The rotor-dishing problem is caused by users who routinely removed the rotor by inserting an object through the intake and beating on the rotor/pin assembly to remove it. Lubrication has nothing to do with the problem. In a piped engine (FAI), the action of the pipe prevents the rotor from contacting the backplate on the closed side of the disc-backplate.
Hope this helps clear up some points. Thanks, Dave and Henry, for all the help.
Video recommendation and recap
As a recap of last month: Here is what Lloyd Brunham has to say about Lyle Larson's new videos:
"Lyle has made a three-tape, 10-hour version of everything you ever wanted to know about building and setting up a racing plane. This is unquestionably the most thorough and complete video of its kind.
"Lyle keeps no secrets and shows step-by-step, glue-joint-by-glue-joint, everything from unpacking the wing cores to setting the needle and test-flying the plane for the first time.
"No matter how many planes you have built, I guarantee you will learn something from this video. Lyle's methods and shortcuts on construction and finishing alone are worth the $85 price.
"The camera work is good and detailed and Lyle narrates every minute of the 10 hours with painstaking detail as if he were sitting right next to you.
"For the beginner, this tape is a must. If you have built a sport plane you could build a first-class Formula I after viewing this tape."
Lyle goes on to show his way of applying primer, masking, painting, and buffing out the finished product. But he's not done yet. He rebuilds a Nelson engine, shows his bladder-regulator system, and shows how he carves a prop.
We all have our ways of doing things, and Lyle definitely has his. He is very successful at what he does, and many thanks to him for taking the time and effort to make this video. It is a definite must-see.
Thanks, Lloyd. For more information call Lyle at (714) 365-1155.
See ya! +
Transcribed from original scans by AI. Minor OCR errors may remain.

