
Radio Control: Pylon Racing
Duane Gall, 1267 S. Beeler Court, Denver CO 80231
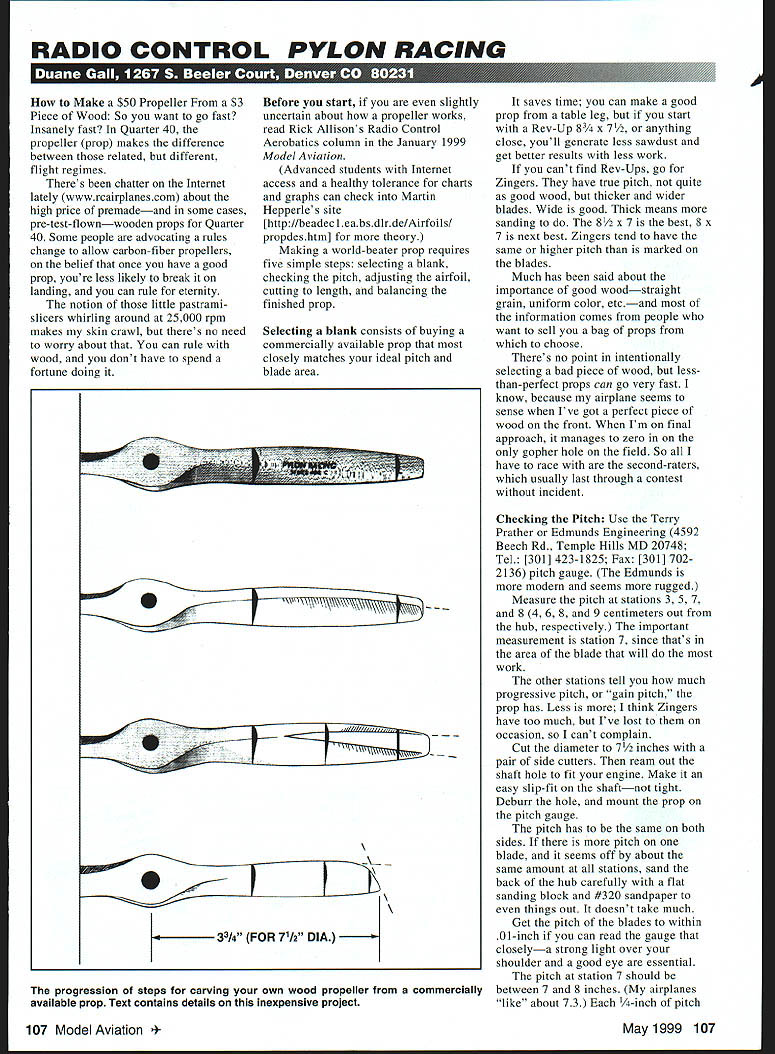
How to Make a $50 Propeller From a $3 Piece of Wood
So you want to go fast — insanely fast? In Quarter 40, the propeller (prop) makes the difference between those related, different flight regimes.
There’s been chatter on the Internet lately (www.rcairplanes.com) about the high price of premade — and in some cases pre-test-flown — wooden props for Quarter 40. Some people are advocating a rules change to allow carbon-fiber propellers, on the belief that once you have a good prop, you’re less likely to break it in landing, and you can rule for eternity. The notion of those little pastrami-slicers whirling around at 25,000 rpm makes my skin crawl, but there’s no need to worry about that. You can rule with wood, and you don’t have to spend a fortune doing it.
Before you start, if you are even slightly uncertain about how a propeller works, read Rick Allison’s Radio Control Aerobatics column in the January 1999 Model Aviation.
(Advanced students with Internet access and a healthy tolerance for charts and graphs can check Martin Hepperle’s site (http://bea.de/clea.bs.dlr.de/Airfoils/propdes.htm) for more theory.)
Making a world-beater prop requires five simple steps:
- Selecting a blank
- Checking the pitch
- Adjusting the airfoil
- Cutting to length
- Balancing the finished prop
Selecting a blank consists of buying a commercially available prop that most closely matches your ideal pitch and blade area. It saves time; you can make a good prop from a table, but if you start with a Rev-Ups (8-3/4 x 7-1/2), or anything close, you’ll generate less sawdust and get better results with less work.
If you can’t find Rev-Ups, go for Zingers. They have true pitch, not quite as good wood, but thicker and wider blades. Wide is good. Thick means more sanding to do. The 8-3/4 x 7-1/2 is the best; 8 x 7 is next best. Zingers tend to have the same or higher pitch than is marked on the blades.
Much has been said about the importance of good wood — straight grain, uniform color, etc. — and most of the information comes from people who want to sell a bag of props from which to choose. There’s no point in intentionally selecting a bad piece of wood, but less-than-perfect props can go very fast. I know, because my airplane seems to sense when I’ve got a perfect piece of wood on the front. When I’m on final approach, it manages to zero in on the only gopher hole on the field. So all I have to race with are the second-raters, which usually last through a contest without incident.
Checking the Pitch
Use the Terry Prather or Edmunds Engineering (4592 Beech Rd., Temple Hills MD 20748; Tel: [301] 423-1825; Fax: [301] 702-2136) pitch gauge. (The Edmunds is more modern and seems more rugged.) Measure the pitch at stations 3, 5, 7, and 8 (4, 6, 8, and 9 centimeters out from the hub, respectively). The important measurement is station 7, since that’s in the area of the blade that will do the most work.
The other stations tell you how much progressive pitch, or “gain pitch,” the prop has. Less is more; I think Zingers have too much, but I’ve lost to them on occasion, so I can’t complain.
Cut the diameter to 7-1/2 inches with a pair of side cutters. Then ream out the shaft hole to fit your engine. Make it an easy slip-fit on the shaft — not tight. Deburr the hole, and mount the prop on the pitch gauge.
The pitch has to be the same on both sides. If there is more pitch on one blade, and it seems off by about the same amount at all stations, sand the back of the hub carefully with a flat sanding block and #320 sandpaper to even things out. It doesn’t take much.
Get the pitch of the blades to within .01 inch if you can read the gauge that closely — a strong light over your shoulder and a good eye are essential. The pitch at station 7 should be between 7 and 8 inches. (My airplanes “like” about 7.3.) Each 1/4-inch of pitch translates to about 5 mph of straightaway speed, assuming the engine can turn the airplane and doesn’t bog down in corners.
Adjusting the Airfoil
The hard part is ahead; now I’ll focus on the top blade — the curved top wing. The goal is to turn the blade into a nice high-speed airfoil. The more tip speed, the more you’ll approach Mach 1; less inboard you need thickness for efficiency, strength, and torsional rigidity.
If you started with a Zinger, you will need to remove a bunch of wood and sharpen the leading and trailing edges. Dragon Skin steel sanding sheet in a Red Devil mounted holder (Red Devil holder #3329) cuts fast. Stay away from hub tools — don’t accidentally cut a notch that will weaken the prop. Work carefully until you’ve made a diamond airfoil (actually a triangular cross-section since the bottom is flat). The high point is about 1/4 to 1/3 of the way back. The leading edge will look too thick; the tip will be fixed.
Finish with #120 aluminum-oxide paper on a padded block to remove gouges caused by the Dragon Skin. Make the rear part of the airfoil flat, smooth, and clean, and bring down a sharp trailing edge. If you’ve built Free Flight hand-launched gliders, you’ll have an advantage here. Flatten the top diamond airfoil starting about station 4 and going out. Use a flat padded sanding block and #120 paper again.
At station 4, you won’t remove much material; at the tip, you’ll sand away most of the airfoil until it’s virtually a flat plate. The points in between will be somewhere in between. Finally, blend the contours so it looks like a prop again. Some people like to measure the thickness at various points with calipers, but I never have time. If the wood is anywhere near uniform in density, you’ll sand off enough in the balancing process that the thickness will be about equal on both sides anyway.
Cutting to Length
You might wonder why this prop was made 7-1/2 inches long, when all you need in Quarter 40 is a 7- to 7-3/8-inch diameter. The answer lies at your feet, in all of the sawdust that you inadvertently trimmed off the edges and tips while you were making them nice and sharp. Also, by the time it’s done, there won’t be enough blade area at station 8 to measure the pitch.
Carefully cut the ends to approximately 7-3/8 inches in diameter; keep them equal. Test the “flex” on the blades to make sure they’re still strong enough to handle three horsepower. Holding #320–#400 Carborundum paper in your hand, lightly go over the leading and trailing edges to get rid of splinters. You’ll lose a little blade area, but don’t worry; your engine can’t turn it all anyway. Also, blunt the leading edge to a gentle radius. Sharp trailing edges speed you up; sharp leading edges slow you down.
Use the padded block and #320 to rake or radius the leading edge at the tip. Keep the shape of the blades as equal as you can. Try to keep the rear part of the tip pointy, as on those expensive props. Think of the money you’ve just saved.
Balance and Finish
It’s time for the moment of truth: chuck that propeller on the balancer and see how it turned out.
If you’re sure that there are no witnesses, use the padded block and #120 sandpaper to thin down the “meaty” part of the airfoil on the heavy blade until it’s about right. Smooth it out again with #320, and take it out to test run. (Be sure to bring all of your gear: ear plugs, safety goggles, etc.)
If you hit 24,000 rpm on the first try, you have a job. You’ll probably be in the 22,000–23,000 range, which means you need to reduce the diameter to 7.1 or 7.2 inches and possibly narrow the tips to lose some area.
Rebalancing isn’t necessary until you get home, unless you really hack away at it. Funny noises while it runs are bad; fly it if you feel lucky.
The final touch is to recheck the blade’s balance, polish it all over with #600 paper, and seal the outside with something waterproof. Wax or furniture polish are OK; clear epoxy, such as Z-Poxy, is time-consuming and requires more rebalancing, but gives very nice results.
The best I’ve found is thin CyA (cyanoacrylate) applied quickly with a small wad of toilet paper, and polished immediately with the back side of #600 Carborundum paper. After the CyA soaks in and cures thoroughly, polish it with the front side of the #600 and apply a light coat of wax. Rubbing it with a piece of waxed paper will do, but don’t get carried away; lest you sand the end off. I’ve been there.
Once you’ve collected a half-dozen propellers that run 23,800–24,800 rpm, find one that ended up too small (say, 25,500) and use it as your “reference” prop. Run all of your propellers the same day, and mark the flying props according to how far down in rpm they are from your reference prop.
Bring out your reference prop for the first run on race day. If it goes 26,000, select a flying prop marked “minus 1,500” to get the magic 24,500 rpm.
If the air is bad, or your engine gets sick and won’t turn any of your flying props, your ace in the hole is to run the reference prop until you resolve the situation.
Proper storage is important. Keep your props accessible, but safe from mishaps. The best system is to bring them out on race day with your electric starter and other pit gear, piled with other stuff in an old cardboard box clearly labeled “junk props.”
Transcribed from original scans by AI. Minor OCR errors may remain.

