
Radio Control: Pylon Racing
Bill Hager
SUMMER is just around the corner, although as I write this it is 99 degrees outside with the promise of hotter weather on its way.
I have already attended several races and, from time to time, I will write up contest reports from different areas so you have some idea what is going on around the country. Send in contest reports and pictures (black and white, preferably 5 x 7); we will try to use some of them.
Middle Tennessee R/C Society — Percy Warner Park (April 19–20)
I received a contest report from John Kilsdonk on the Middle Tennessee Radio Control Society pylon races held April 19–20. For most of the middle states this was the season opener. The race was held in beautiful Percy Warner Park among flowering trees on the top of the hill.
Greg Doe was the Race CD and did an outstanding job. Greg and all of the workers deserve congratulations for a job well done.
Three events were flown over the two days, all on the 10-lap, 2-mile (478') Q/M course.
- 1/2-A: The 1/2-A race was won by Forest Whitson flying a GLH; Jimmy Bartels recorded the fast time of 1:36.
- Quarter Midget (Q/M): Gail Jacobson won flying his new "Pole Kitty" (a two-piece, QM-size Polecat) to a perfect score and also posted the fast time of the event (1:29.01). Cliff Smith, also flying a "Pole Kitty," finished second.
- Quickie 500: Drew an outstanding 33 entries. Using SEMPRA rules, KB-8011 Spickler Kit, no mufflers and re-worked props, there was a three-way tie for first with perfect scores. Because the three were on the same frequency, finishing positions were decided by fast times: Jimmy Bartels took first, Denny Sumner second, and John Kilsdonk third.
In conclusion, it was an excellent weekend of racing with great hospitality and officiating.
Summary of results:
- 1/2-A — 11 entries:
- F. Whitson — 1:45
- J. Bartels — 1:36
- C. Smith — 1:46
- G. Jacobson — 1:46
- J. Kilsdonk — 1:55
- Q-500 — 33 entries:
- J. Bartels
- D. Sumner
- J. Kilsdonk
- G. Jacobson
- D. Boute
- Quarter Midget — 13 entries:
- G. Jacobson — 15 pt., 1:29.01
- C. Smith — 14 pt., 1:45.0
- D. Sumner — 13 pt., 1:37.0
- J. Kilsdonk — 13 pt., 1:39.0
- T. Grandenher — 12 pt., 1:44
Austin R/C Association — Northeast Austin (May 11)
The Austin R/C Association held its first race May 11 at a very nice new flying field on the northeast side of Austin. This event was a Quickie 500 race. George Parks was the CD and the club did a great job.
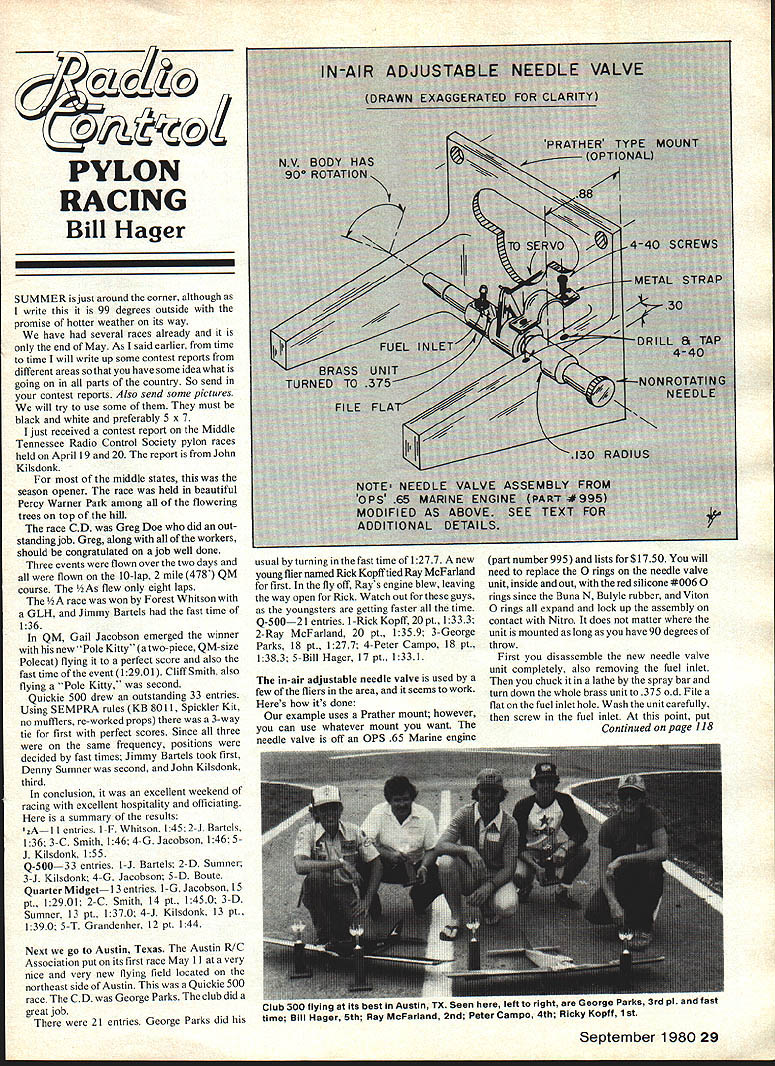
There were 21 entries. George Parks turned the fast time of 1:27.7. A young flier, Rick Kopff, tied Ray McFarland for first; in the fly-off Ray's engine blew, leaving the win to Rick. The youngsters are getting faster — watch out for them.
Q-500 — 21 entries:
- R. Kopff — 20 pt., 1:33.3
- R. McFarland — 20 pt., 1:35.9
- G. Parks — 18 pt., 1:27.7
- P. Campo — 18 pt., 1:38.3
- B. Hager — 17 pt., 1:33.1
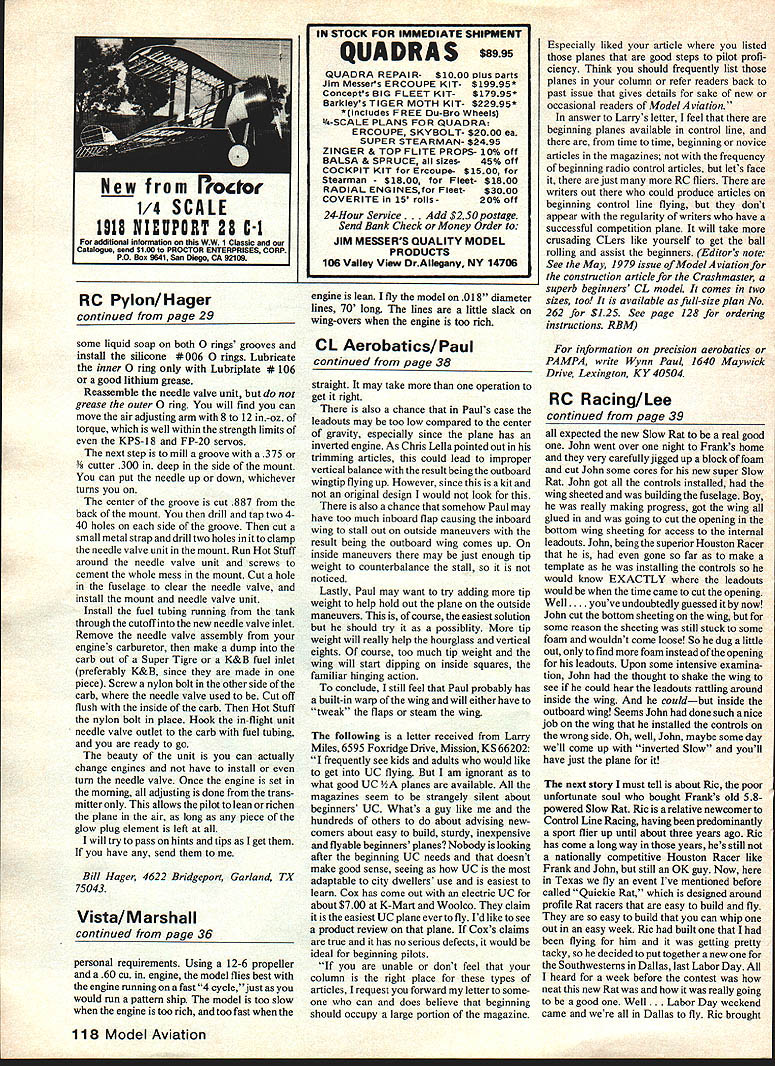
In-flight (adjustable) needle valve — how it's done
A few fliers in the area use an in-air adjustable needle valve. The following describes one way to fabricate and install such a unit. Our example uses a Prather mount, but you can use whatever mount you prefer.
Parts and materials:
- Needle valve from an OPS .65 marine engine (part number 995)
- Red silicone O-rings, size #006 (replace original O-rings)
- Lubriplate #106 (lithium grease)
- Liquid soap (for O-ring installation)
- Lubricant/adhesive (e.g., Hot Stuff)
- Small metal strap for side mounting
- Nylon bolt (as described below)
- Tools: lathe, file, mill (7/64 cutter), drill/tap, appropriate drills, cutters, and clamps
Important note: replace the original Buna-N, butyl, or Viton O-rings with silicone #006 O-rings — the original O-rings can swell and lock up when exposed to nitromethane.
Procedure (summary):
- Disassemble the new needle valve unit completely, removing the fuel inlet.
- In a lathe, chuck the assembly by the spray bar and turn down the brass unit to 0.375" O.D. File a flat on the fuel inlet hole.
- Wash the unit carefully. Screw in the fuel inlet point.
- Put liquid soap in both O-ring grooves and install the red silicone #006 O-rings. Lubricate the inner O-ring with Lubriplate #106. Grease the outer O-ring as well.
- Reassemble the needle valve unit. You should be able to move the air-adjusting arm with about 8–12 in.-oz. torque — well within strength limits.
- Prepare the mount: mill a groove 0.375" wide using a 7/64" cutter, 0.300" deep. The side mount allows the needle to be positioned up or down as required.
- For a back mount, cut a center groove 0.087", drill and tap two small holes (the text refers to .040 — use appropriate hardware for your mount).
- For a side mount, cut a small metal strap, drill two holes and clamp the needle valve unit in the strap.
- Apply Hot Stuff (adhesive) around the needle valve unit screws to secure the mount assembly.
- Cut a hole in the fuselage to clear the needle valve; install the mount and needle valve unit. Route the fuel tubing from the in-flight valve to the tank, using a cutoff/new inlet as required.
- Remove the original needle valve assembly from the engine carburetor. Adapt the engine carburetor fuel inlet — for Super Tigre or K&B carbs, use the appropriate fuel inlet piece (K&B preferred if it is a single piece). Screw a nylon bolt into the carb where the original needle valve was used, cut it flush inside the carb, and secure it with Hot Stuff if needed. Hook the in-flight unit's needle valve outlet to the carb inlet.
This produces a remotely adjustable needle valve that allows fine in-flight mixture adjustment. Ensure all fittings are secure and test thoroughly on the ground before flying.
---
Transcribed from original scans by AI. Minor OCR errors may remain.

