

Radio Control: Pylon Racing
Ed Rankin
RON SCHORR, 5244 Teesdale Ave., North Hollywood, Calif., 91607, will be our president of the NMPRA for 1976. Ron was our treasurer for 1974-75, and he has really put our organization in a very good financial position. For the first time the NMPRA was able to contribute to the Championship Race with prizes and sponsorship. He is a top notch manager. Ron is an active race pilot and knows all of the desires and problems of the competitive pilot. In addition, he has been active in directing contests and knows all of the problems associated with conducting a race contest. Ron has been in the NMPRA many years, and has dedicated himself to promote Pylon racing. I know that Ron has many new ideas for 1976 and that he will do a tremendous job. Let's all pitch in and help Ron make 1976 another banner year for the NMPRA. Ron has informed me that the 1976 Championship Race will be held in Calif. and not in Las Vegas. This was only a rumor and not a fact.
I have been racing since 1966, and have built many airplanes during these years. In the past, I would build only one extra airplane during the winter months. During the racing season I would always have to build new ones between contests and under pressure. Last winter I finally got wise to this situation, and did all of my building during the winter months. I built three F-I and two pattern airplanes, and was glad that I did since I lost two F-I airplanes during the racing season. If you are going to be an active race pilot, you will probably compete in ten or 12 contests during the season, in addition to a lot of test flying. Therefore, you might lose at least one or two airplanes. So why not do your building during the off-season when you have plenty of time to build several airplanes. I plan to build four F-I airplanes this winter, and have already finished one in the four weeks since the Championship Race.
Another good tip I would like to share with you. During the off-season, you can tune-up your flying skills by flying a pattern airplane on the weekends. On every flight go through the complete AMA pattern, and work on each maneuver to perfection. You would be surprised how this will help improve your reflexes which is a really important skill in flying a pylon racer. In addition, you might enter some pattern contests to further improve your flying skills. So many race pilots fly only racers, and really never learn how to fly an airplane properly. Flying a pattern airplane will give you good flying experience, and when the racing season begins you will be a better pilot.
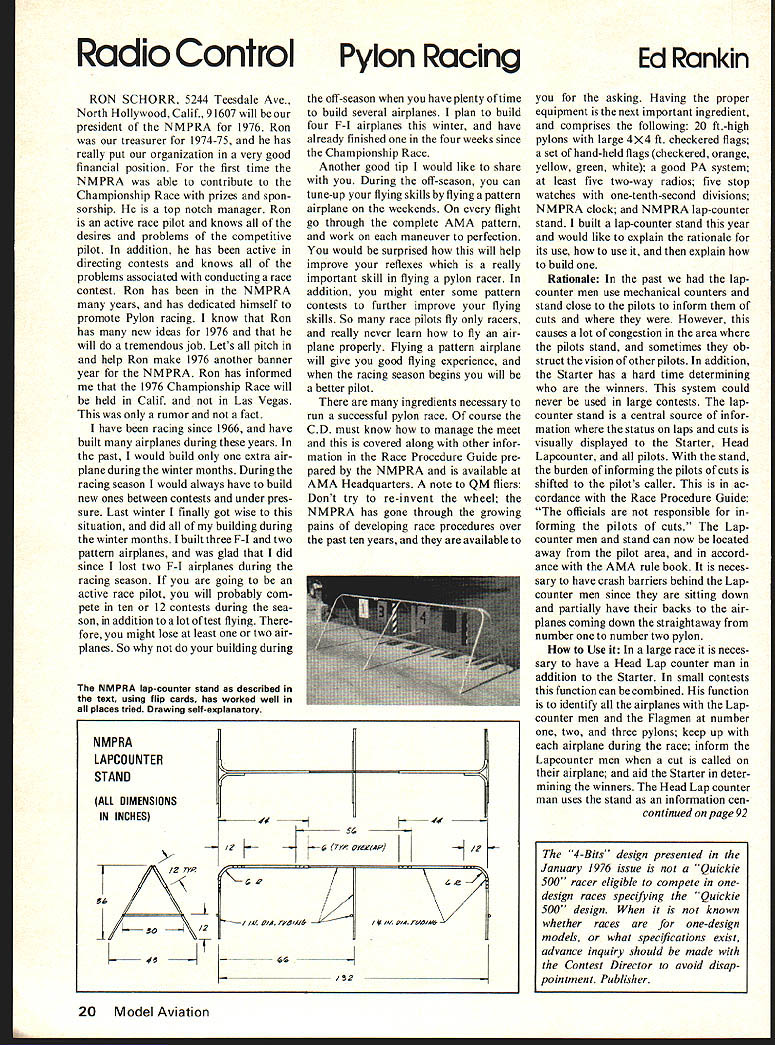
There are many ingredients necessary to run a successful pylon race. Of course the C.D. must know how to manage the meet and this is covered along with other information in the Race Procedure Guide prepared by the NMPRA and is available at AMA Headquarters. A note to QM fliers: Don't try to re-invent the wheel; the NMPRA has gone through the growing pains of developing race procedures over the past ten years, and they are available to you for the asking. Having the proper equipment is the next important ingredient, and comprises the following: 20 ft.-high pylons with a large 4x4 ft. checkered flags; a set of hand-held flags (checkered, orange, yellow, green, white); a good PA system; at least five two-way radios; five stop watches with one-tenth-second divisions; NMPRA clock; and NMPRA lap-counter stand. I built a lap-counter stand this year and would like to explain the rationale for its use, how to use it, and then explain how to build one.
Rationale: In the past we had the lap-counter men use mechanical counters and stand close to the pilots to inform them of cuts and where they were. However, this causes a lot of congestion in the area where the pilots stand, and sometimes they obstruct the vision of other pilots. In addition, the Starter has a hard time determining who are the winners. This system could never be used in large contests. The lap-counter stand is a central source of information where the status on laps and cuts is visually displayed to the Starter, Head Lap-counter, and all pilots. With the stand, the burden of informing the pilots of cuts is shifted to the pilot's caller. This is in accordance with the Race Procedure Guide. The officials are not responsible for informing the pilots of cuts. The lap-counter men and stand can now be located away from the pilot area, and in accordance with the AMA rule book, it is necessary to have crash barriers behind the lap-counter men since they are sitting down and partially have their backs to the airplanes coming down the straightaway from number one to number two pylon.
How to Use it: In a large race it is necessary to have a Head Lap-counter man in addition to the Starter. In small contests this function can be combined. His function is to identify all the airplanes with the lap-counter men and the Flagmen at number one, two, and three pylons; keep up with each airplane during the race; inform the lap-counter men when a cut is called on their airplane; and aid the Starter in determining the winners. The Head Lap-counter man uses the stand as an information cen- (continued on page 92) ter. Having proper equipment is the next important ingredient. It comprises the following:
- 20-ft-high pylons
- large 4 x 4-ft checkered flags
- a set of hand-held flags (checkered, orange, yellow, green, white)
- a good PA system
- at least five two-way radios
- five stop watches (one-tenth-second divisions)
- an NMPRA clock
- an NMPRA lap-counter stand
If you build the lap-counter stand this year I would like to explain the rationale of its use and explain how to build it.
Rationale: In the past lap-counter men used mechanical counters and stood close to the pilots to inform cuts. However, this caused a lot of congestion in the pilots' area. Pilots would sometimes obstruct the vision of other pilots. In addition, the Starter had a hard time determining winners. This system could never be used in large contests. The lap-counter stand provides a central source of information where the status on laps and cuts is visually displayed to the Starter, Head Lap-counter, and all pilots. With the stand the burden of informing the pilots of cuts is shifted to the pilot's caller in accordance with the Race Procedure Guide. The officials are not responsible for informing the pilots of cuts. The lap-counter men and stand can now be located away from the pilot area. In accordance with the AMA rule book it is necessary to have crash barriers behind the lap-counter men since they are sitting down and partially have their backs to the airplanes coming down the straightaway from number one to number two pylon.
Use: In a large race it is necessary to have a Head Lap-counter man in addition to the Starter. In small contests these functions can be combined. His function is to identify all the airplanes with the lap-counter men and the Flagmen at number one, two and three pylons; keep up with each airplane during the race; inform the lap-counter men when a cut is called on their airplane; and aid the Starter in determining the winners. The Head Lap-counter man uses the stand as an information center.
Each lap-counter man has two sets of cards. One set has numbers which show the laps and another set is to show cuts. The four sets are color coded yellow, white, green and orange and are matched with the respective colored flag at number one pylon. The number displayed denotes the lap that the airplane has started. On take-off the number one card is displayed; at the end of the first lap the number two card is displayed; at the end of the second lap the number three card is displayed, etc. and when the airplane has completed its ninth lap and has started on its tenth lap, the number ten card is displayed.
There are three cards at each station to display cuts. One card is the color code; one card is colored white with black diagonal stripes to denote one cut; and one card is solid black to denote two cuts. When the airplane has one cut, the color card is flipped instead of a numbered card to display one cut. When the airplane receives the second cut the black and white striped card is flipped to display the solid black card. He then stops counting laps and performs the Head Lap-counter that his airplane has two cuts, and flips all of his cards to show the number one lap card while keeping the black cut card displayed. We have found that it is more convenient to arrange the cards where they can be flipped forward and over the support rings to display the laps.
Construction: A photograph of the completed assembly and a dimensional sketch are shown to aid in the construction. As previously stated, a set of lap cards and a set of cut cards are required at each of the four stations, which is a total of 52 cards. Therefore, it is desired to select a material for these cards that is lightweight and has good durability, since they are going to be banged around for a long time. One-sixteenth inch thick phenolic or formica will fill this requirement.
The lap cards are 9 x 12 in. and the cut cards are 3½ x 4½ in. Two 5/8" diameter holes are drilled at the top of each card for attachment to the stand with 3/8-in. binder rings. For the lap cards, the holes are drilled with one in. edge distance and for the cut cards use 5/8 in. edge distance. Ten cards taped together can be drilled at one time on a drill press. A quick calculation shows that this is 35.6 sq. ft. of phenolic and 71.2 sq. ft. of painting surface. The type of paint to be used is left up to you; however, I used K&B Superpoxy primer and enamel for a scuff-resistant and long-lasting finish.
To spray the primer I laid the cards on the garage floor with newspaper underneath. When one side is dry they can be turned over for painting the other side. To paint the cards with the Superpoxy enamel, I strung them on two wires tied to the rails of the garage doors. This method allows you to paint ten lap cards and one cut card front and back without changing paint colors in your spray gun. The eight remaining cut cards can all be painted black at one time, and then four can be masked at 45 degrees for the one inch white stripes.
Numbers should be seven inches tall and are black. These can be cut out of contact paper or painted. I chose to paint them using a stencil cut out of 9 x 12 in. poster board. These can be painted at the same time the black-cut cards are being painted. For best results spray with low pressure on the gun and very thin paint.
This stand is made entirely of 1¼" and 1" O.D. aluminum tubing, and takes less time to fabricate than the cards. Refer to the sketch for overall dimensions. The bends can easily be made using a 1" thick by 12" diameter wood mandrel turned on a wood lathe with a ½ in. radius groove cut on the circumference. Assembly of the stand is done with 3/16" dia. x 2½" long machine screws and nuts. The stand is divided into sections so that it can be disassembled and carried in the trunk of a car. If a van is used for transportation, only the center tubing section, and the center support are required to be assembled.
The complete lap counter stand will cost about $60 depending on your resources, and will require about 30 hours to build. The phenolic or formica can be purchased at a lumber yard; the tubing from a hardware store; and the binder rings from a stationery store.
This is a very worthy project, and if your club is very active in racing you would be surprised at the results when used properly. We have used this stand for all of our district races this year in addition to the AMA Nats and the NMPRA Championship race with very good results.
Building Tips
- For best results in filling wood pores and fiberglass pits, brush the first coat of K&B Superpoxy primer mixed with micro-balloons. When dried it will have a very rough texture but can be sanded very smoothly with 150-grit sandpaper. Apply an additional coat mixed with micro-balloons to cover the remaining imperfections. Sand with 220-grit sandpaper, and spray two very thin coats of primer. This method will give you a very light filler for painting the K&B Superpoxy enamel. (Approximately 3 oz. for a F-1 airplane.) Thin the mixed enamel one to one with thinner and spray three coats at one sitting with 20 PSI gun pressure set on suction feed. The enamel coating should weigh about two ounces, with a total paint job weight of .5 oz.
- Pilot canopy can be tinted very easily by placing in warm water (not too hot) with Rit dye. Leave the canopy in this solution until the desired tint is obtained.
- The 1/64" thick plywood strip reinforcement used on edges of tails and rudders can be glued with Zapp or Hot Stuff using a hard structural adhesive. Also use a hard structural attachment and apply Zapp on the surface and edges. Sand to a smooth finish after it has dried.
- A neat access panel installation can be made on fiberglass fuselages using the following procedure. Mark off and cut out with Moto-Tool cutting disk. Wax edges of the removable access panel. Position the panel back on the fuselage and place masking tape on both sides of the panel. Cut 1/2" wide strips of fiberglass cloth and apply with fiberglass resin on the inside of fuselage over the seam. Before the fiberglass has cured, remove tape and paper to prevent damage. A neat lip is formed for the panel edges to rest on. Camloc or screws can then be used to retain the panel.
(Editor's Note: Beginning with the April issue, Dave Lane, 4477 136th, Hawthorne, Calif. 90250, will replace Ed Rankin as Pylon contributing editor, so direct your mail to him rather than Ed. Ed has done a bang-up job as our Pylon columnist, but he has been so deeply involved in Pylon affairs that he simply has overwhelmed himself with work — something had to give.)
Transcribed from original scans by AI. Minor OCR errors may remain.

