
Radio Control: Scale
Bob and Dolly Wischer
Kitchener‑Waterloo Scale Rally
The Kitchener‑Waterloo Scale Rally, held the first weekend after Labor Day, was blessed with pleasant temperatures and virtually no wind. By late Friday afternoon most of the better parking spots in the large campground adjacent to the Flying Dutchmen's club field at Kiwanis Park were already occupied. The gathering centered on social activity, large‑screen video and the usual corn roast on Saturday evening.
- 154 airplanes were registered, down slightly from the 200‑area attendance of past meets.
- Some models were display‑only, but the excellent weather kept the sky filled with flying models. Only exhausted RC battery packs limited additional flights by late Sunday afternoon.
- Pairs of look‑alike models flown in unison are becoming common at this meet.
Notable models and details:
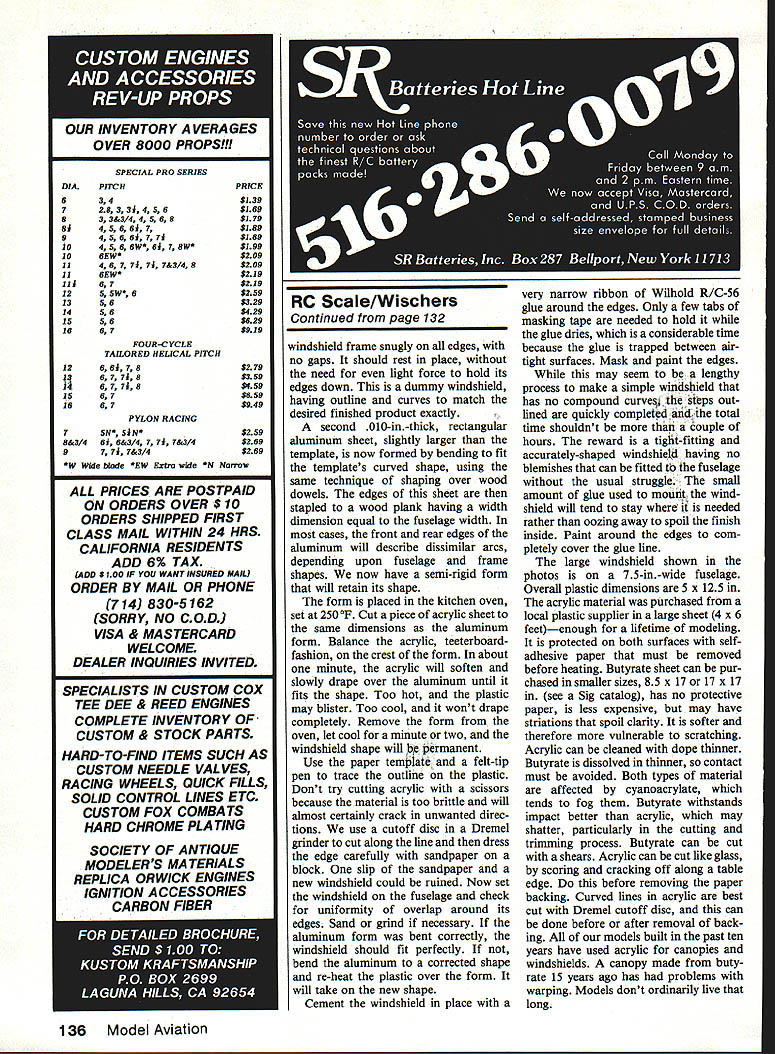
- Two 1/4‑scale CAP‑10s (John Britton and Ken Coleman) were finished in the colors of the French Connection aerobatic team. They were superbly aerobatic and displayed exceptional vertical performance. One was powered by an OS .160/Gemini twin and the other by a Supertigre 2500. The kits used molded fiberglass fuselages and foam wings with molded‑in fuselage stringers. (Ken Coleman, 3300 Don Mills Road, Suite 1709, Toronto, Ontario M2J 4X7.)
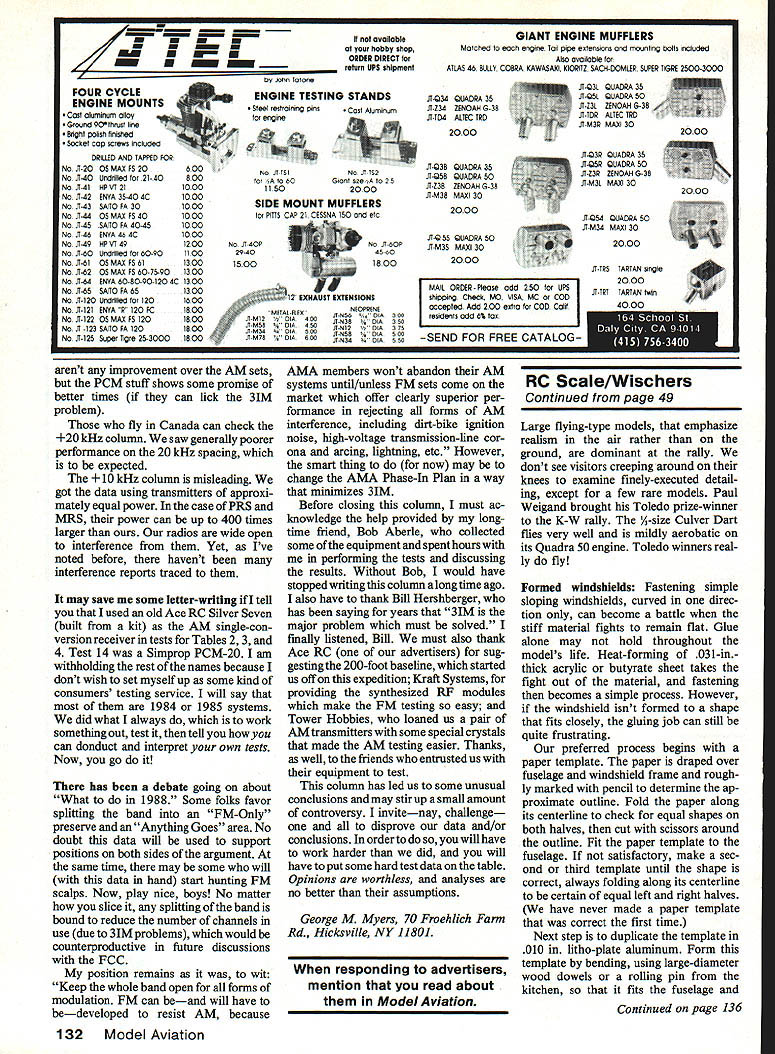
- A Fiat CR.32 by Jack Swift was a latest FAI Scale effort: 1/5 scale, OS .12 cu.‑in. four‑stroke, 10.5 lb., butyrate dope over Sig covering, airbrushed camouflage, scalloped wing trailing edges and neatly applied cockpit edging.
- A pair of North American AT‑6s built from Nick Ziroli kits were flown together. Dick Speidel produced his own worm‑gear‑driven retract mechanisms using Boston gears with micro switches to limit travel. His 32‑lb Texan, with a Sachs engine, flew with lively performance and handled as though it weighed much less.
Trends and observations:
- Impressively large flying‑type models now dominate the rally; Bob Nelitz's perfectly detailed 1/2‑size Piper Cub was the largest on the field.
- Fewer smaller, finely detailed models are being flown compared to the past, and many larger aircraft lack close‑up scale detail. The authors miss the era when smaller models, displayed and flown in quantity, were the center of attention.
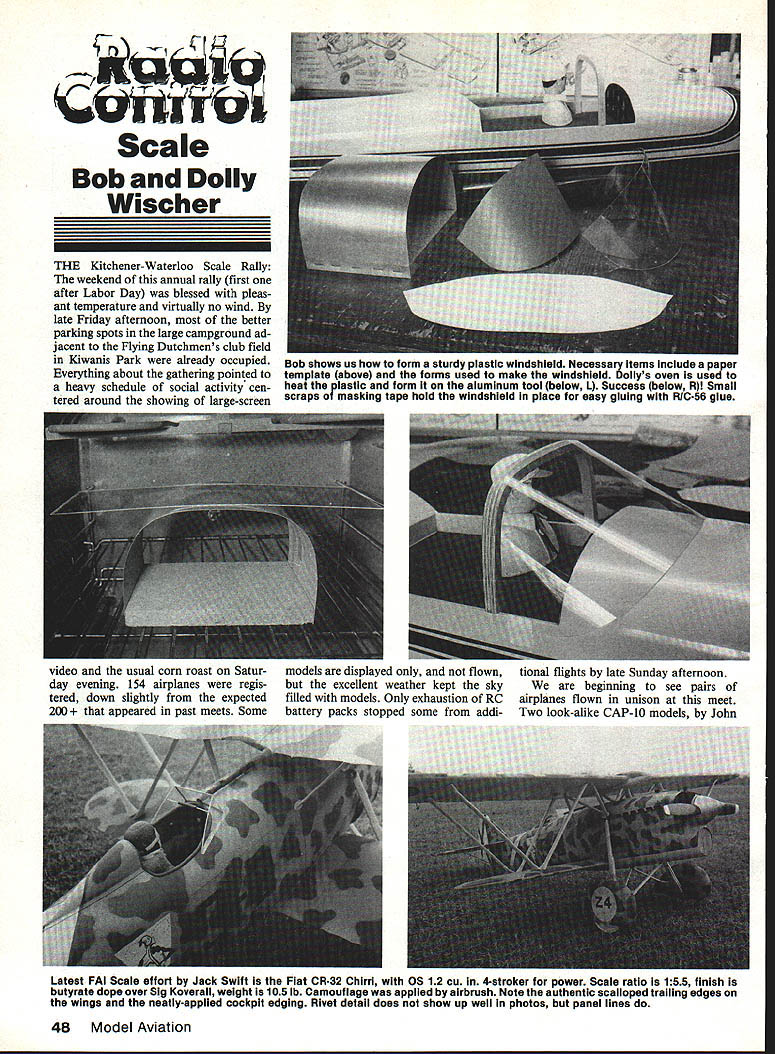
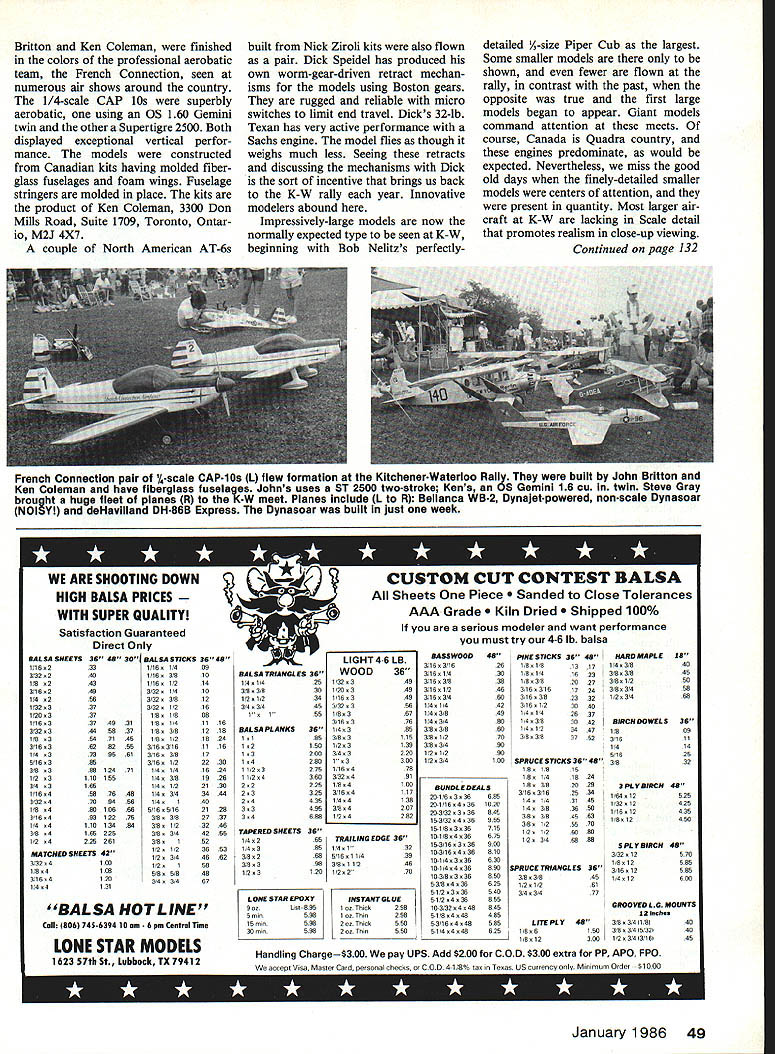
Formed windshields
Fastening simple sloping windshields (curved in one direction only) can be difficult when stiff material refuses to remain flat. Glue alone may not hold throughout the model's life. Heat‑forming 0.031‑inch acrylic or butyrate sheet removes much of the struggle and makes installation straightforward. The following process produces a snug, durable windshield with good fit.
Procedure:
- Make a paper template. Drape paper over the fuselage and windshield frame, roughly mark the outline, fold on the centerline to ensure symmetry, then cut and refine with scissors and a razor blade.
- Transfer the paper shape to 0.010‑inch aluminum and file smooth to make an aluminum template.
- Bend the aluminum template to the required curvature using large‑diameter wood dowels or a rolling pin. If the front and rear edges describe different arcs, bend accordingly.
- Staple the formed aluminum to a wood plank (plank width = fuselage width) to create a semi‑rigid form that retains shape.
- Preheat oven to about 250°F. Cut an acrylic sheet to the same rectangular size as the aluminum form and remove protective backing before heating (if present).
- Balance the acrylic on the crest of the hot form; it will soften and slowly drape over the aluminum in about a minute. Remove and let cool for a minute or two—shape will be permanent.
- Use the paper template and a felt‑tip pen to trace the outline on the plastic. Cut with a Dremel cutoff disc, then dress edges with sandpaper on a block. Check fit and re‑form if necessary.
- Cement the windshield with a very narrow ribbon of Wilhold R/C‑56 glue around the edges and hold with a few tabs of masking tape while the glue dries. Mask and paint the edges to cover the glue line.
Notes and materials:
- Do not cut acrylic with scissors; it will crack. Use a Dremel cutoff disc for curved cuts.
- Acrylic cleans with dope thinner; butyrate is softer and more scratch‑prone and may have clarity distortions.
- Butyrate sheet sizes are smaller and cheaper (see Sig catalog), while large acrylic sheets (4 x 6 ft.) are available from plastics suppliers and last a lifetime.
- The authors have found acrylic superior for canopies and windshields; older butyrate can warp over many years.
Example:
- A large windshield described was for a 7.5‑in.‑wide fuselage; overall plastic dimensions 5 x 12.5 in.
On‑board glow ignition
Product note: Ace R/C Nylite III glow plug lighter for on‑board ignition when throttle is near idle.
Features:
- Adaptable to twins and two‑cylinder engines.
- Consists of a micro switch in a box and an adjustable cam attached to the throttle pushrod; set to close the circuit to a 1,200‑mAh cell at any point in servo travel (idle or other selected position).
- An on‑off switch prevents battery discharge when the engine is stopped with the throttle at idle.
- External starting battery can be plugged into the charging socket when the unit is switched off; internal cell starts when switched on.
- Includes a low‑profile remote headlock switch that fits inside a tight cowl, three plugs for the on‑board cell and an adapter for an external battery.
- Adds less than four ounces to model weight and can serve as nose ballast if needed.
Benefits:
- Dependable slow idle for inverted engines or four‑strokes, positive response when throttle is opened, and starting without an external power source.
- Available as Nylite II for one or two glow plugs, in kit or assembled forms.
Scale instruments
At the K‑W Rally, Bob produced printed instruments for 3/8‑ and 1/2‑scale panels in four colors.
Details:
- Background: basic black; numerals and graduation lines in yellow with red and green maximum/minimum markings.
- Printed on heavy paper with all lettering reproduced to scale; smallest inscriptions readable with a magnifying glass.
- Suggested installation methods included.
- Contact: Cedarbridge Scale, RR4 Creemore, Ontario, Canada L0M 1G0.
Small details and finishing
A well‑finished cockpit greatly enhances scale realism.
- Instrument panels: print from a photo or hand‑letter; simulate bezels with small washers or plastic tubing.
- Seat belts: make from cotton tape and a few spots of cement.
- Radio boxes, antenna fairings and other protuberances: keep neat and scale in appearance.
- Weathering and finish: be subtle. Heavy weathering usually detracts unless the subject is intentionally worn. Gloss paint and clear canopies highlight bright work and convey an "in‑service" look, but excessive polishing can make a model look like a toy.
- Level of detail: tailor detail to model scale and typical viewing distance. Large, close‑viewed subjects demand finer detail; small models or those seen mainly in flight should avoid delicate fittings that are likely to be damaged or remain invisible.
- Balance: a scale model that flies well and lands intact makes a better impression than an ultra‑detailed display model that never leaves the ground. Scale fidelity combined with good flying characteristics is the ideal balance.
Bob and Dolly Wischer S‑221 Lapham Peak Rd. Delafield, WI 53018
Transcribed from original scans by AI. Minor OCR errors may remain.

