
Radio Control: Scale
Bob and Dolly Wischer
Flap Operation
The value of flaps in model performance is often debated. Their basic purpose is to allow decreased speed without loss of lift and to steepen the glide path for a more predictable touchdown. Drag increases considerably, and throttle may need to be added to compensate.
For models with low wing loading that never fly very fast, flaps are often fitted only for scale appearance. If the full-size airplane was fast and heavy and the model also flies like a streamlined brick, flaps can be beneficial. Almost all modern full-size aircraft built in the past 50 years use some form of flaps.
Key points about flap behavior:
- Test flaps at a reasonably high altitude on first flights. Pitch changes when flaps are first lowered can be surprising.
- Most flap-equipped models will pitch nose-up to some extent if speed is too high when flaps are extended. With careful throttle and elevator-trim management, speed can be reduced and pitch change minimized.
- Some models show a marked increase in stability with flaps extended: steadier glide path and less susceptibility to gusts, thermals, or turbulence.
- Because low wing loading exaggerates ballooning, models often drift past the chosen landing spot higher than expected. For some builders this makes flaps not worth the time and effort, although they remain an impressive scale feature.
Example fix for extreme pitch change:
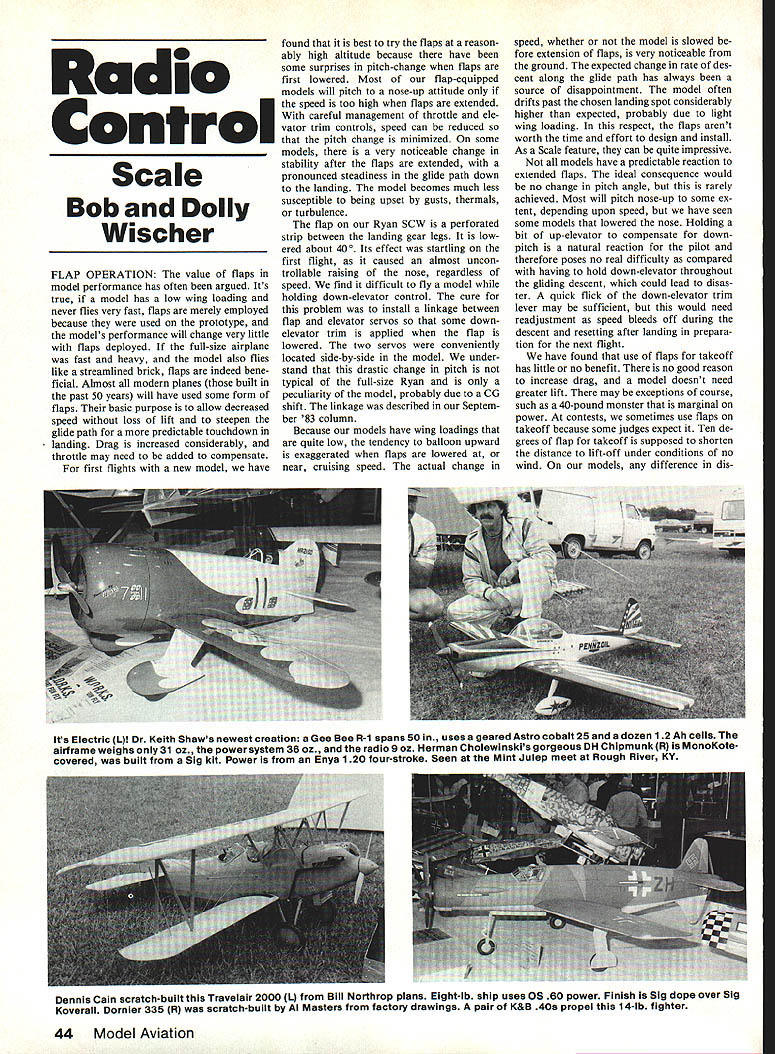
- On our Ryan SCW the flap (a perforated strip between the landing-gear legs) lowered about 40° and caused an almost uncontrollable nose-up on first flight. Holding down elevator was impractical.
- The cure was a linkage between flap and elevator servos so some down-elevator trim is applied automatically when the flap is lowered. If servos are side-by-side this linkage is an easy installation. The extreme pitch change was likely a model peculiarity (CG shift) rather than a full-size trait.
Piloting notes:
- A slight up-elevator to compensate for a down-pitch is easier to manage than continuously holding down-elevator throughout the approach.
- A quick flick of the down-elevator trim lever may be sufficient; you will need to readjust trim as speed bleeds off during descent and reset after landing.
Flaps and Takeoff
- Using flaps for takeoff generally gives little or no benefit on models; there is no good reason to increase drag if the model does not need greater lift.
- Exceptions may exist (for example, very heavy models with marginal power).
- Ten degrees of flap is sometimes suggested to shorten lift-off distance in no-wind conditions, but on most models the difference is nearly impossible to detect.
- Best practice for first flights: avoid using flaps for takeoff and landing. Experiment with flap settings at a safe altitude.
Contest Considerations
- Some contestants use flap operation as a flight option, but expect a low score if flap motion isn't easily visible from the air.
- Judges are not required to observe flap motion unless flaps are a declared flight option; if used, judges will expect extension/retraction at a rate consistent with the prototype.
Flap Types — Fowler Flaps and Complexity
- Fowler flaps (which extend rearward and downward on tracks) increase wing area and are the most effective flap configuration. They compensate for loss of lift due to slower airspeed while increasing drag.
- Because of their complexity they are seldom fully replicated on models; builders often simulate action. When reproduced in a scale-like manner, Fowler-type flaps are effective in steepening glide path and impress spectators and judges.
- Some historical aircraft (e.g., Republic P-47) used rearward-extending flaps; these are rarely seen operating truly scale on models due to linkage complexity.
Servos, Power, and Flap Loads
- Of all servos in a scale model, retract and flap servos are driven to the greatest workload.
- The flap servo must hold flaps in the extended position against airloads for potentially long periods; this continuous holding current shortens battery life relative to flights without flaps.
- If a retract servo is used for flaps, its slower speed can improve realism; extra gearing can also reduce current consumption in intermediate positions.
- A useful trick: arrange the servo output lever so that at full-flap travel the linkage is aligned across the servo shaft centerline. If the output lever is at a halt with the linkage in-line, there will be minimal load on the servo motor and current will drop to idle when flaps are fully extended.
- Be mindful at the end of a long flying day: a flap (and a retract) servo drawing continuous current can lower battery voltage, potentially causing reduced radio range if batteries are marginal.
Typical servo sizing:
- Standard servos with 25 to 40 in·lb torque have been adequate for most flap duties. Use a 180° retract servo if desired for slower, smoother flap movement.
Incidence Angles and an Accident Reminder
Incidence angles matter. We had a crash where a kit-built model, assumed to have correct incidence, descended nearly vertically into the pit area. Fortunately nobody was hurt.
What went wrong:
- During building, the stabilizer leading edge had been inadvertently raised slightly, producing a lifting force at the tail.
- The model had a large stabilizer relative to elevator area (large stab, small elevator). Elevator travel and balance were set near minimum to avoid overcontrol.
- As speed increased, the model tended to tuck under and required full up-elevator to recover. On first flight the elevator servo reached its limit and the model crashed.
Lessons:
- Do not assume kit incidence angles are correct—check them.
- Ensure adequate elevator travel and that servos are capable of the required authority. Balance stab/elevator sizing and control throw to prevent insufficient recovery authority.
High-Lift Wings and General Advice
- Adding flaps without understanding their aerodynamic effects (lift, drag, pitch changes) can make a model harder to fly.
- For true scale realism, flaps can be effective when used with understanding and properly tested.
- Practical checklist for first flights and flap testing:
- Verify incidence angles, CG, and control throws before flight.
- Avoid flap use on first takeoff and landing.
- Test flaps at safe altitude with plenty of room to recover.
- If unexpected pitch change occurs, retract flaps immediately and correct trim.
- Monitor battery voltage and be aware of continuous current draw from flap servos.
- Use flap/elevator linkages if needed to trim out large pitch changes automatically.
Flaps remain a useful and impressive scale feature when designed and used with care.
Transcribed from original scans by AI. Minor OCR errors may remain.

