

Radio Control: Scale
Bud Atkinson
One of the unique problems most scratch scale builders have is to find a canopy already manufactured that will adapt to his particular scale project and, of course, there are the standard P-51, P-47, etc., usually advertised as WW-II canopies. Sig, for one, has several such canopies. So do other manufacturers. But, of course, there are many WW-II airplanes that don't use the standard bubble-type canopies, such as the Axis air forces along with our own Navy aircraft and, of course, the aircraft of the '30s, and so on. So the next best thing to do is to make your own. I'm sure most of us have tried this without too much luck. Practically all commercially made canopies are vacuum formed. This requires special equipment and considerable work just to make one or two canopies. I hope to explain here an easy method I have found that requires little or no special equipment and a minimum of work.
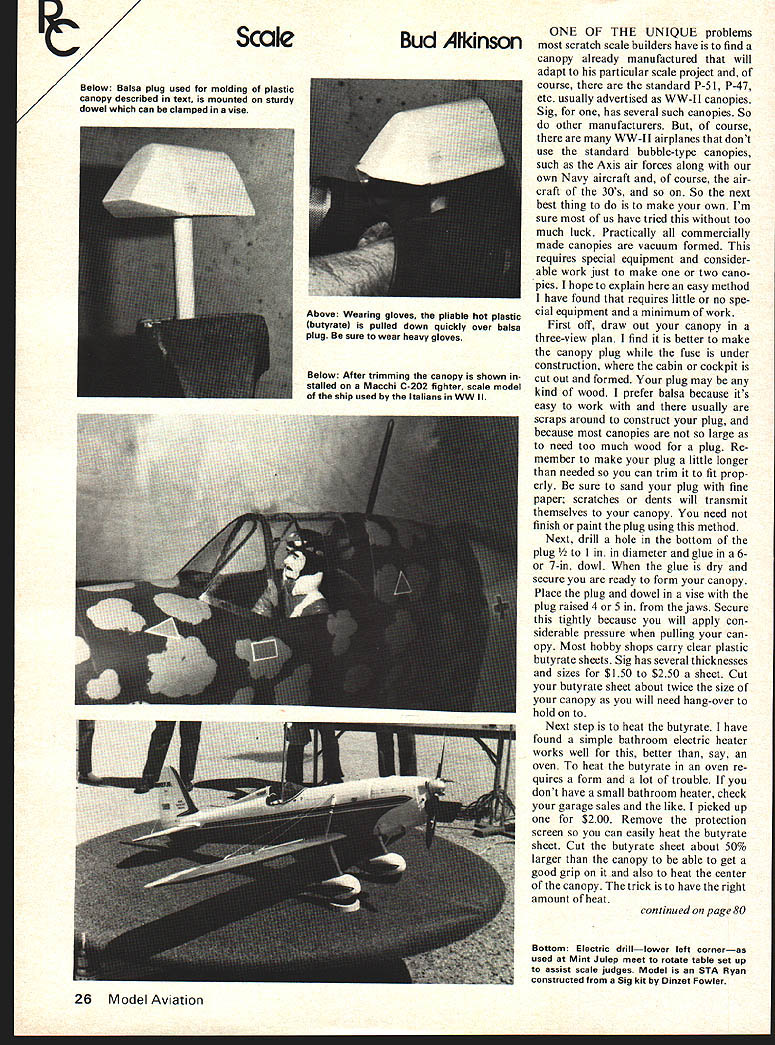
First off, draw out your canopy in a three-view plan. I find it is better to make the canopy plug while the fuse is under construction, where the cabin or cockpit is cut out and formed. Your plug may be any kind of wood. I prefer balsa because it's easy to work with and there usually are scraps around to construct your plug, and because most canopies are not so large as to need too much wood for a plug. Remember to make your plug a little longer than needed so you can trim it to fit properly. Be sure to sand your plug with fine paper; scratches or dents will transmit themselves to your canopy. You need not finish or paint the plug using this method.
Next, drill a hole in the bottom of the plug 1/2 to 1 in. in diameter and glue in a 6- or 7-in. dowel. When the glue is dry and secure you are ready to form your canopy. Place the plug and dowel in a vise with the plug raised 4 or 5 in. from the jaws. Secure this tightly because you will apply considerable pressure when pulling your canopy. Most hobby shops carry clear plastic butyrate sheets. Sig has several thicknesses and sizes for $1.50 to $2.50 a sheet. Cut your butyrate sheet about twice the size of your canopy as you will need hang-over to hold on to.
Next step is to heat the butyrate. I have found a simple bathroom electric heater works well for this, better than, say, an oven. To heat the butyrate in an oven requires a form and a lot of trouble. If you don't have a small bathroom heater, check your garage sales and the like. I picked up one for $2.00. Remove the protection screen so you can easily heat the butyrate sheet. Cut the butyrate sheet about 50% larger than the canopy to be able to get a good grip on it and also to heat the center of the canopy. The trick is to have the right amount of heat.
RC Scale/Atkinson
Using a good pair of gloves place the butyrate sheet about 4 in. from the heating element and slowly move it back and forth until the plastic becomes pliable and starts to sag; also it should start to smoke. Immediately remove it from the heat and lay it over the plug in the vise, carefully centering it. At the same time very firmly pull straight down over the plug. This must be done very quickly as the plastic will cool quickly around the outer edges and will distort and not form to your plug. Hold for several minutes to cool and then let it set for about 10 min. until completely cooled. Remove and trim to suit. If, for any reason, the canopy does not come out right you may reheat the plastic sheet. It will slowly resume its original shape. It's important that it's hot enough but care should be taken not to get it too hot because the canopy will distort and not be clear. You may want to try a sample run before forming your canopy.
Trimming may be painted on or use trim tape, or even prepainted masking tape cut into small strips. The three pictures show the steps to complete your canopy. Many items may be formed in this manner, such as gun turrets, gun bubbles, lights, etc.
At the time of writing I have just returned from the 4th Annual Mint Julep R/C Meet at Rough River Park in Kentucky. This has to be one of the finest scale meets in the country. Facilities are superb. Setting in the rolling hills of north central Kentucky in a lovely park with lake and all the facilities and about a 2500 ft. black-top runway to fly from. The state of Kentucky's Park Dept. is to be commended for the help they give contest directors and the many volunteer workers who make it possible.
The Kentucky Park Commission is to be highly commended for their fine help in these meets. The only fly in the meet was the poor cooperation from the weather man. It rained off and on both Saturday and Sunday. Still it was flyable weather, although the wind was a little across the runway. I'm afraid the heavy rain and cold weather of Friday night may have kept some contestants from attending. Although the weather was down, the quality was evident in both static and flying. There were in attendance three multi-engine stand-offs, two Aerocommander originals and a B-25. The variety of aircraft truly made up for the lower number of scale models seen in past years.
One of the most interesting models was a static turntable that slowly rotated to give the judges a really good look at each model. The table was about 4 ft. in diameter and stood about 2 ft. from the ground, which gave the judges a chance to see the undercarriage plainly, as well as the propellers and tail surfaces. The table could be turned slowly by the use of an electric drill with a large dowel running on the turn
Radio Control: Scale
Bud Atkinson
One of the unique problems scratch-scale builders have found is that canopies already manufactured will not adapt to a particular scale project. Of course standard P-51, P-47, etc., usually advertised as WW‑II canopies — Sig has several such canopies. Other manufacturers' WW‑II airplanes don't use standard bubble‑type canopies. Axis air forces and Navy aircraft of the '30s, of course, used different styles. So the next best thing is to make your own. I'm sure many of us have tried with mixed results. Practically, commercially made canopies are vacuum formed and require special equipment and considerable work just to make two canopies. I hope to explain an easy method I have found that requires little or no special equipment and a minimum of work.
First off, draw out the canopy in three views. I find it's better to make the canopy plug from the fuse under construction. Cabin and cockpit cutouts may be made in the formed plug. I prefer balsa because it's easy to work and there are usually scraps around the shop. Construct the plug; because canopies are large you need not use too much wood. Remember to make the plug a little longer than needed; you can trim and fit properly later. Be sure to sand the plug with fine paper — scratches and dents will transmit themselves to the canopy. Finish and paint the plug using the method you prefer.
Next, drill a hole in the bottom of the plug, 1/2‑in. diameter. Glue a 6‑ or 7‑in. dowel into the hole and let it dry. Place the plug in a dowel vise so the plug is raised in the jaws about 4–5. Secure tightly because you will apply considerable pressure pulling the canopy. Most hobby shops carry clear plastic butyrate sheets; Sig has several thicknesses and sizes (about $1.50–$2.50 per sheet). Cut the butyrate sheet about twice the size the canopy will need so you have a hangover to hold.
Next step: heat the butyrate. I have found a simple bathroom electric heater works well — better, I'd say, than an oven. Heating butyrate in an oven requires a lot more trouble. If you don't have a small bathroom heater, check garage sales — I picked one up for $2.00. Remove the protective screen and you can easily heat the butyrate sheet. Cut the butyrate sheet about 50% larger than the canopy so you can get a good grip. Also heat the center of the sheet; the trick is to have the right amount of heat so the plastic becomes pliable without overheating.
Wearing heavy gloves, pull the pliable hot butyrate down quickly over the balsa plug. Be sure to wear heavy gloves.
Transcribed from original scans by AI. Minor OCR errors may remain.

