
Radio Control: Scale
Author
Don Srull 941 Kimberwicke Rd. McLean, VA 22101
Introduction
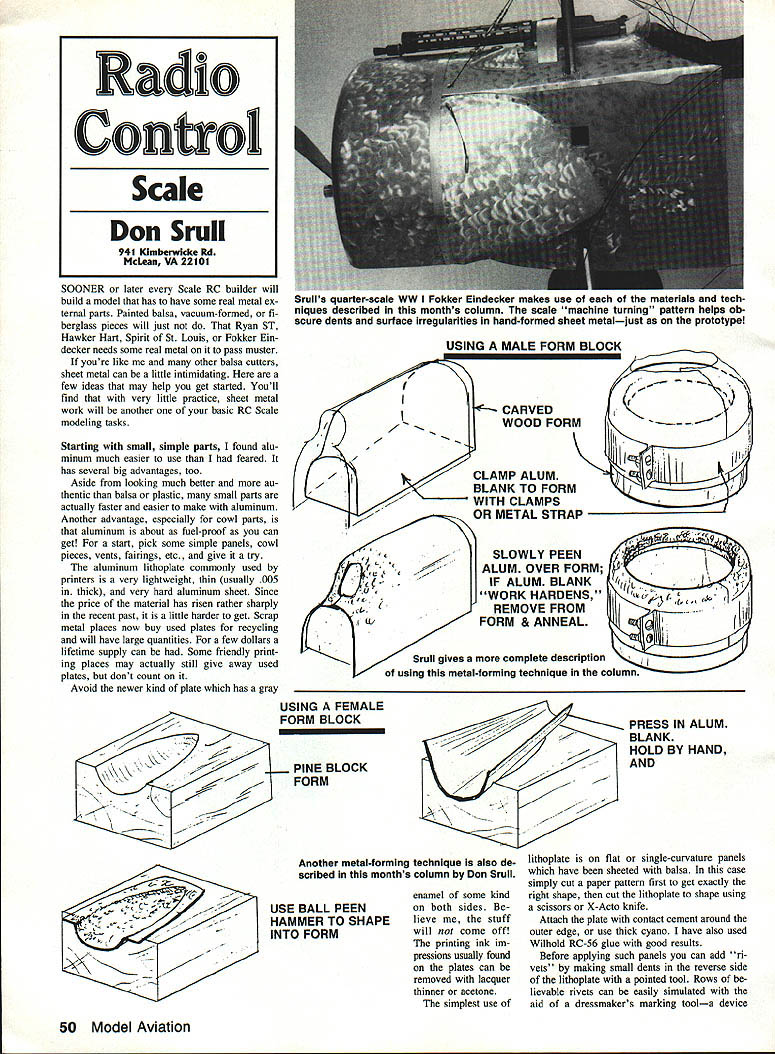
Sooner or later every scale RC builder will need real metal external parts. Painted balsa, vacuum-formed, or fiberglass pieces will sometimes just not do. That Ryan ST, Hawker Hart, Spirit of St. Louis, or Fokker Eindecker needs some real metal on it to pass muster.
If sheet metal seems intimidating, here are a few ideas to help you get started. With a little practice, sheet metal work will become another basic RC scale modeling skill. Start with small, simple parts—panels, cowl pieces, vents, fairings—and give it a try.
Why use aluminum
Aluminum has several advantages:
- It looks better and more authentic than balsa or plastic.
- Many small parts are actually faster and easier to make with aluminum.
- For cowl parts, aluminum is very fuel-proof.
Lithoplate (printer's aluminum)
The aluminum lithoplate used by printers is very lightweight, thin (usually .005 in. thick), and very hard. Material availability and price have changed in recent years; scrap metal dealers often have used plates for a few dollars, and some printing shops may give away used plates.
Notes about lithoplate:
- Avoid newer plates with a gray enamel on both sides—the enamel will not come off.
- Printing ink impressions can usually be removed with lacquer thinner or acetone.
- The simplest use is on flat or single-curvature panels that are already sheeted with balsa. Cut a paper pattern first, then cut the lithoplate to shape with scissors or an X-Acto knife.
- Attach the plate with contact cement around the outer edge, thick cyanoacrylate, or Wilhold RC-56 glue.
- You can add "rivets" by making small dents in the reverse side with a pointed tool. Rows of rivets can be simulated using a dressmaker's marking tool.
A small Dremel wire brush used at medium speed in a Moto-Tool can produce authentic-looking "machine turning" patterns on cowls and panels. The brush resembles a small metal gear; rolling its gear end on the lithoplate using a straightedge as a guide will produce a quick line of evenly spaced marks on the other side.
Forming lithoplate and annealing
For panels and fairings with a small amount of double (compound) curvature, gently burnish the lithoplate while it is held on a sheet of soft balsa. Use finger pressure and a small piece of flannel or cloth to reduce friction. A firm, even pressure will produce a slight compound curve as the balsa yields under the metal.
For sharper curves, use a spoon or a plastic burnishing tool. For very deep curves, the hard lithoplate must be hammered into shape. Before deep forming, soften the plate by annealing—heat it with a simple butane torch. Practice on scrap first. Don't pick up the heated plate with pliers (they can be damaged or melt); a little care is required.
If you do a lot of forming, the plate can work-harden and become brittle. If this happens, reheat it in the butane flame and it will soften again.
Flashing (gutter) aluminum — a favorite material
Another very good aluminum material I use—and my favorite because it's so easy to work—is flashing or gutter aluminum sold in hardware stores. It is dead soft, usually .010 in. thick, and comes in long rolls of various widths. In many areas, a 14-in. roll is inexpensive and will last a long time.
Characteristics and tips:
- Because it is soft and ductile it forms into complex compound surfaces easily with ball-peen and plastic-headed hammers.
- For most small items, hammering does not work-harden the metal and annealing isn't necessary.
- For heavy forming (circular cowls, etc.) work hardening can occur. The piece will become stiff and stop changing shape—remove it from the form and soften it with a butane torch. More heat may be required for thicker pieces.
Hammer-forming methods
There are basically three simple ways to hammer-form aluminum sheet:
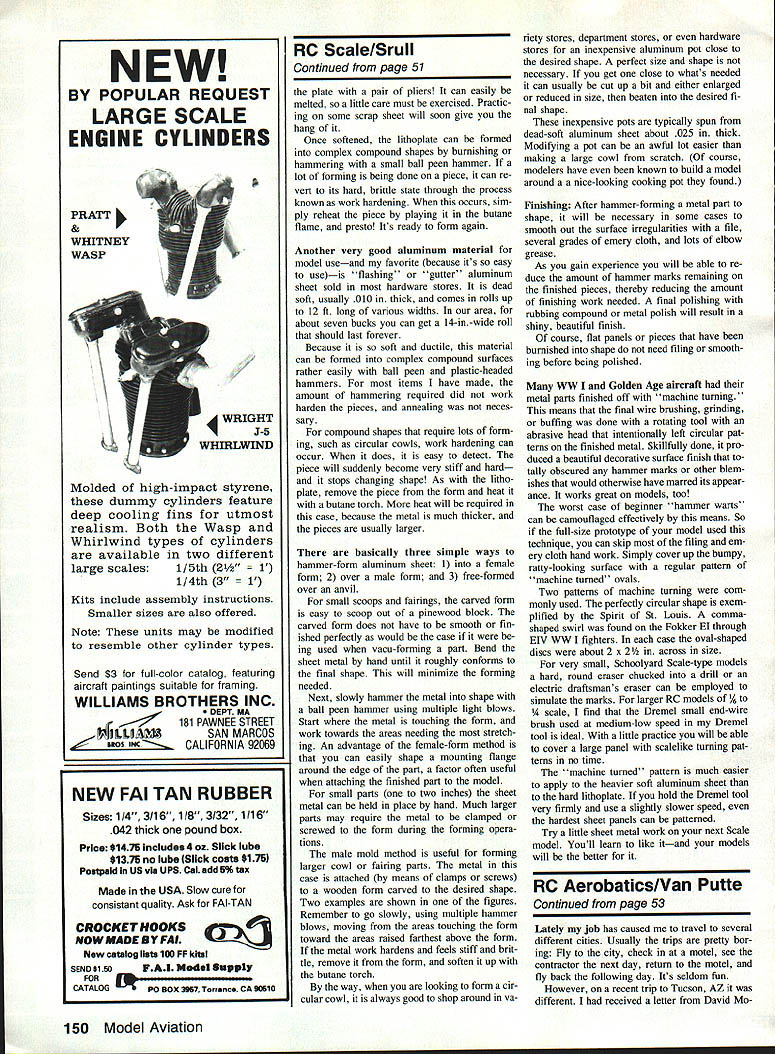
- Into a female form.
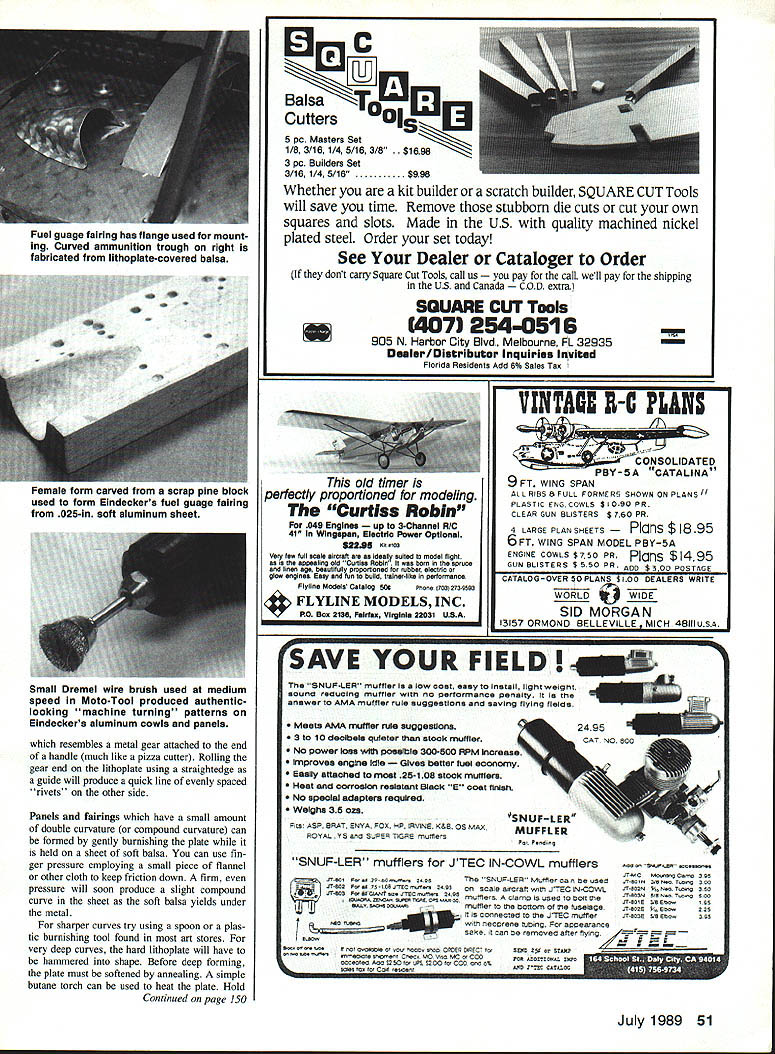
- Over a male form.
- Pre-formed over an anvil.
Female-form method:
- Carve a scoop or fairing shape out of pinewood. The carved form does not need to be perfectly smooth.
- Bend the sheet by hand to a rough shape first, then slowly hammer the metal into the form with multiple light blows using a ball-peen hammer.
- Start where the metal touches the form and work toward the areas needing the most stretch.
- You can easily shape a mounting flange around the edge of the part.
- Small parts can be held by hand; larger ones may need clamping or screws.
Male-form method:
- Attach the metal (with clamps or screws) to a wooden form carved to the desired shape.
- Use multiple light hammer blows, moving from areas in contact with the form toward raised areas.
- If the metal work hardens, remove and anneal with a butane torch.
Pre-formed over an anvil:
- Useful for certain shapes; treat similarly with light, controlled hammering.
Using household pots for cowls
When forming a circular cowl, shop variety and department stores for inexpensive aluminum pots close to the desired shape. Pots are often spun from dead-soft aluminum sheet about .025 in. thick. They can be cut up and beaten into the final shape and are often easier to modify than building a large cowl from scratch. Modelers have even built around a nice cooking pot they found.
Finishing
After hammer-forming, smooth surface irregularities with files, several grades of emery cloth, and elbow grease. With experience you can reduce hammer marks and the finishing workload. Final polishing with rubbing compound or metal polish gives a shiny finish.
Flat panels or pieces burnished into shape usually need little or no filing before polishing.
Machine turning
Many WWI and Golden Age aircraft had metal parts finished with "machine turning"—filing, grinding, or buffing with a rotating abrasive head that leaves circular patterns. Skillfully done, this decorative finish obscures hammer marks and blemishes.
Patterns:
- Perfect circular discs (e.g., Spirit of St. Louis).
- Comma-shaped swirls (e.g., Fokker E III–E IV fighters). Swirl discs were typically about 2 x 2 in.
To apply on models:
- For very small models, use a hard, round disc in a drill or electric screwdriver.
- For larger RC models (1/6 to 1/4 scale), a Dremel small end-wheel brush at medium-low speed is ideal.
- The pattern is easier to apply to softer aluminum than to hard lithoplate. Hold the Moto-Tool firmly and use slightly slower speed for lithoplate.
Final tip
Try a little sheet metal work on your next scale model. You may find you like it—and your models will be better for it.
Transcribed from original scans by AI. Minor OCR errors may remain.

