
Radio Control: Scale
Jeff Troy
200 S. Spring Garden St. Ambler, PA 19002
Bob Holman Plans
Scale plans are always of interest, especially when you're looking for new projects. Bob Holman's catalog is packed with top-quality plans, kits, semi-kits, and accessories. In almost every practical scale, Holman's designs have won competitions ranging from local Scale fun-flys to major events like the FAI World Championships.
A five-dollar bill to Bob Holman Plans, P.O. Box 741, San Bernardino, California 92402, is all it takes to receive one of the most complete scale model information packages available. If the five is a problem, send a stamped, self-addressed envelope and Bob can give you a general idea of what he has available.
Whether your interest is in vintage aeroplanes, golden age, World War I, World War II "heavy metal," military jets, or contemporary light civilian aircraft, his catalog is an excellent source for the avid scale model craftsman.
Bob is the original U.S. supplier for C.A.P. plans and accessories, Dennis Bryant plans and accessories, and Brian Taylor plans and accessories. His company stocks many plans and three-views published in British magazines like Aeromodeller and Scale Modeller. A few years back, Bob sent me a complete set of Bentley drawings of the full-scale short-nosed Focke-Wulf FW-190. These are, unquestionably, the finest, most thorough drawings I have seen to date on any aircraft.
If you're looking for something new to build, obscure aircraft information, or just a great catalog to leaf through, send for a goodie package from Bob Holman Plans.
Model Aviation's F-14 TAMEcat
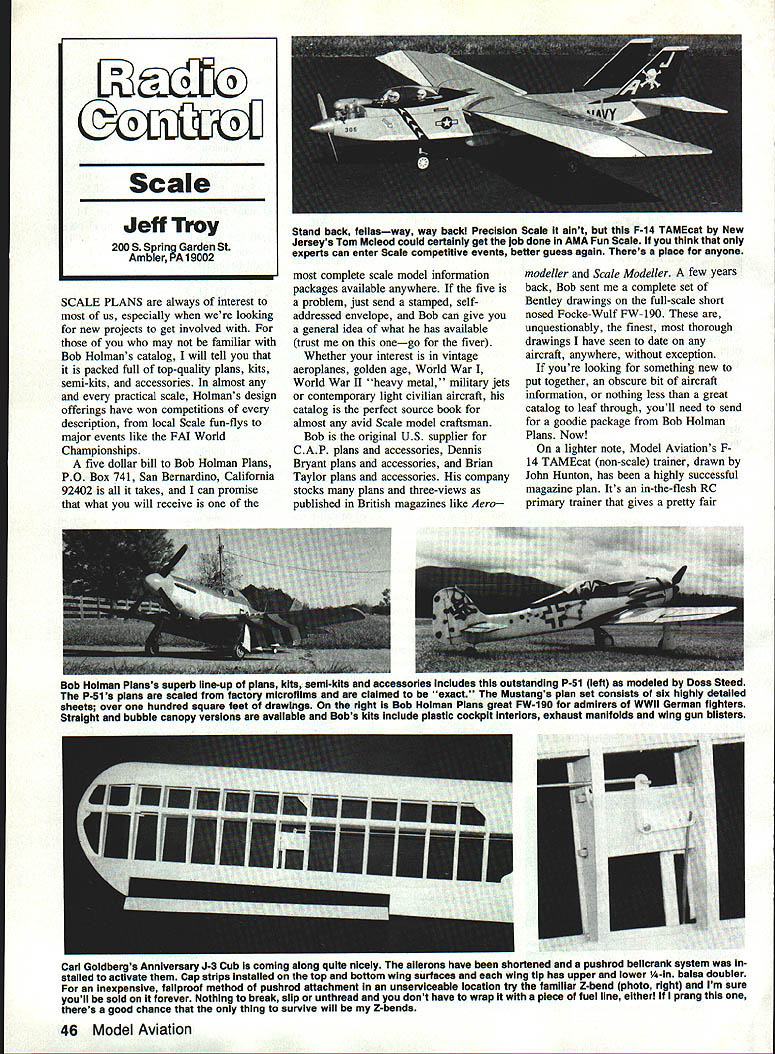
Model Aviation's F-14 TAMEcat (non-scale) trainer, drawn by John Hunton, has been a highly successful magazine plan. It's an in-the-flesh RC primary trainer that gives a fair impression of a Navy Tomcat with its wings extended — a far cry from the typical box-like trainer. New Jersey's Tom McLeod sent photos of a TAMEcat he built; it looks good enough to pass muster in a funscale contest. With the right maneuvers, a primary trainer can produce some impressive displays.
Ace ColorWorks Chromeplate Super Glossy
In July I received a call from Leland Seghetti of Vallejo, California, about a paint that duplicates metal airplane skin. The paint is an enamel sold in Ace Hardware stores under the label ColorWorks. Ask for Chromeplate Super Glossy manufactured by Ace Hardware. Lee told me that after letting the paint dry two days he covered a sample with a fuel-soaked rag (15% nitro) for over twenty minutes with no sign of deterioration to the finish, and no clear overcoat was used.
I have not had time to test this personally, but consider the information worthy of mention and the source reputable. Try a can of Chromeplate Super Glossy and let me know how it worked for you.
Carl Goldberg Anniversary J-3 Cub — early progress
Carl Goldberg's Anniversary J-3 Cub is coming along nicely. The ailerons have been shortened and a pushrod bellcrank system was installed to activate them. Cap strips have been installed on the top and bottom wing surfaces and each wingtip has upper and lower 1/4-inch balsa doublers.
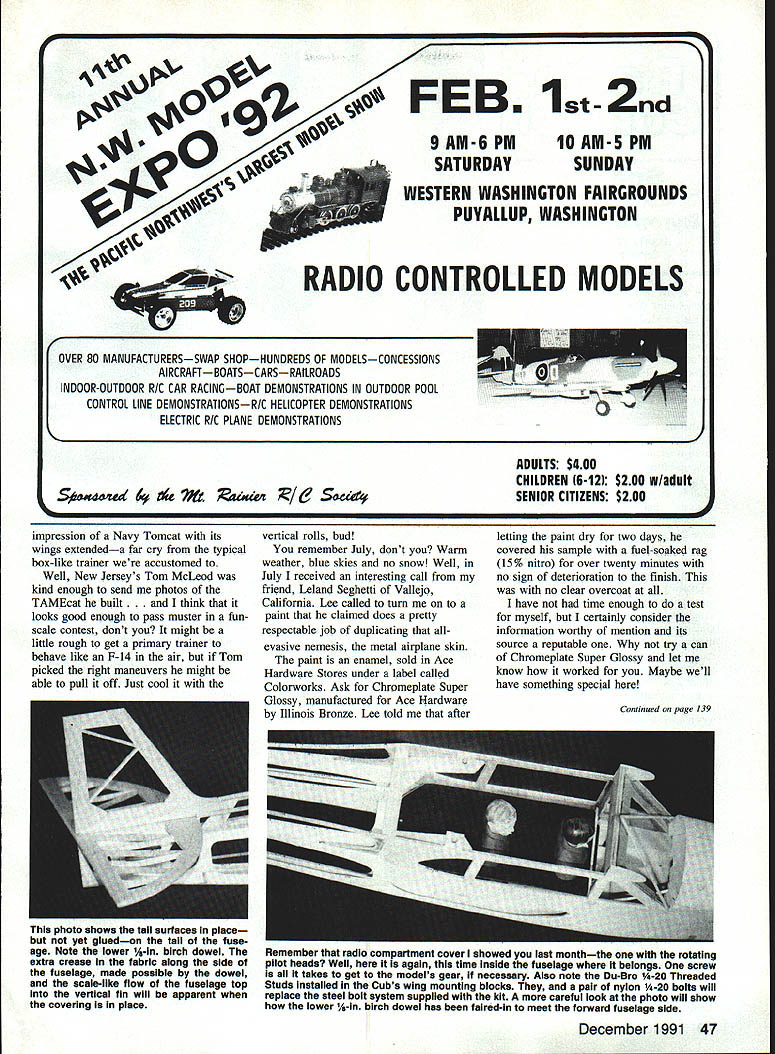
For an inexpensive, failproof method of pushrod attachment in an inaccessible location, try the familiar Z-bend. Nothing to break, slip, or unthread, and you don't have to wrap it with a piece of fuel line. If I crash this one, there's a good chance the only thing to survive will be my Z-bends.
Remember the radio compartment cover I showed last month — the one with the rotating pilot heads? Here it is again, this time inside the fuselage where it belongs. One screw is all it takes to get to the model's gear if necessary. Also note the Du-Bro 1/4-20 threaded studs installed in the Cub's wing mounting blocks. They, and a pair of nylon 1/4-20 bolts, will replace the steel bolt system supplied with the kit. A careful look at the photo will show how the lower 1/8-inch birch dowel has been faired-in to meet the forward fuselage side.
Radio Control: Scale — New column concept and J-3 Cub build
Column concept
Last month a new concept began in this column. In simplest terms, the column will give special attention to a series of entry-level Scale kit construction projects, one kit every three or four months depending on popularity and anticipated reader interest. With each project, I will outline changes, finishing, and maneuver selection — all with the absolute neophyte in mind.
Newcomers need a fair opportunity to develop their potential at a reasonable rate. They must learn the value of building models they can handle, both on the bench and in the air. Fledgling model pilots need a few early successes to boost self-confidence and enthusiasm. No tight pilot learned basic flight in a combat-ready F-16, so why should we expect a novice model builder to start at a Masters-level competition? Fun Scale events offer beginners an entry-level opportunity without many of the frustrations that accompany larger competitions.
In Fun Scale, an airplane isn't hammered by static judges; it's merely examined to see if it resembles the full-scale prototype. Documentation doesn't have to be more than a kit box photo, and the contestant selects five optional maneuvers in addition to the five mandatory ones. Fun Scale is a low-key, low-pressure, high-reward event — a good way to get started in Scale.
My first project: Carl Goldberg Anniversary J-3 Cub
Since the model's introduction last month, I've framed my Cub and made a few changes to the superb kit design. I don't claim these changes will produce a better flying model, but they will yield a J-3 Cub that looks a bit more like the prototype.
After comparing the kit plans to my documentation, I made a few minor changes even for the fun scale builder.
#### Wing
To more closely emulate the prototype, I shortened each aileron to 19-1/4 inches. I chose to activate them with pushrods and bellcranks instead of the strip aileron linkage provided in the kit. Strip aileron linkage could present a torsional twist problem if it must stretch an extra eight or ten inches from the center section to the root of each aileron.
I also felt the model's wing ribs should be capped to provide a cleaner base for covering. I did not change rib count or spacing, nor did I install half-ribs between each full-chord rib.
Capping the ribs required some planning. I traced the outline of a W-5 rib on 1/16-inch plywood, cut it out, and used the plywood form as a sanding guide to trim the ribs so they would accept the cap strip without gaps. The cap strip is 1/16 x 1/8-inch balsa, cemented in place and sanded to a smooth finish.
To carry the pushrods outboard, I installed small plywood bellcranks in the wing center section and ran the pushrods back through the wing to the ailerons. I reinforced the pushrod attachment areas with small plywood doublers glued to the underside of the wing sheeting. The pushrod ends were finished with Z-bends — a simple, proven method that provides a secure link while allowing easy adjustment. If you haven't used Z-bends before, they're inexpensive, easy to make, and virtually trouble-free in service.
#### Fuselage
For the most part the fuselage was built straight from the kit with two exceptions. First, I beefed up the nose area with extra formers and a laminated firewall to accept a slightly larger engine mount. Second, I boxed the top longerons ahead of the cabin to better match the prototype contour and provide a neater place to install the cabin decking.
I installed the radio gear on spruce and plywood doublers to spread the load and keep vibration away from the servos. The receiver battery and switch were mounted for easy access and removal. Balance was checked frequently as the model went together; I arrived at the recommended nose moment by a combination of component placement and a small amount of lead.
#### Covering and finish
I did not attempt to duplicate a factory finish, but aimed for a neat, clean covering job suitable for Fun Scale. The fabric look of the Cub is easily simulated with light covering and careful sanding of surfaces before applying dopes or sealers. Trim and lettering were kept simple and period-correct to convey character without hours of fiddly detail.
#### Flying
I set up the Cub with fairly generous control throws for initial flights and used expo on the elevator to soften the response. The model flew predictably and was easy to trim. With practice the model will perform the modest aerobatic selections typical of Fun Scale flying as well as gentle maneuvers that show scale character. With experience you can dial in crisper responses by reducing throws and trimming hinge gaps.
Construction details and modifications
- Goldberg's sheeting is 3/32 inch thick. After removing 1/16 inch for the caps at the notch locations, a tiny tick of material remains — this is expected.
- I traced and cut a ply W-5 rib form from 1/16-inch plywood and used it as a cutting guide to remove 1/16 inch of wood from between the forward and rear sheeting notches on both the top and bottom of my plywood rib.
- The kit's two W-4 ribs needed material removed from the rear sheeting notch to the main spar notch, top and bottom.
- I followed the Cub's wing construction as outlined in the manual, except I installed 1/16 x 1/4-inch cap strip material between the front and rear sheeting before fitting the lower spar into position. The spar was then glued to the cap strips as well as the lower sheeting.
- With the ribs modified as described, no other changes in construction were necessary except for adding caps to the top of the wing at the proper time.
Conclusion
If your goal is to get started in Scale without becoming discouraged, a modest approach — careful planning, a few well-chosen refinements, and an eye toward simplicity — will serve you well. The Anniversary J-3 Cub is an ideal first project: uncomplicated, forgiving, and attractive in the air. In the next installment I'll cover final detailing, rigging, and the selection of maneuvers that show your model to best advantage in Fun Scale competition.
Continued next month.
Transcribed from original scans by AI. Minor OCR errors may remain.

