

Radio Control: Scale
Jeff Troy, 200 S. Spring Garden St., Ambler, PA 19002
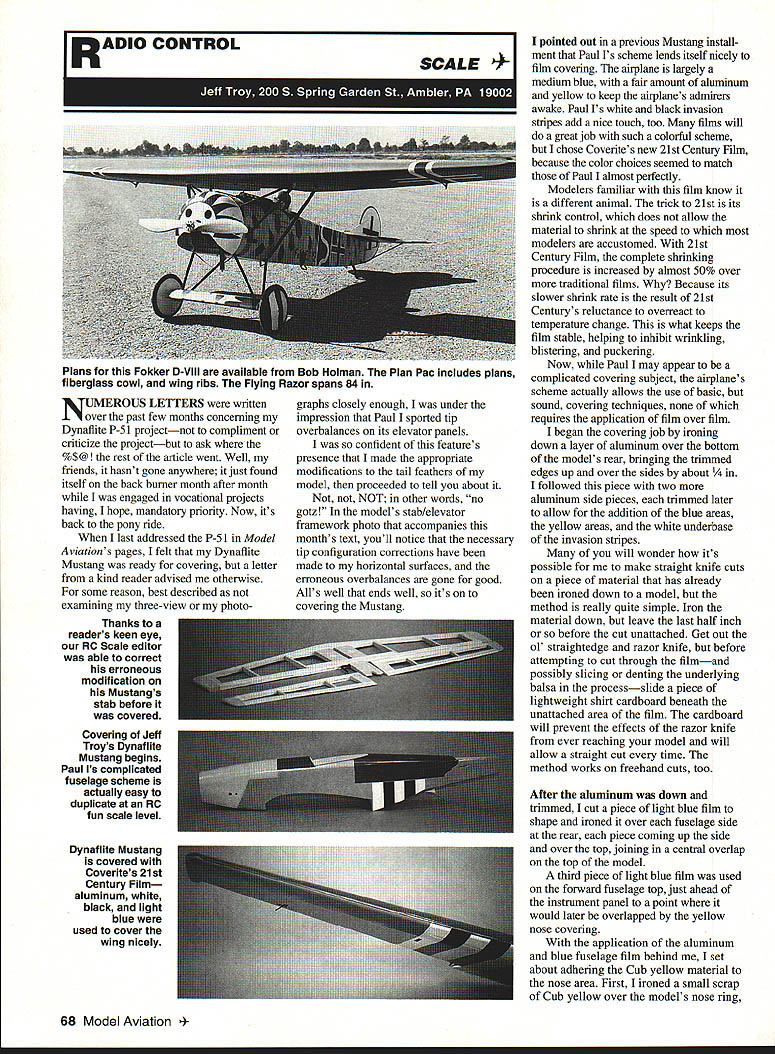
Numerous letters were written over the past few months concerning my Dynaflite P-51 project — not to compliment or criticize the project, but to ask where the rest of the article went. The article hadn't gone anywhere; it simply found itself on the back burner while I was engaged in vocational projects that had mandatory priority. Now it's back on the pony ride.
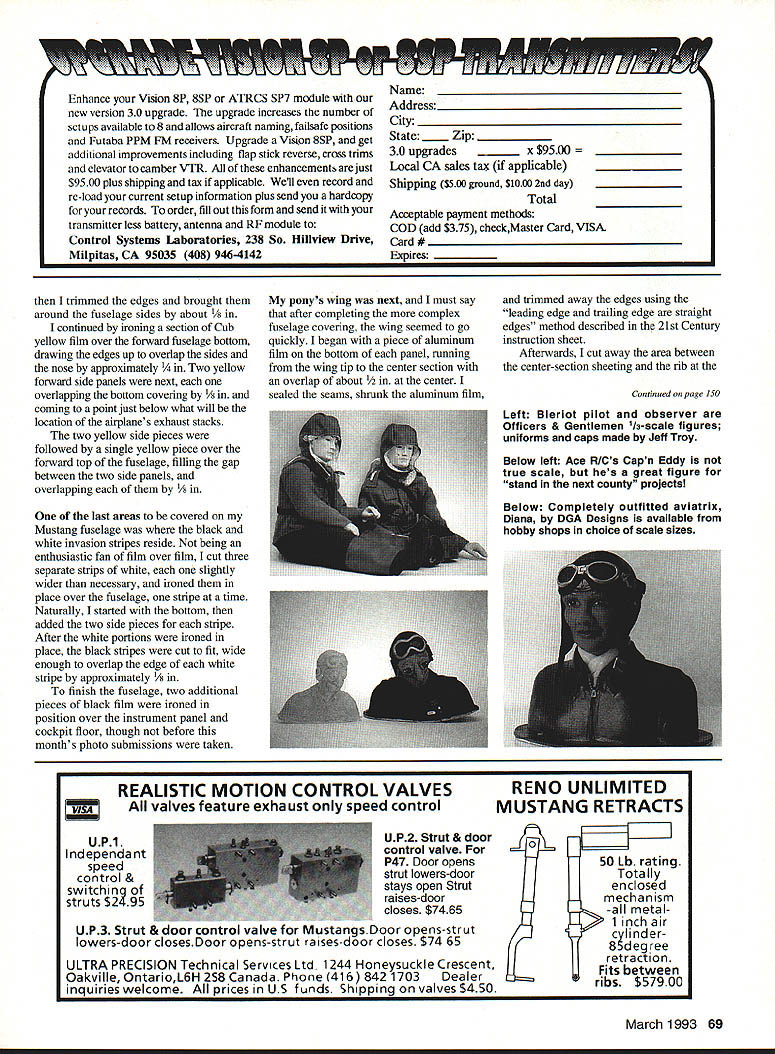
When I last addressed the P-51 in Model Aviation's pages I felt the Dynaflite Mustang was ready for covering. A kind reader advised otherwise after a careful examination of the three-view and photographs. I had mistakenly assumed Paul's Mustang sported tip-overbalance elevator panels and had modified my model accordingly. The error has been corrected: the stabilizer/elevator framework photo that accompanies this installment shows the necessary tip-configuration corrections and the erroneous overbalances are gone. All's well that ends well — on to covering the Mustang.
Covering materials and characteristics
I chose Coverite's new 21st Century Film because the color choices closely match Paul's scheme. The airplane is largely medium blue with a fair amount of aluminum and yellow, and Paul's white and black invasion stripes add a nice touch.
Modelers familiar with 21st Century Film know it's a different animal. The trick is its shrink control: the film shrinks more slowly than traditional films, increasing the overall shrinking procedure by almost 50%. Its reluctance to overreact to temperature change keeps the film stable and helps inhibit wrinkling, blistering, and puckering.
Although Paul's scheme may appear complicated, it actually allows the use of basic, sound covering techniques and requires film-over-film in only a few areas.
Fuselage covering — sequence and technique
I began the covering job by ironing down a layer of aluminum over the bottom rear of the model, bringing the trimmed edges up and over the sides by about 1/4 in. I followed this with two more aluminum side pieces, each trimmed later to allow for the addition of blue areas, yellow areas, and the white underbase of the invasion stripes.
Many will wonder how to make straight knife cuts on material already ironed to the model. The method is simple: iron the material down but leave the last 1/2 in. or so before the cut unattached. Use a straightedge and a razor knife, and before cutting slide a piece of lightweight cardboard (shirt cardboard works well) beneath the unattached area of film. The cardboard prevents the razor from nicking or denting the underlying balsa and yields a straight cut every time. This method works for freehand cuts as well.
After the aluminum was down and trimmed, I cut light-blue film to shape and ironed it over each fuselage side at the rear, each piece coming up the side and over the top to join in a central overlap. A third light-blue piece covered the forward fuselage top just ahead of the instrument panel; this piece would later be overlapped by the yellow nose covering.
I then applied Cub yellow to the nose area. First a small scrap was ironed over the model's nose ring, trimmed, and brought around the fuselage sides by about 1/8 in. A section of yellow covered the forward fuselage bottom with edges drawn up to overlap the sides and the nose by approximately 1/4 in. Two yellow forward side panels followed, each overlapping the bottom covering by 1/8 in. and coming to a point just below the planned exhaust-stack location. A single yellow piece was applied to the forward top to fill the gap between the two side panels, overlapping each by about 1/8 in.
One of the last fuselage areas to cover was the black-and-white invasion stripes. Not being an enthusiastic fan of film-over-film, I cut three separate strips of white (each slightly wider than necessary) and ironed them in place one stripe at a time — starting with the bottom and then adding the two side pieces for each stripe. After the white bases were in place, the black stripes were cut to fit, each wide enough to overlap the edge of its white stripe by about 1/8 in. Two additional pieces of black film were ironed over the instrument panel and cockpit floor to finish the fuselage (photos were taken before those panels were applied).
Wing covering — sequence and tips
The wing seemed to go quickly after the more complex fuselage work. I began with a piece of aluminum film on the bottom of each panel, running from wingtip to center section with about 1/2 in. overlap at the center. I sealed seams, shrunk the aluminum, and trimmed edges using the "leading edge and trailing edge are straight edges" method described in the 21st Century instruction sheet.
I cut away the area between the center-section sheeting and the rib at the outboard end of the landing-gear trunnion block at each panel to make room for the two large pieces of white invasion-stripe base. I measured the width of the wing's open area to be filled with white material and cut two pieces of white film 3/16 in. wider than that dimension, yielding 3/8 in. overlap at each side. After applying the white base, I cut four black invasion stripes and ironed them in place over the white film — very slowly and carefully to minimize bubbling.
Although I used iron-on film for the black stripes, peel-and-stick materials are strongly suggested for film-over-film applications. Suggested alternatives include Carl Goldberg's Ultratac Plus, Coverite's Graphics or Presto, or Top Flite Model's MonoKote Trim Sheets.
Once the invasion stripes were down, I cut slots for the two aileron pushrods, the pair of bomb releases, and the right and left wire landing gear.
To finish the wing and fuselage underside, I used two pieces of light blue where required, trimming and fitting as necessary.
Tail, final assembly, and flying
The tailgroup received careful attention: the elevator and stabilizer were finished and balanced so that no tip-overbalance problems would appear in flight. With all major surfaces covered and installed, final assembly was straightforward.
The end result is a clean, colorful finish that matches Paul's scheme quite well and holds up in service. With control-surface rigging and balancing done properly, the model handled as a proper scale Mustang should.
Well, that's it for the Mustang this month. Next installment I'll try to have the basic covering job finished so I can delve a little deeper into duplicating — or more rightly, simulating — Paul's markings. For now, get your mothball Mustang kits out of your closets and play along; the wing and fuselage should keep you busy.
Docu-Search
Each month I receive letters from readers asking for help documenting particular airplanes. I'm only one person with a limited library and a narrow personal interest window, so I can't help everyone directly. Instead, I will print members' needs here to bring them to the attention of nearly 200,000 Model Aviation readers who may be able to help.
If you need documentation, drop me a postcard or letter stating the scale airplane you need help with and what you need (photos, a three-view, parts, plans, etc.). Print your name, address, and telephone number. (I won't print your phone number unless you ask me to, otherwise you may be besieged with collect calls.)
Current requests:
- Richard Prann, 722 Howard Street, University Gardens, Rio Piedras, PR 00927 — needs full documentation for the Bristol M1.C.
- John P. Violette, 337 Greenwood Drive, LaPlace, LA 70068 — needs a source for Red Baron Pizza decals to trick out his 1/3-scale Balsa USA Stearman.
- Martin Widdfield, 596 California Avenue, Reno, NV 89509 — needs anything and everything available on the Brown B-2 Racer, specifically the original version before any modifications.
So remember: if you need help with a project, drop me a card and I'll try to let Model Aviation's readers know exactly what you need.
Pilot kits
Each month I try to give you a look at useful and interesting modeling products — kits, accessories, tools, books, documentation, and photos. I also like to include photos of the many magnificent models readers send and to continue my "Just For Fun Building Clinic" with popular sport-scale or R/C fun-scale models, suggesting simple modifications that improve scale appearance.
One kit worth mentioning is a female aviatrix from DGA Designs, 135 East Main Street, Phelps, NY 14532. "Diana," as dubbed by DGA, is molded of lightweight latex rubber and comes complete with a detailed head, leatherlike flying jacket, helmet, and goggles. She is an easy pilot to assemble and finish, with complete instructions for these steps.
Closing
That's about it for this installment. I am preparing for my trip to Chicago and the Radio Control Hobby and Trade Association (RCHTA) model show. Next issue I hope to have photos and a report on the scale activity at the Chicago static tables — normally some of the finest displays of aeromodeling skills to be seen anywhere.
So until next time, build straight and fly safely.
Transcribed from original scans by AI. Minor OCR errors may remain.

