


RADIO CONTROL SCALE
Jeff Troy
200 S. Spring Street, Ambler, PA 19002
I'll open this month's rambling by thanking friend and colleague Stan Alexander for sitting in for me and bringing you top-quality coverage of 1993's National Model Airplane Championships Scale events. I wish I could have been there, because I love the AMA Nationals, but previous business commitments prevented my attendance. Stan, thanks again, bud. I owe you one!
When we last connected, I had been committed to a rather interesting homebuilt D.VII replica's color scheme for my Aeroplane Works kit of Rich Uravitch's Plans & Plastic Fokker D.VII design. However, since I announced the selection of this kit as our next group project, you've bombarded me with all manner of D.VII documents and color schemes that promise a much more accurate match to a full-scale than that particular homebuilt would have allowed.
There really would have been no great difficulty in making the necessary changes to Rich's design to match the homebuilt, but the core of the problem was that the homebuilt actually did a pretty lousy job of matching an authentic D.VII — and I don't want us to end up with dimensionally correct models that look wrong to everyone.
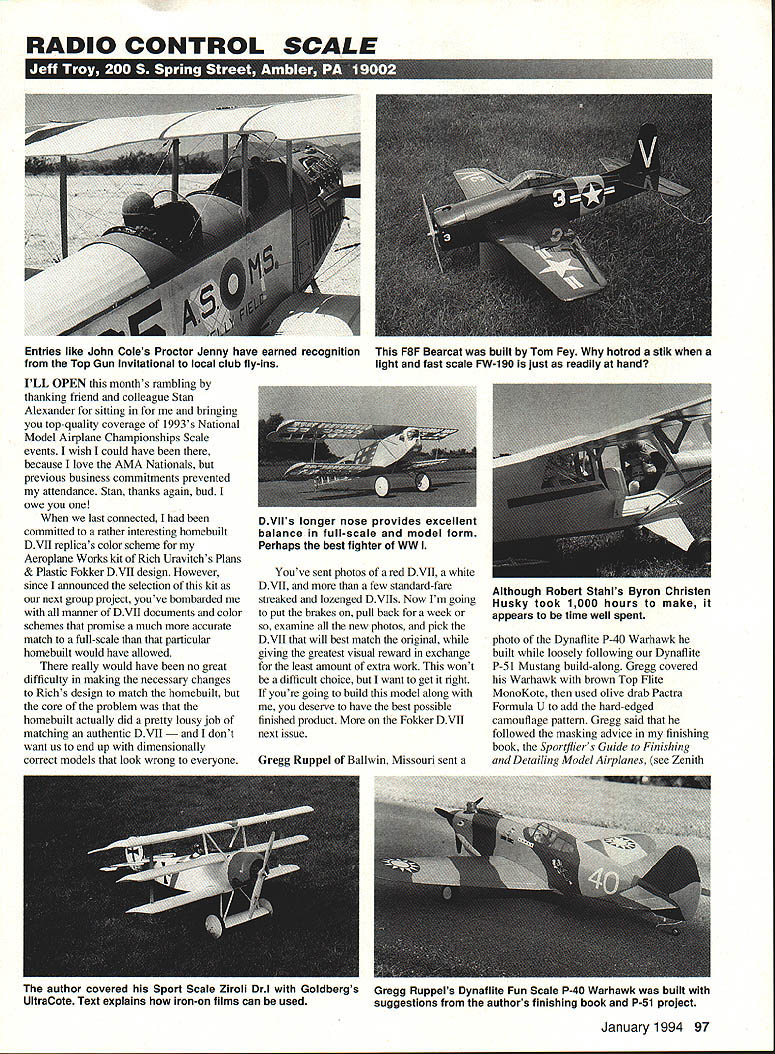
You've sent photos of a red D.VII, a white D.VII, and more than a few standard-fare streaked and lozenged D.VIIs. Now I'm going to put the brakes on, pull back for a week or so, examine all the new photos, and pick the D.VII that will best match the original, while giving the greatest visual reward in exchange for the least amount of extra work. This won't be a difficult choice, but I want to get it right. If you're going to build this model along with me, you deserve to have the best possible finished product. More on the Fokker D.VII next issue.
Dynaflite P-40 (Gregg Ruppel)
Gregg Ruppel of Ballwin, Missouri sent a photo of a Dynaflite P-40 Warhawk he built while loosely following our Dynaflite P-51 Mustang build-along. Gregg covered his Warhawk with brown Top Flite MonoKote, then used olive drab Pactra Formula U to add the hard-edged camouflage pattern. Gregg said that he followed the masking advice in my finishing book, The Sportflier's Guide to Finishing and Detailing Model Airplanes, by using inexpensive, adhesive-backed shelf paper to handle large areas quickly and effectively, and taking advantage of the very moderate tack rate, which is not likely to peel paint when the masks are removed.
Doing British roundels on a 1/3-scale Sopwith Pup? Try shelf paper as a mask material. It cuts easily, yielding a very clean edge, and it comes large enough that the rounded mask won't have to be pieced together.
The decals on Gregg's P-40 came from Paul Major's company, Major Decals, a division of Northeast Screen Graphics in East Longmeadow, Massachusetts. Paul's markings are first-rate, and most are available in your choice of adhesive-backed stickies or water-soluble decals.
If your model has compound curves, or even gentle ones like those usually found between rib bays on fabric-covered wings, go for the water decals. Stickies don't conform well to compound curves, and the markings' surfaces can often end up puckering severely around the edges.
Gregg chose an O.S. .48 Surpass four-stroke to power his airplane, and faired the airplane's air scoop to mate the engine. Gregg added a removable drop tank, landing gear nacelles, exhaust stacks, and machine guns. Looks good from here, Gregg. Fly it yet? How 'bout it?
On fabric finishes and covering choices
I have an interesting note for those of you who think that great lengths must be taken to achieve a realistic finish on a fabric-covered model. Well, more often than not, you're correct, but it is not always the case.
Several years ago, I was to attend a serious scale contest. Because I was in the middle of moving from Virginia to Pennsylvania, I had to choose a model that could be built quickly, yet still interest sophisticated judges. My meager flying skills lent themselves to WW I aeroplanes, and the Fokker Dr.I seemed to be the perfect subject. I built a Dr.I from slightly modified Ziroli plans, and finished the aeroplane with none other than Carl Goldberg Models' UltraCote. What? An iron-on film on a scale WW I model? How can this be?
The full-scale Dr.I I chose is a 1976 replica that hangs in EAA's Oshkosh museum. This aeroplane is painted with, of all things, Pettit (makers of Hobbypoxy) white paint, with red and black trim colors. Fabric grain shows on this aeroplane, and obviously would not show from fifteen feet in a quarter-scale model.
I needed to get the finishing job done in a hurry, so I checked all of the available iron-on films for color match to Hobbypoxy white, and discovered that UltraCote was right on the money. Two days with the iron and straightedge, and another day to stain the struts and paint the cowl (Coverite's Black Baron insignia red matched UltraCote's red very nicely), and I had my Dr.I ready to fly.
I never brought that model to the contest, but if I had, I think that the color and markings score would not have been too bad. The finish didn't have the closeup class of good paint work, but under the normal (15-foot) judging conditions, it answered the demands exceptionally well.
Remember, there are no rules that say you can't compete with film-covered models. However, if you choose to go that route, make sure your model is covered well, and that the covering you choose emulates the skin color and surface texture of the full-scale aeroplane you are modeling.
Christen A-1 Husky (Robert Stahl)
Long Island, New York's Robert Stahl built a very nice-looking, quarter-scale Byron Christen A-1 Husky. Robert chose a SuperTigre 3000 and a Zinger 18 x 8 prop, complemented by a McDaniel On-Board Ignition system and a Bennett-Super Smoke system. McDaniel's lighting system was not installed, and the flying surfaces were covered with Super Coverite. Bob's Husky is finished with Coverite's 21st Century primer and paint.
In Bob's words: "...complete interior is upholstered, no wires showing at all, also upholstered behind rear seats, this way there are no servos or pushrods showing, everything is concealed, also easy to get by removing floor panel."
Top and front windshield are very easy to remove because I drilled and tapped each hole and installed nested rivets. Remote fills for fuel and smoke fuel are on either side of fuselage; plastic bubble on right side of cowl is to cover glow plug.
"Plane weighs in at 31 pounds, but it is off the ground instantly and flies beautifully."
Bob's Christen Husky took approximately 1,000 hours and a year-and-a-half. He flies it using Futaba's Super Seven radio system.
Gee Bee R-6 QED (Pete Fusco)
Pete Fusco of Kingwood, Texas is building a Gee Bee R-6 QED. Pete writes, "Built in 1934 as a long distance racer, it was the last of the Gee Bees and unfortunately, was plagued with problems and bad luck its entire career. Francisco Sarabia, the 'Lindbergh of Mexico,' was drowned in it when the engine quit and he dead-sticked into the Potomac River in 1939. The airplane still exists, in a small museum in his hometown. When he had it, it was the 'Conquistador Del Cielo'—Sky Conqueror."
If the model behaves itself, Pete intends to offer plans for sale. At 1/5-scale, with an 88-inch wing at approximately 32 pounds on a 3.2 Sachs with C.H. electronic ignition, the project should be very interesting. Let's hear more after the air time, okay?
Proctor Jenny (John Cole)
A most impressive, bare-bones interior photo of John Cole's Proctor Jenny was published here last year, along with John's promise to show us photos of the completed model. Well, the time has come and the finished piece is even better than we expected — and we expected a lot!
As of early July, this stunning model has had about ten flights under its belt, all of which have demonstrated incredible pleasure and realism. John claims that his cockpit modifications don't detract, and may even contribute to the airframe's rigidity.
It seems there were some problems during early flights due to the extraordinary amount of flying, landing, control, and rigging wires on board the aircraft, but after a bit of "poking around," as he puts it, most of the metal noise has been eliminated. John will be competing in his local U.S. Scale Masters Qualifier with this magnificent Proctor aeroplane.
Fun-scale plans from Gus Morfis
An interesting line of fun scale plans is being offered by Gus Morfis of 4709 Green Meadows Avenue, Torrance, CA 90505-5679. Primarily WWII fighters in 1/12-scale, they are designed around .15 or .20 two-stroke glow engines. Gus' plans will produce models that are lightweight. They were originally intended as RC combat aircraft and they show no provision for landing, but many modelers who build these airplanes are enjoying their lightly loaded flying characteristics for everyday sport flying with models that resemble full-scale subjects.
Right now, you can choose from:
- Grumman F8F Bearcat
- P-47D Thunderbolt
- Messerschmitt Me-109 F/G
- Focke-Wulf Fw 190A / Fw 190D / TA-152C
- Curtiss P-40B Tomahawk
- Mitsubishi A6M Zero
- Lavochkin La-5 and La-7
- Macchi C.202
- Hawker Typhoon
- Hawker Hurricane
The models span from 32 1/4 inches to 41 1/4 inches, and the plans clearly indicate the outlines of all ribs, bulkheads, and formers needed to get the job done. Contact Gus Morfis for more specific information regarding plan price and availability.
CAD software and resources
Some months ago, I mentioned an interest in spending some time at the keyboard — or more correctly, the puck and digitizing tablet — to learn about my ModelCad and DesignCad 2-D software programs. Well, I still have not found time to accumulate enough proficiency to discuss these programs with any authority, but they are, so far, a tremendous amount of fun to explore.
In addition to the American Small Business Computers, Inc. CAD programs, I have also obtained a set of three instructional video tapes on DesignCad-2D from ViaGrafix. ViaGrafix is at 31 South Adair, Pryor, OK 74361, and A.S.B.C. is at One American Way, Pryor, OK 74361. When greater skill is at hand, I promise to write about this made-for-modeling software.
Leo Opdycke's World War I Aeroplanes is, without question, one of the finest information sources for WW I aircraft on the face of the planet. After my previous mention of CAD systems, I received a nice note from Leo, calling attention to World War I Aeroplanes issue #138, pages 91-97, where there is an excellent article on a computer software program that lets you develop accurate three-views from photographs. Leo says the system should be of interest to modelers everywhere; it truly works, and it's the only one of its kind. Back issues are available at $4 by writing to World War One Aeroplanes, Inc., 15 Crescent Road, Poughkeepsie, NY 12601.
Getting issue #138 will be a pleasant experience, to be sure, but if you are interested in early aeroplanes and do not yet subscribe to this publication, consider doing so. Numerous issues of World War I Aeroplanes are better than only one, and you have been missing something you would look forward to receiving — more and more with each issue!
Next time, I'll match a specific three-view and color scheme to my Aeroplane Works Fokker D.VII kit, and I'll explain some of the modifications that will be made to produce a more accurate model from the excellent basic plans that Rich Uravitch drew for this exciting full-scale project.
Until then, build straight and fly safely. I'll talk to you again.
Transcribed from original scans by AI. Minor OCR errors may remain.

