
RADIO CONTROL SCALE
Jeff Troy, 200 S. Spring Street, Ambler, PA 19002
This year's Mid-Atlantic Radio Control (MARC) show was the affair's tenth annual celebration. It was once again held at the Maryland State Fairgrounds in Timonium, Maryland on June 5–6, and as always, it was a smashing success. My schedule allowed me to visit the show for the first time, and what I saw made me wish I had been able to see it sooner.
Industry support of the MARC show was evident. Instead of only one or two nearby cottage-industry exhibitors, the show's aisles were filled with every level of exhibitor from cottage entrepreneurs to major players.
Even our friendly AMA attended. District IV Vice President Howard Crispin and a few dedicated assistants spent most of the weekend spreading good will, distributing information, and entertaining the AMA's many members, including me, who stopped by to chat.
The MARC show is a selling show, so there was plenty of cash and an abundance of action at the booths and the numerous swap tables. Several well-stocked hobby outlets had large displays of items for sale at their booths as well.
There was no shortage of Scale models on the MARC static tables, but as luck would have it, I found myself at this particular show without my camera. You'll just have to take my word on this one, my friends: the models were largely first-rate examples of Scale at its uppermost levels.
One familiar trade-show necessity that definitely came into play at the MARC show was the ability to draw a huge crowd. I never expected to see monster attendance at an RC show other than WRAM, Weak Signals, or RCHTA, but considering its physical size, this show was proportionately packed from the time it opened.
If you're an easterner, this show should become a part of your agenda (as it has mine). If you're located elsewhere but plan to be in the eastern part of the country during early June, try to take an extra travel day and visit the MARC show. It will make a nice addition to your business or holiday trip.
Manufacturers' News
I stumbled across two of the countless items at the MARC show that may interest you. The first is a second-generation update of a product that I've been playing around with for more than a year, designed and manufactured by my friends Tim and Megan Richardson of Ultra R/C Products in Georgia.
The Ultra Wingman was developed to help you quickly and accurately inspect a wide spectrum of preflight check items. The hand-held microcomputer provides diagnostics, reads battery condition, and remembers your personal preflight routine. The unit works with an onboard flight pack that provides data on RPM, exhaust gas temperature, and battery condition. A sound-level meter, ambient temperature display, and various timer functions are just a few of the Ultra Wingman's additional useful features.
I won't go into too much detail, since an updated Ultra Wingman II is now available, but you'll just love this if you're the techno-data-crunching type. Send an SASE to:
- Ultra R/C Products, 5455 Linger Longer Road, Cumming, GA 30130.
I try to make you aware of plan services, documentation services, and other similar services that benefit the Scale discipline, but I never realized that I hadn't mentioned Wendell Hostetler's Plans until I almost tripped over Wendell's exhibitor booth at the MARC show.
Normally such an oversight might be forgivable, but this outfit has been providing the Scale community with quality plans for way too long to be left out in the cold. You should really put this outfit on your Scale source checklist.
Wendell has an impressive array of interesting civilian subjects, and even a couple of military classics like the PT-19 and P-6E thrown in for good measure. How about a 30% J-3? Not big enough to make you hock the family wheels, but plenty big enough to set your model apart from the pack. Send an SASE to:
- Wendell Hostetler's Plans, 1041 Heatherwood Lane, Orrville, OH 44667.
Last month I wrote about a relatively new WWI aircraft preservation and recreation organization called The First Warplanes. As promised, I contacted the group for additional information and was absolutely thrilled with the package I received. I've also had the pleasure of seeing their first newsletter/magazine, Aerodrome Update, complete with a back-cover color reproduction of "Yanks Mount Up," a newer (1990) WWI print by aviation artist James Dietz.
If WWII aeroplanes do the trick for you, send your inquiries to:
- The First Warplanes, Inc., P.O. Box 366, Guntersville, AL 35976.
This is an association you should consider very seriously. Incidentally, Aerodrome '94, the biennial WWI fly-in and convention promoted by The First Warplanes, will be held at Guntersville Airport on August 20–21. Wait until you see their WWI Flying Replica Museum!
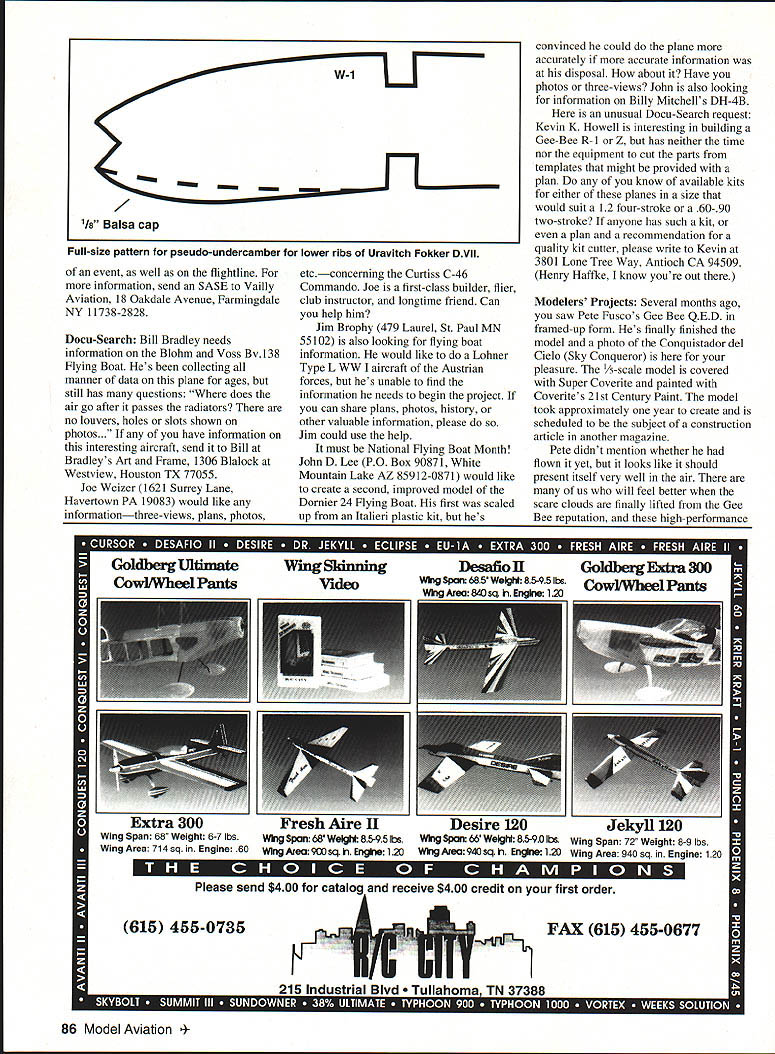
Since my casual mention of an L-19 Bird Dog photo a few months ago, I've received several letters about the pleasant-looking military light observation plane. Here's a big break for those who want to build one: Roy Vaillancourt has a great-looking 108-inch L-19-01 Bird Dog available as a plan set or as a partial kit, and either should make an excellent project for fans of this airplane.
The L-19 Bird Dog seems like the perfect subject for getting someone's feet wet in the competitive arena. It's hard to beat an unarmed, high-wing cabin model for stability and handling ease, and the Bird Dog is simple enough that Scale newcomers shouldn't be intimidated by its construction, yet it's complicated enough to make an effective entry in the Static portion of an event, as well as on the flightline. For more information, send an SASE to:
- Vaillancourt Aviation, 18 Oakdale Avenue, Farmingdale, NY 11738-2828.
Docu-Search
- Bill Bradley needs information on the Blohm & Voss Bv 138 flying boat. He's been collecting all manner of data on this plane for ages but still has many questions: "Where does the air go after it passes the radiators? There are no louvers, holes, or slots shown on photos...." If you have information on this interesting aircraft, send it to:
- Bradley's Art and Frame, 1306 Blalock & Westview, Houston, TX 77055.
- Joe Weizer would like any information—three-views, plans, photos, etc.—concerning the Curtiss C-46 Commando. Joe is a first-class builder, film instructor, and longtime friend. Can you help him?
- Joe Weizer, 1621 Surrey Lane, Havertown, PA 19083.
- Jim Brophy is looking for flying-boat information. He would like to do a Lohner Type L (WWI Austrian) but he is unable to find the information he needs to begin the project. If you can share plans, photos, history, or other valuable information, please write to:
- Jim Brophy, 479 Laurel, St. Paul, MN 55102.
- John D. Lee would like to create a second, improved model of the Dornier 24 flying boat. His first was scaled up from an Italeri plastic kit, but he's convinced he could do the plane more accurately with better reference material. Have photos or three-views? John is also looking for information on Billy Mitchell's DH-4B.
- John D. Lee, P.O. Box 90871, White Mountain Lake, AZ 85912-0871.
- Kevin K. Howell is interested in building a Gee-Bee R-1 or Z but has neither the time nor the equipment to cut the parts from templates that might be provided with a plan. Do any of you know of available kits for either of these planes in a size that would suit a .120 four-stroke or a .60–.90 two-stroke? If anyone has such a kit, or even a plan and a recommendation for a quality kit cutter, please write to:
- Kevin K. Howell, 3801 Lone Tree Way, Antioch, CA 94509.
- (Henry Haffke, I know you're out there.)
Modelers' Projects
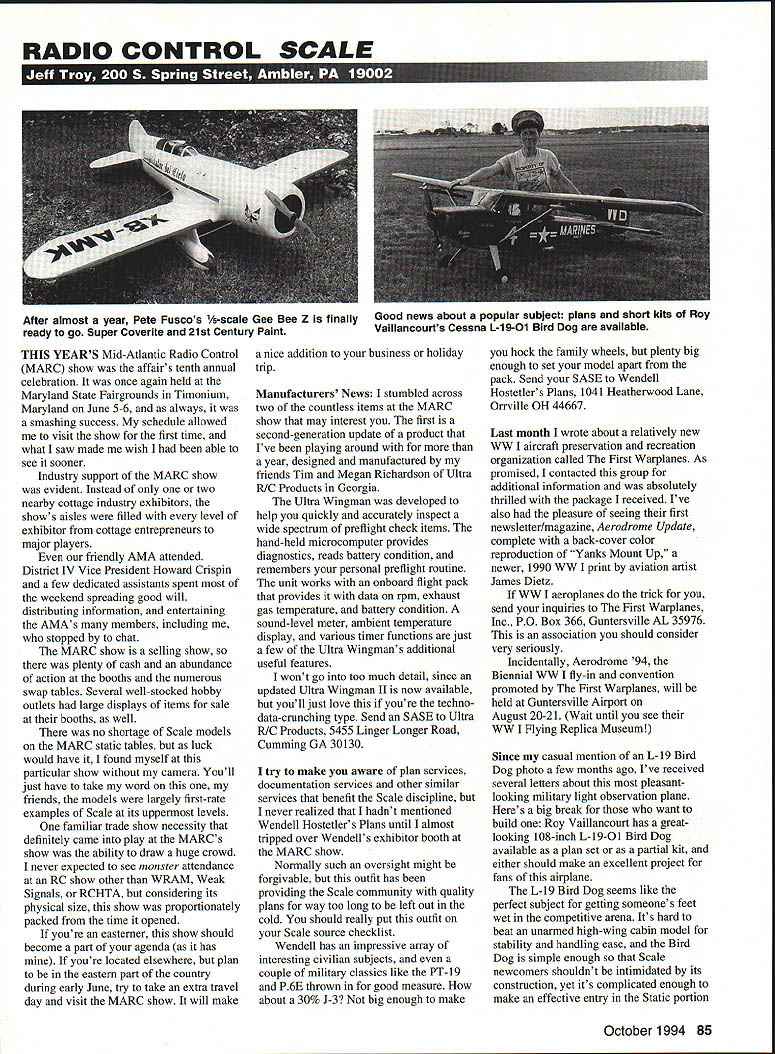
Several months ago you saw Pete Fusco's Gee Bee Q.E.D. in framed-up form. He's finally finished the model and a photo of the Conquistador del Cielo (Sky Conqueror) is here for your pleasure. The 1/5-scale model is covered with Super Coverite and painted with Coverite's 21st Century Paint. The model took approximately one year to create and is scheduled to be the subject of a construction article in another magazine.
Pete didn't mention whether he had flown it yet, but it looks like it should present itself very well in the air. There are many of us who will feel better when the scale clouds are finally lifted from the Gee Bee reputation and these high-performance models begin to show their true handling qualities. Gradually, these models will be given the confidence they deserve.
What are you working on? If you'd like to share your Scale creations, send a photo and pertinent facts about your model to the address at the head of this column. Try to include the model's span, length, weight, construction materials, power, radio, finish, flight performance, and any comments concerning the model's special in-flight features or mechanical options. All of these items are generally of interest to the Scale community. I can't promise publication, but if you built a decent airplane, I'll do my best to let everyone know about it.
Fokker D.VII Build-Along
How is your aeroplane coming along? So far, you should have finished framing your tail feathers and basic fuselage, and should be anxious to begin construction of the upper and lower wings.
Before the wings are built, you may wish to consider adding "pseudo undercamber" to the Uravich design's airfoil, but before getting into this, I'll address a few minor points of fuselage construction and describe a method for installing the 1/8-inch fore-and-aft fuselage deck sheeting.
Many of you are more experienced than I, so you may not find much enlightening material in this particular procedure. Many others, however, are following the true purpose of these build-along series: to exchange as many hints and as much useful information as possible in the basic and advanced skills of radio-controlled aeromodelling. So regardless of your personal level of experience, why not read along? You may find a method of handling a situation that you'll really like.
On the other hand, you could also find that your own construction method performs better for you than mine, in which case you will have learned precisely what not to do, which can also be quite a useful lesson. Either way, something beneficial will hit your bench.
After bulkheads F-2, F-3, and the firewall have been installed, the fuselage sides should be joined at the tail and the fuselage cross members are cut from 3/8-inch square balsa and glued into place per plan. Deck formers A through E are added next, followed by the 1/8-inch Lite Ply cockpit deck and the 1/4-inch stringers in the nose and tail deck sections. Be very careful when installing the two hardwood cabane strut mounts. The slots must face downward as the model is placed on its wheels.
Sheeting the deck is next, and this can present a problem or two. Of the many minor obstacles that plague aspiring modelers, bending balsa sheeting without having it crack is one that should be dealt with early on, as it is one of aeromodelling's most basic requirements. It's not as difficult as it might seem; it's really pretty easy.
Cut the length of a piece of 1/8 x 4-inch balsa sheeting to span from the nose of the model to about the middle of the cockpit area between formers A and B. Hold the edge of the sheet on the top edge of the fuselage and against the base of the formers, as if you were trying to make the fuselage four inches thicker.
Check the fit of the sheet's edge against the upper fuselage; it should be flush. If it is flush, remove the sheet and run a bead of Zap-A-Gap along the edge and put the sheet back in place.
If it isn't flush, trim the formers until the sheet fits properly, then glue it in place. Hold the sheet in position until the glue cures.
The next step is to bend the sheeting around the formers as far as the 1/4-inch stringer to form the forward deck; but you must first lay the fuselage on its top side, with the sheet side up. I keep a small, capped container of water near my workbench when applying water-based fillers or bending sheeting. Spread an even coating of water over the outside of the 1/8-inch balsa sheet.
Water will cause the sheet's grain to soften, and it will cause the sheet to bend in the direction of the curve you need. The rule is simple: if water is on the outside, the sheet softens and bends to the inside. If water is on the inside, the sheet will soften and bend to the outside.
Once the sheet becomes pliable enough to bring around to the 1/4-inch stringer without cracking, hold it down over the stringer with a metal straightedge and cut the excess sheeting away at the stringer's approximate centerline. Carefully glue the sheet's edge down to the stringer with a sparing application of thin Zap.
Repeat the process for the deck sheeting on the model's opposite side, but you will probably have another problem when it comes to trimming the edge of the second sheet: you'll have to trim the second sheet to mate properly against the edge of the first sheet without cutting into the first sheet.
The simplest way to do this is to bend and hold the second sheet over the edge of the first sheet and mark the cut line. Then, before attempting to make the cut, slide a piece of sheet cardboard or scrap balsa under the second sheet. This will protect the first sheet from damage but allows you to cut completely through the second sheet.
Once the cut is made and the excess balsa out of the way, hold the edge of the second sheet against the first. If it fits properly (and it should), apply thin CyA to the joint. Finally, glue the sheeting to all the formers from the underside of the fuselage.
Rear deck sheeting: You may find that opening small portions of the cockpit and engine areas will help your perspective and allow you to make more accurate cuts.
When the water dries thoroughly on all four pieces of sheeting, use #100 paper on a T-bar to sand everything flush. Cut a cockpit opening template from See-Temp or thin card stock, then cut the cockpit hole into the sheeting. If you like, you can also relieve the area behind the firewall and in front of F-2 to accept the engine of your choice, but don't take away any more wood than you have to for now. We may choose to add some dummy engine detail later on.
Wing changes
The most significant change will be a slight modification to the model's ribs. My intent was to emulate an undercambered airfoil simply and effectively, without paying too high a performance price for the look.
I felt that adding a small amount of material to cap the underside of each rib at the nose would be a much easier task to accomplish than attempting to relieve the bottoms of all the ribs and cutting new notches for the lower spars.
One possible drawback to the procedure is that adding too much material would change the centerline of the airfoil and necessitate changing the mounting angle of the wings. As a result, the "N" and cabane struts would require modification. It is possible that several models might have to be built and flown before the modified angles could be passed to you with confidence.
No way. Keeping the possible negative consequences of extensive modifications in mind, and remembering that this is supposed to be a very basic fun-scale project, I chose to add only a minimal amount of balsa to the bottom of each wing rib—just enough to lend the impression of undercamber without having the builder change the position of the leading edge or alter the incidence angles of the wings.
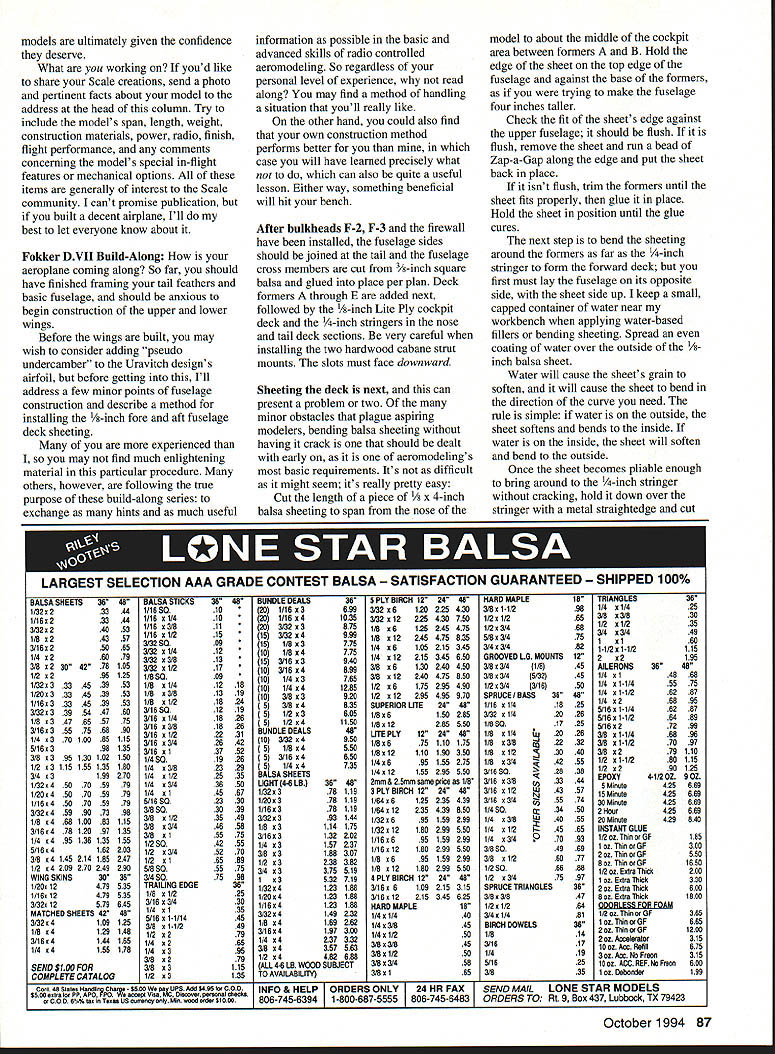
Note the simple line drawing of the change. The materials of choice are 1/8-inch medium/soft balsa or Lite Ply. The most direct method of getting the lower cap pieces cut is to make a template from See-Temp or 1/32-inch plywood, then use the template to cut one part for each of the model's W-1 ribs, W-2 ribs, and half ribs. The lower add-on cap is really a no-brainer and one-size-fits-all.
When you've got the caps cut, spread a little waxed paper on your flat workbench and Zap the caps into place on the bottoms of the ribs. That's as tough as it gets.
Next month, you'll start building wings. Until then, build straight and fly safely. I'll talk with you again.
Transcribed from original scans by AI. Minor OCR errors may remain.

