

RADIO CONTROL SCALE
Jeff Troy, 200 S. Spring Street, Ambler PA 19002
Introduction
I'm going to break from form for this issue. No Docu-Search; no manufacturers' news; not even modelers' projects. I'll make this one all business and address a subject that's been something of a scare-monger for modelers down through the ages, especially with the increasing interest in WWII subjects for larger-than-.60 engines: fiberglassing an airframe. Nothing else could be quite so intimidating or quite so misunderstood.
Let's face it: if you've never done it, fiberglassing an airplane is just plain scary. In fact, if you've tried it but botched the job, it's going to be even scarier.
Model finishing is always a fascinating and controversial subject. Regardless of the model type or method chosen, speaking to 27 modelers about a model's finishing plan will usually yield 27 different opinions about what is and what is not correct. Truth is, all 27 would be correct, with each opinion being exactly what the person holding it regards as his own personal truth in finishing.
Here, then, are a few of my own thoughts on basic model aircraft finishing. Then I'll get to the job at hand.
Basic finishing approach
Regardless of size or type, foreign or domestic, military or civilian, airplanes are made of many individual parts. Duplicating the finish of each part is really quite a simple matter. One at a time, look the parts over and identify each job that needs to be copied. Then choose the appropriate finishing materials and the precise method that will deliver that particular result. It isn't difficult — it's easy.
How about that wooden wing strut on the old Jenny? Is it shiny or semi-gloss? Is it dull? Is it woven or smooth? It's shiny and smooth, and its finish is wood-grain, so your job is straightforward. Stain the model's wooden strut in a matching tone, then seal the strut with any fuelproof clear that will yield a permanent, glossy finish.
How about the major components of the venerable Piper J-3 Cub? Are they glossy, semi-gloss, or flat? Are they woven or smooth? They're not woven, and in most cases they're gloss yellow. This means you can cover your model with any of the popular fabrics, then seal the covering with a coat of thinned nitrate dope and paint the model in a matching shade of gloss yellow. 21st Century Fabric also performs this task, but you don't have to seal or paint it; it's already painted for you.
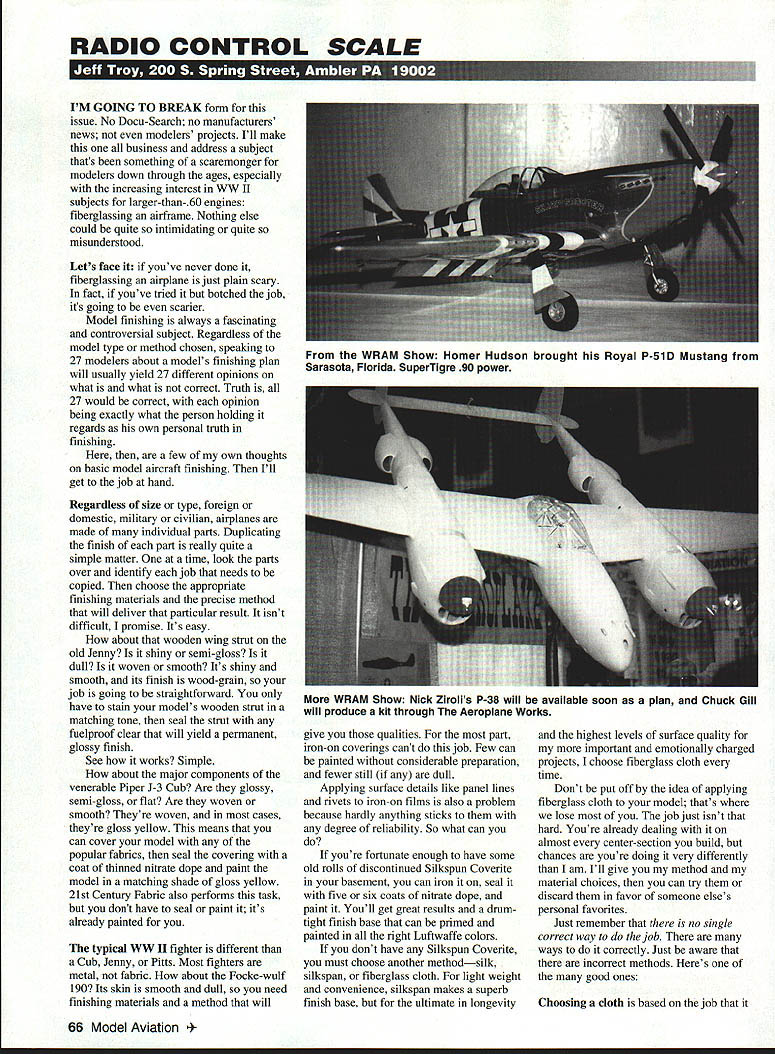
The typical WWII fighter is different than a Cub, Jenny, or Pitts. Most fighters are metal, not fabric. How about the Focke-Wulf 190? Its skin is smooth and dull, so you need finishing materials and a method that will give you those qualities. For the most part, iron-on coverings can't do this job. Few can be painted without considerable preparation, and fewer still (if any) are dull.
Applying surface details like panel lines and rivets to iron-on films is also a problem because hardly anything sticks to them with any degree of reliability. So what can you do?
If you're fortunate enough to have some old rolls of discontinued Silkspun Coverite in your basement, you can iron it on, seal it with five or six coats of nitrate dope, and paint it. You'll get great results and a drum-tight finish base that can be primed and painted in all the right Luftwaffe colors.
If you don't have any Silkspun Coverite, you must choose another method—silk, silkspan, or fiberglass cloth. For light weight and convenience, silkspan makes a superb finish base, but for the ultimate in longevity and the highest levels of surface quality for my more important and emotionally charged projects, I choose fiberglass cloth every time.
Don't be put off by the idea of applying fiberglass cloth to your model; that's where we lose most of you. The job just isn't that hard. I'll give you my method and my material choices; then you can try them or discard them in favor of someone else's personal favorites.
Just remember that there is no single correct way to do the job. There are many ways to do it correctly. Just be aware that there are incorrect methods. Here is one of the many good ones.
Cloth and resin choices
Choosing a cloth is based on the job it must perform for you. When no additional structural strength is required and your glass job is to be nothing more than a smooth finish base, the lightest-available cloth should be chosen.
Dan Parsons has a 0.6-ounce (per square yard) cloth that has become quite popular among the Scale and Pattern communities, and K&B Manufacturing has a 0.75-ounce cloth. Both are high in quality.
On the sturdier end, for the best combination of structural reinforcement and a solid finish base, K&B offers 2-ounce and 6-ounce glass cloths. For the typical WWII fighter, I'll usually choose heavier cloth for the wing saddle and nose areas of the airplane, followed by light cloth overall—actually doubling my layer of 6-ounce cloth in high-stress areas.
Contrary to most modelers, my choice of resin to lay and seal the cloth is not epoxy resin; it is polyester. I find polyester to be harder and lighter, yet easier to sand. It's true that polyester cures to a more brittle surface than most epoxies, but I have never found this to be a problem when the recommended amount of catalyst (hardener) is added to the resin.
Although I will readily admit that I haven't tried very many of the latest "sandable" epoxies, those that I have tried have left me rather cold. Most epoxies become soft with heat; this is big trouble in glassing, since sanding is a crucial step in the fiberglassing process. Sanding builds friction; friction builds heat; heat softens epoxy; soft epoxy loads sandpaper and makes the task frustrating at the least. Most epoxies are also considerably heavier than polyester resin, resulting in a heavier model—undesirable in most cases.
My alternative is K&B polyester resin, available in quart and pint cans. K&B polyester resin cures reliably at rates dictated by the amount of hardener used. Best of all, it sands very nicely, especially with the addition of microballoons: a very fine filler for use with all aeromodeling resins—epoxy, polyester, or otherwise.
Before you plan on having your next model done in glass cloth and resin, understand that fiberglass should only be applied to solid or sheeted areas. It should never be used to bridge open-bay surfaces. If you must glass over open bays, cover them with silk or silkspan first, followed by a few good coats of thinned nitrate dope. Seventy-two hours later the top coat can be glassed.
Polyester resins do not cure properly over certain epoxies and cyanoacrylate (CYA) glues. If you've already applied a resin-coated cloth with either of these products, use a finger to apply a thin coat of Titebond glue or Devcon 5-Minute Epoxy (there's no bad reaction with this one) over the CYA or epoxy. Either of these products will create an adhesion-ensuring barrier between polyester resins and the CYA or epoxy that occasionally may have to be used underneath them.
Don't worry about using these adhesives for construction. Only large areas should present problems to the resin's curing.
Many modelers brush resin (epoxy or polyester) onto their model, then lay their glass cloth atop the resin and squeegee the cloth flat. Don't do that, or you're likely to end up with the heaviest model you've ever built. The glass-over-resin method traps too much resin under the cloth and creates a terrible mess during the working procedure.
Safety
Work with resins only in well-ventilated areas. These materials are toxic and you should not expose yourself to their vapors without protection. Wear a respirator throughout the glassing and sanding procedures, and use eye protection when using catalyst—resin hardeners can cause irreversible blindness. Work carefully at all times.
Procedure (wing example)
Preliminaries out of the way, I'll avoid telling you what not to do and concentrate only on what you should do, step by step. I'll use a wing to describe the procedure; you can use your own intelligence and ingenuity to cover other parts of your model.
If your center-section is already glassed per your kit instructions, apply that cure-barrier of Devcon 5-Minute Epoxy over the CYA or epoxy, then go right to the application of lightweight cloth in Step 12. If you're still in bare wood, start here:
- Cut a piece of 6-ounce cloth to a width approximately 20–25% of your wing's entire span. The cloth should be long enough to cover the wing chord in a single application, and the grain of the cloth should run spanwise (tip to tip). Use a new razor blade to avoid getting "pulls" in the cloth.
- Turn the wing upside-down and lay the cloth over the bottom, overlapping the leading and trailing edges and centering the cloth from left to right. Carefully smooth the cloth with your palms.
- Pour one ounce of K&B polyester resin into a glass jar or a K&B mixing cup, then add 10 drops of catalyst (10 catalyst drops per ounce of resin will give you a working time of not less than half an hour, and a rock-solid cure time of 24 hours or less). Continuously mix the catalyst into the resin for not less than three minutes.
- Use a 3/4- or 1-inch-wide soft camel-hair or doe brush to brush the resin over the cloth. The trick is to get the cloth thoroughly wetted, but not saturated. When you see the cloth begin to go wet and the wood grain becomes visible through the weave of the wetted cloth, you're right where you want to be.
- Work the edge of a rubber squeegee (or the edge of a 1/8" soft balsa sheet) gently over the cloth and resin to ensure that the cloth is dead-flat to the surface, there are no bubbles or ripples, and no excess resin is pooling. The cloth should begin to wrap around toward the top of the wing, just past the halfway point of the leading and trailing edges.
- After 24 hours, use a T-bar with #100 sandpaper to sand away the overhanging cloth just beyond the halfway point at the leading and trailing edges. Feather the edges of the cloth to smoothly transition into the wooden leading and trailing edges of the wing.
- Use the T-bar to feather the ends of the cloth into the surface of the wing's bottom.
- Turn the wing topside-up and repeat Steps 1–7 to handle the top of the center-section, this time feathering the leading and trailing edges of the top cloth into the cloth that is already covering the bottom of the wing.
- Mix another ounce of resin and catalyst, then slowly stir microballoons into the mixture. Add microballoons until the mixture becomes the consistency of spackling compound. Note: the mix will cure faster now.
- Use a dampened finger to apply this filler to a 2–3 inch wide area where the fiberglass cloth ends at the top and bottom of the wing. Use a dampened finger to smooth the filler.
- When the filler has cured, use the T-bar to sand it, blending the edges of the cloth (top and bottom) into the surface of the wing.
- Lay a length of light cloth (Parsons 0.6-ounce or K&B 0.75-ounce) over the wing bottom. Use a single piece of cloth if your wing's span permits. If not, lay the cloth from one wingtip to just past the wing center (e.g., right tip to center), then lay a second piece over the opposite side, overlapping at the center by an inch or two.
- Mix an appropriate amount of catalyst and resin, maintaining a ratio of 10 drops to the ounce. Stir thoroughly for at least three minutes and brush the resin over the cloth in the same manner you applied the resin over the heavier center-section cloth.
- Use the squeegee as described in Step 5.
- After the familiar 24-hour cure, sand the excess material from the perimeter of the wing. Feather every edge of cloth into the wood on the opposite side of the wing, just past the halfway point.
- Turn the wing over and cover the top—same procedure as used for the bottom.
- Sand and feather all edges. The wing should now be covered, except for areas inside the aileron or flap openings, if any.
- If there are exposed areas of wood on your wing, use smaller pieces of cloth and resin to cover them, blending all edges with the T-bar when the resin is cured.
- If you feel that greater strength will be required, brush a second coat of catalyzed resin over the wing. If not, that's it for the basic glass application.
Sealing and finishing
- Mix up a few ounces of resin and catalyst, then add microballoons until the mixture has a consistency somewhat like maple syrup: thick, but not too runny.
- Brush the mixture smoothly over the entire wing and let it dry.
- This is the task that separates the men from the boys. Grab one of Dave Brown's heavy-duty plastic belt-type sanders and start sanding the microballoon/resin mix. Be careful not to cut through the cloth; your objective is to sand the mixture dead-flat to the cloth, buffing but not covering the weave.
- Repeat Step 22 and sand again.
- Repair any damaged areas of cloth with microballoon/resin mix, sanding more carefully this time.
- Sand for finishing by starting with 100-grit sandpaper, then switch to 180 and sand until the scratch marks from the 100 are gone. Then switch to 280 and sand until the scratch marks from the 180 are gone. Repeat with 220, 320, and 400 paper.
- Prime the finished wing with K&B Super Poxy Primer or Coverite's 21st Century Primer. You're ready for painting or surface-detailing procedures.
I'm sure you'll agree that this is one of the most straightforward methods for applying fiberglass cloth with little trouble and excellent results. It's an old-school method that has been very good to me for many years. I've tried to improve it, but I have found no products or methods that yield better results for the types of modeling in which I'm involved.
Try this, my friends. Sure, you'll hate it, but you'll love the results.
Next month, Toledo. Until then, build straight and fly safely. I'll talk with you again.
Transcribed from original scans by AI. Minor OCR errors may remain.

