
Radio Control: Scale
Bob & Dolly Wischer
INFORMATION SOURCES: The book "Veteran and Vintage Aircraft" by Leslie Hunt (The Garnstone Press Limited, 59 Brompton Road, London SW3 1DS) contains a listing of the world's aeronautical museums and collections of civil and military, as well as individual display and privately owned aircraft. The era covered includes the two World Wars and the period between. Nine thousand fascinating and rare machines are described and listed according to location with a cross index to plane names. The book contains a list of useful addresses and the locations of the world's major aviation collections, a large percentage of which are here in the U.S. Knowing where to gather information on the plane of your choice is a long step in the direction of accurate documentation and construction.
Another publication listing aircraft in museums around the world has been compiled by the National Air and Space Museum, Smithsonian Institution, Washington, D.C. Most museums also have libraries to which modelers can refer for copies of photos and informational data. A self-addressed, stamped envelope should always be included when asking for information, with an international reply coupon for foreign nations.
San Diego Museum Fire: The loss of one of these priceless museums is severely felt by scale modelers. On February 22, the San Diego Aerospace Museum was the victim of arson with a total loss of its collections of planes, models, aviation artifacts and research library. In an appeal for full-size planes, models, and library materials, we received a letter from scale modeler Bill Noonan. Bill says: "The board of directors of the Aerospace Museum has resolved to start anew and build a collection second to none. The irony of the museum loss is that after ten years of effort, the museum finally got a commitment for a permanent, safe building that we were to occupy in the fall of 1978. That building will be used for the new museum. A ribbon cutting ceremony is scheduled for December 17 of this year, commemorating the Wrights' first flight. Obviously the nucleus for the new museum will be modest compared to the original collection."
Bill works at the San Diego zoo, which is only a five-minute walk from the museum. Bill continues: "I spent all my lunch hours in the fine research library, which was totally destroyed. The archivist, Bruce Reynolds, was constantly supplying scale builders with information and photos. I personally feel the library loss, as I am sure other scale builders do. It is difficult to realize that such irreplaceable stuff as a complete set of Jane's All The World's Aircraft, numerous one-of-a-kind German and French aviation books dating to before WW-I, scores out-of-print books, as well as bound volumes of Flight, Aeroplane, Flying Aces, Popular Aviation, Model Airplane News, all dating to the early 20's, are gone.
"I think model builders everywhere owe a debt of gratitude to all museums for providing a source of not only inspiration, but a tangible research source, particularly through the library.
"The museum director, Col. Owen Clark, has expressed interest in devoting a significant portion of the 51,631 sq. ft. available in the new building to display of scale models, hopefully arranged chronologically as in the Smithsonian. Although the museum is interested in acquiring museum-quality models of any scale, he said they would like to establish a uniform 1" = 1', if possible. They had a particularly interesting collection of all Bendix and Thompson racers, a Winnie Mae, JN-4 and Fokker D-VII. Any modelers wishing to contribute may correspond directly with the museum: Col. Owen Clark, Director, San Diego Aerospace Museum, Room 203, Casa del Prado, Balboa Park, San Diego, CA 92101."
Forming Clear Plastic Canopies:
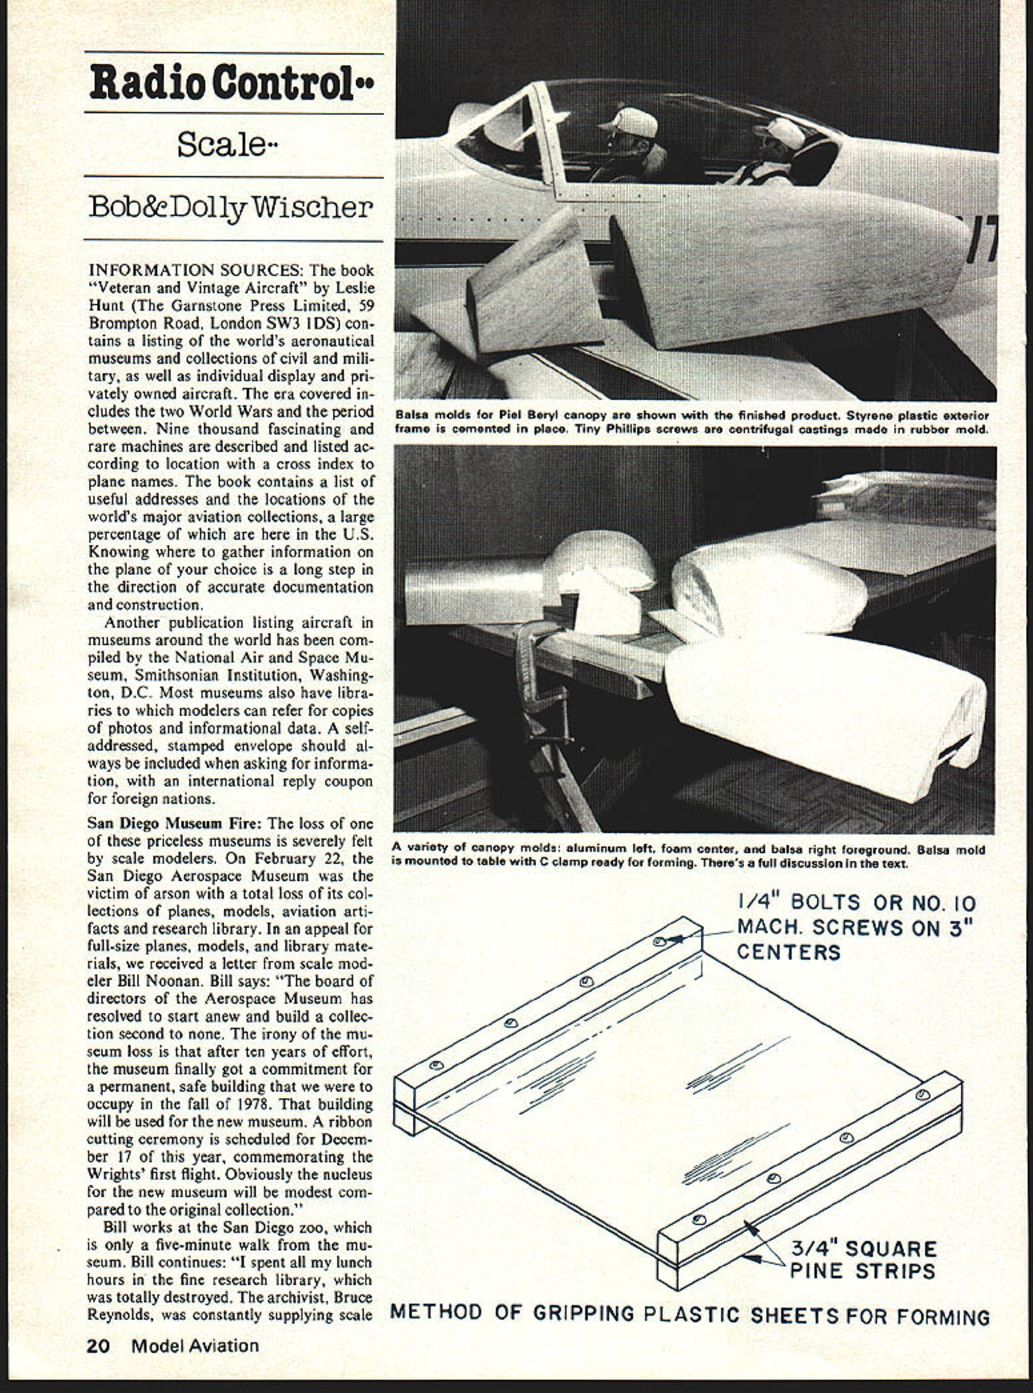
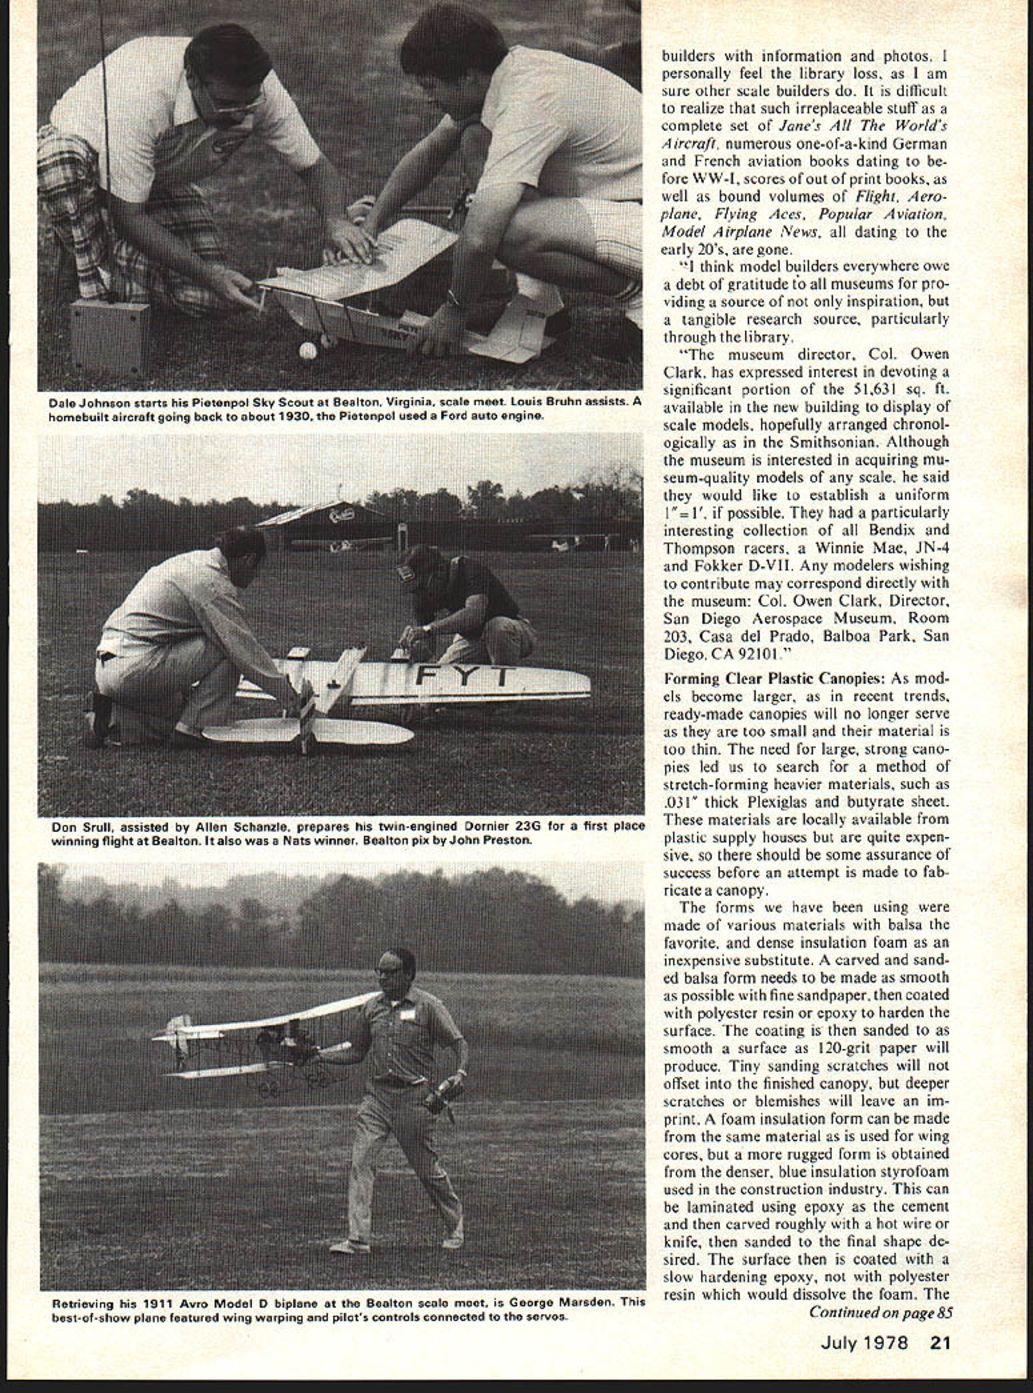
As models become larger, as in recent trends, ready-made canopies will no longer serve as they are too small and their material is too thin. The need for large, strong canopies led us to search for a method of stretch-forming heavier materials, such as .031" thick Plexiglas and butyrate sheet. These materials are locally available from plastic supply houses but are quite expensive, so there should be some assurance of success before an attempt is made to fabricate a canopy.
The forms we have been using were made of various materials with balsa the favorite, and dense insulation foam an inexpensive substitute. A carved and sanded balsa form needs to be made as smooth as possible with fine sandpaper, then coated with polyester resin or epoxy to harden the surface. The coating is then sanded to as smooth a surface as 120-grit paper will produce. Tiny sanding scratches will not offset into the finished canopy, but deeper scratches or blemishes will leave an imprint. A foam insulation form can be made from the same material as is used for wing cores, but a more rugged form is obtained from the denser, blue insulation styrofoam used in the construction industry. This can be laminated using epoxy as the cement and then carved roughly with a hot wire or knife, then sanded to the final shape desired. The surface then is coated with a slow hardening epoxy, not with polyester resin which would dissolve the foam. The sanding after the first coat only. Approximately five additional coats of dope, thinned only enough for brushing, sanded lightly between coats, will provide an excellent base for color coats. Color may be either dope or epoxy enamel.
Installation of windshield, wheels, tailwheel assembly, engine, tank, and radio, completes the model. Band on the wing and check for alignment. Trim wing saddles, if necessary, to level up wings. Check balance point as shown on plans and add weight, if required, to bring ship into balance. Model can be slightly nose-heavy, but not tail-heavy. Anchor ballast securely. Check control travel and neutral settings with trim set in center. Be sure controls travel in proper direction. Go out and dust a few crops!
hardened epoxy can then be finished by sanding.
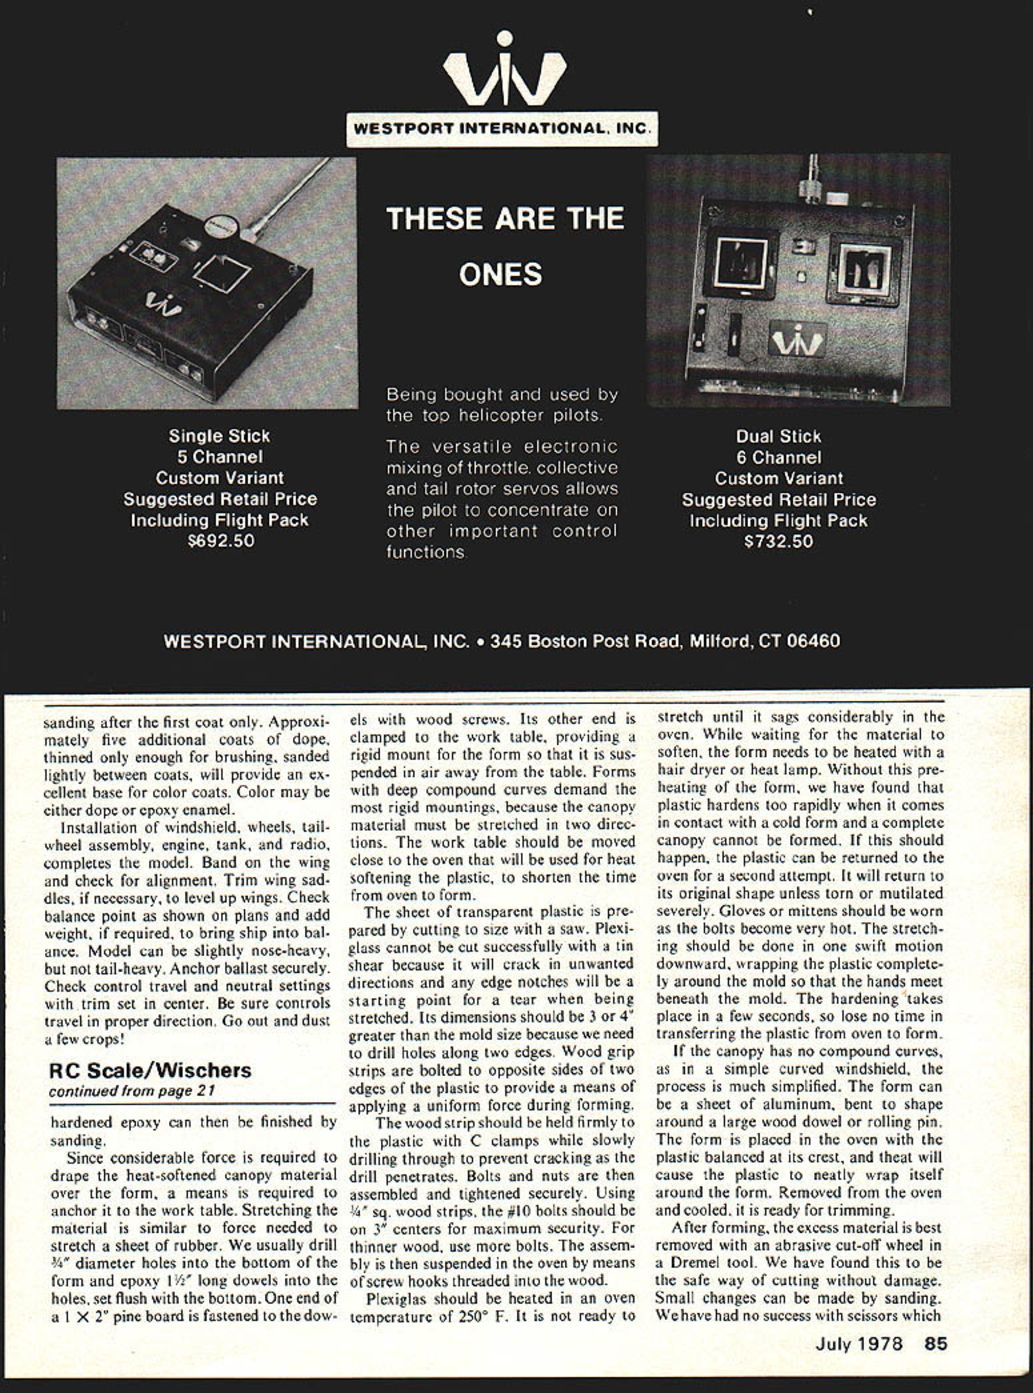
Since considerable force is required to drape the heat-softened canopy material over the form, a means is required to anchor it to the work table. Stretching the material is similar to force needed to stretch a sheet of rubber. We usually drill 3/8" diameter holes into the bottom of the form and epoxy 1/2" long dowels into the holes, set flush with the bottom. One end of a 1 x 2" pine board is fastened to the dowels with wood screws. Its other end is clamped to the work table, providing a rigid mount for the form so that it is suspended in air away from the table. Forms with deep compound curves demand the most rigid mountings, because the canopy material must be stretched in two directions. The work table should be moved close to the oven that will be used for heat softening the plastic, to shorten the time from oven to form.
The sheet of transparent plastic is prepared by cutting to size with a saw. Plexiglas cannot be cut successfully with a tin shear because it will crack in unwanted directions and any edge notches will be a starting point for a tear when being stretched. Its dimensions should be 3 or 4" greater than the mold size because we need to drill holes along two edges. Wood grip strips are bolted to opposite sides of the edges of the plastic to provide a means of applying a uniform force during forming.
The wood strip should be held firmly to the plastic with C clamps while slowly drilling through to prevent cracking as the drill penetrates. Bolts and nuts are then assembled and tightened securely. Using 3/4" sq. wood strips, the #10 bolts should be on 3" centers for maximum security. For thinner wood, use more bolts. The assembly is then suspended in the oven by means of screw hooks threaded into the wood.
Plexiglas should be heated in an oven temperature of 250°F. It is not ready to stretch until it sags considerably in the oven. While waiting for the material to soften, the form needs to be heated with a hair dryer or heat lamp. Without this preheating of the form, we have found that the plastic hardens too rapidly when it comes in contact with a cold form and a complete canopy cannot be formed. If this should happen, the plastic can be returned to the oven for a second attempt. It will return to its original shape unless torn or mutilated severely. Gloves or mittens should be worn as the bolts become very hot. The stretching should be done in one swift motion downward, wrapping the plastic completely around the mold so that the hands meet beneath the mold. The hardening takes place in a few seconds, so lose no time in transferring the plastic from oven to form.
If the canopy has no compound curves, as in a simple curved windshield, the process is much simplified. The form can be a sheet of aluminum, bent to shape around a large wood dowel or rolling pin. The form is placed in the oven with the plastic balanced at its crest, and heat will cause the plastic to neatly wrap itself around the form. Removed from the oven and cooled, it is ready for trimming.
After forming, the excess material is best removed with an abrasive cut-off wheel in a Dremel tool. We have found this to be the safe way of cutting without damage. Small changes can be made by sanding. We have had no success with scissors which causes cracks.
In full-scale practice, the internal canopy frame is usually steel tubing. Brass or aluminum tube can be used in the model, assembled with silver solder or epoxy. The canopy can be fastened to the frame with 1/32" thick foam tape, such as Fasson Fas-Mount which has adhesive on both sides. A very rigid wood frame can be made by using white glue to laminate two or more layers of 5-ply 1/16" plywood, which is then cut to shape.
Bob and Dolly Wischer, Rt. 1, S-221 Lapham Peak Road, Delafield, WI 53018.
Transcribed from original scans by AI. Minor OCR errors may remain.

