
Radio Control: Scale
Bob & Dolly Wischer
Super-Efficient Airplanes
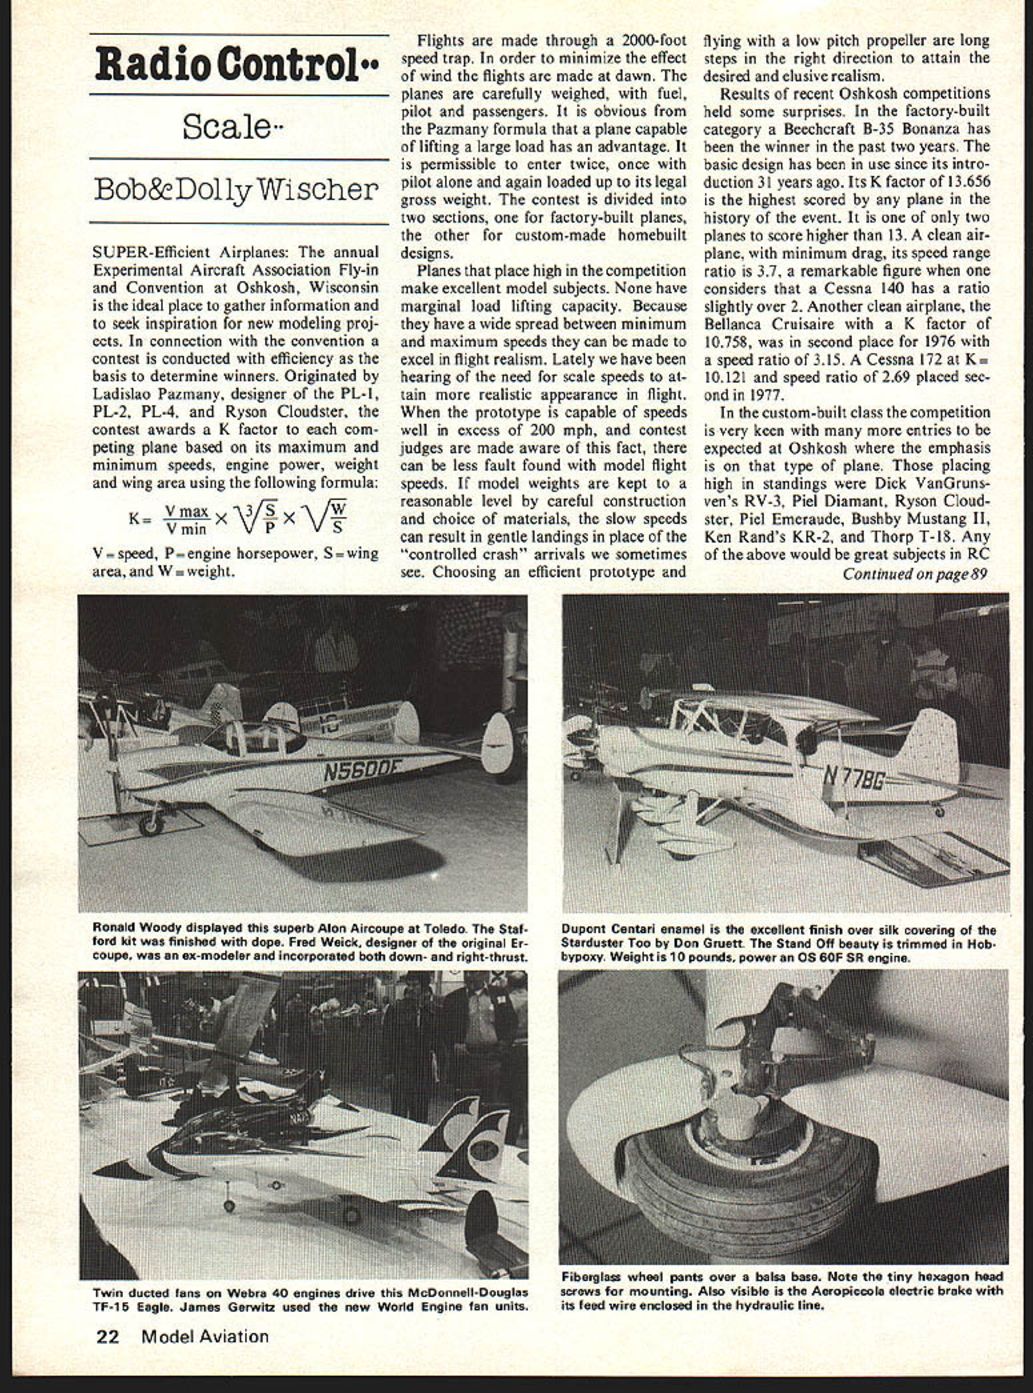
The annual Experimental Aircraft Association Fly-In and Convention at Oshkosh, Wisconsin, is the ideal place to gather information and seek inspiration for new modeling projects. In connection with the convention a contest is conducted with efficiency as the basis to determine winners. Originated by Ladislao Pazmany, designer of the PL-1, PL-2, PL-4, and Ryson Cloudster, the contest awards a K factor to each competing plane based on its maximum and minimum speeds, engine power, weight and wing area using the following formula:
K = (Vmax / Vmin) × ³√(S / P) × √(W / S)
V = speed, P = engine horsepower, S = wing area, W = weight.
Flights are made through a 2,000-foot speed trap. To minimize the effect of wind, flights are made at dawn. The planes are carefully weighed with fuel, pilot and passengers. It is obvious from the Pazmany formula that a plane capable of lifting a large load has an advantage. It is permissible to enter twice, once with pilot alone and again loaded up to its legal gross weight. The contest is divided into two sections: one for factory-built planes, the other for custom-made homebuilt designs.
Planes that place high in the competition make excellent model subjects. None have marginal load-lifting capacity. Because they have a wide spread between minimum and maximum speeds they can be made to excel in flight realism. Lately there has been emphasis on matching scale speeds to attain more realistic appearance in flight. When the prototype is capable of speeds well in excess of 200 mph, and contest judges are made aware of this fact, there is less fault found with model flight speeds. If model weights are kept reasonable by careful construction and choice of materials, the low minimum speeds can result in gentle landings in place of the "controlled crash" arrivals we sometimes see. Choosing an efficient prototype and flying with a low-pitch propeller are long steps in the right direction to attain the desired and elusive realism.
Results of recent Oshkosh competitions held some surprises. In the factory-built category a Beechcraft B-35 Bonanza has been the winner in the past two years. The basic design has been in use since its introduction 31 years ago. Its K factor of 13.656 is the highest scored by any plane in the history of the event. It is one of only two planes to score higher than 13. A clean airplane with minimum drag, its speed-range ratio is 3.7, a remarkable figure when one considers that a Cessna 140 has a ratio slightly over 2. Another clean airplane, the Bellanca Cruisair (K = 10.758) was in second place for 1976 with a speed ratio of 3.15. A Cessna 172 (K = 10.121, speed ratio 2.69) placed second in 1977.
In the custom-built class the competition is very keen, with many entries expected at Oshkosh where the emphasis is on that type of plane. Those placing high in the standings included:
- Dick VanGrunsven's RV-3
- Piel Diamant
- Ryson Cloudster
- Piel Emeraude
- Bushby Mustang II
- Ken Rand's KR-2
- Thorp T-18
Any of the above would be great subjects in RC scale, the RV-3 in particular because of its high K score of 13.527 and its incredible speed ratio of 4.46. A single-place plane with a 125-hp Lycoming for power, it flew through the speed trap at 204 mph and a very slow 46 mph. A Sport Scale RC RV-3 was entered in the 1977 Riverside Nats by Glen Carter, finishing in eighth place. By far the fastest plane in the tests was the Bushby Mustang II with its 180-hp Lycoming and 229 mph. Because its weight is about 200 pounds more than the RV-3 with approximately the same wing area, its low minimum speed of 60 mph kept it from placing higher than fourth in 1976. The Piel Emeraude is well known, having won a World Scale Championship in 1974, and the Diamant is a stretched Emeraude with seats for four. The Ryson Cloudster is the Pazmany-designed 100-hp long-distance motor-glider that flew from California to Oshkosh on 27 gallons of fuel for an average of almost 60 miles per gallon. Engine power was used less than half the time during the 32 hours flown. The large wing of the Ryson would make it a slow-flying model.
Color Masking
Have you ever wondered how to get a sharp line between colors in finishing? A pressure-sensitive polyester film tape is available to make this job simpler. At a thickness of only .003" the tape leaves almost no edge and, because it is smooth, there is no problem with color seeping beneath its edge, even when edges are not sealed. When pressing in place the tape gives an indicator to tell when it is securely fastened to the surface. Its smoothness also permits taping sooner after previous colors are applied without the risk of leaving an imprint, as is common with wrinkled paper tapes.
As with other tapes, the sharpest line can be produced by removing the tape before the newly applied color is completely dry. A disadvantage with the polyester tape is that it will not bend sharply. It is best used for straight lines and gentle curves. We obtained our tape from a local store that specializes in supplies for auto refinishing. It is available in the widths most desirable for model work — 1/8", 1/4", and 1/2" — in 60-yard rolls. Produced by 3M, it is called Scotch Brand Fine Line Masking Tape.
Wheel Pants
The part of a plane most vulnerable to damage is the propeller, with wheel pants a close second. Coarse grass or crop stubble will rip pants from their mountings unless proper reinforcement is applied in their construction. It is always a temptation to merely carve pants from balsa and, when new, they appear solid and strong. A few landings in the rough or nose-overs and they begin to show their weaknesses as scuffs and tatters accumulate.
Carving from balsa will produce pants in the fastest time with the least effort, and these can be used with success if precautions are taken to protect their weak spots. The quickest method we know is the split-block system:
- Use two equal-size blocks with the dividing line down the center. Glue them together with one tiny drop of white glue at each end, positioned so the glue spots will not be carved away.
- Carve and sand the external surface to shape.
- Insert a razor blade to split the halves by cutting the glue spots.
- Hollow the halves using Exacto routers and finish by drum sanding with a Dremel grinder or a drum sander attachment in an electric drill.
We have found the drill drum to be a very useful tool for hollowing balsa parts as it removes material rapidly using a coarse sanding sleeve. The hollowing must be sufficient to clear the wheel by approximately 1/8"; anything less invites trouble with a deflecting tire rubbing on the inside and resulting in ground loops. The area adjacent to the landing gear leg will require plywood reinforcement on the inside, making certain that this does not interfere with tire rotation. The two halves can now be permanently cemented together.
At this point the pants will be extremely light and thin, depending upon the amount of material hollowed out, and if used in this condition would be easily damaged. For this reason we cover the outside surface with fiberglass cloth and polyester resin. The balsa is merely a base shell for fiberglass. For maximum life use a heavy boat cloth as the first layer followed by a second layer of lighter cloth. The pants have now gained weight but also strength and toughness. The resin surface can be sanded to a fine finish ready for paint or dope.
For fastening we prefer a brass plate soldered to the axle, with 2 or 3 machine screws threaded into #2-56 blind nuts embedded in the plywood. For best scale appearance these should be hexagon-head screws. To further improve scale effect, the brass plate should be inside the pants with nuts soldered to the inside surface in place of the blind nuts. The exterior surface is then clean with only the screw heads showing, for maximum authenticity. The bottom edges of the inside are slotted to fit over the axle for assembly.
In full-scale practice a single hex screw is usually used on the outside, threaded into a bracket on the axle end. On models we tap a #2-56 or #0-80 hex screw into one end of a cylindrical spacer, the opposite end drilled to fit the axle. The screw steadies the outside of the pant and the spacer also serves to hold the wheel centered so that a tire cannot rub on the interior. With this method the pants hold the wheels in place and no wheel collars are required.
When right and left pants are different (for example, when a bulge occurs on the inside to streamline wheel brakes) the split-block method is ideal. When right and left are symmetrical it may be desirable to make a plaster mold so that any number of pants may be made by laying fiberglass layers in the mold. The pattern should be pine or basswood, made in halves as described for balsa but not hollowed out, and used as the mold pattern.
Mold-making process:
- Give the patterns a varnish or dope finish to prevent water absorption and mount them flat side down in a shallow plywood box with wood screws.
- Give the patterns a thin coat of light grease and pour the box full of plaster of Paris or hydrocal.
- Disassemble the box and remove the patterns from the plaster when it is hardened (easiest when the plaster is still warm and the grease is liquid).
- Coat the inside surface of the mold depressions with polyvinyl alcohol as a parting agent for polyester resin.
- Lay several layers of fiberglass cloth into the mold with resin to form half pants.
- Trim and cement halves together with epoxy or polyester resin using a strip of reinforcing cloth at the inside joint for strength.
Advantages of the mold process include reproducibility and a very smooth external surface that needs almost no sanding. A similar process can also be employed for many other parts such as engine cowls and canopies. Keep in mind that the pattern should have a slight draft angle on all vertical surfaces so it can be easily removed from the plaster mold. Because wheel pants are made from shallow patterns this should not cause difficulty, but on deep patterns a draft angle is a necessity.
Bob and Dolly Wischer Rt. 1, S-221 Lapham Peak Road, Delafield, WI 53018.
Transcribed from original scans by AI. Minor OCR errors may remain.

