


Radio Control: Scale
Bob & Dolly Wischer
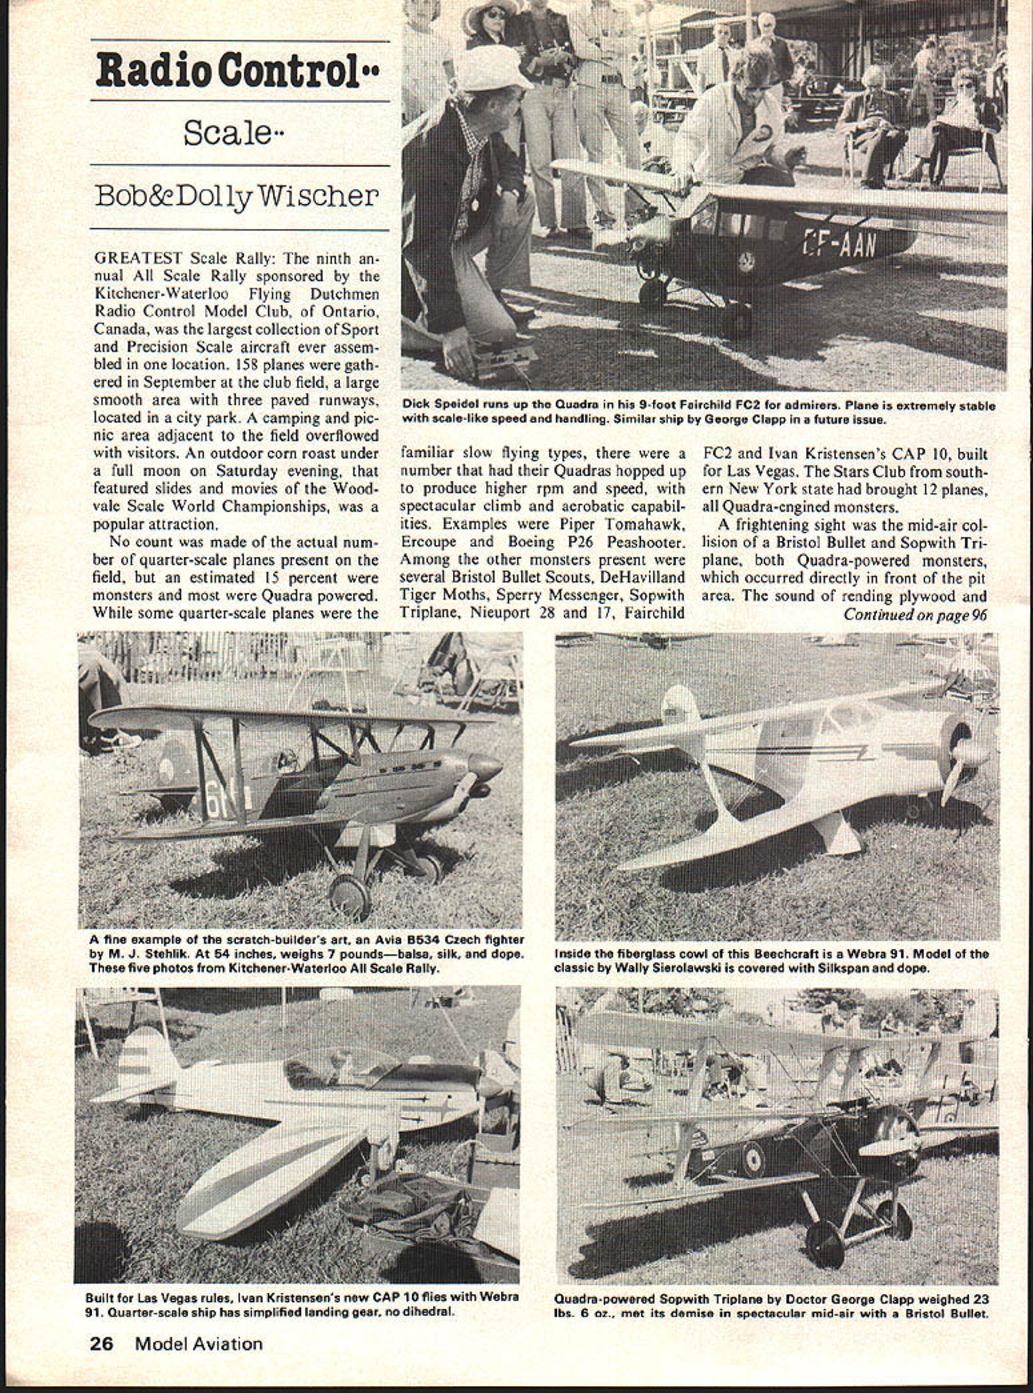
Greatest Scale Rally
The ninth annual All Scale Rally, sponsored by the Kitchener-Waterloo Flying Dutchmen Radio Control Model Club of Ontario, Canada, was the largest collection of sport and precision scale aircraft ever assembled in one location. One hundred fifty-eight planes were gathered in September at the club field, a large smooth area with three paved runways located in a city park. A camping and picnic area adjacent to the field overflowed with visitors. An outdoor corn roast under a full moon on Saturday evening, featuring slides and movies of the Woodvale Scale World Championships, was a popular attraction.
No count was made of the actual number of quarter-scale planes present on the field, but an estimated 15 percent were monsters and most were Quadra-powered. While some quarter-scale planes were the familiar slow-flying types, a number had their Quadras hopped up to produce higher RPM and speed, with spectacular climb and acrobatic capabilities. Examples included:
- Piper Tomahawk
- Ercoupe
- Boeing P-26 Peashooter
- Bristol Bullet Scout
- DeHavilland Tiger Moth
- Sperry Messenger
- Sopwith Triplane
- Nieuport 28 and 17
- Fairchild FC-2
- Ivan Kristensen's CAP 10 (built for Las Vegas)
The Stars Club from southern New York State had brought 12 planes, all Quadra-engined monsters.
A frightening sight was the mid-air collision of a Bristol Bullet and a Sopwith Triplane, both Quadra-powered monsters, which occurred directly in front of the pit area. The sound of rending plywood and spruce, followed by the impact with earth, is not easily forgotten. Accidents will occur, and size is not a factor in their frequency—an errant 1/2A pylon racer can also be a missile. Flying the big ones requires extra care.
At this rally there were often six planes airborne at a time. Club members controlled all takeoffs and landings, keeping the fliers in a group to avoid problems with communications. Their system worked.
The scale rally idea seems ideally suited to scale-type people. They can come to fly or just to exchange ideas and examine the handiwork of other builders. Those who prefer flying place their transmitter number in a frequency slot; when it reaches the bottom the number is called. The number card is clipped to the antenna and when finished with the flight the card goes into the top of the slot, and the process repeats. Those who would rather talk than fly do not place their cards in a slot. They spend time conversing with the owner of an attractive model, watching the flights, or just socializing.
A number of fellows asked how the canopy was installed, so the following is a description of the technique I use. I’m sure none of this is original with me; I probably picked it up from some magazine article, I know not where.
Scene at Bealton
The DC/RC Scale Meet and Model Show is a little Rhinebeck or Morgan Hill. It has a colorful setting—Bealton, VA. This year they flew Monster 1/4 Scale, Sport Scale, Schoolyard Scale, and Team Scale. Bealton is home to a full-scale flying circus, performing for the public on weekends—vintage planes, skydiving, wing walking, and dogfighting. The September 23–24 DC/RC meet was a ball for contestants and spectators. John Preston took the photographs.
RC Scale/Wischers
Accidents will occur and size is not a factor in their frequency. Flying the big ones requires extra care. At this rally there were often six planes airborne at a time; club members controlled all takeoffs and landings, keeping the fliers in a group to avoid communications problems. Their system worked.
Canopy Installation: From Marc Sparks' Newsletter of the Madison (WI) Area Radio Control Society by Carl Mohs, editor
My models are usually covered with fabric and airplane dope, so the technique might have to be modified if one of the plastic films is used, but it will work fine with most other materials. My first step is to trim the plastic canopy to fit the fuselage, first with scissors and for a final fit I lay a sheet of sandpaper directly on the fuselage, moving the canopy back and forth until a snug fit is obtained. Next, an outline of the canopy is traced on the fuselage and cockpit detail is added, as much or as little as you like. I was able to find a color picture in a Piper advertisement of an instrument panel which fit pretty well and added much in a very easy way. I use flat black to simulate the cockpit openings and usually one of the trim colors on the cowl in front of the cockpit for a nice contrast with the basic fuselage color. Magic markers and table-tennis balls give me military-type helmets on rather round-faced individuals, but how could you make a lighter-weight pilot? These are especially useful when there is not a great deal of room under the canopy.
Assuming that all of the cockpit detail is in place, don't forget to put in an identification tag where it can be read through the canopy; a nice weatherproof place for it is on the cockpit floor under the fuel tank or on the interior of the canopy.
If your model lands in the cornfield, it is a little difficult to remove if the finder has ideas of getting started in the hobby the easy way. Now, after a final cleaning of the cockpit and the interior of the canopy, it is ready to be glued in place. I use a cyanoacrylate sparingly, as it has a tendency to produce a dusty substance which will be clinging to the inside of the canopy when you create static electricity with your wiping rag. Tacking the canopy in three or four spots is sufficient and then I use a bead of five-minute epoxy to seal the entire joint, being careful not to force it under the edge.
When this is set I define the edges of the canopy frame with masking tape on canopy and fuselage; the dimensions will vary with the situation and your preference, but the masking tape provides a smooth edge to the frame and gives it a tailored appearance.
I use microballoons and epoxy cement, although balloons and resin would work as well. I use one of the slow-setting epoxy cements so that I have enough working time. The mix is heavy and dry enough so that it can be picked up like putty. Mix with a screwdriver blade which is rigid enough to work the mix and then place a bead of the mix at the canopy junction, using a moist finger to shape the mix into the frame. At the same time, move any excess along the canopy junction, creating more frame as you go. I have found saliva works better than water, and a rag for removing epoxy from the finger is handy. Use as little moisture as you can as excess seems to slow the set. Try to work the material so that only a thin film extends onto the masking tape. When finished, set aside until thoroughly hardened.
Most of the trimming and sanding is done before the masking tape is removed. A rat-tail file is great for preliminary shaping, followed by sandpaper. When you have sanded down to the masking tape and are satisfied with the contours, remove the tape. All that remains is to retape the canopy before the final painting. 3M makes a thin Mylar tape which, if used in fairly straight lines, gives a very clean edge to the paint without the necessity of painting the edge of the tape with clear dope. The remainder of the canopy can be covered with ordinary masking tape.
Color Documentation
Finding good-quality photos of a subject aircraft is a necessity for documentation as well as an information source during construction. Access to the prototype solves the problem for contemporary planes, but many builders choose subjects that are not available and must rely on books, magazines, museums, and manufacturers for photos. To obtain maximum points for finish color and markings, a color photo is advisable. It may be possible to obtain one through a new service offered to scale modelers by AMA member Roger Ablett of Ablett Photography:
- Roger Ablett
- 8441 Buckland Ave.
- La Mesa, Calif. 92041
Roger has a personal collection of photographs of several hundred rare and unusual aircraft. The actual product offered will be primarily professional custom hand-printed glossy color 8 x 10 enlargements from slides, made to order. The photos were taken, for the most part, with the scale modeler in mind. He also has available flight shots of many air-show planes and warbirds, taken from the ground with long telephoto lenses, that make fine photos for home or workshop. Anyone wishing photos should write to Roger at the above address, including a self-addressed, stamped envelope stating your needs and the specific plane or type.
Bob and Dolly Wischer Rt. 1, S-221 Lapham Peak Road Delafield, WI 53018
Transcribed from original scans by AI. Minor OCR errors may remain.

