
Radio Control: SCALE
Bob & Dolly Wischer
Sliding Canopy Method
A canopy that slides on rails is one of the eye-catching features that separates a really excellent scale model from the ordinary, and it isn't especially difficult to produce. We can always copy the methods used on some full-size planes to avoid problems involved in inventing a scheme.
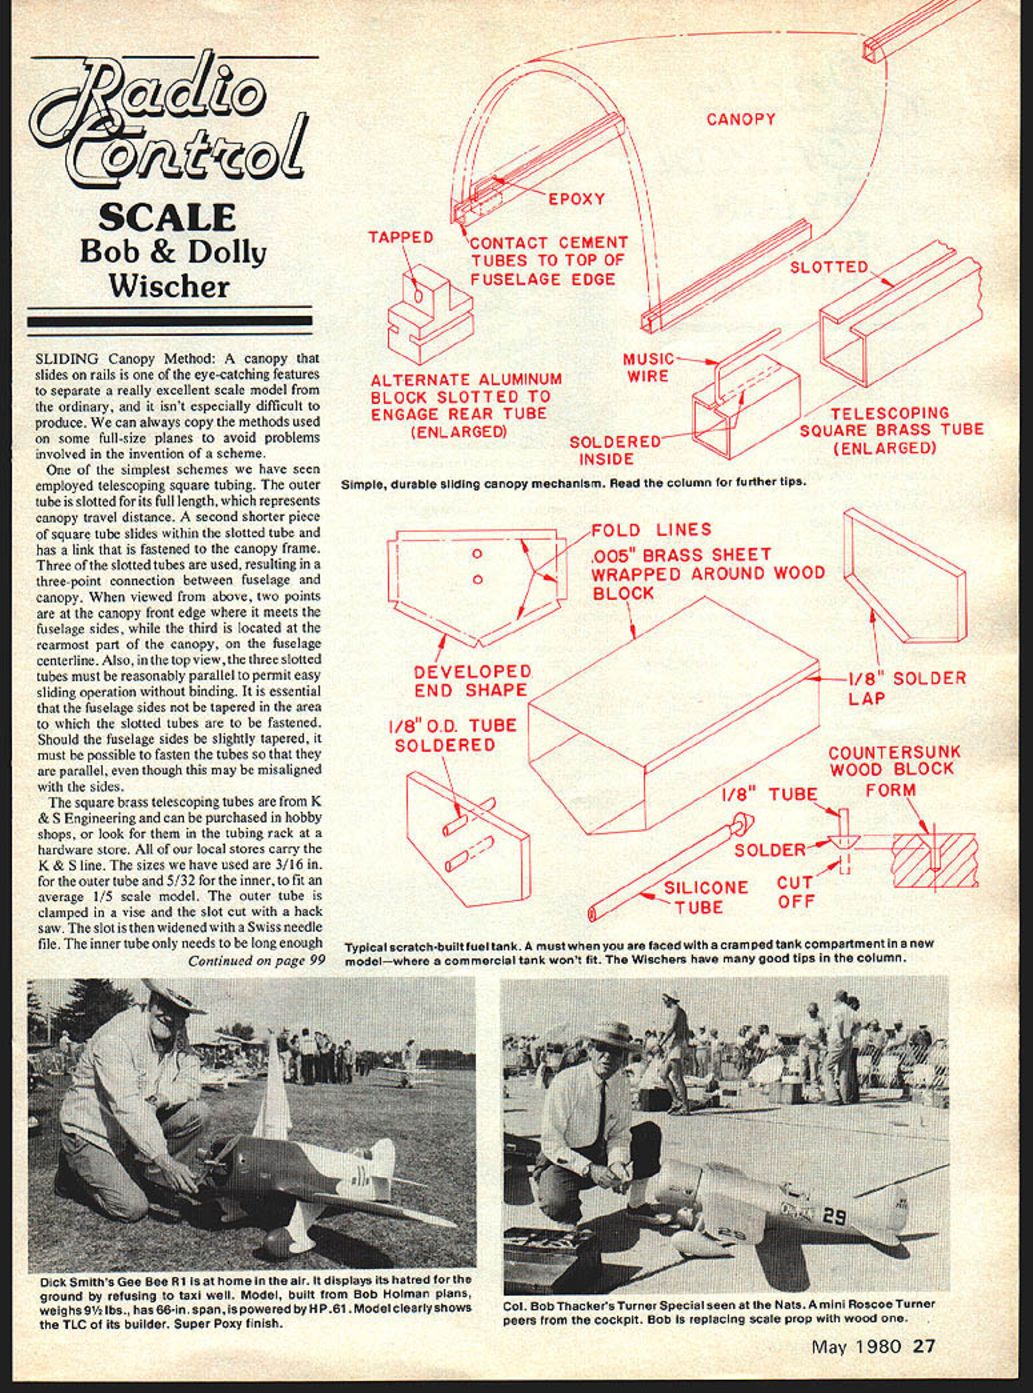
One of the simplest schemes we have seen employs telescoping square tubing. The outer tube is slotted for its full length, which represents the canopy travel distance. A second shorter piece of square tube slides within the slotted tube and has a link fastened to the canopy frame. Three slotted tubes are used, resulting in a three-point connection between fuselage and canopy. When viewed from above, two points are at the canopy front edge where it meets the fuselage sides, while the third is located at the rearmost part of the canopy on the fuselage centerline. In top view, the three slotted tubes must be reasonably parallel to permit easy sliding operation without binding. It is essential that the fuselage sides not be tapered in the area where the slotted tubes are to be fastened. If the fuselage sides are slightly tapered, it must still be possible to fasten the tubes so that they are parallel, even if this results in slight misalignment with the sides.
The square brass telescoping tubes are from K & S Engineering and can be purchased in hobby shops, or in the tubing rack at a hardware store. The sizes we have used are 3/16 in. for the outer tube and 5/32 in. for the inner, to fit an average 1/5-scale model. The outer tube is clamped in a vise and the slot cut with a hacksaw. The slot is then widened with a Swiss needle file. The inner tube only needs to be long enough to prevent window jamming when sliding, about 1/8 in., or slightly more.
To connect the inner tube to the canopy, we use a U-shaped length of 1/32-in. music wire soldered to the interior of the inner tube. A notch filed in one end keeps the wire centered while soldering. The wire extends through the slot and is epoxied to the canopy frame with Hobbypoxy Formula 3 thixotropic epoxy glue, which will stay where put and not migrate down into the slot. Epoxy that runs into the space between inner and outer tubes renders a non-sliding canopy.
Fastening brass tubes to balsa fuselage sides is best accomplished with contact cement. One good cement, found in hobby shops and popular with model railroaders, is Walther's Goo. We have brass-to-balsa joints on canopies that are now eight years old and still sound.
A tiny bit of light grease such as Vaseline on the inner tube helps give smooth operation. Another helpful trick is to round off the inner tube ends with a fine file to avoid the galling that often results from a brass-to-brass bearing surface. With a bit of extra effort, a canopy mounted as described can be made demountable. This can be done by using a brass or aluminum block on the third track at the rear of the canopy in place of the inner square tube. The portion of the block that runs inside the slotted tube would have the same dimensions as an inner tube. A 5/32-in.-thick piece of aluminum can have grooves filed in its sides and a threaded hole in the exposed portion. An aluminum bracket epoxied to the canopy is then held with a single screw. The canopy can be disengaged from the two front tubes by leaving a short space at their aft ends so that the inner tubes will slide clear. To reduce weight, keep the length of outer tubes to the sum of the canopy sliding distance plus 1/8 in.
Fuel Tanks
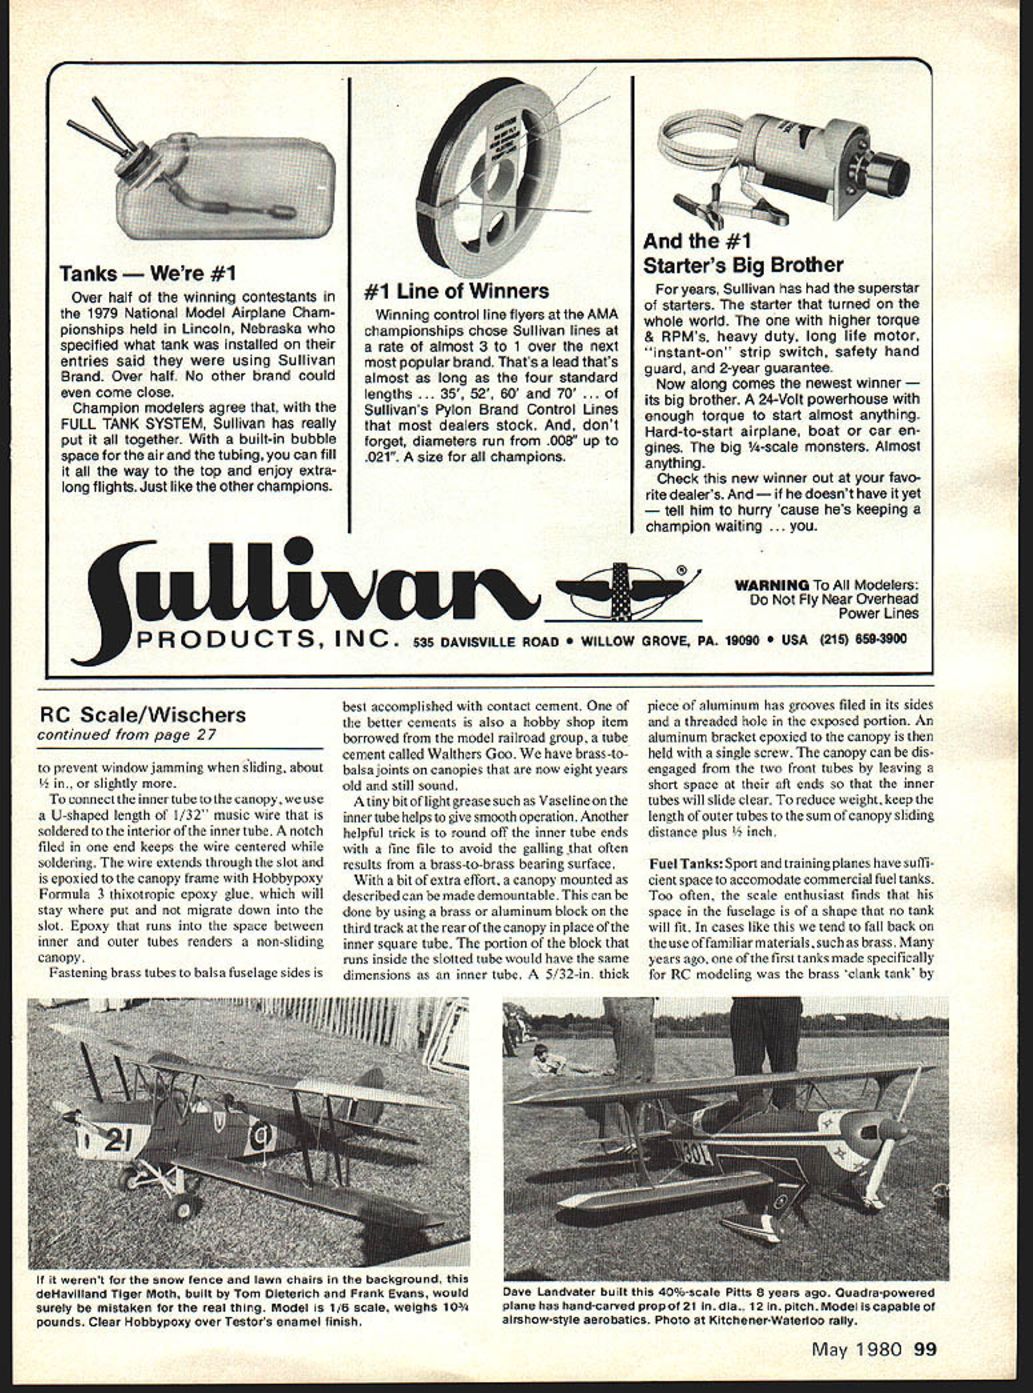
Sport and training planes have sufficient space to accommodate commercial fuel tanks. Too often, the scale enthusiast finds that space in the fuselage is of a shape that no tank will fit. In cases like this we tend to fall back on familiar materials such as brass. Many years ago one of the first tanks made specifically for RC modeling was the brass "clank" tank by Harold deBolt. On our scale models we prefer a lighter material and have been using .005 shim brass for custom tanks to fit odd spaces. At this thickness, brass is extremely easy to solder; sharp bends can be made without effort and weight is kept to a minimum. An 8-fluid-ounce tank will weigh about 1 1/4 ounces, not too different from a polyethylene tank made from ultra-high-molecular-weight raw material.
Almost any shape can be made by forming around a wood block. The preferred shape has a V bottom so that the tank can be completely emptied. An absolute necessity is provision for air in the tank. We have found that unplated brass pickups in our field fuel containers become porous after being immersed for one season. Holes for fuel vent tubes on the front surface can be pierced easily with a sharp steel scriber. Done with care, the holes will be a slight press fit on the tube. The pierced hole is actually extruded by this means, affording a wider solder surface.
Before soldering the rear of the tank into position, install a clunk tube and weighted pickup. Silicone tubing is the only material that seems to have a long life sealed inside a completely soldered tank. The weight is made by drilling a 3/16-in. hole into a hardwood block and then countersinking to about 1/2 in. diameter. A short length of 1/8-in. brass tube is inserted into the bottom of the countersink and solder is melted into the remaining depression. The wood becomes charred but does not flame. There will be some smoke, so it may be wise to do this outdoors. The tube is cut off flush with the tip of the solder cone. Bend the silicone tube toward the tank while soldering the tank rear in place to avoid melting the weight.
Brass sheets are another item available in hobby shops, found in the railroad section or in the Sig catalog. Usual sheet size is 4 x 10 inches. The tank interior should be flushed with alcohol or dope thinner to remove solder flux residue. In designing and constructing a tank, a handy measure is: 1.8 cu. in. = 1 fluid ounce. Check for leaks by submerging the tank in water while pressurizing with low pressure through the fuel line with the vent plugged. To calculate tank weight, one square inch of .005 brass weighs .028 ounce.
Coming Events
One of the most active scale organizations is the Scale Squadron of Southern California. This year they will be conducting the first Master Scale Championship, for which entrants come from the winners in four regional contests and the Nats. In addition to the Squadron contest, the four regional contests are the Mint Julep, Kentucky; Tangier, Florida; Sparks, Philadelphia, Pa.; and Milwaukee Flying Electrons, Wisconsin. The Masters contest will be held October 3–5 at Mile Square Park in Fountain Valley, CA.
Transcribed from original scans by AI. Minor OCR errors may remain.

