
Radio Control: Scale
Bob & Dolly Wischer
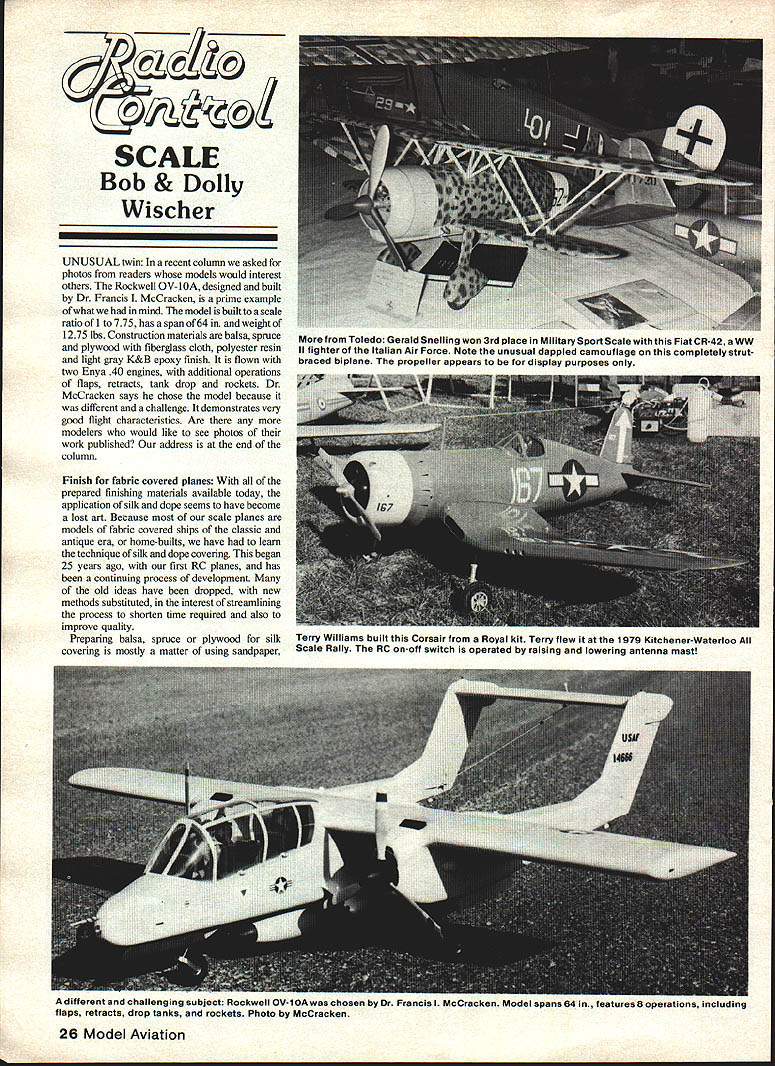
Unusual twin
In a recent column we asked for photos from readers whose models would interest others. The Rockwell OV-10A, designed and built by Dr. Francis I. McCracken, is a prime example of what we had in mind. The model is built to a scale ratio of 1 to 7.75, has a span of 64 in., and a weight of 12.75 lbs. Construction materials are balsa, spruce and plywood with fiberglass cloth, polyester resin and light gray K & B epoxy finish. It is flown with two Enya .40 engines, with additional operations of flaps, retracts, tank drop and rockets. Dr. McCracken says he chose the model because it was different and a challenge. It demonstrates very good flight characteristics. Are there any more modelers who would like to see photos of their work published? Our address is at the end of the column.
Finish for fabric-covered planes
With all of the prepared finishing materials available today, the application of silk and dope seems to have become a lost art. Because most of our scale planes are models of fabric-covered ships of the classic and antique era, or home-builts, we have had to learn the technique of silk and dope covering. This began 25 years ago with our first RC planes and has been a continuing process of development. Many of the old ideas have been dropped, with new methods substituted, in the interest of streamlining the process to shorten the time required and also to improve quality.
Preparing the structure
Preparing balsa, spruce or plywood for silk covering is mostly a matter of using sandpaper, preferably over a wood block, to level surface irregularities.
- Use at least two grades: No. 50 open-coat aluminum oxide paper for rapid cutting and shaping, followed by No. 100 for smoothing to remove deep scratches and rough spots.
- After sanding, completed surfaces that will come in contact with silk must be prepared by coating with at least three coats of heavy clear dope, with light sanding between coats. Dope that has been thinned requires more coats. Use the smallest amount of thinner which will permit the dope to flow and penetrate.
- A quick follow-up with No. 150 open-coat aluminum oxide may be required, depending upon the texture or hardness of the balsa.
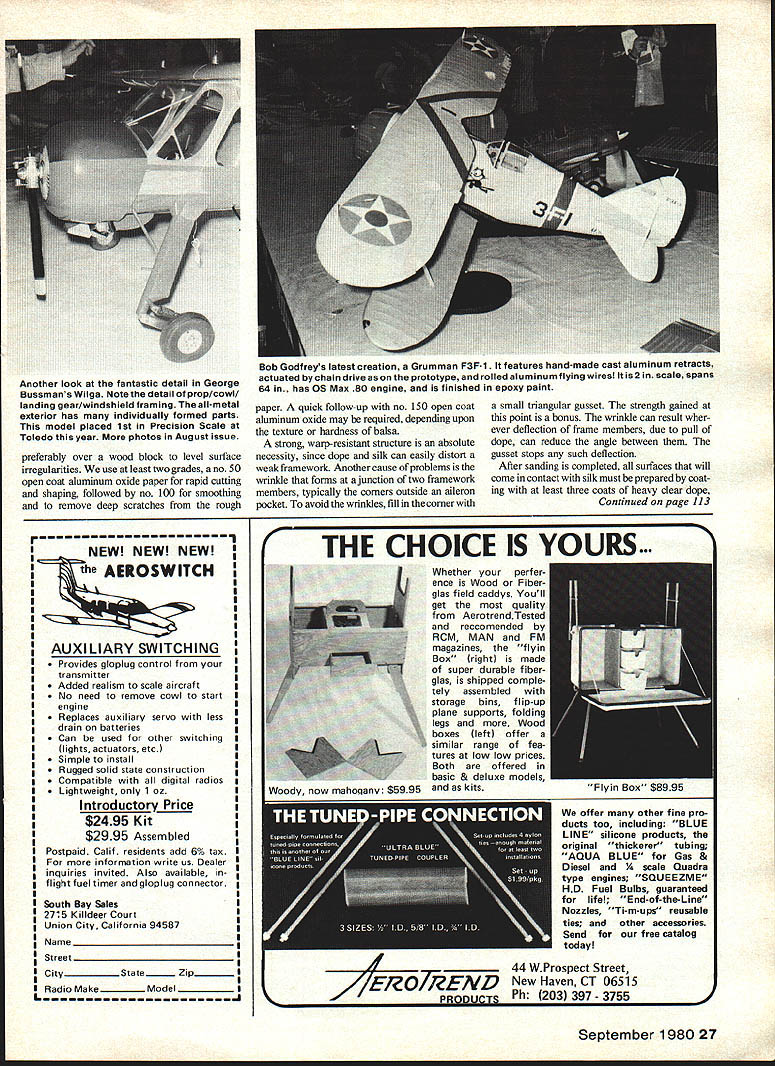
A strong, warp-resistant structure is an absolute necessity, since dope and silk can easily distort a weak framework. Another cause of problems is the wrinkle that forms at a junction of two framework members, typically the corners outside an aileron pocket. To avoid the wrinkles, fill in the corner with a small triangular gusset. The strength gained at this point is a bonus. The wrinkle can result wherever deflection of frame members, due to pull of the dope, can reduce the angle between them. The gusset stops any such deflection.
In a wing structure, for example, leading and trailing edges, as well as the center rib and tip, should be well coated. These are the edges where silk will be fastened during covering. Other ribs also need a coating to prevent pinholes later due to over-absorption in these areas, where dope could enter the balsa underneath rather than coating the silk.
Covering technique
The actual covering is best done in sections, such as top of a wing half followed by the bottom, and repeated for the other half. Fuselage sides and top and bottom are covered in a like sequence. Trying to cover more area in a single piece can lead to problems.
At our house, one scissor is considered sacred, to be used for cutting silk only, because we have learned that a dull scissor will refuse to cut a smooth edge in the lightweight material. For a large area, such as a wing half, the cut is to a dimension two or three inches wider and longer than the part to be covered. The grain of the silk should run the long direction; this is parallel to the selvage—that edge which is woven to prevent raveling.
In covering a wing, the dry silk is laid over one half the span and is then sprayed generously with water using a window or laundry sprayer. The silk is thoroughly soaked and the process may need to be repeated during covering a large area when humidity is low. Dope is brushed across the center rib and rubbed gently into the weave while stretching chord-wise. It will adhere securely in about two minutes.
The silk is then pulled tightly span-wise and dope brushed through the wet silk onto the rib, making certain that the weave runs parallel to the wing and that crossing threads run parallel to ribs, or at right angles to wing length. The complete wing tip need not be doped at one time. Start at the center of the tip and work toward the edges, doping and pulling until completed.
Most of the stretching will be done in the span-wise direction. Silk is strong, and pulling can be quite energetic. It will need to be held with a firm grip of fingertips until adhesion occurs, after which an additional area can be doped and stretched. At this point it will be quite apparent that a substantial coating was needed on the tip before beginning covering. Without it, tension could not be maintained.
The full length of the leading edge can then be doped, pulling more gently chord-wise to remove wrinkles along the way, and the process repeated at the trailing edge. If wrinkles are visible at this point, they will have to be removed by softening the dope along the edge nearest the wrinkle and pulling. To avoid a gap between ribs, we have stretched the silk with a much greater force span-wise than chord-wise. Excess silk can be removed with a new razor blade and the loose edges stuck down with dope. Overlaps become invisible later because the thin silk edges are submerged in the heavier dope applications, making an imperfect edge inconsequential. The wing bottom covering can follow immediately.
The general technique described is also applicable on fuselage and tail surfaces, with greatest stretch in the long direction. Sheeted wood decks and blocks are also covered to help harden the surface. When wet, silk will easily follow compound curves. If the curvature is too severe, a slit with a sharp razor will remove the wrinkle with no after effects. The slit eventually becomes invisible.
After the water has evaporated, a drum-tight, wrinkle-free covering should result. At this point, shrink-wrap-type covering would be a detriment because it would soften the dope-downed edge with more dope and will pull out the offending defects.
First coats of clear dope
Application of the first coat of clear dope is the critical operation. If the dope is too thick, pressure of the brush on the open silk surface will force dope through the loose weave, where it will gather in droplets. Visible through the surface as a small ringlet, they are permanent and should be avoided by very gentle brushing with well-thinned dope, keeping the soft brush relatively dry during the first coat. Subsequent coats do not require this extra care in application, and the dope can be thicker. Adding thinner unnecessarily adds to the cost of materials and to the time needed for final finish and fill of the weave. For economy of time and money, use as little thinner as possible.
When the weave is completely filled with clear dope, after three to five brushed coats, it will be noted that dope will no longer penetrate to the under-surface through the tiny openings between threads. The sheeting and balsa gaps will now be filled and will have a hard satin, which at this stage is quite pronounced.
Talc filler for sheeting and blocks
For this purpose a prepared filler can be brushed on or a filler can be made with talcum powder, purchased from a drugstore. Use non-perfumed white talc. The mixture is approximately:
- 1 part talc
- 1 part clear dope
- 4 parts thinner
If the proportion of thinner is reduced, sanding is made more difficult later. If more talc is used, the surface will reticulate into myriad small cracks. Use the talc mixture only over balsa-sheeted or block surfaces; never over open silk areas. Usually two coats will suffice to hide balsa grain. Sand smooth with extra-fine paper, removing almost all of the talc, leaving only enough to fill the grain and silk weave. Raw silk edges should also be sanded. We have found it unnecessary to sand open silk areas.
Give all areas, open silk and talc-treated alike, another three or four coats of clear dope, which can be either sprayed or brushed. Our preference is by brush. If flowed on smoothly with a soft brush, no brush marks should be evident. Without this clear dope treatment over the talc areas, it will be found that later coats of color dope may not adhere, especially when peeling off masking tape in later steps. Use only enough thinner to get a smooth flow.
Final color and finish
At this point the entire plane should have a smooth, blemish-free surface and color dope will not be expected to hide imperfections. The obvious advantage is that a minimum of color is required and weight build-up is avoided. Most of the heavy talc has been sanded off and we now need only enough color to render the open areas opaque. In bright sunlight, some of our scale models are not quite opaque; that is, a hand laid on the top surface is visible as a shadow when viewed from underneath in open silk areas. This represents the least possible build-up of weight in color application.
The talc-covered areas are a good simulation of metal-covered portions of a plane. If the model has fiberglass parts, they should be given the same dope and talc care and used to give these a fine finish with the same procedure outlined previously. Finished with clear dope and color, they will appear to be made of metal.
Transcribed from original scans by AI. Minor OCR errors may remain.

