

Radio Control: SCALE
Bob and Dolly Wilscher
Scale Documentation
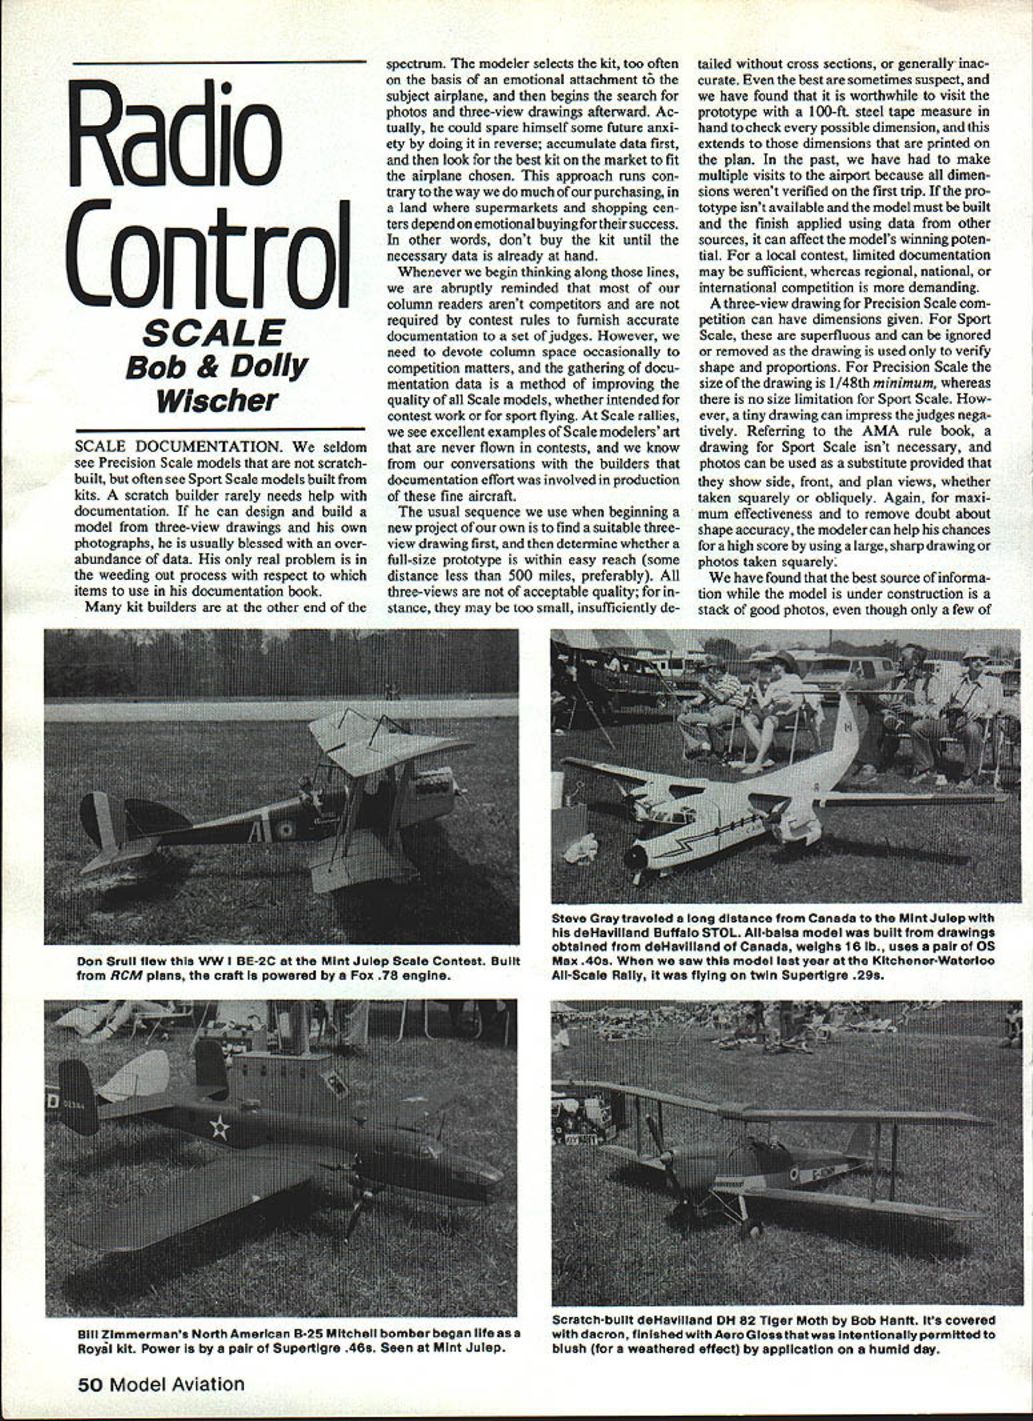
We seldom see precision-scale models that are not scratch-built, but we often see sport-scale models built from kits. A scratch builder rarely needs help with documentation. If he can design and build a model from three-view drawings and his own photographs, he is usually blessed with an overabundance of data. His only real problem is in the weeding out process with respect to which items to use in his documentation book.
Many kit builders are at the other end of the spectrum. The modeler selects the kit, too often on the basis of an emotional attachment to the subject airplane, and then begins the search for photos and three-view drawings afterward. Actually, he could spare himself some future anxiety by doing it in reverse: accumulate data first, and then look for the best kit on the market to fit the airplane chosen. This approach runs contrary to the way we do much of our purchasing, in a land where supermarkets and shopping centers depend on emotional buying for their success. In other words, don't buy the kit until the necessary data is already at hand.
Whenever we begin thinking along those lines, we are abruptly reminded that most of our column readers aren't competitors and are not required by contest rules to furnish accurate documentation to a set of judges. However, we need to devote column space occasionally to competition matters, and the gathering of documentation data is a method of improving the quality of all scale models, whether intended for contest work or for sport flying. At scale rallies, we see excellent examples of scale modelers' art that are never flown in contests, and we know from our conversations with the builders that documentation effort was involved in production of these fine aircraft.
The usual sequence we use when beginning a new project of our own is to find a suitable three-view drawing first, and then determine whether a full-size prototype is within easy reach (preferably some distance less than 500 miles). All three-views are not of acceptable quality; for instance, they may be too small, insufficiently detailed without cross sections, or generally inaccurate. Even the best are sometimes suspect, and we have found that it is worthwhile to visit the prototype with a 100-ft steel tape measure in hand to check every possible dimension, and this extends to those dimensions that are printed on the plan. In the past, we have had to make multiple visits to the airport because all dimensions weren't verified on the first trip. If the prototype isn't available and the model must be built and the finish applied using data from other sources, it can affect the model's winning potential. For a local contest, limited documentation may be sufficient, whereas regional, national, or international competition is more demanding.
A three-view drawing for precision-scale competition can have dimensions given. For sport-scale, these are superfluous and can be ignored or removed, as the drawing is used only to verify shape and proportions. For precision-scale the size of the drawing is 1/48th minimum, whereas there is no size limitation for sport-scale. However, a tiny drawing can impress the judges negatively. Referring to the AMA rule book, a drawing for sport-scale isn't necessary, and photos can be used as a substitute provided that they show side, front, and plan views, whether taken squarely or obliquely. Again, for maximum effectiveness and to remove doubt about shape accuracy, the modeler can help his chances for a high score by using a large, sharp drawing or photos taken squarely.
Photography and Photos for Documentation
We have found that the best source of information while the model is under construction is a stack of good photos, even though only a few of these will be used in our documentation book. A hundred is not too many, and most can be inexpensive black-and-white prints, with a few color prints. We photograph every detail, gathering dimensions and sketches in a notebook as we completely cover the airplane. The details need to be reproduced on the model to make it look real, and the usual kit doesn't include all of the information. Guessing at sizes afterward is to be avoided.
We use a 35mm camera with interchangeable lenses. If photos are to be used in place of a three-view drawing, the camera lens preferred has a 135mm focal length—to minimize distortion in those photos showing side, front, and plan views. All other photos can be taken with a normal lens. If the plane is located deep in a hangar and can't be moved outdoors, use a wide-angle lens and, if necessary, use a flash. This lens introduces distortion, but the photos are better than nothing—and certainly better than depending upon memory.
The plan-view photo presents a problem, as there isn't a practical way of taking it without the aid of a helicopter or giant crane. The rules state that it need not be taken directly from above. An oblique view, taken from a tall ladder, the roof of a building, or even the top of a car will help to show wing and tail surface outline shapes.
Any size photo is useful during construction of the model. For contest documentation books, 5 x 7 in. photos are the size we prefer; these are large enough to show surface details. The rules for sport-scale limit the number of 8½ x 11 in. pages to six, and very likely only three or four of these will be available for photos, depending upon whether the three-view drawing requires one or two pages. Using 8 x 10 photos will mean that only three or four can be shown, whereas six or eight 5 x 7 in. photos can be mounted in the same space. To please the judges, six is better than three.
We have never had color photos that were regarded as satisfactory proof of hue authenticity—with one exception—and that is a color photo of the model posed alongside the prototype, where inaccuracies cancel out. Color chips from the prototype or from other authoritative sources are preferred. For civil aircraft, make color chips on heavy paper and have the airplane owner sign a statement that they are accurate. It is possible to obtain reasonably correct color prints through custom processors and by sending the negatives back to the processor repeatedly and choosing the best of the results. Light colors seem to be most difficult to reproduce accurately.
Where a color scheme has subtle differences in hue between adjacent areas, a color photo may be necessary—not to show exact colors, but rather to delineate boundaries of color areas. Where color differences are great, such as WWII aircraft upper and lower surfaces, a black-and-white photo with color chips is preferred because color photos of battle-weary aircraft are nearly nonexistent. Modeling a museum airplane is an alternative method, although good indoor color photos are a challenge to the best photographers. Don't count on getting good photos in a dimly lit museum under artificial lighting. Flash exposes only one point of a subject properly; nearby portions are overexposed, and distant areas will be too dark. Only the most powerful flash unit can be expected to cover a whole airplane. Good photography demands uniform lighting. With all of these construction photos to choose from, be careful not to use photos in the documentation book that show details not visible on the model.
Building the Documentation Book
In a documentation book with one page for the three-view and four pages for photos, there is only one remaining page to carry the three necessary items:
- A description of the prototype chosen, including name, model number, or military designation.
- Color chips.
- A declaration as to which parts of the model were not made by the builder.
Any modification made to kit parts other than simple painting should be brought to the judges' attention so that credit can be given for craftsmanship. For example, the kit may contain a clear plastic canopy and the modeler needs to spend time and effort to add framework for realism. The canopy must be listed in the declaration as an item not made by the builder and a note added describing changes made. Take advantage of every opportunity to let the judges know that the parts didn't come directly from the kit box or the hobby shop. In particular, describe functional parts that had to be custom made by the builder, including homemade concealed mufflers, retracts, and operating parts.
Elaborate artwork or photos on the outside of the hard-cover loose-leaf notebook is a waste of effort because busy judges are interested only in what's inside. From the local stationer, obtain clear plastic sheet protectors with black paper inserts to fit the three-ring notebook. Mount the photos, drawings, and a typed sheet containing description, color data, and the declaration. With a book containing only three double-sided pages, an indexing method isn't required. Anything that can be done to condense written material is beneficial in leaving a good impression on judges who wish to speed the process. Quick judging was one of the reasons for the emergence of sport-scale. A wordy description of the model giving its dimensions, engine used, and finish details is not needed by judges and is a waste of their reading time. It could lead to a negative effect in their thoughts about the model. To make the judges happy, keep it clean, simple, and avoid razzle-dazzle over-selling.
Mixing Military Colors
Peti Paint Corp., maker of Hobbycote Products, has released paint-mixing information that is of special value to those who have been frustrated in the past trying to duplicate Air Force WWII colors. They have evolved the formulas for dural 41 (FS 34087) and neutral gray 43 (FS 36173), the two most-used colors on warplanes.
Olive drab, in particular, has always been an elusive color to mix because there was a change in the Federal Standard in 1964, keeping the same designation but changing its hue. Many of us were confused as to which was the real color for our warplanes. Hobbypoxy procured the correct Federal Standard color chip and set about the task of determining which of their standard products should be used in exact proportions to obtain the correct color. The formula for WWII olive drab (upper surfaces):
- 2 parts H66 dark red
- 2 parts H81 black
- 1 part H10 white
- 1 part H49 club yellow
Used with an equal amount of Part B Flat Hardener.
For lower surfaces of USAAF aircraft, Hobbypoxy matched neutral gray 43. Formula:
- 4 parts H10 white
- 2 parts H81 black
- 1 part H26 light blue
Used with an equal amount of Part B Flat Hardener to give the proper degree of non-gloss finish.
Hobbypoxy points out that hues may shift depending upon viewing light and that matte colors will appear darker as the surface becomes glossier and lighter if sprayed "dry." Thorough mixing is an absolute necessity.
Hobbypoxy is now working on the formulas for WWII U.S. Navy colors: sea blue 35042, intermediate blue 35164, and white 37875. When these are available they will be published in this column. RAF and Luftwaffe colors will follow. Hobbypoxy gives credit to Claude McCullough for his help in color matching. Claude is the leading expert in this field.
Bob and Dolly Wilscher S-221 Lapham Peak Rd., Delafield, WI 53018
Transcribed from original scans by AI. Minor OCR errors may remain.

