
Radio Control: Soaring
Byron Blakeslee
Last Pitch — U.S. F3B Team Fundraiser
Our U.S. F3B Team — contestants Steve Work, Rich Spicer, and Steve Lewis — will leave for Germany about mid-July to represent the United States at the 1987 Soaring World Championships. The team needs to raise about $15,000 in donations to accomplish this.
You can help by purchasing:
- team pin: $5
- patch: $10
- both: $15
A raffle of several thousand dollars' worth of radios and kits will be held for contributors. Please send donations to: USA Soaring Team, P.O. Box 9328, Albuquerque, NM 87119.
---
Team Synergy — Letter from Seth Dawson
Seth Dawson, a member of Team Synergy and F3B Team assistant manager, wrote the following:
"I read your comments in the May column with interest. I agree wholeheartedly on the amount of dedication, money, time, and effort required to field a winning F3B team. For the group that can sustain this level of commitment, the satisfaction of pushing piloting skills and sailplane design to their limits is very real. On the down side, there is no question that a winning team must put thousands of hours and many dollars into pushing the state of the art.
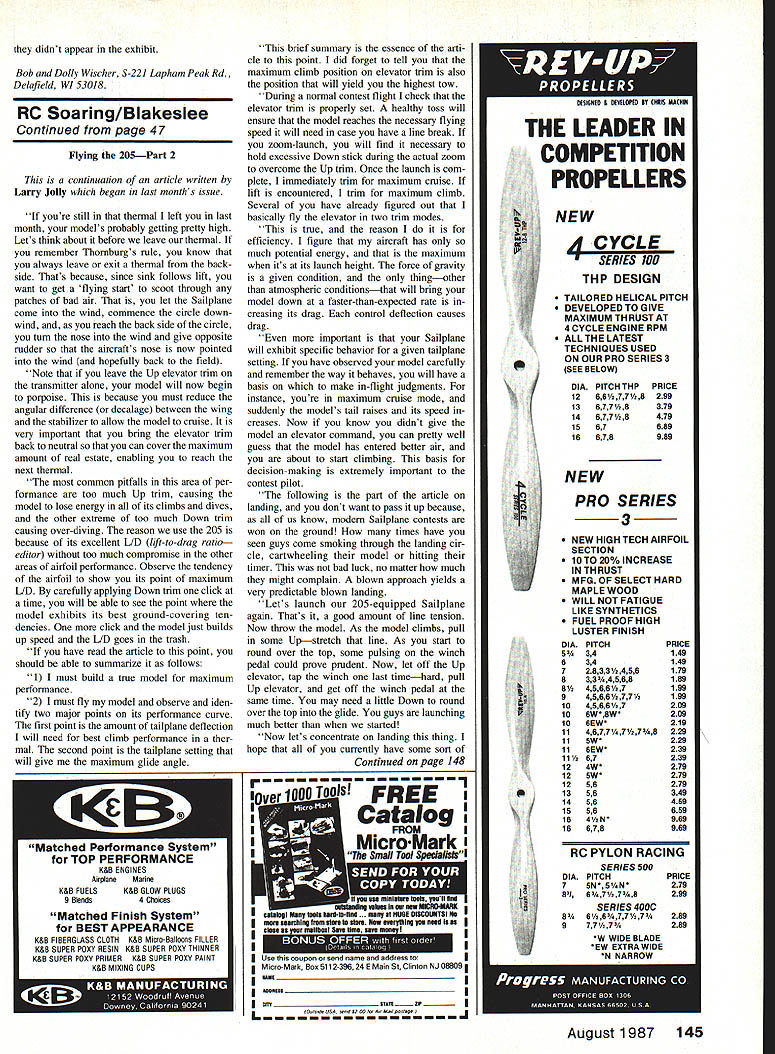
"In the last two years, we've destroyed half a dozen Synergies while exploring the boundaries of pilots' and sailplanes' performance. Rich Spicer has destroyed two of them. Steve Lewis, three, and I've crashed and burned one. I'd always known that graphite conducts electricity, but this accident proved just how well it does! The photo shows what happens when you jumper two 12,000-volt power lines with a Synergy. The carbon wing skins and spar shorted the power lines, and the plane burst into flames. By the time it burned out, several hundred dollars' worth of radio gear and graphite as well as a couple of hundred hours of work were reduced to a blackened lump of carbon.
"No injuries or property damage resulted. The crash was the result of a battery failure in a brand-new receiver pack. I bought an expanded-scale voltmeter the next day, and now check our RX and TX packs before every flight.
"F3B at the international level is a very demanding sport. The sacrifices (burnt or otherwise!) made by the team are substantial. The satisfaction of creating the best in man and machine makes these sacrifices all worthwhile."
---
New German Scale Kit Maker — Roke (Roland Kern)
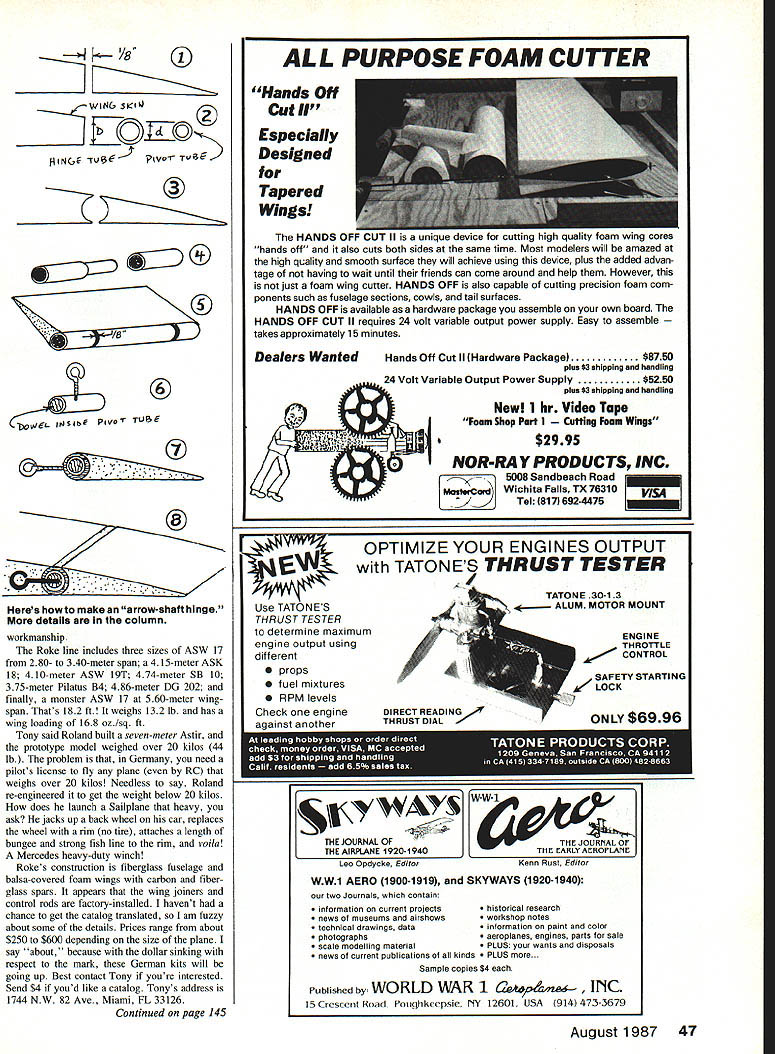
Tony Arnoux (Miami, FL) has imported German Roke kits (Roland Kern, Wannweil, south of Stuttgart). Tony was impressed by the size and quality of Roland's models and imported several to Florida. He is bringing in a limited number of kits for sale.
Roke lineup includes:
- ASW 17: 2.80 to 3.40 m spans
- ASK 18: 4.15 m
- ASW 19T: 4.10 m
- SB 10: 4.74 m
- Pilatus B4: 3.75 m
- DG 202: 4.86 m
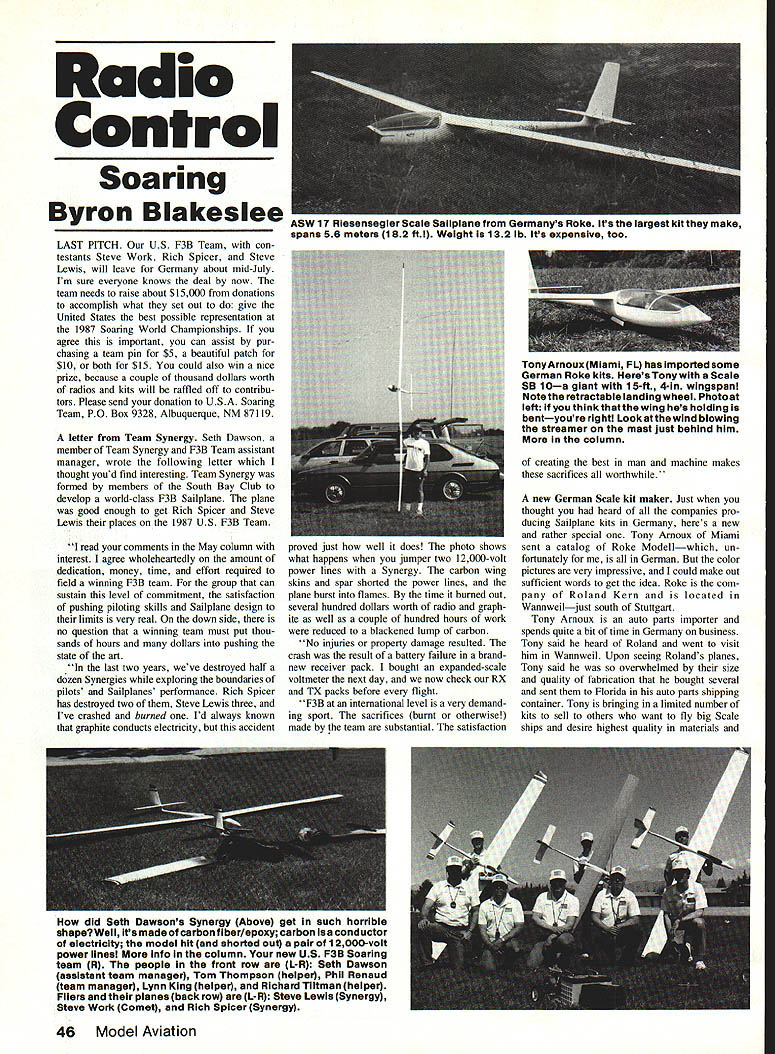
- Large ASW 17: 5.60 m (18.2 ft), 13.2 lb, wing loading 16.8 oz/sq ft
- Roland also built a seven-meter Astir prototype (over 20 kg); he re-engineered it to stay under the German 20-kg RC license limit.
Construction: fiberglass fuselage, balsa-covered foam wings with carbon and fiberglass spars. Wing joiners and control rods appear factory-installed. Prices range roughly $250–$600 depending on size (subject to exchange-rate changes). Send $4 for a catalog to: Tony Arnoux, 1744 N.W. 82 Ave., Miami, FL 33126.
---
RC Soaring / Blakeslee
Flying the 205 — Part 2 (continued from last month) — Larry Jolly
If you're still in the thermal, your model is probably getting pretty high. Remember Thornburg's rule: always exit a thermal from the back side. Since sink follows lift, you want a "flying start" to pass through any patches of bad air. Let the sailplane come into the wind, begin the circle downwind, and as you reach the backside, turn the nose into the wind and apply opposite rudder so the aircraft points into the wind (and hopefully back to the field).
If you leave the Up elevator trim on the transmitter, the model will begin to porpoise because you must reduce the angular difference (decalage) between the wing and stabilizer to cruise. Bring the elevator trim back to neutral to cover maximum ground and reach the next thermal.
Common pitfalls:
- Too much Up trim — model loses energy in climbs and dives.
- Too much Down trim — causes over-diving.
The 205 is used for its excellent L/D (lift-to-drag ratio). By carefully applying Down trim one click at a time, observe where the model shows best ground-covering tendencies. One more click and the model builds speed and the L/D degrades.
Summary so far:
- Build a true model for maximum performance.
- Fly and observe two major points on its performance curve:
- tailplane deflection for best climb in a thermal
- tailplane setting for maximum glide
The maximum climb elevator trim is also the position that will yield your highest tow.
During a contest flight, check elevator trim and ensure a healthy toss to reach necessary flying speed (useful in case of line break). If you zoom-launch, you may need to hold Down stick during the zoom to overcome Up trim. After launch, trim for maximum cruise; if lift is encountered, trim for maximum climb. Basically, Larry flies the elevator in two trim modes for efficiency.
Each control deflection increases drag. If you know how your sailplane behaves for a given tailplane setting, you'll be able to make in-flight judgments. For example: in maximum cruise, if the model's tail raises and speed increases without input, you likely hit better air and are about to climb.
---
Landing (continued — Larry Jolly)
Modern sailplane contests are often won on the ground. Blown approaches lead to predictable blown landings. Launch the 205 with good line tension and a strong toss. As the model climbs, pull Up to stretch the line. Round over the top with some Down as needed, tap the winch one last time hard, pull up elevator, and get off the winch pedal simultaneously.
Develop a landing routine if you don't have one.
Key points about speed and trim:
- Letting the nose drop increases speed and ground cover.
- Pulling back past minimum-sink makes the model mush and lose altitude.
- Use spoilers and elevator trim together when setting up for landing.
Landing procedure:
- Use elevator trim to hold the nose up. On the count of three, raise the spoilers and simultaneously pull in 3/4-up elevator. Apply both simultaneously to avoid a rapid nose-down pitch.
- With spoilers raised, sink rate increases — practice applying full Up elevator without stalling, and practice closing the spoilers. Never open spoilers full and then attempt an approach and landing; you'll land short.
- Think of spoilers like a car accelerator — apply them as needed to adjust glide path.
Approach timing (approximate):
- 2 minutes to go: determine wind direction. Position yourself upwind of landing circle with the wind at your back. Check wind again at 1:30 and 1:00. After 1:00, avoid moving position.
- Save plenty of altitude for approach; don't get caught in sink.
- Position the model directly downwind ~1 football field away and ~200 ft high (~half launch height). Enter the approach window at normal gliding speed (cruise) at ~60 seconds to go and put elevator trim in thermal trim.
- Circle until ~50 seconds, then head toward you, decreasing glide angle to be ~40 ft high as you approach (hold Down elevator).
- Make a 90° turn either way and carry that line ~100 ft, avoiding people and other transmitters.
- At ~25 seconds, turn 90° downwind, maintain cruising speed and by ~18 seconds be at ~25 ft altitude, ~75 ft downwind.
- At ~18 seconds, turn 90° to cross the landing circle perpendicular to wind (base leg).
- Between 15 and 12 seconds, make the final 90° into the wind toward the circle; start slowing, apply spoilers and Up elevator.
Ideal final glide:
- Start from ~15 ft altitude, 75 ft out, glide straight toward center, constantly and evenly losing altitude to touch down at the 95 mark and slide to 100.
- Near the edge of the 25-ft circle on the far side, the model should be about 3 ft above ground. Any higher makes it harder to avoid overshooting.
- As you approach, level the wings (avoid last-minute rudder corrections). When 3 ft off the ground and lined up, bring a little Up to slow, snap spoilers off, and let the model settle. Flare only as necessary. Use a little rudder in light wind to keep nose into wind. At touchdown, hold nose up to let the tail skid touch first and let it settle.
---
Additional Landing Notes (Byron Blakeslee)
A fairly fixed landing pattern like Larry described will help you get to the spot on time. Practice both left- and right-hand patterns. The Final Turn Point (FTP) at 12–15 seconds is movable — if short on time, turn sooner and cut the corner; if you have extra time, fly past the FTP, make a 180°, and get back on final with at least 50 ft to fly to the spot. You need the full 50 ft to ensure the plane is lined up straight. Landing a little short or a little past is understandable, but there's no excuse for being left or right of the spot.
---
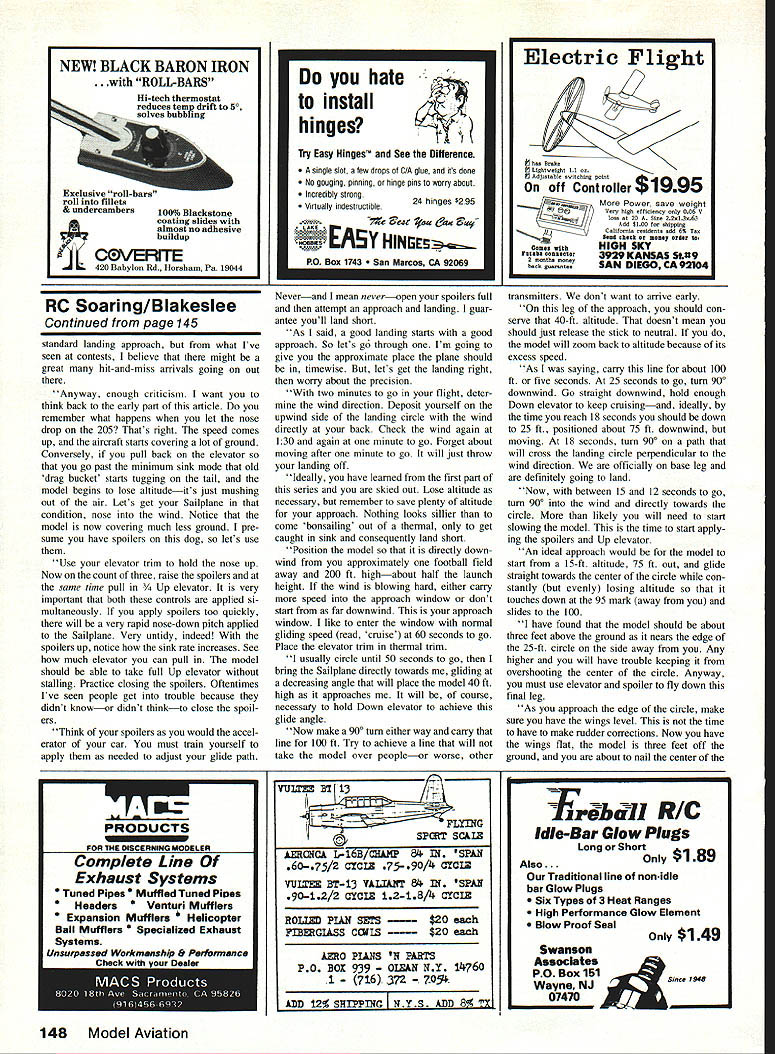
How to Make a Tube (Arrow-Shaft) Hinge — Lenny Kreeft
Lenny Kreeft (Gilcrest, CO) describes an aerodynamically clean, freely moving tube hinge, ideal for foam wings already skinned with thin hard material (e.g., fiberglass). Best used on constant-chord wings, or arrange the hinge line to have constant thickness.
Preparing the wing:
- Cut the control surface (aileron and/or flap) from the wing leaving a 1/8-in. kerf (gap). A radial arm or table saw works well. Support the wing in foam beds so it won't twist.
- Measure the wing thickness at the hinge line. This determines the required outer tube diameter. From a sporting goods store, obtain enough aluminum arrow shafts with an outside diameter (OD) equal to this measurement (available in 1/4-in. increments). Also buy a shaft that just slips inside the hinge tube for inner pins.
- Wrap sandpaper around a hinge tube and carefully sand a hollow into both the wing and control surface to a depth almost half the tube's diameter. Reassembled with the hinge tube in place, maintain the 1/8-in. space between wing skins on top and bottom.
- If necessary, splice the hinge tube with a short piece of pivot tube. Epoxy the hinge tube to the control surface (airfoil–flap).
- File slots in the hinge tube from skin to skin about 1/8-in. wide and spaced roughly every six inches.
Making the pivot tubes:
- For each hinge location, cut a piece of pivot tube just long enough to fit snugly into the hinge slots in the wing skin (not too long), sized to accept a screw with ~3/32-in. shank thickness. Zap the dowel piece inside the pivot tube and drill a hole straight in the middle of the side of the screw eye; remove burrs.
Assembling the hinge:
- Relieve a small slot in the foam at each screw-eye location. Protect the hinge tube with Vaseline and epoxy the screw eyes into the wing. The hinge tube will be held adequately, and the control surface will move up and down smoothly.
---
How-to Summary (Larry Jolly)
For beginners, memorize the main points Larry wrote: build a proper model, identify trim positions for climb and cruise, use two elevator trim modes (cruise and climb), and develop a fixed landing pattern practiced both left and right. These basics will accelerate your progress in sailplane contests.
---
Other News
- Off The Ground Models (Paul Carlson) has moved to Lawrenceville, IL. Address: P.O. Box 518, Old Highway 50 East, Lawrenceville, IL 62439. Phone: (618) 943-7070. Paul can meet demand and is willing to make up to a three-meter design called the Quetzal; it can be cut down to a 100-in. plane. Construction: fiberglass fuselage, foam wings (not fully sheeted). Airfoil: Selig 0403 root, 0401 tip.
- Hand-Launch news: Tom Luperger designed a micro-sized Bird of Daylight (a small version of Dave Thornburg's Bird of Time) gaining popularity in Southern California. John (unnamed last name in report) is producing semi-symmetric, thin-section airfoils and parts (except 1/32-in. wing sheeting). Send $1.99 + $2.50 postage to: 1304 Palm Avenue, Huntington Beach, CA 92648.
- Dodgson Designs videotapes: Bob Dodgson's Tape No. 1 (winter release) features flying shots and design philosophy. Tape No. 2 (two hours) shows Dave Banks' wing-construction sequences. Tape No. 3 (90 minutes) shows fuselage construction and linkage layouts. Refundable deposit: $15, $30, or $40 depending on ordering one, two, or three tapes; shipping/handling $10, $15, or $20 (totals $25, $45, or $60). For $45 extra, Bob will partially pre-build the fuselage for Windsong, Camino, or Pixie (formers, bulkheads, elevator bearings, nose and wing saddle plywood installed and reinforced in a jig for perfect alignment). Bob's address: 21230 Damson Road, Bothell, WA 98021. Phone: (206) 776-8067.
- Valley Forge Fifth Annual Sailplane Contest: August 15–16 at the Valley Forge Signal Seekers' flying field near King of Prussia, PA. Classes: Sportsman, Expert, Junior in both class D and class B both days; Hand-Launch (class A) both days; Sport Scale on Sunday only. CD: Paul Olix (also Soaring CD at the Nats). Info: Fran, 764 Alexander Drive, Hatfield, PA 19440. Daytime phone: (215) 341-6713; evenings: 361-9516.
---
A Note of Thanks
Mrs. Mary Holley sent a note addressed to the sailplaners who expressed sympathy on Dwight Holley's passing last December:
"Model soaring was a large part of Dwight's life, and I know your acknowledgment of his accomplishments and of the type of Champion he was would mean a great deal to him — as it does to me."
---
Byron Blakeslee 314 Winebago Dr., Sedalia, CO 80135 Please enclose a SASE for responses.
Transcribed from original scans by AI. Minor OCR errors may remain.

