


Radio Control: Soaring
Byron Blakeslee 3134 N. Winnebago Dr. Sedalia, CO 80135
Fiberglass Alcyone Fuselage
My October 1991 column featured the 121-inch-span Alcyone kit manufactured by Mel Culpepper. Below is a press release from Northeast Sailplane Products (NSP) announcing a new fiberglass/Kevlar fuselage option:
NSP is pleased to announce the availability of the new fiberglass/Kevlar fuselage Alcyone as of December 1991. This enhancement to the Alcyone means reduced building time and cleaner lines. The builder can still enjoy the simple radio installation and excellent flight characteristics for which the Alcyone is already famous.
The fuselage comes in two pieces, the main fuselage and the nose cone. The fuselage retains the basic lines of the current wood fuselage and is fully retrofitable. The Kevlar reinforcement in the tail helps prevent breakage in those hard contest landings. When you slip off the fitted nose cone, underneath is a full fuselage minus the piece that would correspond to the canopy on the wood version. The fuselage nose cone allows for hassle-free access to the radio gear as well as an aerodynamically clean seal for the fuselage.
For current owners of the Alcyone, the fiberglass fuselage is available for $59.95. The new kits, available through NSP, will sell for $199.95. The wood fuselage version will still be available for $149.95; no change in price.
NSP contact:
- Address: 16 Kirby Lane, Williston, Vermont 05495
- Phone: 802/658-9482
- Note: Send $5.00 for NSP's catalog (the 1992 edition should be available).
Keep a Flight Log?
A letter from Brian Smith of Barberton, Ohio:
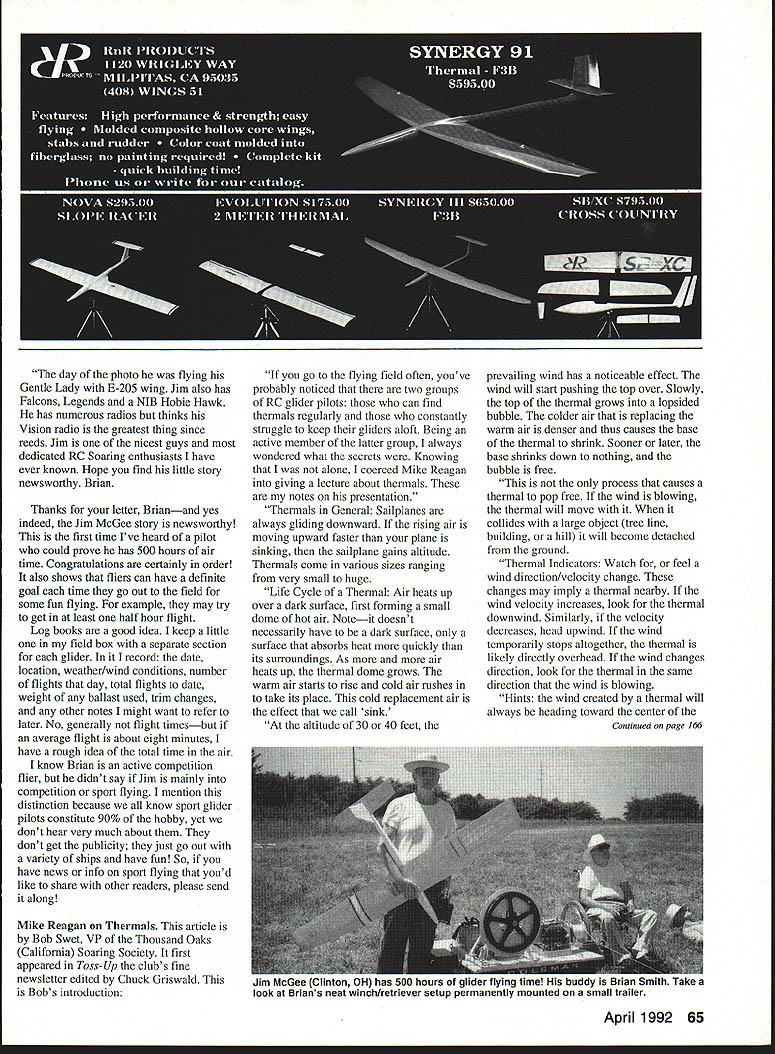
Please find the photo enclosed of one of our club members, Jim McGee. On the day the picture was taken Jim had reached 500 hours of in-the-air time while RC soaring. He has over 50 half-hour flights and has flown RC sailplanes ever since there was such a thing. Jim has flown almost every sailplane produced and faithfully recorded every flight time.
Toss-Up clubs' fine newsletter (edited by Chuck Griswald) first appeared with an article by Bob Swet, VP, Thousand Oaks California Soaring Society. Bob's introduction:
Go to the flying field often; you've probably noticed two groups — RC glider pilots who can find thermals regularly and those who constantly struggle to keep gliders aloft. Being an active member of the latter group, I always wondered what the secrets were. Knowing alone coerced Mike Reagan into giving a lecture about thermals; the following are notes from that presentation.
Thermals — General
Sailplanes are always gliding downward relative to the surrounding air. If the surrounding air is moving upward faster than the plane is sinking, the sailplane gains altitude. Thermals come in various sizes, ranging from very small to huge.
Life Cycle of a Thermal
- Air heats up over a surface (often a darker surface that absorbs heat more quickly), forming a small dome of warm air.
- As more air heats, the dome grows and warm air starts to rise. Cold replacement air near the ground is the effect we call "sink."
- At altitudes of 30 to 40 feet, prevailing wind begins to distort the top of the thermal, pushing it over and making the bubble lopsided.
- The base of the thermal shrinks as denser cold air replaces warm air. Eventually the base can shrink to nothing and the bubble becomes detached from the ground.
- Thermals can also detach if they drift with the wind and hit a large obstacle (tree line, building, or hill).
- As a thermal rises it entrains surrounding air, may begin to rotate, and often develops sinking air around the edges. Moisture can condense at the top, forming a cloud cap (cumulus) that marks the top of strong thermals.
Thermal Indicators
Watch for or feel changes that may imply a thermal nearby:
- Wind direction or velocity changes:
- If wind velocity increases, look for the thermal downwind.
- If velocity decreases, head upwind.
- If the wind temporarily stops, the thermal may be directly overhead.
- If the wind changes direction, look toward the direction the wind is blowing.
- The wind created by a thermal tends to head toward the thermal center.
- Tall grass can serve as a telltale for wind direction.
- Observe other gliders: their flight behavior shows lift or sink. If others are in strong lift and not too high above you, try to join them — but beware of being too far away to return to the landing zone.
- Watch the pattern of passing thermals by noting location, altitude, time, and wind direction; thermals often cycle (generate at regular intervals).
- Bugs swarming upward, groups of sparrows feeding in rising air, or lightweight debris (dust, leaves, paper) rising or swirling are good indicators of a thermal.
- Soaring birds (vultures, hawks, gulls, etc.) circling are strong indicators; they usually stay with the thermal after you join. Hawks often circle in the same direction as the vortex.
- Trees provide clues: the undersides of leaves showing or a tree whose leaves remain motionless while adjacent trees move can indicate rising air.
- Low, puffy cumulus clouds usually indicate rising air; sink and thermals exist in close proximity, so avoid flying too long in sink.
- A change of direction or attitude of your plane can signal you are at the edge of rising air — the nearer wing will rise and the aircraft may turn away from the thermal. An uncommanded turn often means you should turn the opposite way to get into the thermal core.
- Differentiate between wind-caused turns and thermal-caused turns by being aware of wind where the glider is flying versus wind where you stand.
Hints for Flying in Thermals
- Do not cover the same air twice when searching for a thermal — if it wasn't there the first time, it probably isn't there the second.
- Once you find a thermal, stay with it and follow it downwind as it drifts. Occasionally a thermal may rise vertically without drifting.
- It is better to stay in a weak thermal than to search for a stronger one and fail to find it.
- When in lift, fly at the speed for minimum sink. When searching, fly at the best lift/drag speed (best glide angle).
- The best part of a thermal is usually on the upwind side. Fly tighter circles on the upwind side to exploit stronger upward velocity.
- Alternating rising and falling suggests you are on the downwind edge of the thermal — head upwind.
- Learn a thermal's shape by moving away from the core in various directions until lift quits, then return to the core. No two thermals are identical; adjust your mental model quickly.
- If terrain favors thermals downwind, consider looking downwind — a thermal that passed before launching might be caught by flying downwind. Remember you must be proportionally higher to cover the same distance when flying upwind in wind.
- Minimize time in sink by flying 90° to the wind and increasing speed when appropriate.
Thanks to Mike Reagan for sharing his knowledge, and to Bob Swet for bringing it to us.
Soaring Championships — Vincennes, Indiana (July 18–25, 1992)
- Vincennes (and nearby Lawrenceville, Illinois) hosted recent AMA Nationals and was chosen for this event due to central location, good weather, and community support.
- Championships in nine categories of RC soaring will be held, with opportunities for fellowship and sharing.
- Lodging: plentiful within five miles of the contest sites; rooms historically $30–$40 per night. Good camping facilities nearby; dorm rooms at U.I. Vincennes are being sought.
- Frequency use: All 50 frequencies will be used with a limit of eight entries per frequency in each event.
For details and entry form: send a self-addressed stamped envelope to Mike Stump, 607 Washington St., Cadillac, MI 49601.
World Interglide 1992 (Fairlop, near London — July 25–26)
- The major F3J contest of the year, sponsored by BARCS, will be held at Fairlop near London.
- F3J is the thermal-duration category of soaring soon to be recognized by the FAI as a World Championship event. F3B is the multi-task soaring category and has been a World Championship event since 1977.
- F3J rules call for hand towing only, so it's a team event for pilot and tower. Visiting pilots can often find local tow operators.
For full information contact Les Sparkes, 607 Chigwell Road, Woodford Green, Essex, England IG8 8AE. Phone: 081-505-0191.
Magic Lessons — Chuck Lohre
This is part two of Chuck's experiences flying his newly purchased Magic, the 138-inch-span unlimited ship manufactured by Frank Weston. The first half appeared in the February column.
Upon returning from the Nationals, where I didn’t even ruffle the experts' tail feathers, I continued to adjust my Magic. The new wings were six ounces heavier, bringing the weight to 68 ounces, but that only affected balance a little. While at the Nationals I started to experiment with a lot of flaps while thermaling — about 20° to 30° with mixed elevator per landing mode. It worked out pretty well; that was the round I maxed.
I don't use the flap stick anymore; down 20° elevator seems a little too much to use while thermaling. Approaches were good, but twice I landed a foot short. Troy Lawicki said I was flying too slowly. I'm learning to adjust the plane to fly at present, since actually judging the proper speed is very difficult. But the Magic is flying great.
It is very important never to stall if you're to get the best performance. In one practice session I got 7.5 minutes at 7:30 p.m., an unheard-of time for me before flying the Magic.
I started to set up the Magic as Frank had suggested, except for flaps. I put in only about 7° because the recommended 90° seemed a little crazy to start with. Since then I've put in 90° flaps. That's the only way to stop the plane. With 75° of flaps the Magic stalls quite a lot and doesn't produce enough drag.
Balance is right on the edge of stability. After trimming to fly at minimum sink, just above stall, the Magic will slowly roll out, or almost fly straight where you point it, out of a 30° dive. That is the setting to get right first. It may take only 1/8 ounce nose weight difference. I use turkey shotgun shot (1/64 ounce each) which just fits into the 3/16-inch hole in the forward compartment. I haven't used any ballast yet.
After flying it as much as I have, these are the settings I've evolved with the 2A2FER template of the Vision transmitter:
- Ailerons: 45° up, 15° down (30° differential)
- Rudder: 30° both sides
- Flaps: 3° up, 90° down
- Elevator: 20° up, 10° down (nearly full throw stop to stop)
- Launch: 15% flaps (1/2 in. down at the rear edge), with 10% up elevator
- Camber: 36% on flaps and aileron, 20% camber on down and up elevator
- Flap-to-elevator ratio: 12% down
- Aileron-to-flap: 5%
- Dual rates: 50%
Set launch and landing threshold at maximum control. Fly with dual rates off and rudder-on-zero mixing. On launch and landing, ailerons and rudder automatically go to max mixing. I put the flight mode switch (FMS) on the left side. This may seem confusing to read, but it's very easy to fly.
When launching:
- Set FMS toward you (flaps 15% down, elevator 10% up and full rudder mixing with aileron).
- Launch, and at top of line flip FMS to neutral center while applying a little up elevator to ease it off the line. It's not a zoom, but I'll learn that later. Not owning a winch makes it a little harder to learn that one well. The best gentle zoom I've had gained only 50–75 feet.
The Magic is not incredibly overbuilt, but the low wing loading and tremendous L/D retention at speed are all I need. While flying into a turn:
- Apply half rudder when starting to turn with half aileron.
- Apply 1/8 in. to 1/4 in. up elevator, then back off a quarter on the rudder and reverse aileron 1/8 in. to 1/4 in. to hold the bank while continuing to hold 1/8 in. up elevator.
Let the plane fly, and don't get tricked into changing settings while the plane flies its ellipse downwind. If you fly smoothly, Magic will continually show you how to re-center the lift by lifting a wing, the same way it showed you where the lift was to start with. Hangar flying determined this sensitivity is due to Magic's light wing loading.
Now, if I could just read the difference between sink causing a wing to drop and lift raising a wing... Reading sink might mean it would be best to fly through it to the thermal beyond, instead of avoiding the area.
Helmut Reichmann's book Cross Country Soaring (full scale) reported on Konovalov's 1970 studies on two types of thermals:
- Type A: common with increased air instability, a number of cores, larger diameter, and more turbulence at edges.
- Type B: smaller diameter, narrower, little turbulence at edges, common when air below 1,000 feet is more stable.
In my opinion this is the best book written on soaring.
The only thing I'd like to change about these flight settings is getting the radio program to fly on dual rates with another position on the FMS: (1) launch; (2) thermaling at low altitude on high rates; (3) thermaling at high altitude on low rates; and (4) penetration flight. The way my present setup works, stick control throws are small: aileron 1/4–1/2 in., rudder 1/4–1/2 in., elevator 1/8–1/4 in., as judged by movement of the ends of the sticks. I'd like to learn to fly with dual rates, but trying to remember to put them on and off is a little too much right now.
When setting up to land, after five clicks of flaps are put in, all controls go to full rates with automatic rudder coupling, plus down elevator coupled to flaps. I haven't used crow yet as it wasn't recommended by Frank. The Magic really scoots across the sky with the FMS switch thrown toward you for 30° of flaps and 5% down elevator.
One other aspect of setup is getting the plane to track straight ahead. Lateral balance is very important. Two No. 11 X-Acto blades stuck in the wing from the outer aileron cutout did it for the first set of wings — I could tell the difference. The second set needed a little more weight, so I hollowed out the wing side of the aileron cutout and stuck in about 4 in. of solder.
After balance is right, trim the plane to fly straight in calm conditions. I vary elevator trim, then adjust flap and aileron transmitter centering one point at a time until the Magic flies straight. You may need to adjust the wing's rear pin hole — I glue a shim to the inner larger-size tubing and reinsert.
Removing the original epoxied tube is easy if you heat it up with a piece of coat-hanger wire fastened to the pushrod wire. After the old one is broken out, back it out with a rat-tail file inserted so it will tighten. The wing root match-up gets off about 1/32 to 1/16 inch, but hasn't been any worse than that.
As carefully as I set the incidence while building, I can never figure exactly where the wings are really doing out along the 138-inch span. In the end it all sorts of balances out, and the Magic flies straight in all modes.
The elevator setting may need readjustment after tracking is finally set. Once done, the Magic will read the slightest difference in air movement; though it's not as sensitive as my Klingberg Wing, it's still a nice ship to know that much about the surrounding air!
Originally I put three layers of automotive strapping tape at 20% of the chord as a turbulator. Frank said the VACO didn't need it, but I thought I had the FX60–100 wings, which he said did. At a recent Dayton contest, Eric Sanders was flying a Merlin (the 100-inch version) without a trip strip and the same foil. We saw it — the effort and expense were all worth it.
Thermaling is a cinch but those all-important landings are very difficult! They should get better with practice. I'm looking forward to really mastering the Magic. Now I have to get over the stage where I know just enough to be dangerous. Most of the time that takes the form of high-risk landings. I'm going to force myself to set up and miss it if I have to. Just last Wednesday I creased the boom in front of the fence as I corkscrewed it after dancing with the approach tree and stalling three times below 50 feet! I'm not going to land from that direction anymore until that tree gets chainsawed out.
I'd like to thank Frank Weston. The Magic is really one of the most advanced planes in the world. From my research, only R&R offers similarly advanced design and construction techniques in the U.S. I'd also like to thank Airtronics for a radio up to the task. I hope these suggestions help others master these planes. I'd recommend taking a few full-scale flights as well. It is a challenging ship, but you'll understand why these planes fly just as the full-scale ones do. Now, I'm off to try some side slips with the Magic — at altitude, of course.
Transcribed from original scans by AI. Minor OCR errors may remain.

