
Radio Control: Soaring
Byron Blakeslee 3134 N. Winnebago Dr., Sedalia, CO 80135
Abstract
- Comments on two new sailplanes
- Genesis and Synergy 91
- Precision Servo Mounts
- How to fly with ballast
- A note about the Thermal Eagle sailplane
BY CHANCE, this month turns out to be an "RnR Products Special." We get the lowdown on the latest kit from Rich and Richard (Spicer and Tiltman, respectively), which is called the Genesis. On top of that, Ron Swinehart gives us his personal evaluation of RnR's Synergy 91. As you might guess, the S-91 came out in 1991 and was intended primarily as an F3B competition ship. Lately, however, some adventurous thermal fliers have discovered it is excellent for straight duration contests as well.
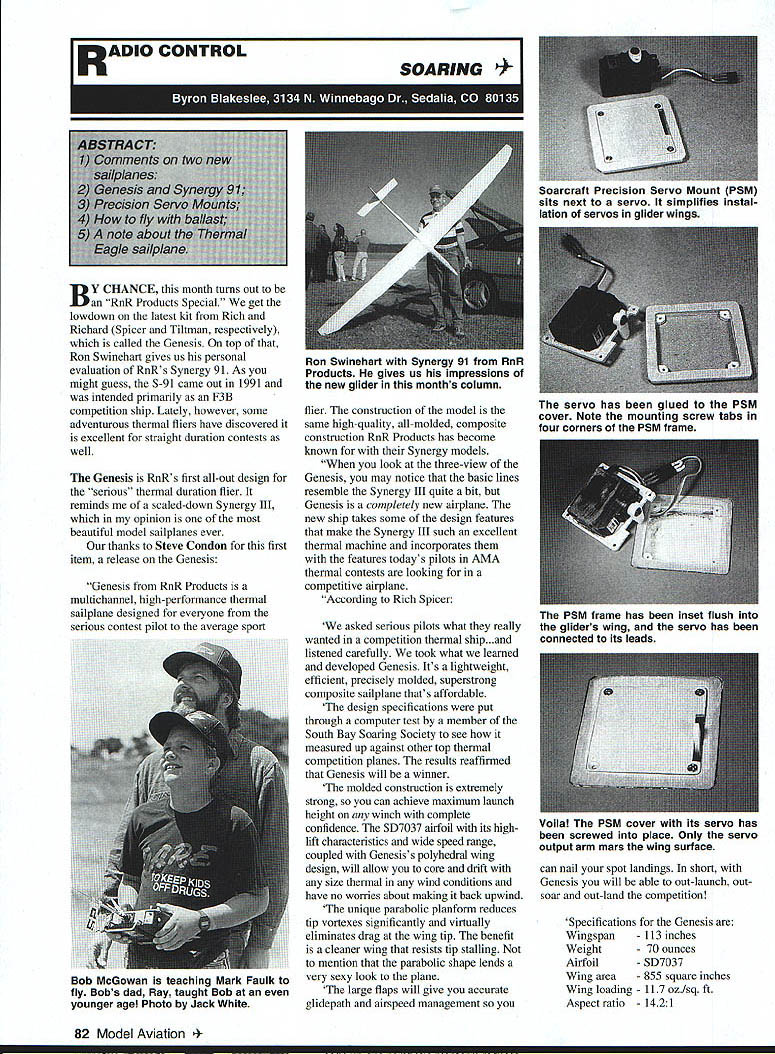
The Genesis is RnR's first all-out design for the "serious" thermal duration flier. It reminds me of a scaled-down Synergy III, which in my opinion is one of the most beautiful model sailplanes ever. Our thanks to Steve Condon for this first item, a release on the Genesis:
"Genesis from RnR Products is a multichannel, high-performance thermal sailplane designed for everyone from the serious contest pilot to the average sport flier.
The construction of the model is the same high-quality, all-molded, composite construction RnR Products has become known for with their Synergy models.
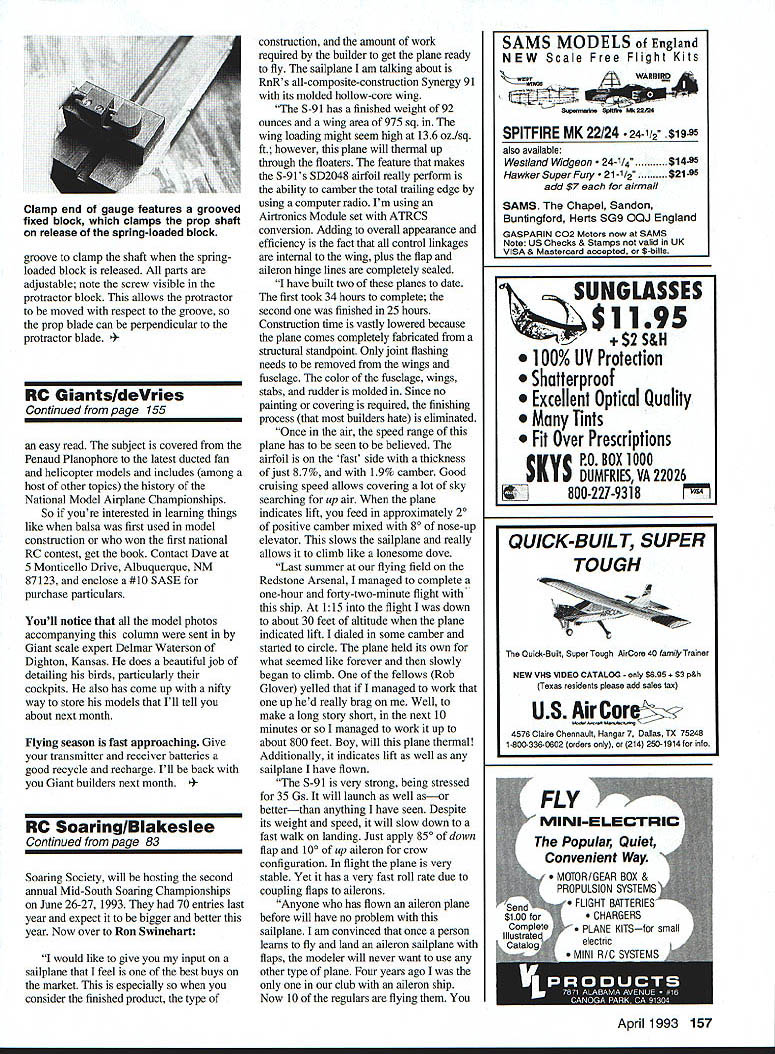
When you look at the three-view of the Genesis, you may notice that the basic lines resemble the Synergy III quite a bit, but Genesis is a completely new airplane. The new ship takes some of the design features that make the Synergy III such an excellent thermal machine and incorporates them with the features today's pilots in AMA thermal contests are looking for in a competitive airplane.
According to Rich Spicer:
'We asked serious pilots what they really wanted in a competition thermal ship...and listened carefully. We took what we learned and developed Genesis. It's a lightweight, efficient, precisely molded, superstrong composite sailplane that's affordable.'
The design specifications were put through a computer test by a member of the South Bay Soaring Society to see how it measured up against other top thermal competition planes. The results reaffirmed that Genesis will be a winner.
The molded construction is extremely strong, so you can achieve maximum launch height on any winch with complete confidence. The SD7037 airfoil with its high-lift characteristics and wide speed range, coupled with Genesis's polyhedral wing design, will allow you to core and drift with any size thermal in any wind conditions and have no worries about making it back upwind.
The unique parabolic planform reduces tip vortexes significantly and virtually eliminates drag at the wing tip. The benefit is a cleaner wing that resists tip stalling. Not to mention that the parabolic shape lends a very sexy look to the plane.
The large flaps will give you accurate glidepath and airspeed management so you can nail your spot landings. In short, with Genesis you will be able to out-launch, out-soar and out-land the competition!"
Specifications for the Genesis are:
- Wingspan: 113 inches
- Weight: 70 ounces
- Airfoil: SD7037
- Wing area: 855 square inches
- Wing loading: 11.7 oz./sq. ft.
- Aspect ratio: 14.2:1
Genesis construction features include:
- Hollow-core, three-piece molded wing made of fiberglass, Rohacell, and carbon fiber
- Servo wires already installed in the wing
- Upper surface glossy white finish; bottom precolored dark for visibility
- Ailerons use a flexible skin hinge eliminating flutter and producing a gapless hinge line
- Flaps use a tape hinge on the bottom with gap seals for the upper surface
- Full-flying stabilizer with a symmetrical airfoil section, hollow-core molded of fiberglass and Rohacell
- T-tail stab mounted on an aluminum rocker assembly, uniquely keyed and secured with one screw; top of fin recessed into stab for a clean, gapless fit
- Fuselage features a slip-off nose cone for quick access to the radio compartment
- Wing is pylon-mounted to improve aerodynamics and keep flaps off the ground during landings; fuselage below the pylon makes an excellent hand grip for sure-throw launches
Building time is minimal because of the molded construction. An experienced modeler can get Genesis air-ready in around 20 hours. The construction required is simple and is explained in detail in a photo-illustrated instruction manual. Construction consists primarily of installing the radio and control surface linkages. A computer radio is recommended to take care of required surface mixing. Four servos are mounted in the wings (Airtronics 14Js will fit) and two standard-size servos in the fuselage.
Genesis kits will be available by the time you read this (early March—BB). The introductory price is only $395, plus $15 P&H. Call or write to Rich Spicer or Richard Tiltman for more information and to place orders:
RnR Products 1120 Wrigley Way, Milpitas, CA 95035 Tel: (408) 946-4751
Synergy 91 — Review by Ron Swinehart
Next is the Synergy 91 review by Ron Swinehart. This is the kind of mail I love to receive — i.e., from a "satisfied customer." (Satisfied with the sailplane, I mean... Ron says he likes the column, too!) Ron is president of the Northern Alabama Silent Fliers club.
The sailplane I am talking about is RnR's all-composite-construction Synergy 91 with its molded hollow-core wing.
The S-91 has a finished weight of 92 ounces and a wing area of 975 sq. in. The wing loading might seem high at 13.6 oz./sq. ft.; however, this plane will thermal up through the floaters. The feature that makes the S-91's SD2048 airfoil really perform is the ability to camber the total trailing edge by using a computer radio. I'm using an Airtronics Module set with ATRCS conversion. Adding to overall appearance and efficiency is the fact that all control linkages are internal to the wing, plus the aileron hinge lines are completely sealed.
I have built two of these planes to date. The first took 34 hours to complete; the second one was finished in 25 hours. Construction time is vastly lowered because the plane comes completely fabricated from a structural sandwich. Only joint flashing needs to be removed from the wings and fuselage. The color of the fuselage, wings, stabs, and rudder is molded in. Since no painting or covering is required, the finishing process (that most builders hate) is eliminated.
Once in the air, the speed range of this plane has to be seen to be believed. The airfoil is on the "fast" side with a thickness of just 8.7%, and with 1.9% camber. Good cruising speed allows covering a lot of sky searching for up air. When the plane indicates lift, you feed in approximately 2° of positive camber mixed with 8° of nose-up elevator. This slows the sailplane and really allows it to climb like a lonesome dove.
Last summer at our flying field on the Redstone Arsenal, I managed to complete a one-hour and forty-two-minute flight with this ship. At 1:15 into the flight I was down to about 30 feet of altitude when the plane indicated lift. I dialed in some camber and started to circle. The plane held its own for what seemed like forever and then slowly began to climb. One of the fellows (Rob Glover) yelled that if I managed to work that one up he'd really brag on me. Well, to make a long story short, in the next 10 minutes or so I managed to work it up to about 800 feet. Boy, will this plane thermal! Additionally, it indicates lift as well as any sailplane I have flown.
The S-91 is very strong, being stressed for 35 Gs. It will launch as well as—or better—than anything I have seen. Despite its weight and speed, it will slow down to a fast walk on landing. Just apply 85° of down flap and 10° of up aileron for crow configuration. In flight the plane is very stable. Yet it has a very fast roll rate due to coupling flaps to ailerons.
Anyone who has flown an aileron plane before will have no problem with this sailplane. I am convinced that once a person learns to fly and land an aileron sailplane with flaps, the modeler will never want to use any other type of plane. Four years ago I was the only one in our club with an aileron ship. Now 10 of the regulars are flying them. You can definitely land more consistently with flaps than was ever possible with spoilers. Believe me, I flew spoilers on everything from Sagitta to four different Mentors.
"At our annual fall contest we had 49 pilots, and at least 50% of them were flying aileron-flap gliders. This is in an area of the country where two years ago very few flew this type of plane. I think the fliers in California and Texas knew this 10 years ago.
"I want to personally thank Rich Spicer and Richard Tiltman for a great sailplane design, the very best type of construction for true airfoils, and above all, their personal touch on any question one might have during the construction phase or on the setup required for flying the Synergy 91."
Thanks for your letter, Ron. That's a — I'd call a truly unsolicited testimonial! For those who want more information on RnR's Synergy 91 (which sells for $395) or their other gliders, you can write or call for a catalog at the address mentioned above.
Note about the Synergy's SD2048 airfoil
This is the only "SD" section that doesn't refer to Michael Selig and John Donovan. The SD in this case stands for Michael Selig and Seth Dawson. Michael and Seth jointly "redesigned" the H02 airfoil with slightly longer bubble ramps on the upper and lower surfaces. The SD2048 was first used on Rich Spicer's Synergy II design that Rich and Steve Lewis flew in the 1987 F3B World Championships.
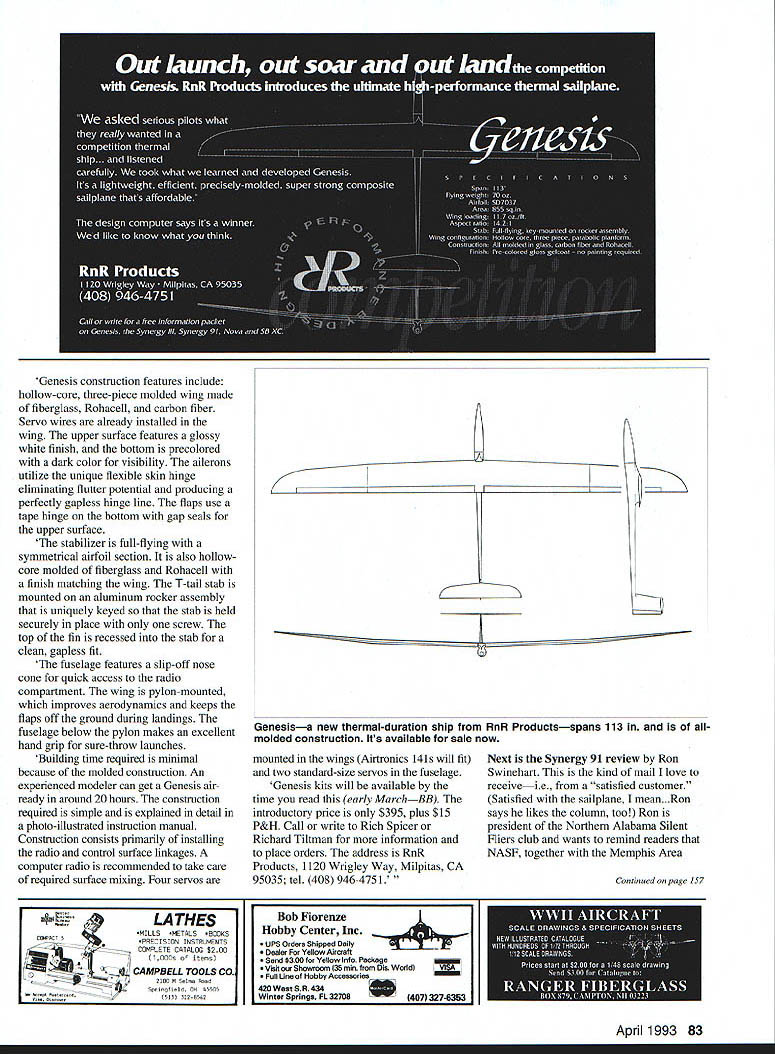
Precision Servo Mounts from Soarcraft
I saw an ad for these servo mounts in RC Soaring Digest and knew I had to try them. This Soarcraft is located in Washington State and is not related to the old Socraftel company in California that used to make kits.
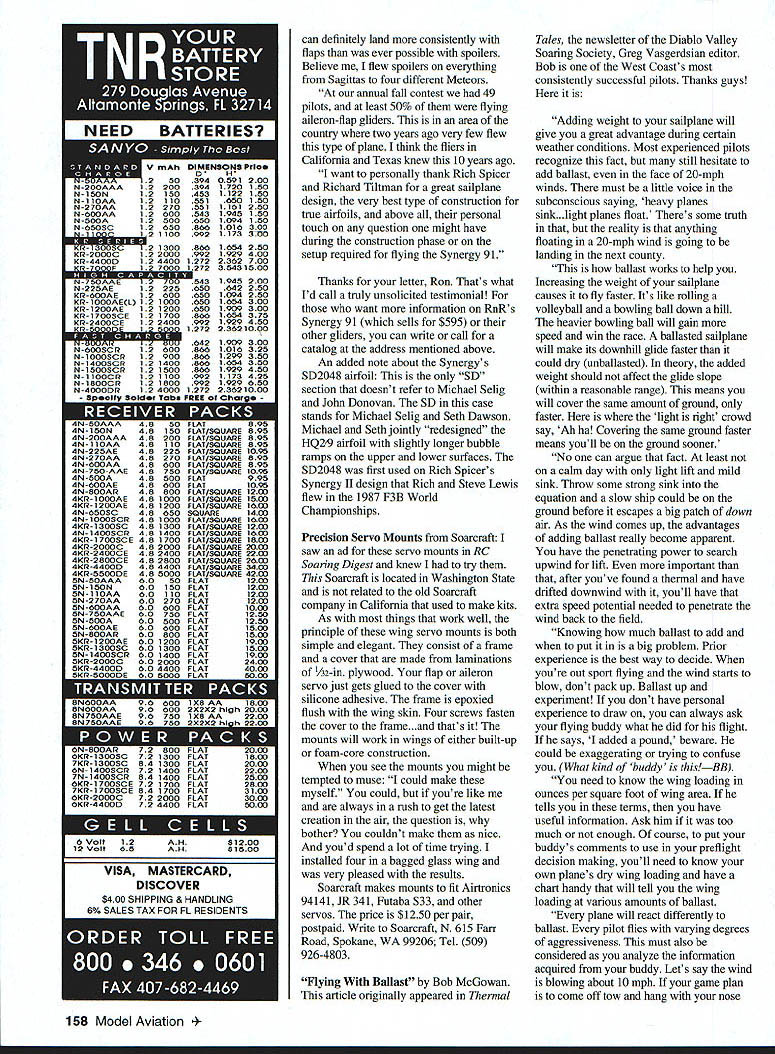
As with most things that work well, the principle of these wing servo mounts is both simple and elegant. They consist of a frame and a cover that are made from laminations of 1/32-in. plywood. Your flap or aileron servo just gets glued to the cover with silicone adhesive. The frame is epoxied flush with the wing skin. Four screws fasten the cover to the frame. The mounts will work in wings of either built-up or foam-core construction.
When you see the mounts you might be tempted to muse: "I could make these myself." You could, but if you're like me and are always in a rush to get the latest creation in the air, the question is, will it bother? You couldn't make them as nice. And you'd spend a lot of time trying. I installed four in a bagged glass wing and was very pleased with the results.
Soarcraft makes mounts to fit Airtronics 94141, JR 341, Futaba S33, and other servos. The price is $12.50 per pair, postpaid.
Soarcraft R.F. 615 Farr Road, Spokane, WA 99206 Tel: (509) 926-4803
"Flying With Ballast" by Bob McGowan
This article originally appeared in Thermal Tales, the newsletter of the Diablo Valley Soaring Society. Greg Vasgersdian, editor. Bob is one of the West Coast's most consistently successful pilots. Thanks, guys!
"Adding weight to your sailplane will give you a great advantage during certain weather conditions. Most experienced pilots recognize this fact, but many still hesitate to add ballast, even in the face of 20-mph winds. There must be a little voice in the subconscious saying, 'heavy planes don't climb; light planes float.' There's some truth in that, but the reality is that anything floating in a 20-mph wind is going to be landing in the next county.
"This is how ballast works to help you. Increasing the weight of your sailplane causes it to fly faster. It's like rolling a volleyball and a bowling ball down a hill. The heavier bowling ball will gain more speed and will move faster. A ballasted sailplane will make its downwind glide faster than it could dry (unballasted). In theory, the added weight should not affect the glide slope (within a reasonable range). This means you will cover the same amount of ground, only faster. Here is where the 'light is right' crowd say, 'Ah ha! Covering the same ground faster means you'll be on the ground sooner.'
"No one can argue that fact. At least not on a calm day with only light lift and mild sink. Throw some strong sink into the equation and a slow ship could be on the ground before it escapes a big patch of down air. As the wind comes up, the advantages of adding ballast really become apparent. You need the penetrating power to search upwind for lift. Even more important than that, after you've found a thermal and have drifted downwind with it, you'll have the extra speed potential needed to penetrate the wind back to the field.
"Knowing how much ballast to add and when to put it in is a big problem. Prior experience is the best way to decide. When you're out sport flying and the wind starts to blow, don't pack up. Ballast up and experiment! If you don't have personal experience to draw on, you can always ask your flying buddy what he did for his flight. If he says, 'I added a pound,' beware. He could be exaggerating or trying to confuse you. (What kind of 'buddy' is this!--BB)
"You need to know the wing loading in ounces per square foot of wing area. If he tells you this in those terms, then you have some useful information. Ask him if it was too much or not enough. Of course, to put your buddy's comments to use in your preflight decision making, you'll need to know your plane's wing area and have a reasonable idea of the loading changes that result when you add ballast.
"Every plane will react differently to ballast. Every pilot flies with varying degrees of aggressiveness. This must also be considered as you analyze the information acquired from your friend. Let's say the wind is blowing about 10 mph. If your game plan is to come off tow and hang with your nose in the wind, then you might as well be dry.
"On the other hand, if you're a little more aggressive and figure that you would drift downwind with a thermal if you were fortunate enough to stumble on one, you'd be wise to carry some ballast. If you're the type who plans to put the nose down and really search, then you need to carry enough ballast to get you moving significantly faster than the wind speed.
"Every plane handles the weight differently, so you need to experiment and find out how yours will react. If your plane is on the light side, experiment by adding a small amount of lead even for very light wind conditions. Not only will it make you fly a little faster, it will also help keep you on track as you get hit by wind gusts on landing approach.
"Of course the stronger the wind, the faster airspeed you need. The faster you need to fly, the more ballast you add. Eventually you will reach a point where the plane's glide ratio deteriorates noticeably. Ballasting beyond this point is usually fruitless. Draggy floater types will reach this point at a lower wing loading than the slicker high-performance ships. Once you determine this point, you'll know the complete window of loadings available to you.
"I know, I keep beating around the bush and you want real numbers. You want to know exactly what wing loadings will work. I'm probably going to regret this, but for the sake of our beginners who are probably still completely in the dark, here are my opinions on some broad rules of thumb:
- A Gentle Lady-type two-meter will probably benefit from ballasting up to only about 9 oz./sq. ft. wing loading.
- A stronger two-meter with a faster airfoil like a Sagitta 600 can go up to about 12 oz./sq. ft.
- A big old Paragon with its draggy high-lift airfoil should probably not go beyond 11 oz./sq. ft.
- A polyhedral Sensor 117, maybe 13 oz./sq. ft.
- The newer breed of ships such as a Falcon 800 or Legend may benefit from up to a 15 oz./sq. ft. loading.
"Increase the wing loading in increments of about one ounce per square foot; anything less will be hard to notice. Unless you build really heavy, you should probably consider adding ballast in winds above 8 mph.
"I hope I've convinced you to try a little weight. Now you need to figure out where to put it. Ballast, usually in the form of lead, needs to be secured directly over the center-of-gravity. Anywhere else means you are altering the trim and CG of your plane as well as adding weight. There are even ingenious ways of mounting ballast to shift the CG in flight. Just make sure it can't shift or fall out during launching or hard landings. Note that for safety, AMA rules state ballast must be carried inside the plane."
Thanks for sharing your knowledge, Bob!
I think one of the beauties of our soaring hobby is the notion that there is always something to learn... always something new to try... always plenty of scope to improve one's flying. If you keep trying to improve, glider flying never gets boring!
As to making ballast pieces, please remember that if you decide to melt lead (like readily available automobile wheel weights) to cast special shapes, molten lead fumes are toxic. Lead melting should be done outdoors or in a very well-ventilated area.
Bob included a personal note to let us know what he's up to:
"My latest building project is a Elite Lite Composites Thermal Eagle. Mine was one of the first after Ron Vann took over the company. I can vouch for the 'first-class' kit quality. In fact, the kits are even more complete now than from Mark Allen (sorry, Mark!).
"I started with a presheeted wing kit. This is the only way to go in my opinion. I know I couldn't sheet wings as light. The Thermal Eagle will be my Open-class contest plane for 1993. I chose the SDB8000 airfoil option. I've flown several sailplanes with this airfoil option and really love it when lightly loaded.
"I plan to use Airtronics 94141 servos in the wings. I've been using them in my planes for two years now and have never stripped a gear. And I don't use servo savers. The radio I use is my Airtronics Vision 8SR, of course; it's still the ultimate for full-house soaring."
Transcribed from original scans by AI. Minor OCR errors may remain.

