
RADIO CONTROL SOARING
Byron Blakeslee, 3134 N. Winnebago Dr., Sedalia, CO 80135
U.S. F3B Team
Our U.S. F3B team will be competing August 6–15, 1993, in the biennial F3B World Championships for multi-task soaring. The contest will be held near Tel Aviv, Israel. Our team includes pilots Larry Jolly, Daryl Perkins, and Randy Spencer. Team manager is 1977 F3B World Champ Skip Miller.
Joe Wurts, who won the 1991 Champs in Holland, is the defending F3B World Champion. Daryl Perkins placed second in Holland, and the U.S. team finished third behind Germany and Great Britain. The guys are practicing hard to take the 1993 team win. The team needs the support of all American sailplaners. Until the F3J (Thermal Duration Soaring) World Champs is held in 1995, F3B is the only international event for RC soaring. The team needs to raise funds to help defray transportation and practice costs that are not picked up by the AMA.
Team members have organized a giant merchandise raffle; tickets are only $5. They are also selling official team logo T-shirts (M, L, XL, XXL) for $15; pins for $3; patches for $5; and stickers for $2. Please add 10% of the merchandise total for shipping and handling. If your merchandise order is over $25, you will receive a free team pin.
Send your check for raffle tickets and merchandise to: 1993 U.S.A. Soaring Team, 15781 Empire Lane, Westminster, CA 92683.
Building and flying the Shadow 118
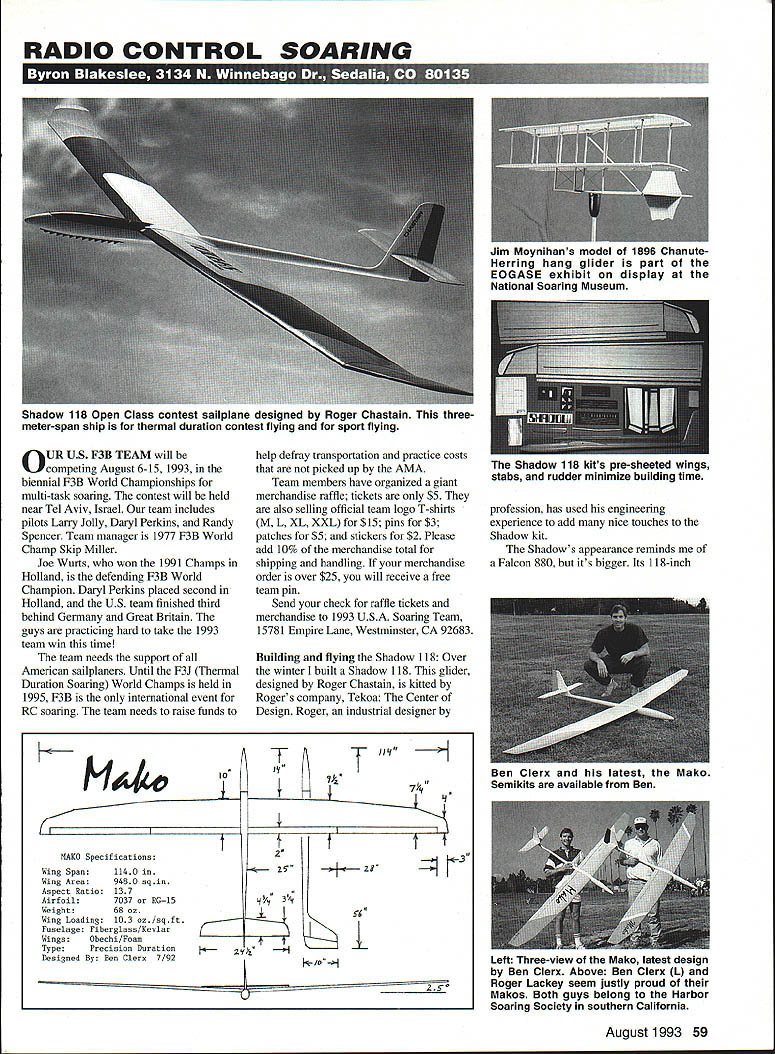
Over the winter I built a Shadow 118. This glider, designed by Roger Chastain, is kitted by Roger's company, Tekoa: The Center of Design. Roger, an industrial designer by profession, has used his engineering experience to add many nice touches to the Shadow kit.
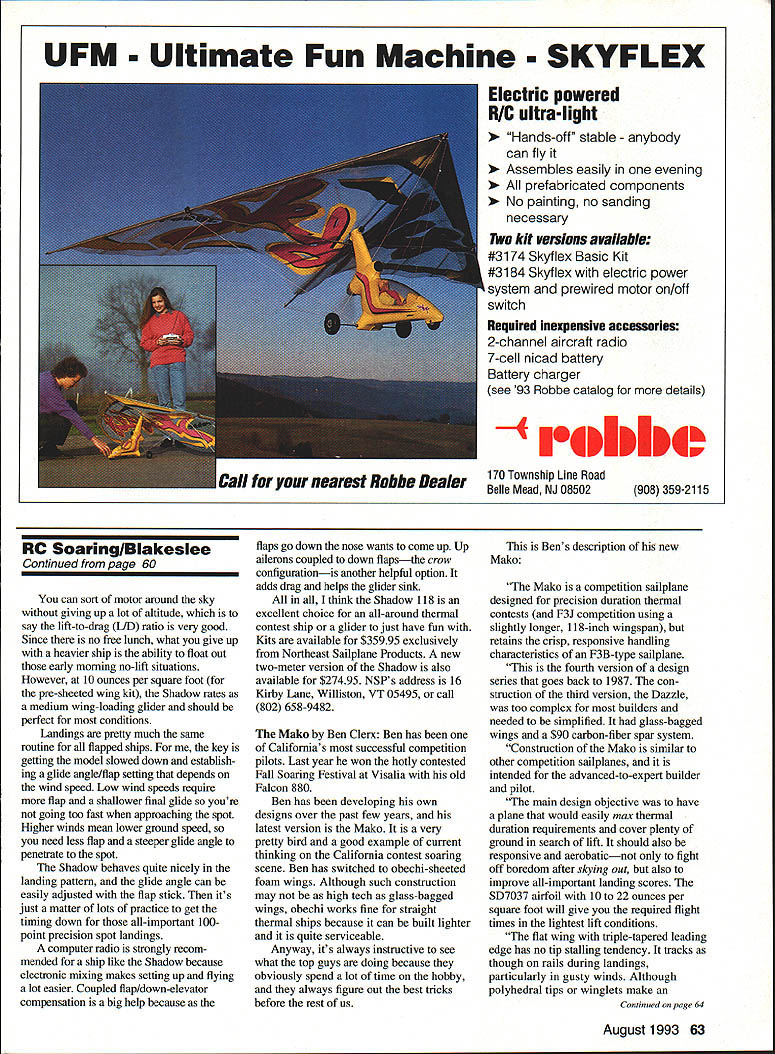
The Shadow's appearance reminds me of a Falcon 880, but it's bigger. Its 118-inch wingspan uses today's popular thermal airfoil SD7037. The Shadow kit's pre-sheeted wings, stabs, and rudder minimize building time.
Current kits have prebuilt wings and molded wing tips — a really good deal because you save a lot of construction time and end up with a lighter finished glider. A Shadow with pre-sheeted wings weighs about 70 ounces, giving a dry wing loading right around 10 ounces per square foot, which should be ideal in low-wind conditions. Ballast can be added if the wind picks up to about 10 mph. My Shadow, which didn't have pre-sheeted wings, weighed 78 ounces, giving a dry wing loading of about 11.5 ounces per square foot.
Constructing the wings took a bit of time but was interesting, since the wings are bagged with epoxy. There is no conventional spar in the wing. The brass joiner tube is carried between the 1/4-inch ply root rib and a 1/8-inch sub-rib six inches out. The spar is tapered strips of fairly heavy unidirectional carbon fiber — two on top and one on the bottom.
I don't know if this construction is the same as used on the pre-sheeted kits, but I've found my wings to be super-stiff. The fuselage is excellently formed fiberglass trimmed to fit the canopy. Finishing the fuselage is conventional, except Roger has you make three little foam plugs to hold the pushrod tubes in their proper places along the fuselage sides. That's a good idea.
The wing joiner is a 1/16-inch round, 14-inch-long piece of high-strength 7075-T6 aluminum with the dihedral angle bent in. The tie between the joiner and brass wing tubes is perfect. I like to shake assembled gliders to see if anything sounds loose. The Shadow doesn't rattle at all; it's solid in all respects.
At first I wondered about the strength of the aluminum joiner, but it's proven to be more than adequate. Neither the joiner nor the wings show much deflection during launch. In fact, the Shadow is about the best launching plane I've flown.
It must be a happy combination of tow-hook location, wing stiffness, airfoil, etc., but the ship wants to climb straight up. (In the building instructions, Roger mentions that his son Blayne prefers a rearward tow-hook location.)
The first launch scared me because as soon as the model left my hand, it took off straight up like a kite in a strong wind. I had instant visions of the old "stall, snap, and roll over" trick. It didn't, though.
Flying the Shadow 118 is a lot of fun. As I just mentioned, launching can be exciting, but it really is no sweat once you get on the sticks. Good zooms are easy after you turn the wing over, then for full wingover, dive/acceleration, and pull-up.
Off tow, the Shadow handles much like a Falcon 880, except I think it's easier to fly. When I say easier, I mean once the center of gravity (CG) and stab settings are dialed in, the Shadow is not overly critical in pitch control. A couple of clicks of up or down stab trim change the flying speed a bit, but don't make a terribly dramatic difference in how the plane performs.
Also, the additional size and weight of the Shadow give it momentum to help keep it going where it's pointed. It doesn't skitter around, but still shows you clearly when it's encountering lift. Once in lift, the Shadow is an excellent climber. There is no problem staying coordinated in thermal turns after aileron differential and a couple of clicks of rudder are adjusted to your liking.
Just a personal aside: My impression when I first flew heavier ships like the Mueller Comet 89T was that they reminded me of driving a Cadillac. Everything was smooth, stable, and solid. The Shadow gives you some of this feeling too.
You can sort of motor around the sky without giving up a lot of altitude, which is to say the lift-to-drag (L/D) ratio is very good. Since there is no free lunch, what you give up with a heavier ship is the ability to float out those early morning no-lift situations.
However, at 10 ounces per square foot (for the pre-sheeted wing kit), the Shadow rates as a medium wing-loading glider and should be perfect for most conditions.
Landings are pretty much the same routine for all flapped ships. For me, the key is being able to be slowed down and established in a glide angle/flap setting that depends on the wind speed. Lower wind speeds require more flap and a shallower final glide so you're not going too fast when approaching the spot. Higher winds mean lower ground speed, so you need less flap and a steeper glide angle to penetrate to the spot.
The Shadow behaves quite nicely in the landing pattern, and the glide angle can be easily adjusted with the flap stick. Then it's just a matter of lots of practice to get the timing down for those all-important 100-point precision spot landings.
A computer radio is strongly recommended for a ship like the Shadow because electronic mixing makes setting up and flying a lot easier. Coupled flap/down-elevator compensation is a big help because as the nose wants to come up. Up ailerons coupled to down flaps — the crow configuration — is another helpful option. It adds drag and helps the glider sink.
All in all, I think the Shadow 118 is an excellent choice for an all-around thermal contest ship or a glider to just have fun with. Kits are available for $359.95 exclusively from Northeast Sailplane Products. A new two-meter version of the Shadow is also available for $274.95. NSP's address is 16 Kirby Lane, Williston, VT 05495; Tel: (802) 658-9482.
The Mako by Ben Clerx
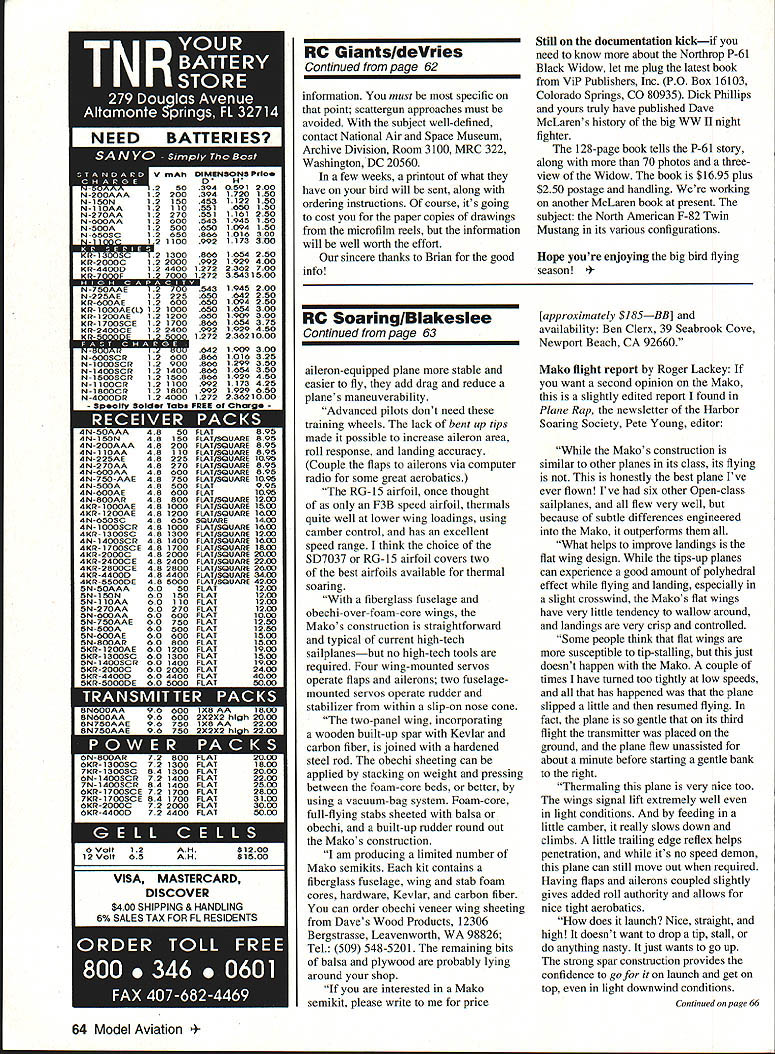
Ben Clerx has been one of California's most successful competition pilots. Last year he won the hotly contested Fall Soaring Festival at Visalia with his old Falcon 880. Ben has been developing his own designs over the past few years, and his latest version is the Mako. It is a very pretty bird and a good example of current thinking on the California contest soaring scene. Ben has switched to obeche-sheathed foam wings. Obeche works fine for straight thermal ships because it's rigid yet lighter, and it is quite serviceable.
This is Ben's description of his new Mako:
"The Mako is a competition sailplane designed for precision duration thermal contests (and F3J competition using a slightly longer, 118-inch wingspan), but retains the crisp, responsive handling characteristics of an F3B-type sailplane.
"This is the fourth version of a design series that goes back to 1987. The construction of the third version, the Dazzle, was too complex for most builders and needed to be simplified. It had glass-bagged wings and a $900 carbon-fiber spar system.
"Construction of the Mako is similar to other competition sailplanes, and it is intended for the advanced-to-expert builder and pilot.
"The main design objective was to have a plane that would easily meet thermal duration requirements and cover plenty of ground in search of lift. It should also be responsive and aerobatic — not only to fight for borrowed air during thermalling, but also to improve all-important landing scores. The SD7037 airfoil, in the 10 to 22 ounces per square foot wing loading range, will give the required flight characteristics.
"The wing features a tapered leading edge and a triple-tapered tip to help prevent tip-stall tendency. It tracks as clean rails during landings, particularly in gusty winds. Although polyhedral tips or winglets make an aileron-equipped plane more stable and easier to fly, they add drag and reduce a plane's maneuverability.
"Advanced pilots don't need these training wheels. The lack of bent-up tips made it possible to increase aileron area, roll response, and landing accuracy. (Couple the flaps to ailerons via computer radio for some great aerobatics.)
"The RG-15 airfoil, once thought of as only an F3B speed airfoil, thermals quite well at lower wing loadings, using camber control, and has an excellent speed range. I think the choice of the SD7037 or RG-15 airfoil covers two of the best airfoils available for thermal soaring.
"With a fiberglass fuselage and obeche-over-foam-core wings, the Mako's construction is straightforward and typical of current high-tech sailplanes — but no high-tech tools are required. Four wing-mounted servos operate flaps and ailerons; two fuselage-mounted servos operate rudder and stabilizer from within a slip-on nose cone.
"The two-panel wing, incorporating a wooden built-up spar with Kevlar and carbon fiber, is joined with a hardened steel rod. The obeche sheeting can be applied by stacking on weight and pressing between the foam-core beds, or better, by using a vacuum-bag system. Foam-core, full-flying stabs sheeted with balsa or obeche, and a built-up rudder round out the Mako's construction.
"I am producing a limited number of Mako semikits. Each kit contains a fiberglass fuselage, wing and stab foam cores, hardware, Kevlar, and carbon fiber. You can order obeche or veneer wing sheeting from Dave's Wood Products, 12306 Bergstrasse, Leavenworth, WA 98826; Tel: (509) 548-5201. The remaining bits of balsa and plywood are probably lying around your shop.
"If you are interested in a Mako semikit, please write to me for price (approximately $185 — BB) and availability: Ben Clerx, 39 Seabrook Cove, Newport Beach, CA 92660."
Mako flight report (Roger Lackey)
If you want a second opinion on the Mako, this is a slightly edited report I found in Plane Rap, the newsletter of the Harbor Soaring Society, Pete Young, editor:
"While the Mako's construction is similar to other planes in its class, its flying is not. This is honestly the best plane I've ever flown! I have had six other Open-class sailplanes, and all flew well, but, because of subtle differences engineered into the Mako, it outperforms them all.
"What helps to improve landings is the flat wing design. While the tips-up planes can experience a good amount of polyhedral effect while flying and landing, especially in a slight crosswind, the Mako's flat wings have very little tendency to wallow around, and landings are very crisp and controlled.
"Some people think that flat wings are more susceptible to tip-stalling, but this just doesn't happen with the Mako. A couple of times I have turned too tightly at low speeds, and all that has happened was that the plane slipped a little and then resumed flying. In fact, the plane is so gentle that on its third flight the transmitter was placed on the ground, and the plane flew unassisted for about a minute before starting a gentle bank to the right.
"Thermalling this plane is very nice too. The wing's signal lift extremely well even in light conditions. And by feeding in a little camber, it really slows down and climbs. A little trailing edge reflex helps penetration, and while it's no speed demon, this plane can still move out when required.
"Having flaps and ailerons coupled slightly gives added roll authority and allows for nice tight aerobatics.
"How does it launch? Nice, straight, and high! It doesn't want to drop a tip, stall, or do anything nasty. It just wants to go up. The unstung spar construction provides the confidence to go for it on launch and get on top, even in light downwind conditions."
And, after all, ultimate survival depends on being the guy on top in the food chain.
(Continued on page 64)
National Soaring Museum dedication
Paul Schweizer sent a letter saying the National Soaring Museum (NSM), located in Elmira, New York, held the dedication for its Evolution of Gliders and Sailplanes Exhibit (EOGASE) on May 21–22. The exhibit includes 122 models of gliders and sailplanes that illustrate the development of soaring from its beginning in 1895 until 1990.
Paul is chairman of the NSM Exhibit Committee. Along with his brothers Ernest and William, he founded the Schweizer Aircraft Company way back in 1938. Paul said the NSM has had many great reports on the model exhibit and that many of the model builders, as well as some of the designers, were on hand for the dedication.
Paul also reported that the NSM now has the Barnaby–Klemperer exhibit that was at the SSA Soaring Convention in Seattle last year. This has 1/4-scale models of the Prufling that Barnaby flew and the Blaue Maus that Klemperer flew. These models were built by Paul Gibson and Craig Aho of Bellevue, Washington. Paul said the superb Prufling model was built from original plans, and more than 1,000 building hours were spent on it.
Sailplaners visiting New York State's southern tier should plan on stopping to see the National Soaring Museum at R.D. #3, Harris Hill, Elmira, NY 14903; Tel.: (607) 734-3128.
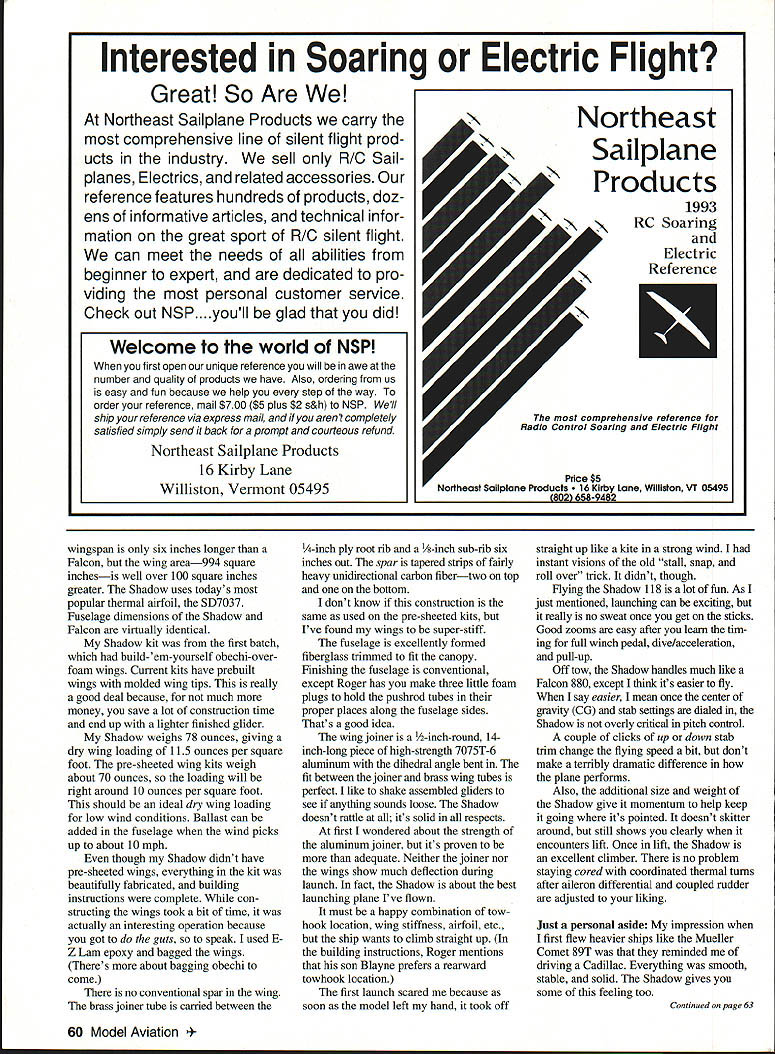
Jim Moynihan's 1896 Chanute–Herring hang glider
Fran Ptashkievicz of Tonawanda, New York, sent a photo of Jim Moynihan's model of the Chanute–Herring hang glider, which is now part of the EOGASE exhibit mentioned above. Fran also sent the following letter:
In March, Jim Moynihan, Don Hobel, and I drove down to the NSM in Elmira so Jim could personally deliver his model of the Chanute–Herring hang glider for the EOGASE exhibit. Jim is a master model craftsman par excellence, and Paul Schweizer had asked Jim to build the model.
The day itself was fantastic. Paul Schweizer himself greeted us at the museum door and escorted us down to the floor of the museum where the model diorama is located. The presentation was made, and Jim's model was added to the exhibit.
Paul had made reservations for us to have lunch with him at a nearby restaurant. It was at least a three-hour lunch. The talk was of course about models and full-scale gliders. Paul pointed out that he and his two brothers were modelers for many years before they formed their glider company in the late '30s. He said that a lot of information on new designs was gleaned from free flight models even after the company was up and going.
"It was one of the most interesting times I have ever had. Following lunch we returned to the museum and met the curator. He took us to the restoration and storage areas where gliders are repaired and held, pending changes in museum displays.
"Meeting one of the Schweizer brothers and listening to the history that he unraveled was a fantastic experience. To say the day was interesting would not give it credit."
(Continued from page 66)
Making obeche-sheeted wings
Because of the current popularity of sheeted foam-core wings with obeche wood veneer, I thought this would be a good time to pass along a few tips I've picked up.
- Obeche splits very easily, so you need to be careful handling and cutting it. Apply masking tape over all cut lines, and make the cuts with sharp scissors.
- Coat both sides of each sheet with Flecto Diamond Finish Varathane to seal the wood. I use the high-gloss variety and apply it with a foam-type brush.
- When applying the Diamond Finish to the first side, the obeche will curl up like a potato chip. Just keep going as best you can. Immediately coat the other side, and it will flatten right out. Hang the sheet up with paper clamps to dry.
- If you are finishing pre-sheeted obeche wings like the ones that come in the Shadow or Thermal Eagle kits, do not apply a heavy first coat of Diamond Finish. Untreated obeche acts like a blotter — the coating can soak down to the epoxy and allow the softened obeche to pull away from the bond. Apply a light coat of Diamond Finish with a paper towel. The thin coat will allow the polymers to do their cross-linking thing and seal the wood. Then you can come back with heavier coats without loosening the bond.
- Three to five coats, with wet-sanding in between, will produce a nice glossy finish.
I use E-Z Lam laminating epoxy from Aerospace Composites to apply the obeche to the foam cores. You can spread it with a plastic squeegee or a foam roller. Just a thin, even coat is all that's required. Tape the trailing edge together with masking tape before beginning the epoxy application.
Vacuum-bagging is the best way to go, because it produces a perfectly even pressure on all surfaces. Most obeche should be applied to white foam cores, so you should use about six inches of mercury vacuum pressure. More than six inches of mercury will crush white foam. (Vacuum gauges read in inches of mercury, not psi. Six inches of mercury equals about three psi, which is equivalent to a load of 1,320 pounds on a wing the size of a Falcon 880. Try putting that many bricks on your bench!)
The Aerospace Composite Products E-Z Vac or Composite Structures Technology Mighty Mini Vac vacuum pumps are fine for bagging obeche. The pumps run continuously and are set for six inches of mercury. They are available individually, but the complete bagging kit that includes the pump, bag material, tubing, breather felt, and fittings is a better deal. The kits don't come with a vacuum gauge, but you can buy one as an extra if you wish. The E-Z Vac kit also includes a pair of very nice Quick-Lock plastic clips used to seal the ends of the bag.
To bag an accurate wing you must start with a perfectly flat working surface. A solid-core exterior door is usually a good bet. You can often buy a slightly damaged one at the local lumberyard at a good price.
Vacuum-bagging procedure (recommended):
- Place the wet wing assembly in the bag, top side up, and seal it. Run the pump just long enough to get the air out of the bag so the film is in contact with the wing, but with no vacuum yet. Shut the pump off, then smooth the wrinkles out of the bag.
- Place the bottom foam bed under the bag and the top bed on top of the bag. Both beds must be positioned exactly under/over the wing core. Use felt-tip pen marks made on both ends of the blank when the core was cut to align the beds.
- Put a flat board on top of the top bed. A few pounds of extra weight spread along the board will ensure that the whole assembly is pressed down and in good contact with your flat work surface.
- Make sure everything is flat and straight before the vacuum is applied. Once the vacuum is applied, the item in the bag will be that shape forever.
- Turn on the pump and let it run for at least 12 hours. If the temperature in your shop is about 70°F, 24 hours is better.
- Epoxy takes a couple of weeks to fully cure, so it is best to let your wings sit in their beds on a flat surface for four or five days before cutting them out.
Good luck!
Transcribed from original scans by AI. Minor OCR errors may remain.

