
Radio Control: Soaring
Byron Blakeslee, 3134 N. Winnebago Dr., Sedalia, CO 80135
We are fortunate this month to have two interesting items from Joe Wurts of Valencia, California—who won the 1991 F3B World Championships in Holland. First, Joe describes a flying demonstration put on for a local elementary school. Second, he explains, in a very instructive article, how he reads the air before and during a flight.
As far as public relations is concerned, a glider show for children is probably the very best thing a club can do to enhance its image in the community. Children are thrilled by magic, and what's more magical than a glider flying around, seemingly by itself—especially when controlled by the world champ?
Canyon Springs Elementary School demonstration (Joe Wurts)
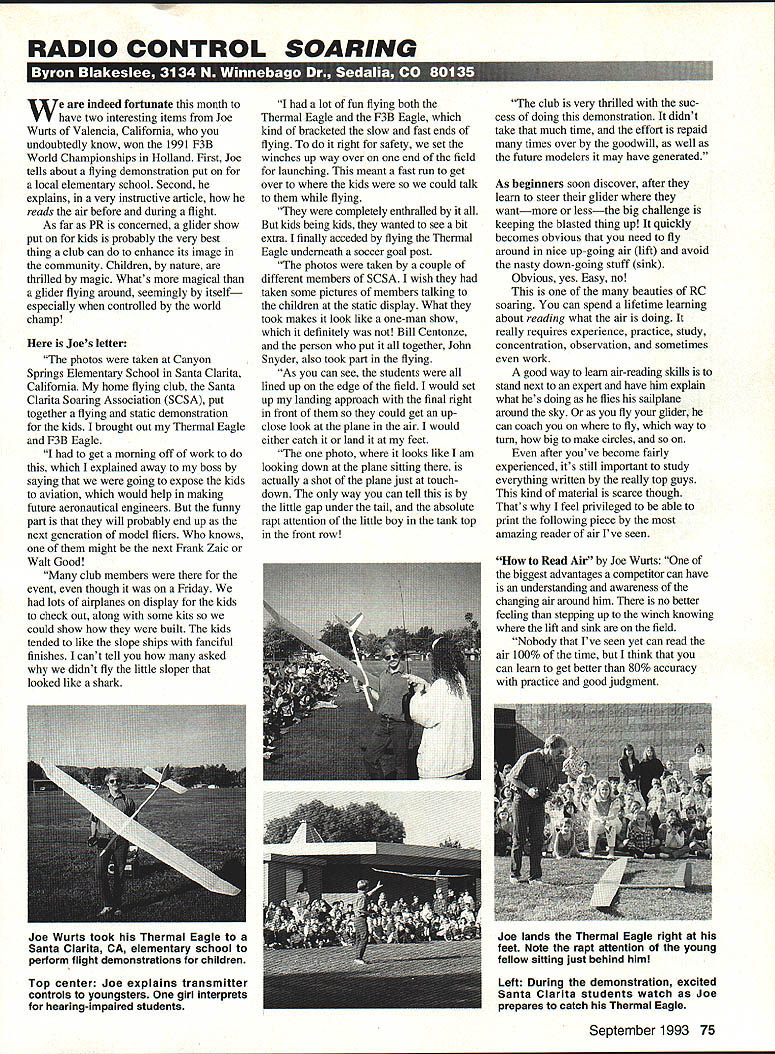
The photos were taken at Canyon Springs Elementary School in Santa Clarita, California. My home flying club, the Santa Clarita Soaring Association (SCSA), put together a flying and static demonstration for the kids. I brought out my Thermal Eagle and F3B Eagle.
I had to get a morning off of work to do this, which I explained away to my boss by saying that we were going to expose the kids to aviation, which would help in making future aeronautical engineers. But the funny part is that they will probably end up as the next generation of model fliers. Who knows, one of them might be the next Frank Zaic or Walt Good!
Many club members were there for the event, even though it was on a Friday. We had lots of airplanes on display for the kids to check out, along with some kits so we could show how they were built. The kids tended to like the slope ships with fanciful finishes. I can't tell you how many asked why we didn't fly the little sloper that looked like a shark.
I had a lot of fun flying both the Thermal Eagle and the F3B Eagle, which bracketed the slow and fast ends of flying. To do it right for safety, we set the winches up for the slow one end of the field for launching. This meant a fast run to get over to where the kids were so we could talk to them while flying.
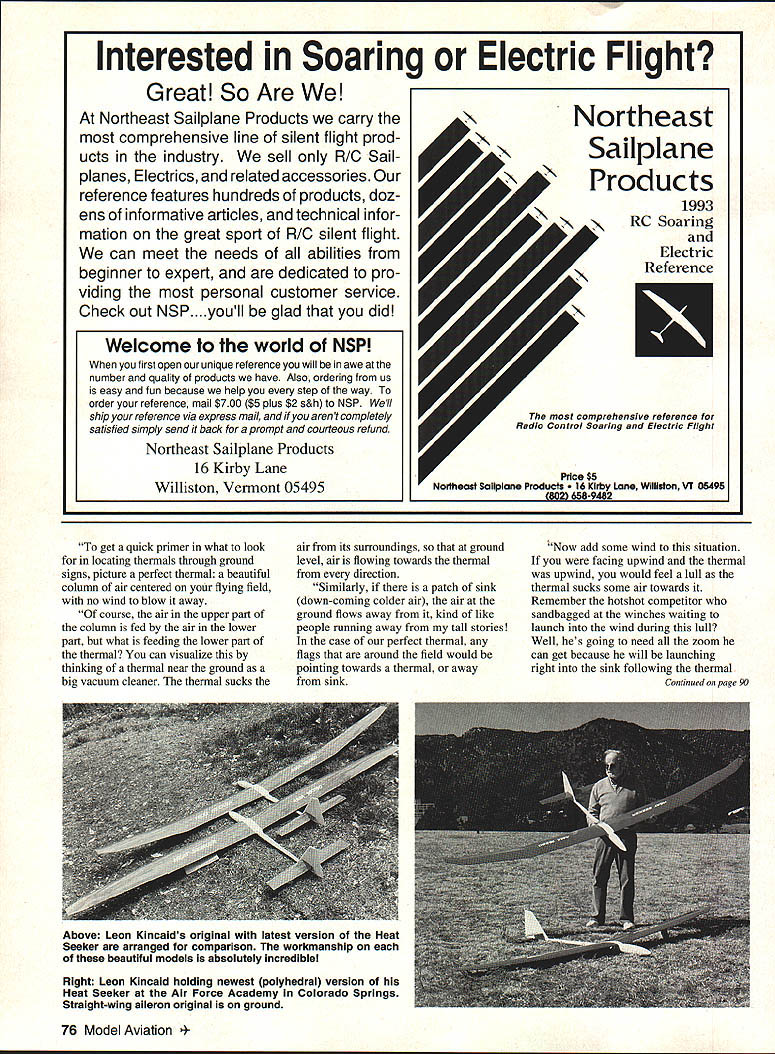
They were completely enthralled by it all. But kids being kids, they wanted to see a bit extra. I finally acceded by flying the Thermal Eagle underneath a soccer goal post.
The photos were taken by a couple of different members of SCSA. I wish they had taken some pictures of members talking to the children at the static display. What they took makes it look like a one-man show, which it definitely was not! Bill Centonze and the person who put it all together, John Snyder, also took part in the flying.
As you can see, the students were all lined up on the edge of the field. I would set up my landing approach with the final right in front of them so they could get an up-close look at the plane in the air. I would either catch it or land it at my feet.
The one photo where it looks like I am looking down at the plane sitting there is actually a shot of the plane just touching down. The only way you can tell this is by the little gap under the tail and the absolute rapt attention of the little boy in the tank top in the front row.
Good success — doing the demonstration didn't take much time or effort but was repaid many times over in goodwill and in the future modelers we may have generated.
How to Read Air (by Joe Wurts)
As beginners soon discover, after they learn to steer their glider where they want—more or less—the big challenge is keeping the blasted thing up! It quickly becomes obvious that you need to fly around in nice up-going air (lift) and avoid the nasty down-going stuff (sink).
Obvious, yes. Easy, no!
This is one of the many beauties of RC soaring. You can spend a lifetime learning about reading what the air is doing. It requires experience, practice, study, concentration, observation, and sometimes even work.
A good way to learn air-reading skills is to stand next to an expert and have him explain what he's doing as he flies his sailplane around the sky. Or, as you fly your glider, he can coach you on where to fly, which way to turn, how big to make circles, and so on.
Even after you've become fairly experienced, it's still important to study everything written by the really top guys. This kind of material is scarce, though. That's why I'm privileged to print the following piece by the most amazing reader of air I've seen.
One of the biggest advantages a competitor can have is an understanding and awareness of the changing air around him. There is no better feeling than stepping up to the winch knowing where the lift and sink are on the field.
Nobody that I've seen can read the air 100% of the time, but I think you can learn to get better than 80% accuracy with practice and good judgment.
To get a quick primer in what to look for in locating thermals through ground signs, picture a perfect thermal: a beautiful column of air centered on your flying field, with no wind to blow it away.
Of course, the air in the upper part of the column is fed by the air in the lower part, but what is feeding the lower part of the thermal? You can visualize this by thinking of a thermal near the ground as a big vacuum cleaner. The thermal sucks the air from its surroundings, so that at ground level air is flowing toward the thermal from every direction.
Similarly, if there is a patch of sink (down-coming colder air), the air at the ground flows away from it. In the case of our perfect thermal, any flags around the field would be pointing toward the thermal, or away from sink.
Now add some wind to this situation. If you were facing upwind and the thermal was upwind, you would feel a lull as the thermal sucks some air toward it. Remember the hotshot competitor who sandbagged at the winches waiting to launch into the wind during this lull? Well, he's going to need all the zoom he can get because he will be launching right into the sink following the thermal that caused the lull. I think this is kind of fitting punishment!
You can generalize by saying that temporary shifts in wind direction and speed point either toward lift or away from sink. Either way, you want to fly toward the downwind direction of the wind shift. Remember, this means that if the wind slows down to a lull, there is a thermal upwind. The relative wind shift is against the wind.
After a while you learn to observe the trees, grass, and many other things to read what the wind shifts are doing around the flying field. If you see trees on the upwind edge of the field getting hit by a gust of wind, this probably means the air is a thermal downwind of the trees, especially if you feel a lull in the wind where you are.
Similarly, if you suddenly feel the wind shift from straight in your face to from the left, there probably is lift somewhere to the right. All you have to do is locate it!
Once you are sensitized to these signs on the ground, you can start taking them to the air to read the same signs via the airplane. Take the simple case of the glider flying straight away from you and straight upwind. If you pass to the right of a thermal, you will likely notice a yawing action of the glider showing a drift from right to left. This means that you should turn left (once again, towards the downwind shift) to go to the thermal.
These clues can sometimes be quite subtle. More than once I have found myself chasing phantom thermals all over the field by misreading the plane. But many times I have turned a short flight into a long and enjoyable one just by getting an idea which way to turn.
Over the last few years I have had occasion to fly at various sites all around the country as well as abroad. I have noticed that, yes, the people that say the thermals at your home field are different aren't correct! But what I have also seen is that at a single location the thermal conditions can vary quite a bit.
In southern California, we frequently see representative conditions similar to those all over the U.S.A. in a single month. This makes the area a good breeding ground for competitive pilots and airplanes that will do well in a broad variety of flying conditions, as opposed to the point-design planes that appear from some sections of the country that evidently do not get much variation in flying conditions.
The warm, humid conditions that predominate in the Midwest and East typically produce thermals that are quite diffuse near the ground. Thermals in a dry, arid climate are stronger near the ground. This is because the mechanism for warming the air is a bit different for each case. It turns out that water vapor is a good absorber of infrared radiation (heat).
So in the hot and humid case (which gives a high value for absolute humidity) you should compare absolute rather than relative humidity. The way the air gets warmed up is caused by the ground getting warm and reradiating the heat back into the air, which can warm the air quite a ways from the ground. The dry and arid case ends up warming the air primarily from direct contact with the ground, which gives these thermals a strong start from the ground.
The humid-air thermals can be just as strong as the dry ones; it's just that the strong part of them is much higher. This means, in practical terms, that the humid thermals are much more difficult to read and fly near the ground, which I'll define as winch-launch height or lower.
They are also more fickle near the ground as there frequently is no solid core to center in. In humid conditions, the concept of thermal-producing locations has a lot more validity, as the thermals will constantly form over areas that radiate well in the infrared spectrum.
If you have detected a shift in the relative wind that is pointing towards a thermal, the next question is to find out how far away it is. It turns out that thermal spacing and diameter are influenced by humidity and also by the height of the inversion layer at the time.
In desert-type conditions, thermal spacing can be on the order of miles. Thermals can be upwards of a half mile across at altitude, and five or six miles between them. This makes RC cross-country flying in the desert quite challenging at times. You climb as high as you can and hope that you hit the next thermal before you hit the ground!
When you have conditions like this the wind shifts are of limited use, because they might be marking a thermal a mile or more away. But on most flying fields the lift is much smaller, with thermals coming in user-friendly sizes.
You can get a feel for this phenomenon just by studying carefully the evolution of thermals during the cycle of a day. Ever notice the smoke from a chimney in a valley in the morning? In the morning on a reasonably calm day, the air near the ground is quite cool, even compared to the air a hundred feet up. This means there is an inversion layer near the ground.
The first thermals of the morning can sometimes go up only 50 or 100 feet. The size of these thermals is correspondingly quite small. As the morning warms up, the inversion layer slowly climbs as the thermals eat into the inversion.
As the inversion climbs, thermal size and spacing slowly increase. A good way to see this happening is to go out early with a hand-launch glider and get some exercise. The first thermals will take the plane up only a little bit — and that is it.
There have been many times early in the morning where I do a launch off a winch and glide around until I get down to where the thermals are. At some point the air near the ground gets to the full-scale pilots refer to as the trigger temperature — the temperature at which the inversion near the ground disappears — at which point large thermals start happening.
A word of caution about these low thermals: frequently you will be flying near the top of them, which will mean that the earlier stuff about drift telling you where the thermal is will not work as advertised. Actually, near the top of a thermal the signs reverse. Think of the top of a thermal as smoke hitting a ceiling. It spreads out. So at the top of a thermal, it is constantly pushing you out. This really makes it hard to stay in the top of a thermal.
Getting frustrated by flying in early thermals can drive you to taking up power planes! Seriously, I enjoy the challenge, especially knowing that it will only last a little while.
The best way to learn these signs quickly is by flying a hand-launch glider — the feedback is immediate. If you don't read it right, you have to throw it again! Good luck with sharpening your air-reading skills.
Thanks for the great article, Joe!
One thing Joe didn't mention, which I've noticed, is that Joe likes to fly barefoot. I've suspected that the feel is minute air temperature changes through his toes — or something like that. We'll have to ask Joe to write a follow-up article on this subject.
Another of the beauties of RC soaring is that each flight is unique. Therefore practice and fun don't tend to get boring. This holds true whether you're flying a little hand-launcher, a beginner's glider, or an exotic full-house ship.
A practice flying diversion that I enjoy ties in closely with what Joe said. With my plane up in the air, I try to notice wind shifts on the ground where I'm standing. When I feel a shift, I scoot my glider over to where I suspect the thermal should be, and usually, if I guessed right, the glider will find lift and climb — even if it takes a dive from a considerable distance to get there. Sometimes I find lift, and sometimes I don't. But the point is, you always learn something about what's going on with the air.
Recommended reading
Joe has said that just about everything you should know about air-reading skills is contained in Dave Thornburg's Old Buzzard's Soaring Book. The book is available for $16.95 from Pony X Press, 5 Monticello Drive, Albuquerque, NM 87123.
F3B World Championships
About the time you read this in early August, Joe Wurts and the U.S. F3B Team will be in Israel competing in the biannual World Championships. Joe will be competing as an individual to defend his world champion title, which is allowed under the rules for the defending World Champion.
Past F3B individual and team winners:
- 1977 — Individual: S. Miller (U.S.A.); Winning Team: U.S.A.; Location: S. Africa
- 1979 — Individual: A. Wackerle (Austria); Winning Team: S. Africa; Location: Belgium
- 1981 — Individual: D. Holley (U.S.A.); Winning Team: Germany; Location: California
- 1983 — Individual: R. Decker (Germany); Winning Team: Germany; Location: England
- 1985 — Individual: R. Decker (Germany); Winning Team: Britain; Location: Australia
- 1987 — Individual: R. Liese (Germany); Winning Team: Austria; Location: Germany
- 1989 — Individual: N. Wright (Britain); Winning Team: Austria; Location: France
- 1991 — Individual: J. Wurts (U.S.A.); Winning Team: Germany; Location: Holland
The official three-man U.S. team is Larry Jolly, Randy Spencer, and Daryl Perkins. With Joe, Larry, and Daryl returning from the '91 team (Randy was Team Manager), we have confidence their depth of experience will bring home both the individual and team trophies this year!
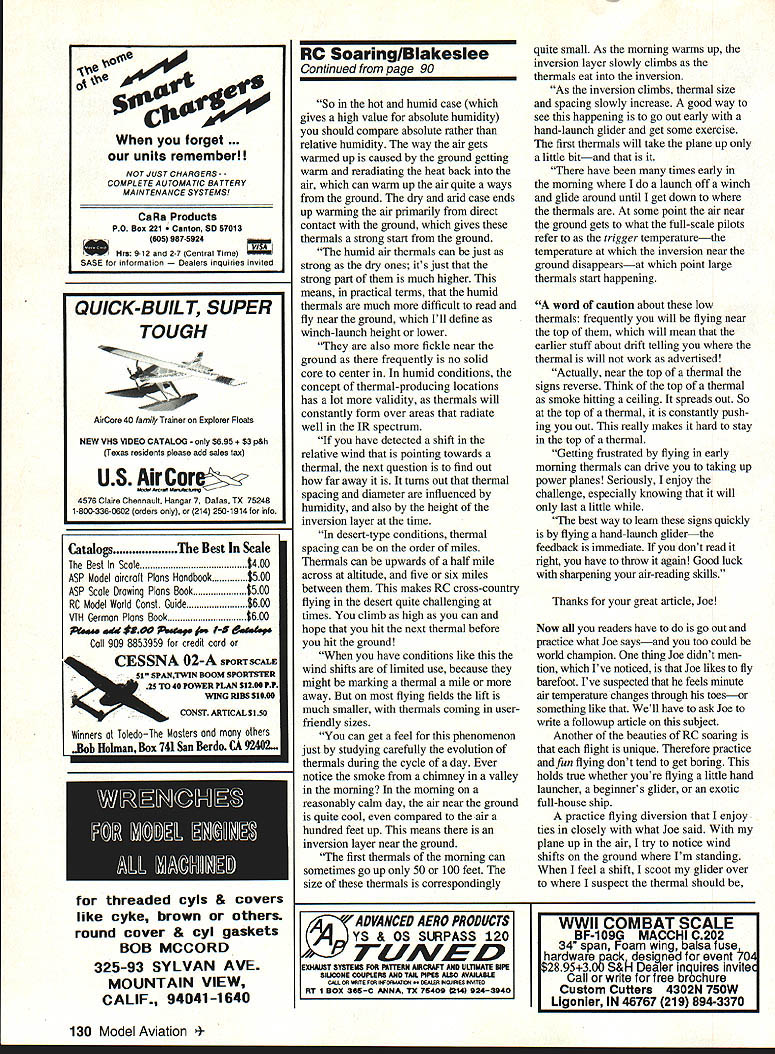
Leon Kincaid's Heat Seeker
Leon sent photos of the new polyhedral version of his Heat Seeker design (the original was described in my January 1993 column). He wants to let everyone know he's moved from Colorado Springs back to North Carolina.
He reports that he is impressed with the way the poly wing version turns so nicely and tightly. He promises more information once he gets settled. Plans for the Heat Seeker are available from Leon at P.O. Box 357, Webster, NC 28788. Phone: (704) 586-4278.
Transcribed from original scans by AI. Minor OCR errors may remain.

