
RADIO CONTROL SOARING
Daryl Perkins, 4234 Petaluma Blvd., North Petaluma, CA 94952
Wow — my first article in a national magazine. What a privilege! What an honor! What should I write about?
First, I should mention Byron Blakeslee. Since I started flying, Byron's articles have been a part of my soaring experience. I learned how to fly by following this gentleman's written word. I devoured anything Byron wrote about. I finally got to meet the man behind the pen at a slope race in Washington, and I couldn't believe what a genuinely nice person he was. I figured since Byron was a national personality, he would be sort of stuck up or something, but he is just a nice guy. Sorry Byron, your secret is out.
I know that I speak for soaring enthusiasts across the states when I say, "Thank you, Byron, for all you have given to the sport. You have been instrumental in the proper steering of our hobby, and we thank you."
If you would like to write to Byron to show your appreciation, I'm sure he would love to hear from you.
A lot of you are probably thinking: "Daryl Perkins? Who is he? And why am I bothering to read this?" While I can't answer the last question, I think it is only fair that I tell a little bit about myself, since you're going to be reading my ramblings month after month.
I have been interested in models for as long as I can remember. My father has his full-scale license and I have flown with him since I was just a young buck, but the little boy in me liked the toy airplanes. He used to take me to some of the local power fields, and we would start building trainer models. The building techniques he taught me stuck with me.
About nine years ago, when I finally had some free time, I completed my first RC sailplane: a Sig Riser. I found a local slope site and decided that sloping was much more fun than walking for the hi-start every five minutes, and besides, you could get really high, and therefore go really fast. I liked this part.
I finally tore the fin off my Riser in a vertical dive and decided I needed a faster model. I went directly to a Bob Martin SR-7. It took me a while to figure out the aileron thing, but once I did, I greatly enjoyed the freedom of high-energy aerobatics.
Since then I have been drawn to faster and faster gliders, while getting involved in slope racing and that demon referred to as F3B. I also do a fair amount of thermal work, but my real love is speed.
I put soaring ahead of everything. I don't really know why I fly. I love the freedom, the people, the friendly competition, but I guess it's just the feeling of enjoying the purest form of RC flying: soaring.
As you read my articles, remember that I am not an aeronautical engineer or an aerodynamicist, but just a normal guy like you who truly loves this sport.
Torrey Pines F3B Contest
As many of you read this, you can look out your window and see wind, rain, or snow. Well, I recently had to brave the elements and travel to San Diego for an F3B contest hosted by the Torrey Pines Gulls and CD'ed by my good friend Steve Condon.
We had to suffer through 75°F–80°F temperatures and nothing but sunshine. (It might have gotten down into the 50s at night, and I even looked at my coat once.) Boy, can these guys host a contest. Rooms were prearranged at the Ramada Inn, with suites for all the contestants. There was an ample supply of field workers (typically a problem in F3B), and Steve even guaranteed that we would all have fun (also typically a problem in F3B).
The list of contestants read like a Who's Who in competitive F3B soaring: the entire US team, Don Edberg, Seth Dawson, Steve Lewis, and Manny Tau were just a few well-known fliers.
There were also three "Sportsman" fliers who signed up to try their luck in this head-to-head sport: Scott Condon, Jim Markle, and the eventual Sportsman winner, George Joy. These guys are definitely not considered Sportsman fliers in any other type of soaring event.
Day One: The contest started out with some low-stress Duration, which immediately became high-stress Duration in the dead air conditions. All you could do was launch and cruise; if you stopped to circle, you were dead. Most of the top competitors recognized this and eked out their times.
Distance took place without too many upsets, but the first round of Speed took a serious toll on some of the top fliers. The contest was open for the taking due to Larry Jolly's line-break problems and cuts by Joe Wurts and myself.
Rich Spicer had the most eventful Speed flight, hitting a tree on this very narrow course. If you can envision a beautiful, all-red Synergy III with a broken tailboom... well, you get the picture.
Speed was flown back-to-back and with cuts. Once again Joe and I had cuts, and the competitors were left to ponder where the far turn was—was the course regulation? Randy Spencer gets the "I should have bought a lottery ticket!" award. Not only was he handed the mother of all thermals in his launch, but after his model went behind the tree that Spicer hit, it came out the other side with the fastest time of the contest: a 17.8.
The day ended with Duration, and slightly better conditions than we had in the morning; all the contestants maxed. We adjourned that evening for mass consumption of beer and pizza.
I fly as much for the people as for the flying itself. Where else could people from such varied backgrounds and lifestyles have this much fun? It was decided at dinner to start much earlier the next day, much to the relief of those of us who had to travel after the contest.
Day Two: We again started with Duration, about an hour earlier than the day before. This didn't make the seven minutes seem any shorter, as I had a 6:58 that I couldn't possibly have stretched to a 7:03.
Most of the top fliers somehow squirmed through their times, with the exception of the 1977 World Champ Skip Miller. Skip had been flying flawlessly and was in contention for top honors until this flight; all he could manage was a 6:08 and a 100-point landing.
Distance and Speed seemed to turn into an endurance test for the Allen Development F3B Eagle, with quite a bit of abuse handed out by Randy Spencer and Larry Jolly. Trying to get that last lap in Distance can be very hard on models, as Randy proved when his model forcefully hit the far-end sighting device.
Randy caught a wingtip that put his Eagle into a flat spin. A rebuilding frenzy ensued as he rushed to get his model back in the air for Speed. After a temporary fix, Randy said, "Boy, you just can't kill these things."
Larry Jolly proceeded to provide Randy's point by dragging a tip across the finish line in Speed. Larry's model hit so hard that I thought it was dust. But after checking the servos, linkage, and spar, the only thing damaged was Larry's ego.
After the dust settled, Randy won—he deserved it. He flew consistently and conservatively—very important in a long contest.
Expert Results
- 1. Randy Spencer — 11,632 points
- 2. Steve Lewis — 11,451 points
- 3. Seth Dawson — 11,413 points
Sportsman Results
- 1. George Joy
- 2. Jim Markle
- 3. Scott Condon
Thanks to the Torrey Pines Gulls for hosting the contest. A good time was had by all.
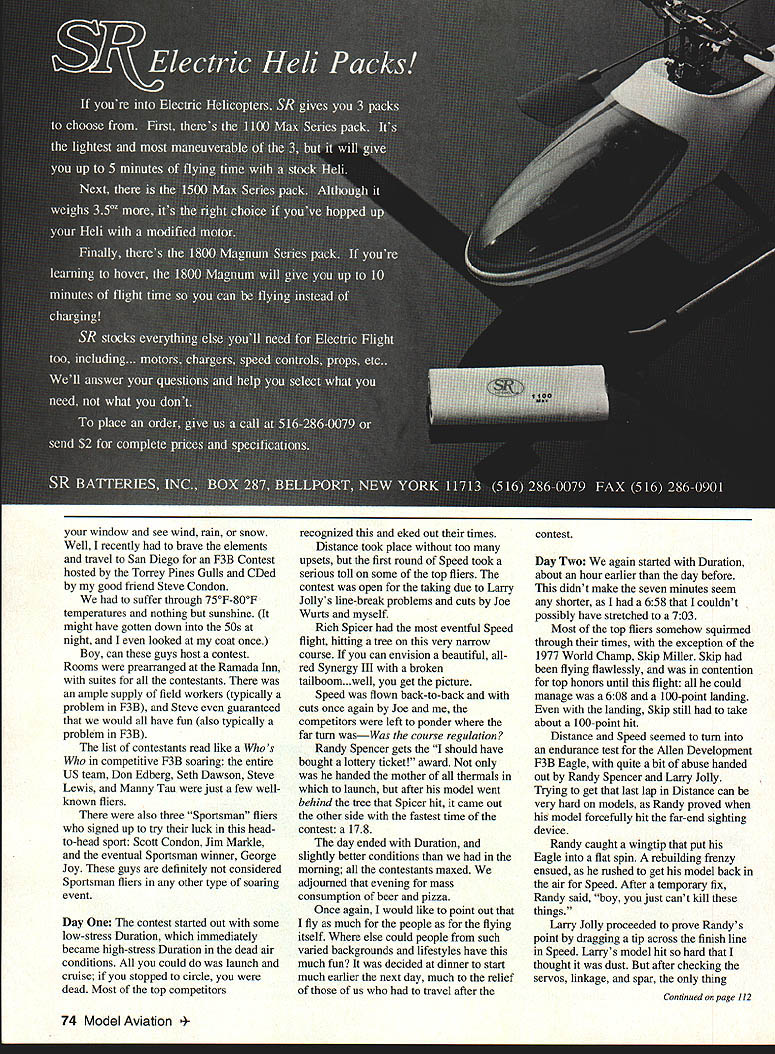
Hawk Encounter (Letter from Ernest F. Barter, Saratoga, California)
The uninitiated often ask me, "Do the birds ever bother your model?" Here is a letter from Ernest F. Barter regarding some escapades with a local bird of prey:
"Hawk Encounter: In the past, local hawks have been friendly sorts and have shared their air space. That is, until about a month ago. I tried to share lift with this guy and he wasn't having any part of it.
"While circling at about 300 or 400 feet, I noticed this hawk some distance away that seemed to be in better lift. (How do they know?) I flew over to his area, approaching from behind and going much faster than he was. Not wanting to overtake Mr. Hawk, I did a 360 to lose airspeed. Making the second approach, again from behind but much slower, I thought I could join up and fly his wingtip. Share a little lift, if you would.
"Wrong! As I came alongside, Mr. Hawk did a very unfriendly act. I couldn't tell if he meant to hit my wing or talons (too high to see and it happened in an instant), but he took a good-sized chunk out of my right wing. Mr. Hawk continued to circle.
"My Falcon was turned 90° by the impact and was obviously in trouble and not responding normally to control inputs. He not only had damaged the wing, but he hit me so hard that both wings were partially unplugged.
"I use electrical tape to join the wings to the fuselage and both sides were pulled free. Long rear joiners and long electrical plugs saved the day. I had lost control of the right flap and had intermittent right aileron. A slow descent and uneventful landing disclosed the extent of damage.
"If the right wing had unplugged another inch, I would have been doing post-crash analysis and probably would never have known what damage was caused by my flying buddy.
"The moral to this story is: approach your resident hawk with caution, and give him a wide berth. Screaming in from behind at high airspeed is obviously not the way to join up with your bird friends."
These are good words of advice! I have heard of some slope clubs actually losing their sites due to bird harassment.
After an altercation with one of these UFOs (Unfriendly Flying Objects, or even Unfriendly Fixed Objects), Ernest goes on to tell of his repair methods.
Repair of Composite Wings (Ernest F. Barter)
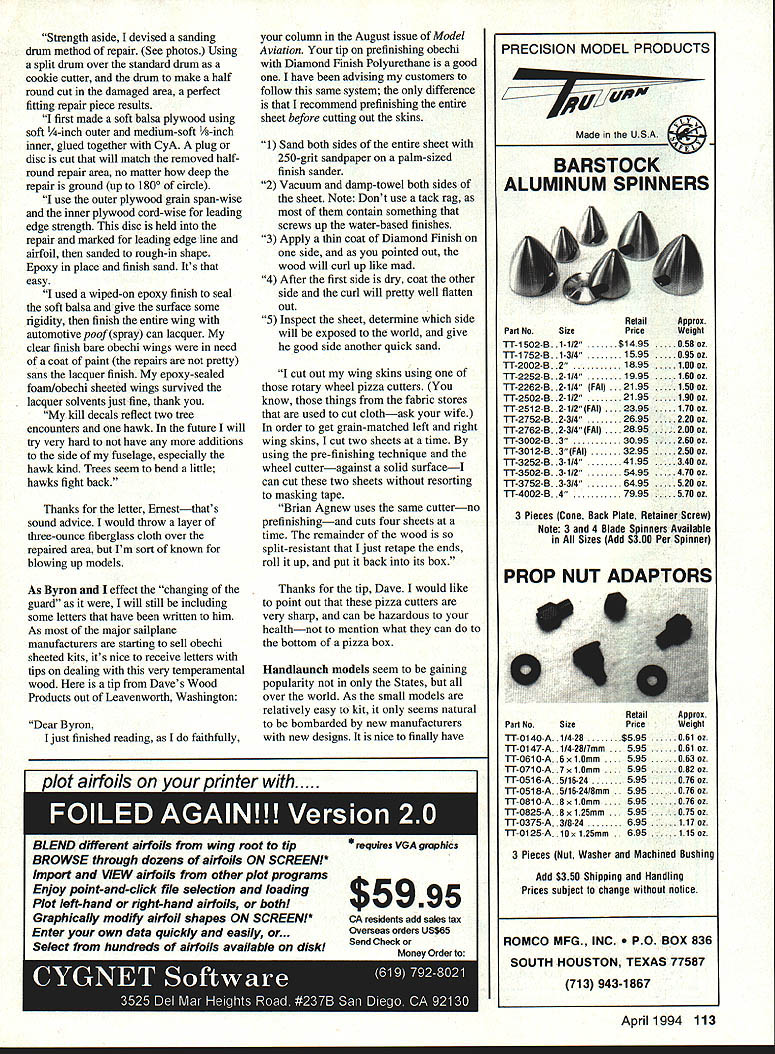
After losing an argument with a tree and effecting a leading-edge repair by using the "cut the leading edge, put sand and fit foam, fit the leading edge, fit the new skin and sand some more" method, I figured there must be a better way.
Using the premise that the skin/leading edge of a composite wing is mostly to provide torsional (read: twist) strength, and cause the air molecules to zip around via the Bernoulli effect, a fitting of foam, leading edge and skin to a damaged area is an exercise in futility. My Falcon spar alone will support all the G's I can dish out, with the skin just going along for the ride.
OK, ok, the engineers out there will say the skin provides some amount of bending strength and I agree, but how much is debatable; my wing doesn't bend any more at the flap/aileron cut-outs than the intact areas of the wing.
I devised a sanding-drum method of repair. Using a split drum over the standard drum as a cookie cutter, and the drum to make a half-round cut in the damaged area, a perfect fitting repair piece results.
I first made a soft balsa plywood plug using soft 1/4-inch outer and medium-soft 1/8-inch inner, glued together with CA (cyanoacrylate). A plug or disc is cut that will match the removed half-round repair area, no matter how deep the repair is ground (up to 180° of circle).
I use the outer plywood grain spanwise and the inner plywood chordwise for leading-edge strength. This disc is held in the repair and marked for leading-edge line and airfoil, then sanded to rough-in shape. Epoxy in place and finish sand. It's that easy.
I used a wiped-on epoxy finish to seal the soft balsa and give the surface some rigidity, then finish the entire wing with automotive spray car lacquer. My clear-finish bare obechi wings were in need of a coat of paint (the repairs are not pretty) and the epoxy-sealed foam/obechi sheeted wings survived the lacquer solvents just fine.
My kill decals reflect two tree encounters and one hawk. In the future I will try very hard not to have any more additions to the side of my fuselage, especially the hawk kind. Trees seem to be a little; hawks fight back.
Thanks for the letter, Ernest — that's sound advice. I would throw a layer of three-ounce fiberglass cloth over the repaired area, but I'm sort of known for blowing up models.
Obechi Finishing Tip (Dave's Wood Products, Leavenworth, Washington)
As more manufacturers start to sell obechi-sheeted kits, it's nice to receive letters with tips on dealing with this temperamental wood. Here is a tip from Dave's Wood Products regarding prefinishing obechi with Diamond Finish Polyurethane:
"Dear Byron, I just finished reading, as I do faithfully, your column in the August issue of Model Aviation. Your tip on prefinishing obechi with Diamond Finish Polyurethane is a good one. I have been advising my customers to follow this same system; the only difference is that I recommend prefinishing the entire sheet before cutting out the skins.
Steps:
- Sand both sides of the entire sheet with 250-grit sandpaper on a palm-sized finish sander.
- Vacuum and damp-towel both sides of the sheet. Note: Don't use a tack rag, as most of them contain something that screws up the water-based finishes.
- Apply a thin coat of Diamond Finish on one side; as you pointed out, the wood will curl up like mad.
- After the first side is dry, coat the other side and the curl will pretty well flatten out.
- Inspect the sheet, determine which side will be exposed to the world, and give the good side another quick sand.
I cut out my wing skins using one of those rotary wheel pizza cutters from the fabric store (the ones used to cut cloth—ask your wife). To get grain-matched left and right wing skins, I cut two sheets at a time. By using the prefinishing technique and the wheel cutter—against a solid surface—I can cut these two sheets without resorting to masking tape.
Brian Agnew uses the same cutter—no prefinishing—and cuts four sheets at a time. The remainder of the wood is so split-resistant that I just retape the ends, roll it up, and put it back into its box."
Thanks for the tip, Dave. I would like to point out that these pizza cutters are very sharp, and can be hazardous to your health—not to mention what they can do to the bottom of a pizza box.
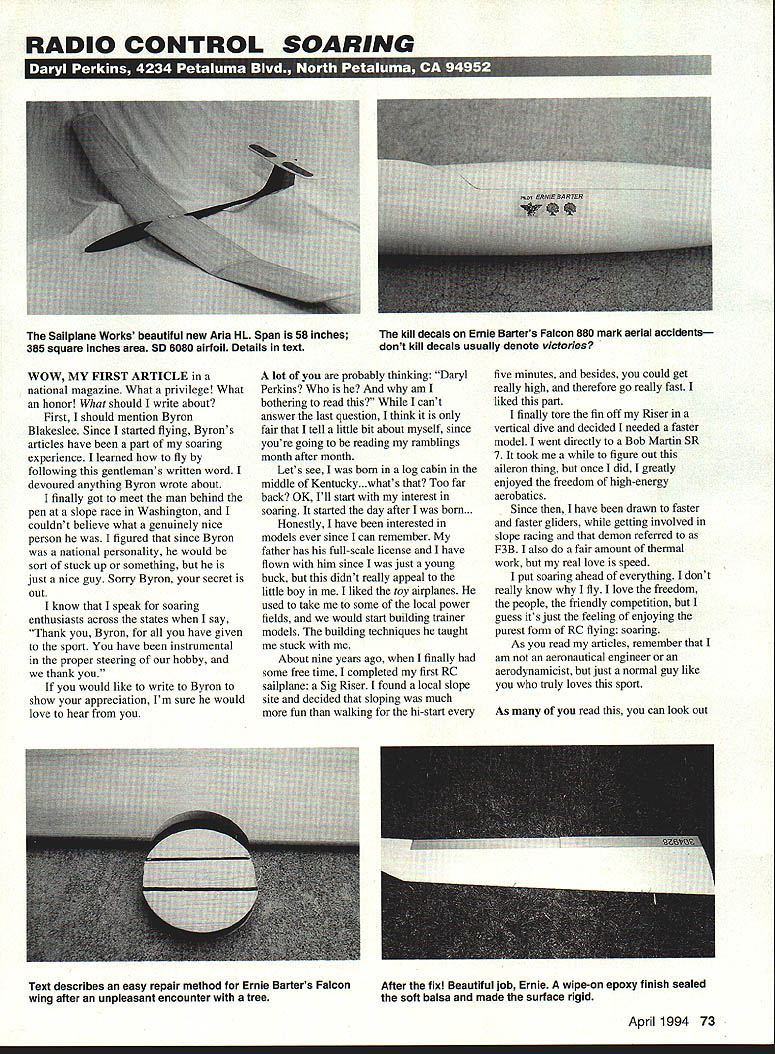
Hand-launched Models and the Aria HL
Hand-launched models seem to be gaining popularity not only in the States, but all over the world. As small models are relatively easy to kit, it only seems natural to be bombarded by new manufacturers with new designs. It is nice to finally have some choices in this very pure form of soaring.
I have had some conversations with Mark Weiland of Aurora, Colorado regarding his new hand-launch effort, the Aria HL. If the Aria is half as good as Mark says, I'll take a dozen to go. I have a tendency to break things. Mark writes:
"The Aria HL started out as a way for me to take my work as an artist from a two-dimensional to a three-dimensional realm. My master's degree work dealt with a personal image that created the illusion of flying and moving in space. I wanted the Aria HL to become a kinetic sculpture. This means that it could move in space, so I could fly that illusion.
"I have always wondered where the line is drawn between a piece of fine art and a model sailplane. This project has satisfied my question. So, during this last year I developed my artistic ideas and finalized the building of a competitive hand-launch.
"I have been flying RC sailplanes for almost twenty years and have found the hand-launch glider to be the most fascinating form of our sport. Dave Thornburg's article on hand-launch and the Sunbird fueled my interest during the early 1980s.
"I created an aileron hand-launch named the Katydid. The conventional building techniques of that time, however, caused it to weigh 20 ounces, which was too heavy.
"Over the past several years my building business has allowed me to see a number of very good sailplanes and methods of building lightweight gliders. With this in mind, I started the design of the Aria HL.
"I wanted a glider that could move upward quickly, slow down in a thermal, and turn on a dime. It is amazing how many little details go into the finalization of a design. For me, the Aria HL has fulfilled all of my design expectations.
"This T-tailed hand-launch has a span of 58.5 inches (60 inches projected) and 385 square inches. The wing is foam, covered in obechi with the trailing edge using 2.9-ounce carbon fiber to allow a knife-edge finish.
"Its fuselage is laid up using epoxy resin, fiberglass, Kevlar, and carbon fiber, with the weight ranging from 1.7 to 1.9 ounces. I have a molded finger rest that also works as a wing hold-down mount.
"The stab is foam with obechi covering using some carbon fiber to reinforce the mounting areas; this is also removable for storage and repair. The rudder is built-up, then covered with Monokote to save weight.
"The servos and battery pack fit into a tray on the fuselage and are held with a single 4-40 bolt. Each of the servos has its own pushrod end which is soldered to the 1/32 music wire that is attached to the control surfaces.
"While some of this seems to be complicated, the reward is a very reliable, strong airframe. I have done outside and inside loops, high-speed passes, rolls, and many other maneuvers which are outside of the normal flight envelope of a hand-launch glider.
"The aircraft that I am flying weighs 14 ounces (this is with a 600 mAh pack), with the lightest I have built at 13.5 ounces and the heaviest at 15.5 ounces. The longest flight I have had is 40 minutes and rising, and next summer I hope to try for a national Duration record with this sailplane.
"I have tried to create a very complete kit with many of the parts precut and fabricated. The plans are full-size with cross-sections and a flaperon slope version shown.
"In fact, a buyer of my sailplane kit could buy a hand-launch kit with an extra wing to build as a sloper for those days when the wind isn't all it could be for hand-tossing.
"The instruction manual is very complete, with drawings, templates, and modifications for larger receivers, flaperons, etc. I think that it is a very good value for the dollar. I have set the price at $99.95, with a preshaped wing being $49.95 extra.
"I am very pleased with the Aria and anyone who would like further information can contact me at The Sailplane Works, 3355 S. Dunkirk Way, Aurora, Colorado 80013; Tel: (303) 699-0467 between 4:30 p.m. and 9:30 p.m., MST."
I have yet to see this design up close and personal, but it sounds very promising. Give Mark a call.
If there is anything you want to read about, please let me know. Until next time... Green air!
Transcribed from original scans by AI. Minor OCR errors may remain.

