

RADIO CONTROL SOARING
Dave Garwood, 5 Birch Lane, Scotia NY 12302
Hand-Launch Glider (HLG)
Hand-launch glider (HLG), the purest form of RC soaring, spurns complicated launch equipment and leaves only you, your airplane, and the air. It provides an unparalleled opportunity to see your model in flight, to see the results of your control inputs, and to learn to read the air.
HLGs are the smallest and can be the least expensive thermal sailplanes, but the feeling of launching into a thermal and riding it upward until your sailplane is but a speck in the sky is one of the greatest kicks in model sailplane flight.
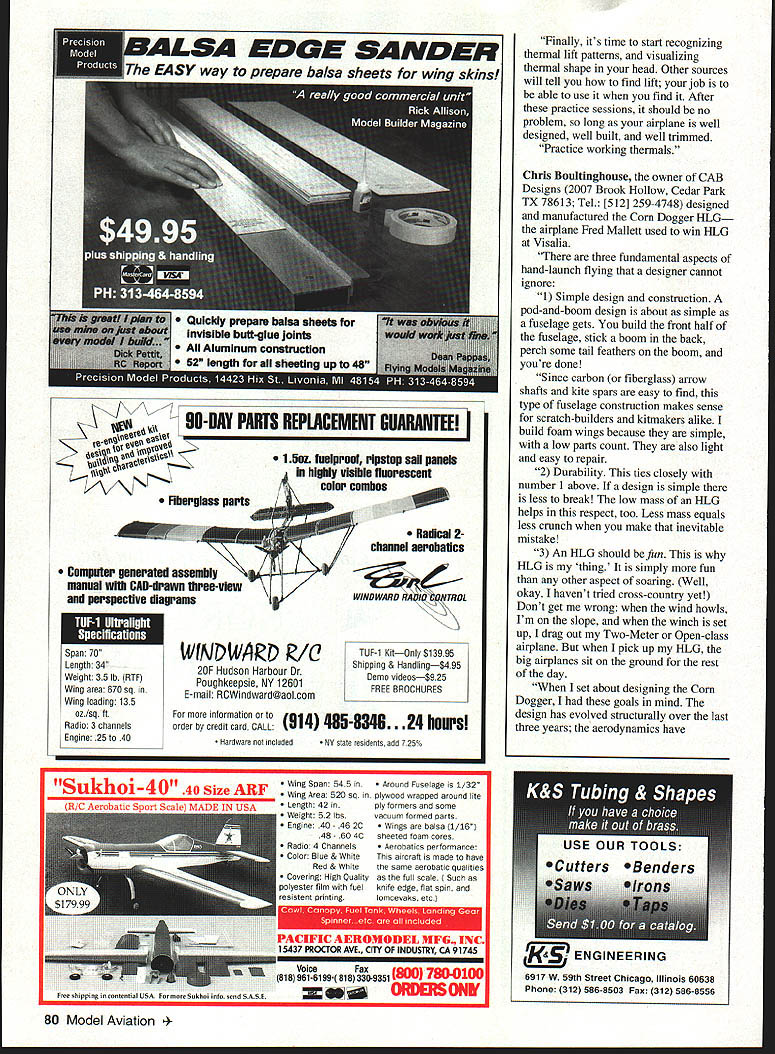
Since the distinguishing characteristic of a hand-launch sailplane is simply a 1.5-meter (60-inch) wingspan limit, construction materials and methods vary. HLG wings may be built up from sticks and sheet, or they may be foam cores sheeted with balsa, obechi, fiberglass, or carbon fiber. Fuselages may be wood or composite, pod-and-boom, or fully shaped. Tailplanes are conventional, T-shape, or V-shape.
Control systems follow larger RC sailplane practice. Two-channel polyhedral models with rudder and elevator are more common because they are light and require simpler and less expensive radio equipment; a four-channel transmitter, mini receiver, and a pair of mini- or microservos will do.
Like other soaring classes, sophistication increases rapidly, and we also see “full house” aileron HLGs with four servos and computer radios to mix aileron and rudder, to provide spoilerons for glidepath control, and reflex for launch preset.
Current HLG designs strive for 12–14 ounces all-up weight. HLGs can go down to 10 ounces or less, but the models begin to get noticeably delicate, suffer from limited receiver-battery life, and become too light to launch well. At 15–16 ounces the airplane is too heavy for many to throw, and hang-time suffers. We used to call 60-inch 16-ounce airplanes HLGs, but now we call them light-air slopers.
Although their low cost and small size may be attractive to beginners, HLGs are not well suited for new sailplane pilots. You have to know how to fly pretty well to put the sailplane in the small thermals found near the ground, and to stay in them. Otherwise you'll have many short flights of 15–20 seconds, which can be discouraging to beginners. Beginners often benefit from other launching methods, which give longer flights and more stick time to master the basics.
Flying HLG generally means making many landings, and your sailplane can get pretty beat up until you've developed competence at landing. If you've mastered the basics of RC sailplane flight, however, you'll learn fast with an HLG. Because you're closer to the airplane, you can more easily see what it's doing in reaction to the air it's flying through. As Dave Thornburg taught, “You learn a lot more about your plane and yourself below fifty feet than above fifty feet.”
Since you get plenty of landing practice, your landing precision is bound to improve. Whether you use this to notch up your contest scores, or just to save wear and tear on the old feet, shooting 50 landings in a flying session sure gives you a chance to improve your accuracy and smoothness.
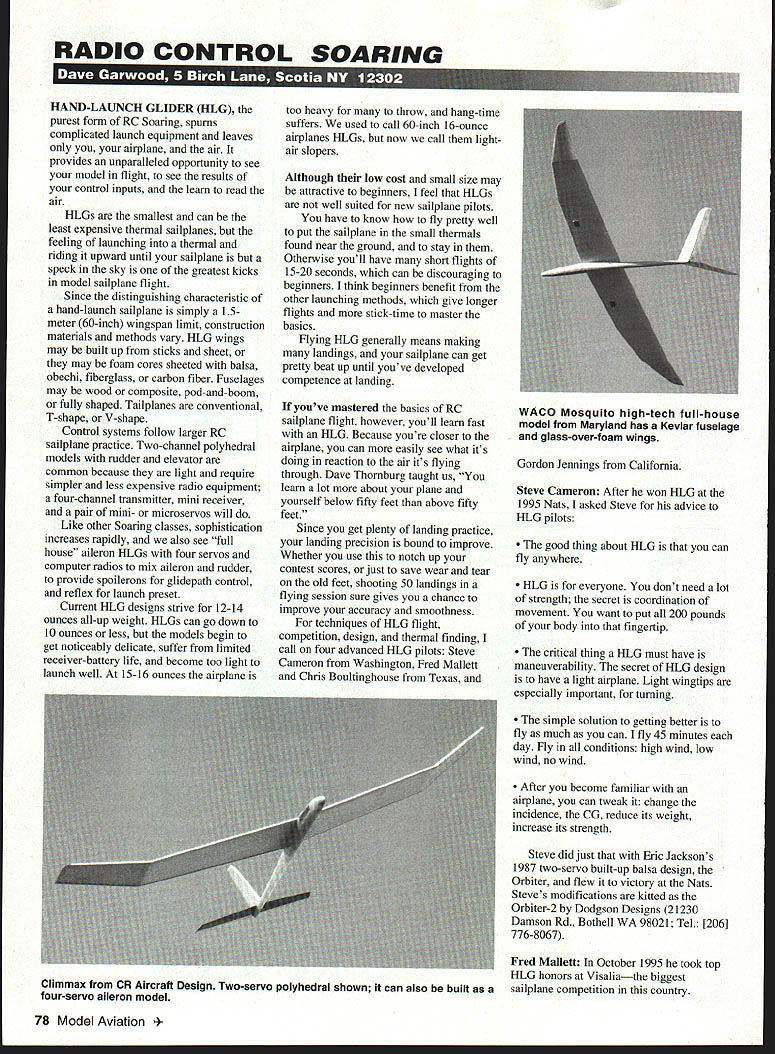
For techniques of HLG flight, competition, design, and thermal finding, I call on four advanced HLG pilots: Steve Cameron from Washington, Fred Mallett and Chris Boultinghouse from Texas, and Gordon Jennings from California.
Steve Cameron
After he won HLG at the 1995 Nats, Steve offered this advice to HLG pilots:
- The good thing about HLG is that you can fly anywhere.
- HLG is for everyone. You don't need a lot of strength; the secret is coordination of movement. You want to put all 200 pounds of your body into that fingertip.
- The critical thing an HLG must have is maneuverability. The secret of HLG design is to have a light airplane. Light wingtips are especially important for turning.
- The simple solution to getting better is to fly as much as you can. I fly 45 minutes each day. Fly in all conditions: high wind, low wind, no wind.
- After you become familiar with an airplane, you can tweak it: change the incidence, the CG, reduce its weight, increase its strength.
Steve did just that with Eric Jackson's 1987 two-servo built-up balsa design, the Orbiter, and flew it to victory at the Nats. Steve's modifications are kitted as the Orbiter-2 by Dodgson Designs (21230 Damson Rd., Bothell WA 98021; Tel.: [206] 776-8067).
Fred Mallett
In October 1995 Fred Mallett took top HLG honors at Visalia—the biggest sailplane competition in the country. His core advice centers on practice and knowing your airplane:
“To do well consistently in HLG, just like in any motor skill or thought process, you must practice. Remember that you must know your airplane, and that means flying it in any conditions that you might expect in a contest.”
He recommends five practice sessions. Each should be done for four hours of flying time before moving on. Try some thermal searching when you are bored.
- Distance throws and returns
- Start by throwing and seeing how far away you can go in a straight line, across the wind, and come back to catch it (or land at your feet). Try to go farther and farther; this will teach you fine, smooth controls, the most efficient speed of your airplane for varying conditions, and also how to get the airplane home. Think of having to walk to get the airplane as a walk of shame.
- Downwind and upwind work
- When you are comfortable, start going downwind and back, then upwind and back (save upwind for last, unless the wind is light).
- Thermal turning and figure-eights
- Next, start throwing and, at the top of the launch, start thermal turning, and see how many turns you can get in. The more efficient you fly, the more turns you'll get (assuming the same launch height). When you have that nailed, start flying figure-eights. When you are smooth, you should be able to hit 90% of your straight-flight time while doing 40-foot circles or figure-eights. This teaches efficient turning and thermal turning. Finding a thermal is not enough; you must fly smoothly and efficiently to make use of it.
- Use local terrain
- Start working HLG-size slopes—the type found in contest fields. Like minivans, trash cans, and especially trees. Throw repeatedly to the same tree to learn the shape of the air flowing over and around it. Many a contest has been won by working treelines for the lift they provide in 3–30 mph winds.
- Wind-speed-dependent speed control and lift recognition
- In higher winds, adjust your flight speed to the wind speed—hover. In lighter winds, you must maintain efficient flight speed, so cruise in figure-eights. This teaches speed control and lift shape. Finally, start recognizing thermal lift patterns and visualizing thermal shape in your head. Other sources will tell you how to find lift; your job is to be able to use it when you find it. After these practice sessions, it should be no problem, so long as your airplane is well designed, well built, and well trimmed.
“Practice working thermals.”
Chris Boultinghouse (CAB Designs)
Chris Boultinghouse, owner of CAB Designs (2007 Brook Hollow, Cedar Park TX 78613; Tel.: [512] 259-4748), designed and manufactured the Corn Dogger HLG—the airplane Fred Mallett used to win HLG at Visalia. His design philosophy focuses on three fundamental aspects:
- Simple design and construction
- A pod-and-boom fuselage is about as simple as a fuselage gets: build the front half, stick a boom in the back, perch the tail feathers on the boom, and you're done. Carbon (or fiberglass) arrow shafts and kite spars are easy to find, making this practical for scratch-builders and kitmakers. Foam wings are simple, have a low parts count, are light, and easy to repair.
- Durability
- Simple designs have less to break. The low mass of an HLG helps here: less mass equals less damage when you make that inevitable mistake.
- Fun
- An HLG should be fun. Chris prefers HLG for its immediate enjoyment; when he picks up his HLG, the big airplanes often sit on the ground for the rest of the day.
When designing the Corn Dogger, Chris evolved the structure and aerodynamics over several years. On airfoil choice, he writes that he compared the HLG flight profile to other types of model aircraft and found powered free flight to be similar. He selected the GO432 airfoil: thin (7.4%), with lots of camber, and it “looked right.” He made a minor change to give a bit more Phillips entry to improve penetration. The rest of the airframe is simple: pod-and-boom for low mass and low parasitic drag, and thin sheet-balsa tail surfaces.
The result is a durable design that is extremely easy to thermal, withstands rough-and-tumble flying, and launches higher than many designs Chris has seen. On ailerons: “Do you need ailerons to fly HLG? No! I offer an aileron version of the Dogger (the Super Corn Dogger) but for general fun and 90% of the contests I attend, I fly the polyhedral rudder-and-elevator version. It is easier to fly, more forgiving, and more fun than trying to concentrate on aileron and rudder coordination.”
If you want to design your own HLG, Chris encourages it: you don't need lots of time or money; you'll have fun; you'll learn how to build light and strong; and you will learn a lot about low-altitude thermalling. Email: CABdesigns@aol.com.
Gordon Jennings — The Third-Vector Method for Finding Lift (windy conditions)
Gordon Jennings explains a simple and useful method for finding lift under challenging, windy conditions. The idea (credited to Joe Wurts) is that the “relative wind” or wind-shift vector always points at the thermal.
- First vector: prevailing wind (direction and strength shown by arrow length).
- Second vector: the recent wind direction after a gust or shift.
- Third vector: the relative wind (the change between first and second vectors). The third vector points to the lift.
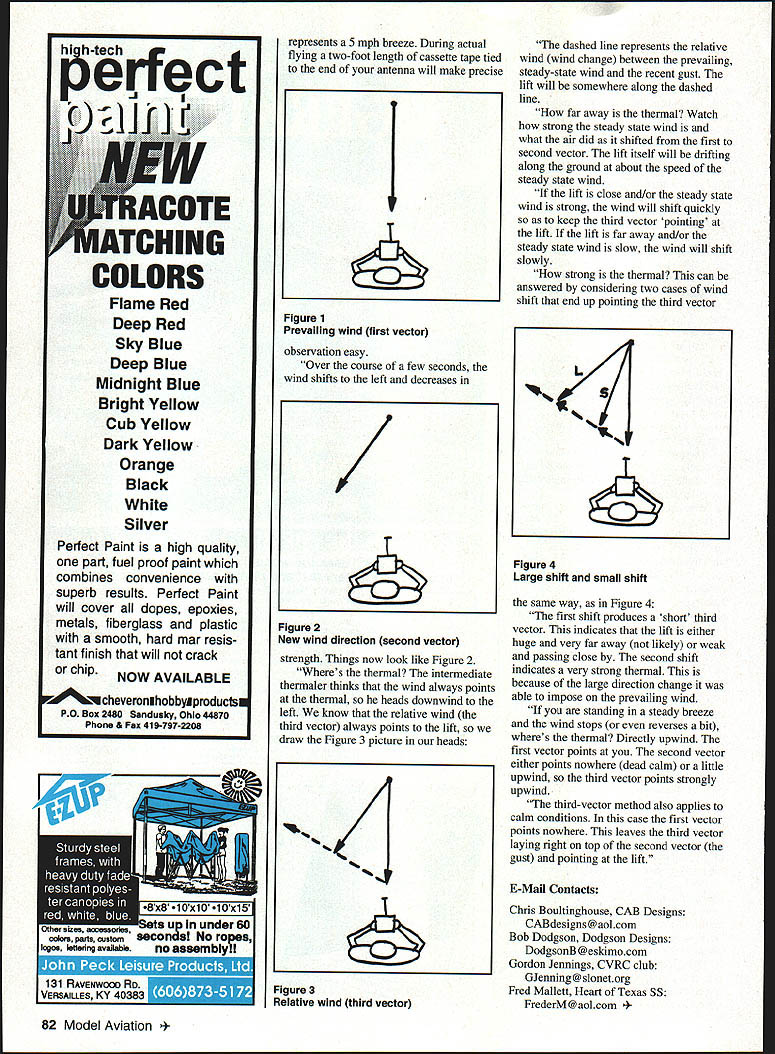
If you imagine facing into the prevailing wind, and then observe a wind shift (for example, a decrease and a shift to the left), the dashed line representing the relative wind between the steady-state wind and the recent gust will point toward the thermal. The lift itself will be drifting along the ground at about the speed of the steady-state wind.
Figure 1 Prevailing wind (first vector)
Figure 2 New wind direction (second vector)
Figure 3 Relative wind (third vector) — the dashed line represents the wind change between the prevailing steady-state wind and the recent gust; the lift will be somewhere along this dashed line.
How far away is the thermal? Watch how strong the steady-state wind is and how quickly the wind shifted from the first to second vector. If the lift is close and/or the steady-state wind is strong, the wind will shift quickly; if the lift is far away and/or the steady-state wind is slow, the wind will shift slowly.
How strong is the thermal? Consider two cases that produce the same third-vector direction but different magnitudes:
Figure 4 Large shift and small shift
- A short third vector indicates either a weak thermal passing close by or a very large thermal far away (the latter is unlikely).
- A long third vector indicates a very strong thermal, because a large direction change was imposed on the prevailing wind.
If you are standing in a steady breeze and the wind stops (or even reverses a bit), the thermal is directly upwind: the first vector points at you, the second vector points little or none, so the third vector points strongly upwind.
The third-vector method also applies to calm conditions: the first vector is effectively zero, so the third vector lies on top of the second vector (the gust) and points at the lift.
E-Mail Contacts
- Chris Boultinghouse, CAB Designs: CABdesigns@aol.com
- Bob Dodgson, Dodgson Designs: DodgsonB@eskimo.com
- Gordon Jennings, CVRC club: GJennings@slonet.org
- Fred Mallett, Heart of Texas SS: FrederM@aol.com
Transcribed from original scans by AI. Minor OCR errors may remain.

