
Radio Control: Soaring
Dan Pruss
PHOTOS this month are of a few planes you aren't likely to see at the local schoolyard. Wolfgang Schluter, LSF Coordinator for Germany, is pictured with his original design "Inkognito." If your first impression was that the picture should have been part of this month's RC Sport Aerobatics column, you weren't far off. The model is only one of several that a group within Schluter's club fly as aerobatic sailplanes. The maneuvers are right out of the FAI rule book for their powered cousins and, in looks and performance, the planes compare closely to the powered counterparts.
This scribe recently witnessed these birds perform when this group from Hanover, Germany was holding a club contest. The task: to fly the complete FAI stunt pattern within seven launches. The flier would announce his maneuvers prior to launch and then execute these same stunts "on the way down." Landings then figured into the scoring also.
The first set I watched was done by Schluter as he came off of an excellent tow of about 250 meters. This was followed immediately by a spin. Recovery was made and a dive followed to pick up airspeed. This was necessary for the next maneuver—a vertical eight. Speed was again increased to provide the necessary "knots" for a series of aileron rolls. This time, after the speed decreased, the nearly eight-pound bird was rolled on its back and split "S"ed to a landing. The flight took about the same amount of time it took you to read this. It was also as impressive as any powered performance could be.
Whether there is a future for such tasks in RC sailplanes is difficult to say. Truly, the gents from Hannover have proven the maneuvers can be done. The planes aren't designed to ride out a thermal as much as they are for aerobatics. And since the maneuvers are accomplished "on the way down," the seven rounds are a necessary requirement and not a factor to be taken lightly when scheduling contests.
By the way, this same group was using a winch for only the second time and they were so impressed with its operation, they left the high-starts in their cars. The winch was designed around an Opel auto starter motor and, because of the starter's short shaft, a narrow drum was used for the line. Towline was of monofilament. The winch gave the spectators a more grandstand-like view.
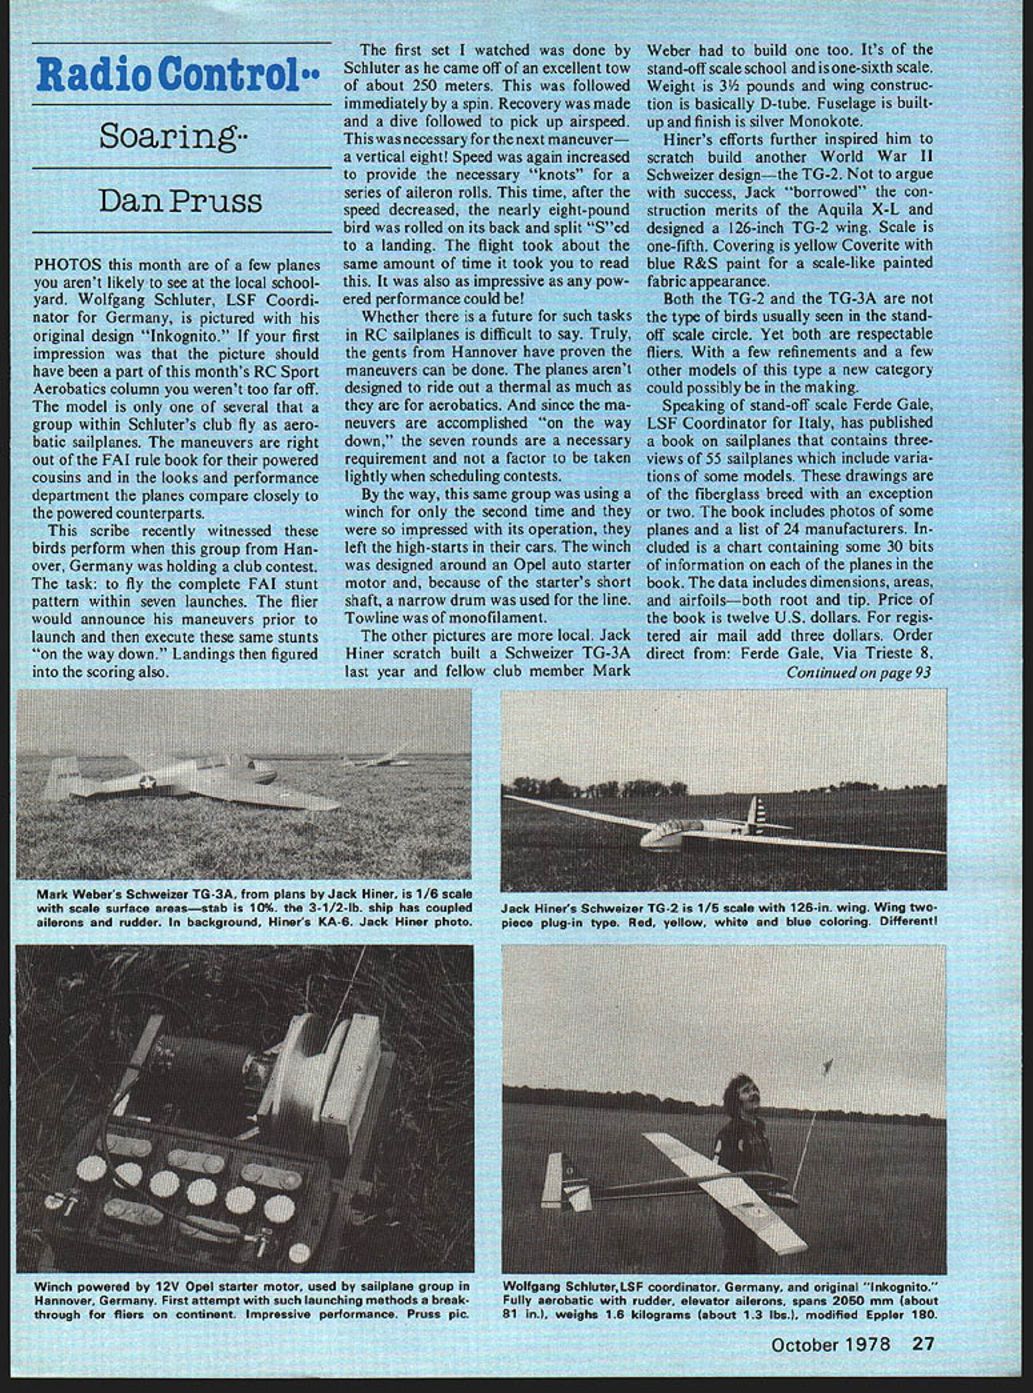
The other pictures are more local. Jack Hiner scratch-built a Schweizer TG-3A last year and fellow club member Mark Weber had to build one too. It's of the stand-off scale school and is one-sixth scale. Weight is 3-1/2 pounds and wing construction is basically D-tube. The fuselage is built up and the finish is silver Monokote.
Hiner's efforts further inspired him to scratch-build another World War II Schweizer design—the TG-2. Not to argue with success, Jack "borrowed" the construction merits of the Aquila X-L and designed a 126-inch TG-2 wing. Scale is one-fifth. Covering is yellow Coverite with blue R&S paint for a scale-like painted fabric appearance.
Both the TG-2 and the TG-3A are not the type of birds usually seen in the stand-off scale circle. Yet both are respectable fliers. With a few refinements and a few other models of this type, a new category could possibly be in the making.
Speaking of stand-off scale, Ferde Gale, LSF Coordinator for Italy, has published a book on sailplanes that contains three-views of 55 sailplanes which include variations of some models. These drawings are of the fiberglass breed with an exception or two. The book includes photos of some planes and a list of 24 manufacturers. Included is a chart containing some 30 bits of information on each of the planes in the book. The data includes dimensions, areas, and airfoils—both root and tip. Price of the book is twelve U.S. dollars. For registered air mail add three dollars. Order direct from: Ferde Gale, Via Trieste 8.
Contest Results
Rick Pearson and his Sailaire turned in a respectable 20:56 for a first-round flight, but Blaine Rawdon and his original design, Mirage, was best of the round with a flight of 15 minutes and 20 seconds. Dick Shilling had a 17:38 in the second round. Rawdon pushed the Mirage beyond its limits and the bird came apart in the air, but Blaine had already earned enough points to come out on top of the 19 entries.
Rawdon's Mirage is a bird with a wingspan of 114 inches and an area of 923 square inches. Empty, the ship's wing loading is only 5.15 ounces per square foot. The wing is of the three-piece type with the middle third flat—no dihedral; the outer panels provide polyhedral. Turbulator spars line the wing between the leading edge and the main spar.
Despite the fact the Mirage had come "unglued" when Blaine pushed it (all planes have a "red line," full scale or model), the Mirage is still a plane to keep your eye on.
Top five:
- Blaine Rawdon
- Bob Sutton
- Dick Shilling
- Rick Pearson
- Larry Pettyjohn
A Note on P.R.
From Jim Newman, the artist in residence at Midwest Products Co., came a pamphlet that members of his club—the Lake County RC Model Soaring Society—pass out to non-members, especially spectators. The pamphlet starts off by announcing boldly, "Hello! We are your quiet neighbors." It then goes on to briefly describe the club's interests, flying site, and includes an invitation to visit the club for an afternoon.
It's a neat little bit of public relations and a natural way for all clubs to get a little positive publicity. A few information sheets of this type in every sailplaner's toolbox could earn a few more feathers in the hat for RC soaring.
Dan Pruss, Rt. 2, Box 490, Plainfield, IL 60544.
Canopy Construction
Dave Chesney
Before final assembly of the vertical and horizontal formers, protect the rear bulkhead from permanent attachment by covering the forward side of the bulkhead with 3" strips of masking tape. Now, bolt the formers to the bulkhead. The assembly, when viewed from the front, will form quadrants; these quadrants are filled with blocks of urethane foam. The urethane foam may be contact-cemented to the vertical and horizontal formers and to the masked rear bulkhead.
After all foam has been installed, sand to the final canopy shape; make sure that all outside edges of the formers and bulkhead are exposed. Templates or a wire contour gauge may be used to aid in sanding to the final shape. Urethane foam sands very easily, but the dust is surprisingly abrasive; take care. The final shape should be vacuumed to remove any excess dust. At this point, any unwanted depressions may be filled with a mixture of urethane dust and polyester resin.
The following steps should be accomplished outside, as the fumes from the resin are very irritating. Also, be sure to follow the instructions supplied with your brand of resin. I used Hobbypoxy resin and an 8-ounce fiberglass cloth. The cloth was purchased from a local boating and hardware store.
Before mixing the resin, prepare the canopy for covering by wrapping 3" masking tape around the circumference of the rear bulkhead so that it overlaps the gap between the foam and wood and extends beyond the rear bulkhead approximately one-half inch; this will prevent the resin and cloth from sticking to the rear bulkhead. Now, cut two pieces of cloth large enough to cover the top and bottom halves of the canopy. A slight overlap at the center former is desirable. Mix enough resin to glass the bottom half of the canopy. Lay the cloth in place and brush on the resin, pulling the cloth and smoothing so as to follow the contours. Make sure ample resin is used at the exposed wood surface of the horizontal former. When you are satisfied, set the work aside to cure.
When the bottom half has cured, trim the excess cloth at the former with a sharp knife and lightly sand. Do not trim the cloth flush with the rear bulkhead. Repeat the process for the top half.
After trimming, mix enough resin to cover the final shape, paint it on, and allow to cure. Once the completed canopy has cured, sand the unit with #200 wet sandpaper to remove the large lumps and irregularities; be careful not to sand through the cloth. If you do sand through, prepare a patch, resin in place, and repeat the process until the large imperfections are gone. Now begin sanding to a smooth finish with #500 wet sandpaper.
If there are low areas, use a filler. I used Hobbypoxy Stuff, but the new Hobbypoxy P.F.C. is superior. Final sanding should yield a smooth, well-contoured surface, ready for the finish of your choice.
Now trim the glass cloth flush with the rear bulkhead. Remove the bulkhead mounting screws and carefully pry the bulkhead free of the foam and tape. Remove all masking tape from the bulkhead and prepare for finishing.
The foam may now be removed from the canopy by digging out large chunks with a screwdriver and finally by using an electric drill with a wire brush attachment. Vacuum the inside of the canopy shell and seal with one coat of resin.
You should now have a canopy and bulkhead ready for painting and attachment to your helicopter. The finished product will weigh slightly more than a factory canopy, but in most cases weight is needed in the nose anyway. Don't forget to balance the machine.
As I close, I'm looking forward to the Nats; hope I'll see you there. Maybe we'll see one of those inverted spins we've read about. Wow! I'm happy just to recover from a tail rotor turn.
Dave Chesney, Rt. 9, Box 621A, Greensboro, NC 27407.
Transcribed from original scans by AI. Minor OCR errors may remain.

