
Radio Control: Sport-Aerobatics
Ron Van Pulte
THE FINAL VOTE from the R/C Contest Board on 1976-1977 competition rules came out just after I sent in last month's column. If you haven't seen them, dig out the January 1976 Model Aviation and take a peek at pages 61-64. On the surface, the changes appear to involve only minor revisions to the Pattern schedules and renaming of the classes from A, B, C, and D to Novice, Advanced, Expert and Masters. However, closer examination shows that the maneuvers for the Novice and Advanced classes must be performed in a prescribed upwind-downwind sequence. It will probably cause some people (including me) a little grief because we have gotten used to doing certain maneuvers in a particular direction no matter which way the wind blows.
The changes to the Pattern schedules look good to me. I doubt that anyone, especially the judges, will mourn the passing of the Figure Eight from the old Class A schedule. It didn't qualify as a good maneuver because it was so difficult to judge uniformly.
The new maneuvers in the Novice class will take some getting used to because they require something unusual for fliers who are just getting into Pattern flying. The One Outside Loop maneuver will be a "show stopper" for some fliers who have seldom pushed the elevator stick forward. Beginner-type airplanes don't generally fly too well inverted because they usually have substantial dihedral to provide lateral stability. When an airplane with a lot of dihedral is flown inverted, the dihedral is destabilizing. A beginner who dares to try an outside loop or inverted flying with this type of airplane soon decides that it's a risky business. A pilot who moves up from a beginner's airplane to one better suited for Pattern work will probably be edgy about the first few outside loops. A bit of practice should cure that.
The other maneuver which will also take some practice and getting used to is the Two-Point Roll. However, it should be a lot easier to get used to than the outside loop.
The Touch-and-Go maneuver has always been a problem for me. My regular flying field has a 200-ft.-wide by 4000-ft.-long runway and I seldom practice the maneuver in a limited area. Consequently, when the runway at a contest is 30 ft. by 150 ft., I tend to clutch. Needless to say, the removal of the Touch-and-Go delighted me. However, thinking about the Non-rolling Figure M in its place brought me back down again.
The Four-Point Roll and FAI Horizontal Eight, which were removed from the Advanced class, are difficult to perform well and easy to judge, two of my primary criteria for maneuver selection. The Slow Roll and Double Immelmann also meet my criteria, so I can't really complain about the switch, except on a personal level. The Four-Point Roll and FAI Horizontal Eight had just become comfortable to me. Can't have everything!
The only real criticism of the new Advanced Pattern is the inclusion of the Two-Point Roll. It seems to be an appropriate maneuver for the Novice class, but it is not sufficiently difficult relative to other maneuvers in the Advanced class. I'd like to see the Four-Point Roll put back in the pattern in place of the Two-Point Roll in the Advanced class.
The Expert pattern is basically the FAI pattern with a Non-rolling Figure M and the removal of the Eight-Point Roll and the Running Eight. There were very few contests last year in which the old Class C pattern was flown, so this should be a welcome change. The Master Pattern is the full FAI Pattern and will probably continue to be the most-used one in contests around the country.
I received a very nice letter from Kemp Bunting, the R/C Category Director at the Nats. Kemp corrected my statement that there were only two or three fliers remaining near the end of Round 6 when the heavy winds hit. He said, "... the 6th round of D Pattern Qualifying was cancelled because the longest line had seven planes to fly ... " Since I was at Site B, the longest line must have been at Site A. My assumption that the lines were nearly even must have been wrong.
Last month I promised to present a technique for calculating the center of mass location of a model. Because each of us likes to set up his airplane differently, the calculated center of mass should be considered the starting point for test flying. The technique guarantees that the airplane will be stable in pitch. If more maneuverability is required after test flights, the center of mass should be moved aft of the calculated point.
The technique is accurate for airplanes with swept or tapered (or both) wings and horizontal tails. The only real limitation is that the wing and tail leading and trailing edges be straight. The technique is set up for monowing airplanes; if there are enough requests for a similar technique for biplane airplanes, I'll present it in a later column.
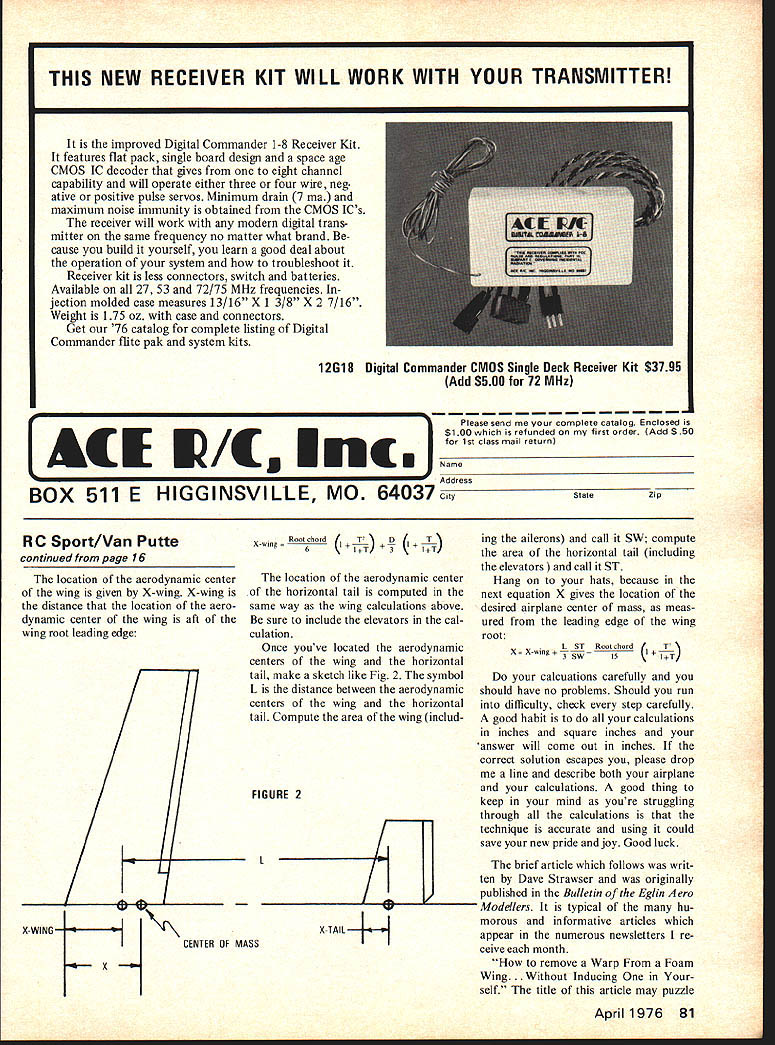
Let's start by computing the aerodynamic center of the wing. Fig. 1 shows half of a swept wing. If there is no leading edge sweep, dimension D will be zero. The taper ratio, T, is the ratio of the tip chord to the root chord.
FIGURE 1
Radio Control: Sport-Aerobatics
The location of the aerodynamic center of the wing is given by X-wing. X-wing is the distance that the location of the aerodynamic center of the wing is aft of the wing root leading edge:
[FIGURE 2]
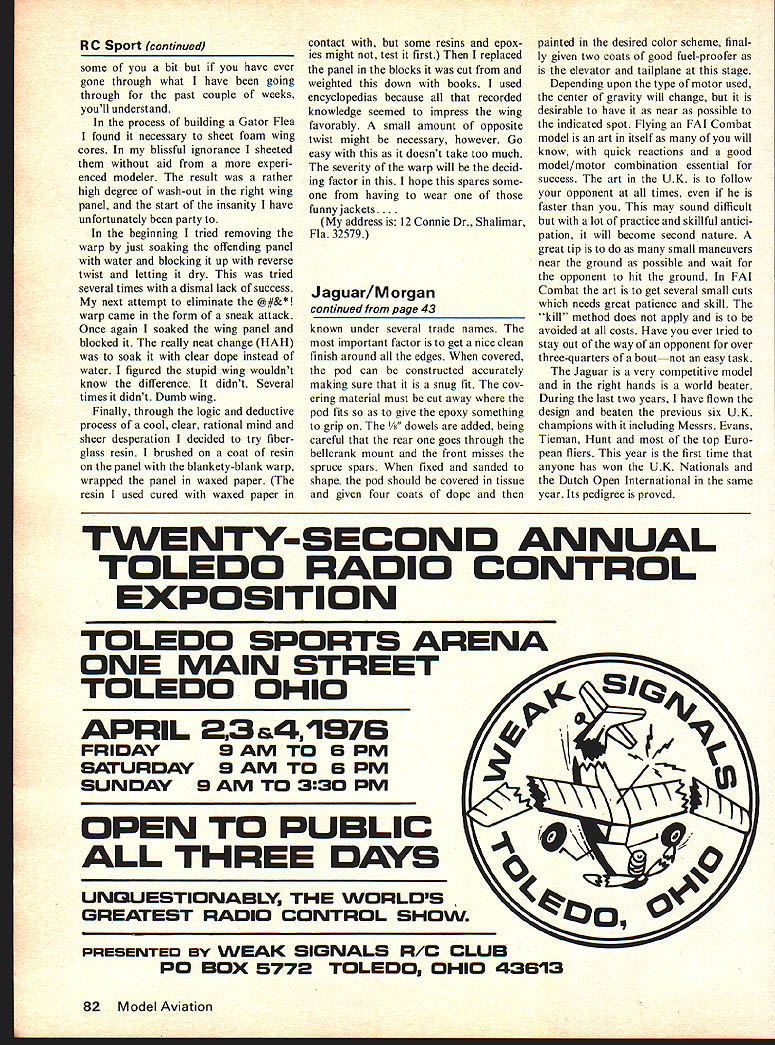
The location of the aerodynamic center of the horizontal tail is computed in the same way as the wing calculations above. Be sure to include the elevators in the calculation.
Once you've located the aerodynamic centers of the wing and the horizontal tail, make a sketch like Fig. 2. The symbol L is the distance between the aerodynamic centers of the wing and the horizontal tail. Compute the area of the wing (including the ailerons) and call it SW; compute the area of the horizontal tail (including the elevators) and call it ST.
Hang on to your hats, because in the next equation X gives the location of the desired airplane center of mass, as measured from the leading edge of the wing root:
X = X-wing + (L · ST) / (SW + ST) - (root chord) · (1 / (1 + T))
Do your calculations carefully and you should have no problems. Should you run into difficulty, check every step carefully. A good habit is to do all your calculations in inches and square inches and your answer will come out in inches. If the correct solution escapes you, please drop me a line and describe both your airplane and your calculations. A good thing to keep in your mind as you're struggling through all the calculations is that the technique is accurate and using it could save your new pride and joy. Good luck.
The brief article which follows was written by Dave Strawser and was originally published in the Bulletin of the Eglin Aero Modellers. It is typical of the many humorous and informative articles which appear in the numerous newsletters I receive each month.
"How to remove a Warp From a Foam Wing... Without Inducing One in Yourself." The title of this article may puzzle some of you a bit but if you have ever gone through what I have been going through for the past couple of weeks, you'll understand.
In the process of building a Gator Flea I found it necessary to sheet foam wing cores. In my blissful ignorance I sheeted them without aid from a more experienced modeler. The result was a rather high degree of wash-out in the right wing panel, and the start of the insanity I have unfortunately been party to.
In the beginning I tried removing the washout by just soaking the offending panel with water and blocking it up with reverse twist and letting it dry. This was tried several times with a dismal lack of success. My next attempt to eliminate the @#&*! warp came in the form of a sneak attack. Once again I soaked the wing panel and blocked it. The really neat change (HAH) was to soak it with clear dope instead of water. I figured the stupid wing wouldn't know the difference. It didn't. Several times it didn't. Dumb wing.
Finally, through the logic and deductive process of a cool, clear, rational mind and sheer desperation I decided to try fiberglass resin. I brushed on a coat of resin on the panel with the blankety-blank warp, wrapped the panel in waxed paper. (The resin I used cured with waxed paper in contact with, but some resins and epoxies might not, test it first.) Then I replaced the panel in the blocks it was cut from and weighted this down with books. I used encyclopedias because all that recorded knowledge seemed to impress the wing favorably. A small amount of opposite twist might be necessary, however. Go easy with this as it doesn't take too much. The severity of the warp will be the deciding factor in this. I hope this spares someone from having to wear one of those funny jackets. (My address is: 12 Connie Dr., Shalimar, Fla. 32579.)
Transcribed from original scans by AI. Minor OCR errors may remain.

