
Radio Control: Sport/Aerobatics
Ron Van Putte
Fuel foaming and filters
Once in a while, topics in my columns touch a nerve with readers and I get all sorts of responses. Such was the case with two recent subjects: fuel foaming and control-hinging techniques.
Many people wrote to say they had tried using a large Sullivan filter under the engine to alleviate fuel-foaming effects and that it had worked for them, too. Still others wrote to say they couldn't find the old-style large Sullivan filter. No wonder—Sullivan doesn't sell them anymore. I discovered that when I tried to order more.
Then I got a letter from Joe Sullivan (Richardson, TX). Joe wrote:
- "I read your account of fuel foaming problems with some interest. We RC car racers might not know an aileron from an elevator, but we do know how to eliminate fuel foaming! Use a sintered bronze filter in the tank. Du-Bro makes a good one—No. 161.
- "This filter seemed to be quite popular a few years ago until one of the columnists knocked it. Since then, use of this filter seems to have declined and foaming problems seem to have increased. I seem to remember that the columnist had problems with the filter clogging (he probably left fuel in the tank). Also, castor-oil fuels would be more likely to clog a filter than the current synthetic-oil fuels.
- "The other solution (not as good, but should usually work) is to use a sintered bronze filter in the fuel line. Nobody makes one, you say? Delta Mfg. does, for the car people: Part No. FF770."
Thanks, Joe. I'll try both solutions.
While we're on the subject: I thought my fuel-foaming problem was solved until I broke a prop during a practice session and installed a substitute prop without balancing it. As you might have guessed, the problem returned with a vengeance. Not even the large filter will help when a badly balanced prop is installed. After I balanced the prop, the problem went away.
At a contest in Cullman, AL, I got some of the best engine runs I'd ever had—until my airplane crashed due to radio failure. Several fliers approached me after I'd retrieved the debris and said, "Well, we'll probably have to read all about your crash in the column in a few months, won't we?" The answer is yes.
Radio crash and new system
The crash was strange because I originally thought I'd lost perspective of the airplane in a hazy overcast, since it didn't seem to do what I thought it was supposed to. I should have known better, because the system had been acting kind of "mushy" and out of trim earlier in the flight. The next weekend I crashed my radio-test airplane while checking out the radio.
I decided to retire an eight-year-old radio system rather than get it repaired and bought a new JR Century VII system. Needless to say, you'll probably hear about my adventures with the JR in the future. The price is certainly right. One hint that fellow JR owners might find useful: the Futaba FSH-20 grommets are a perfect fit for several JR servos, and they're a lot more convenient to use than the odd grommets that come with the system (the ones that have to be cut out with scissors). (Thanks to Steve Helms for that tip.)
Hinging control surfaces
A lot of you mailed your ideas about the perfect method for hinging control surfaces. I appreciate them. Responses fall into three basic categories: use of toothpicks, use of pins, and use of neither toothpicks nor pins. Below are edited versions of three representative responses.
#### Toothpick method (John Trought, Richwood, TX) John's method, summarized and organized into steps:
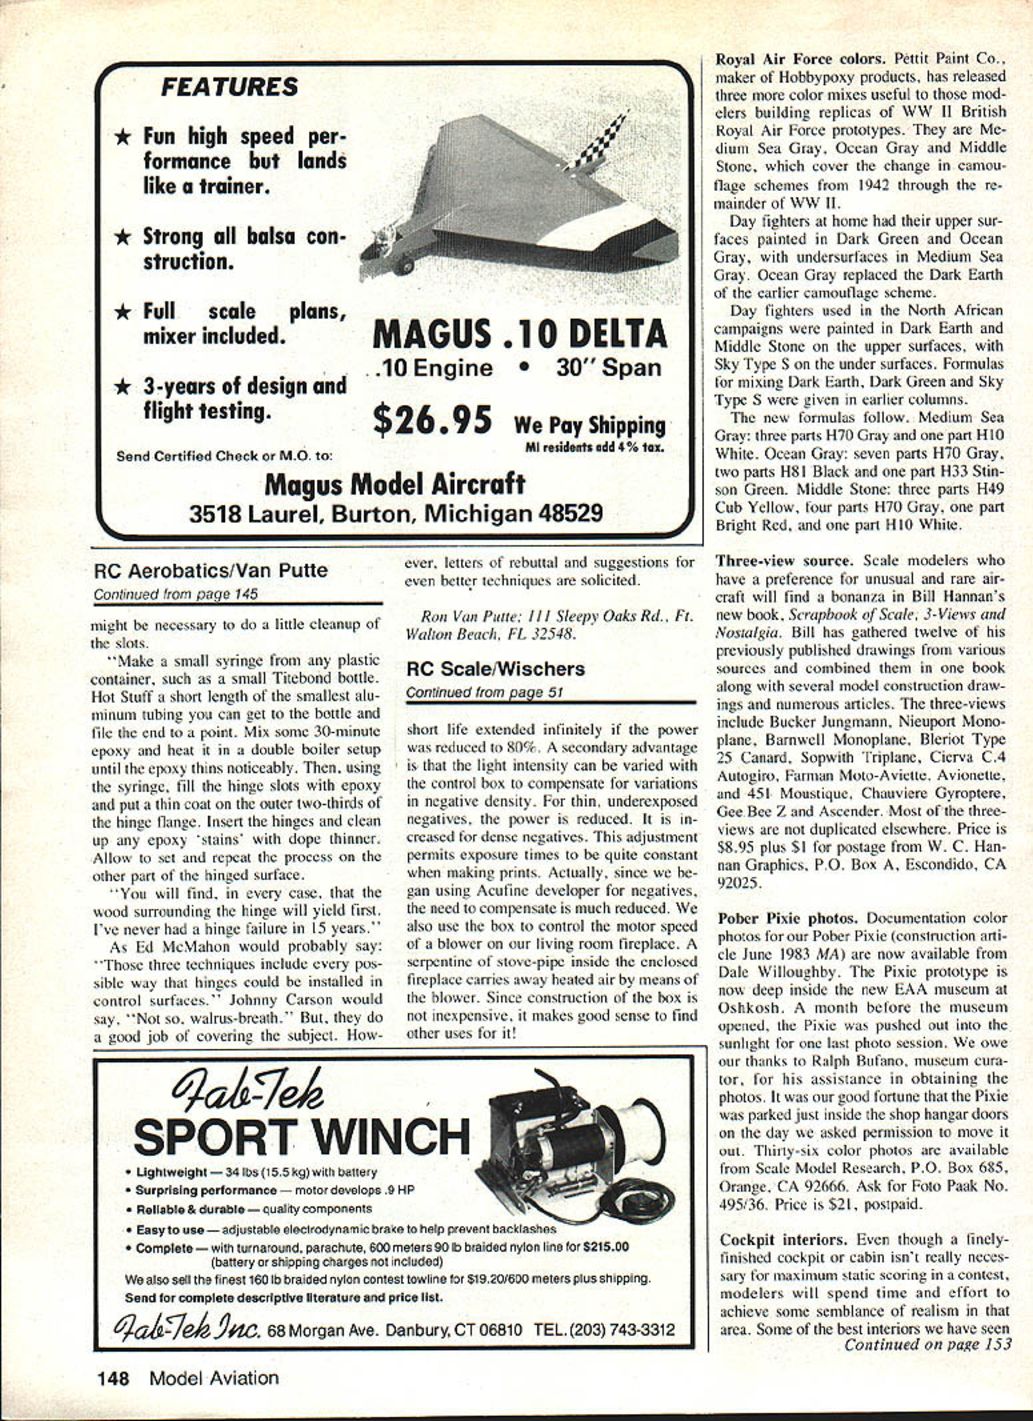
- Prepare the airframe to receive the final prime coat with all hinge pockets cut in all surfaces (if painting). If covering with fabric or plastic, cut a 1-inch strip of covering material as long as required by the control surface and iron it in place on all hinged surfaces.
- Put a glob of petroleum jelly (Vaseline) in a small metal jar top and heat it until it becomes liquid. The liquid should be deep enough (about 3/32 in.) to cover the movable part of the hinge.
- Fold the hinges shut, dip them into the liquid Vaseline, and set them aside until the Vaseline cools.
- Install the hinges in all movable surfaces and drill two No. 50 holes about 3/16 in. back from the edge of the movable part of the hinge and about 1/4 in. apart. Use a backup piece of hardwood when drilling to prevent splintering.
- Put a drop or two of slow-cure CyA into each hole and install round toothpicks all the way through.
- When the CyA sets, cut the toothpicks off with side cutters and sand smooth with a fine-grade abrader (or 320-grit sandpaper on a 1-in.-wide piece of hardwood). Do this carefully so you don't gouge the surface; when you can't feel the toothpick with your fingers, it's smooth enough.
- Repeat when installing the movable surfaces to the airframe. Then apply the final prime coat or covering—the Vaseline keeps the final finish from binding the hinges, and they will be "loose as the proverbial goose."
#### Pin method (Dave Pastor, Pleasanton, CA) Dave favors pinning. His method:
- Use pin-less type hinges (preferably those with molded-in "holes" to allow epoxy to "rivet" them in place). They are easier to fit; squeezed-out epoxy will simply break off when flexed.
- Cut all hinge slots and check the fit and function of control surfaces. Only after the finish is applied does he epoxy the hinges in place.
- Once satisfied that all control surfaces work properly, "pin" the hinges: push a heavy pin (T-pins work great) into the underside of the model until it contacts the outer hinge. Cut the pin off about 1/8 in. away from the surface and, with a flat tool, press the pin in flush so it penetrates the hinge. Do this on both sides of the hinge.
- A drop of Zap or similar adhesive will make it permanent. The pin is invisible from the top and nearly so from the bottom. Dave used this on a ST .46-powered Goldberg Shoestring in 1977 and it is still flying great.
#### Epoxy/teeth method (John Hankes, Verona, WI) John offers a method that avoids toothpicks and pins:
- If using nylon hinges, coat the hinge flanges with carbolic acid using a Q-Tip, making sure the acid gets into the hinge line. Leave for ten minutes and then wash with water. This treatment creates "teeth" on the hinge surface.
- Slot the unfinished surfaces so the hinge fits snugly but not tightly. Proceed to finish the surfaces as desired. If the surfaces are primed and painted, it might be necessary to do a little cleanup of the slots.
- Make a small syringe from any plastic container (for example, a small Titebond bottle). Hot-stuff a short length of the smallest aluminum tubing you can get to the bottle and file the end to a point.
- Mix some 30-minute epoxy and heat it in a double-boiler setup until the epoxy thins noticeably. Using the syringe, fill the hinge slots with epoxy and put a thin coat on the outer two-thirds of the hinge flange.
- Insert the hinges and clean up any epoxy stains with dope thinner. Allow to set, then repeat the process on the other part of the hinged surface.
John reports that in every case the wood surrounding the hinge yields first. He hasn't had a hinge failure in 15 years.
Ed McMahon might say, "Those three techniques include every possible way that hinges could be installed in control surfaces." Johnny Carson might say, "Not so, walrus-breath." Still, these three methods do a good job of covering the subject. Letters of rebuttal and suggestions for even better techniques are solicited.
Ron Van Putte 111 Sleepy Oaks Rd. Ft. Walton Beach, FL 32548
Transcribed from original scans by AI. Minor OCR errors may remain.

