

Radio Technique
By George M. Myers
HOW FAST is it turning? This month's subject is tachometers.
The first one I remember using was called a Vibra-Tach. It looked like a small X-Acto knife, but a piece of music wire extended from the end where we usually see a blade. To use the tool you rested it on the engine and slid a ring which encircled the handle back and forth until the free end of the music wire took up a large oscillation.
The body or "handle" was engraved with an rpm scale, and you read the step nearest the position where the ring had to be to let the wire show the wide vibration. It worked on the principle of resonance. When the mass, length, and stiffness of the wire combined to show the wide vibration, the free part of the wire was in resonance with the engine. There were several difficulties with this instrument, among them being finding access to a cowled engine and the unavoidable effects of prop wash.
Reed and mechanical tachometers
An improvement of sorts was made when the vibrating rod was made into a reed like that found in a harmonica. A group of such reeds could be mounted in a box which protected the reeds from the environment. This design was called a Frahm tachometer. It needed a unique size of reed to indicate each of the rpms to be measured. Then you had to worry about "doubling," which is a situation wherein a reed responds quite well to an rpm twice that for which it was cut.
The next design I recall was called a Starrett tachometer. Used primarily in lathes and milling machines to set the rpm of the work or cutter, the device consisted of a rubber cup on a shaft and a worm gear and pinion enclosed in a metal housing.
To use it you pressed the rubber cup against the rotating element (a prop spinner, for instance) and put your thumb over the pinion gear. One point on the pinion gear had a malformed tooth which caused the pinion to jump each time that tooth passed over the worm gear, and you could feel it and count the number of times it occurred.
You held the Starrett tachometer against the rotating element and counted the jumps against a stopwatch for six seconds. There was a 10:1 ratio in the worm and pinion, so if you counted six jumps in six seconds, you calculated the rpm as 10 x 10 x 6 = 600 rpm. The pinion carried a scale divided in 10 major parts, so if the final disk reading was 0.3, then the rpm was 10 x 10 x 6.3 = 630 rpm. It was handy in the tool shop but not much use to modelers.
Strobe and photo tachometers
About 1940, Dr. Edgerton at MIT invented the strobe light. This was similar to the devices now used by photographers, but in the Strob-O-Tach the flash repeated many times per second. The flashing frequency was carefully calibrated and controllable over a wide range. You painted a distinctive mark on the rotating object then pointed the Strob-O-Tach at it. As you changed the flashing frequency, you could make the painted spot seem to stand still—or move with or against the known rotation.
This device depended on a property of the human eye called "persistence of vision," but it was also subject to doubling. Since everything depended on seeing the object as it was lighted by the strobe, best results were obtained in dim light or darkness. These properties plus the fact that the tool was expensive, heavy, and bulky kept it from being used much by modelers.
The next significant device was the Heathkit Thumb-Tac. This was a photo tachometer which counted pulses of sunlight reflected from a spinner or propeller blade. If pointed to look through the propeller disk the photo tachometer could read the dark shadow of each blade passage.
Housed in a sturdy metal case and being relatively cheap, the Thumb-Tac was quickly accepted and widely used. It was an analog device, so the indicating needle responded almost immediately to changes of rpm and settled quickly on a stable indication. The main problem with the Thumb-Tac was its very small meter which resulted in 1,000-rpm divisions on the 25,000-rpm scale.
Royal soon brought out the Pro-Tach which was an analog device like the Thumb-Tac. The Pro-Tach had a much larger meter and five discrete 5,000-rpm operating ranges selected by five push buttons. Rpm could be read within 200 rpm at any rpm. Pro-Tach quickly grabbed the high end of the model market, but at three times the price of the Heathkit it did not drive the Thumb-Tac off the market.
Contemporary with the photo tachometer were several motor/generator tachometers. The design was simple, and parts were easily obtained. A servo motor was fitted with a rubber cup on its shaft, and the terminals of the motor were connected to a voltmeter. Servo motors contain permanent magnets; therefore, when a servo motor is driven by an external power source it will generate a voltage that varies almost linearly with rpm. The primary objection to this otherwise cheap and practical device is that it puts a small load on the motor being measured, and this consequently reduces the rpm a small amount.
Digital tachometers
With the advent of digital electronics, the technology moved into the field of model tachometers. The Accu-Tach II was one of the first digital units to gain wide acceptance. It used integrated-circuit counting techniques and had the ability to resolve rpm to an accuracy of one part in 1,000 — a feat which is beyond the capability of all but the most expensive analog devices.
But, in order to keep the price down to the levels of analog devices, the digital units had to suffer with a long settling time. It is customary for a digital photo tachometer to take three to five seconds to change from an indication of zero to whatever final rpm it will reach. Three to five seconds is a long enough time for an engine to change rpm or for a shadow to cross the sun or for the operator's hand to shift the unit's aiming point to a new position on the propeller. Any of these events is enough to cause the digital photo tachometer to lose its count, requiring it to start over again for an even longer (apparent) settling time.
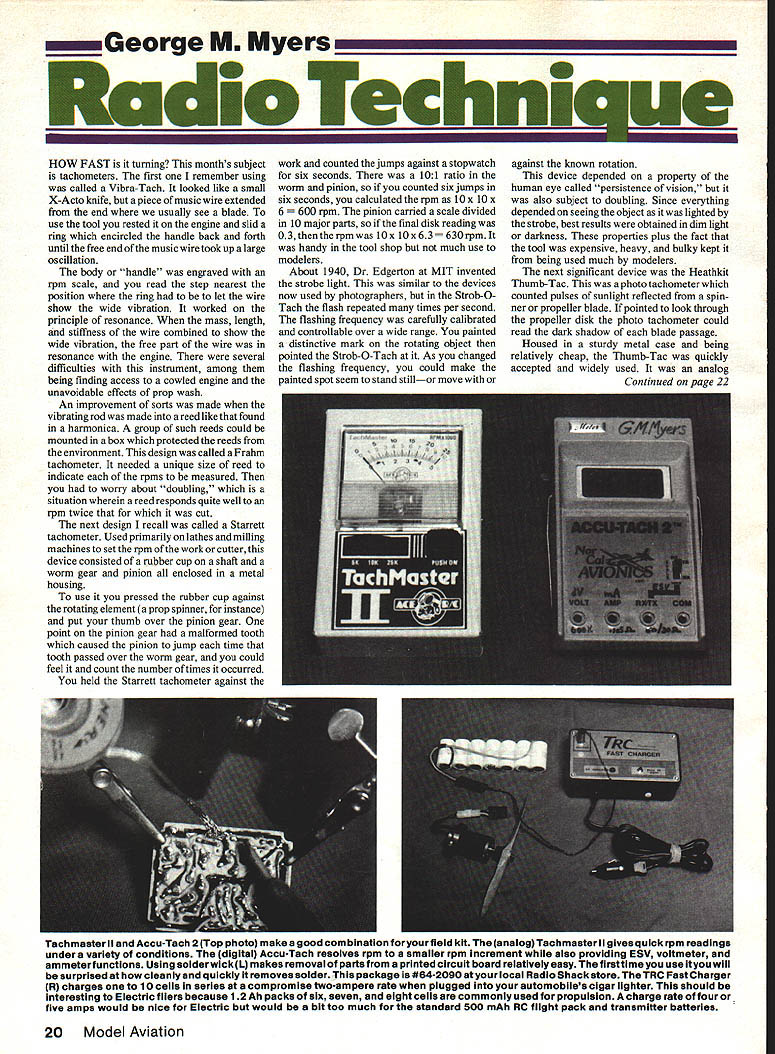
Making best use of the digital devices already present, the Accu-Tach people included (at no additional cost) a voltmeter (±19.99 VDC), a voltmeter-with-load (similar to an ESV), and a milliammeter (which measures 1–999 mA). I must confess that my field kit has been carrying both a Heath Thumb-Tac and an Accu-Tach II for several years. But, as far as I know, the Heath Thumb-Tac is no longer available. The Accu-Tach II is still available from Nor-Cal Avionics, P.O. Box 70956, Sunnyvale, CA 94086.
Tachmaster II
Now we have the Tachmaster II from Ace R/C, Inc., Box 511, Higginsville, MO 64037. This is a three-range version of their earlier Tachmaster. For my money it makes an excellent replacement for the Thumb-Tac. Being an analog device it snaps to a reading almost instantly. The rpm meter is provided with three scales: 0 to 5,000, 0 to 10,000, and 0 to 25,000. A push button (spring-loaded "Off") activates the instrument which is powered with a nine-volt dry battery. A slide switch selects the range.
The primary advantage of the Tachmaster II is that the meter scale is easier to read than the Thumb-Tac, and it is cheaper than the Pro-Tach (which still has the advantage of all those push-button-selected ranges). I spent a pleasant two hours building the kit. Tachmaster II is available as a kit as well as a built-up and calibrated tool. I would advise that you have an ohmmeter available if you choose to build this kit, because the colored stripes are very hard to see on the 1/10-watt resistors. I misread several even though I was using a headband magnifier. The VOM saved me from having to remove resistors which were soldered in the wrong place due to misinterpreting the color code.
That brings to mind another thought: you should have some solder wick handy whenever you build an electronic kit. All you need to do to release a component is to lay the wick on the joint and then set the soldering iron on the wick. The solder wick is a tube made of braided fine copper wire, and it sucks the hot solder right out of a joint.
It may seem a bit peculiar, but I compare all optical tachometers with my old Heathkit Thumb-Tac. The Thumb-Tac has a wide angle of view, so its alignment to the spinning propeller isn't critical. The Thumb-Tac also has a built-in stand and a switch that locks On so you can set it on the ground and have both hands free for controlling the model. But it has that tiny meter which makes precise measurements almost impossible.
Like you, I put a lot of my cash into gadgets for the hobby. If I use something for a while and find that it performs well enough to earn my endorsement, then I may say so in this column. The same goes for things that are sent to me.
I now use the Tachmaster II for quick field readings because the large black-on-white meter is easier to read than the Thumb-Tac's, and the analog circuit gives nearly instantaneous readings. I have added a stand and have changed the push button to the On/Off type.
TRC Fast Charger
The TRC Fast Charger is intended to be used as an adjunct to the slow charger that came with your radio system, not as a replacement for it. It will pump up a pack that has been exhausted in service in about 30 minutes. The TRC Fast Charger plugs into your automobile's cigarette lighter socket, or it can be connected to your starter battery if you wish. However, it draws about 2.2 amps when charging, which may be more drain than you want to put on your starting battery.
If you connect it to a power source with the polarity reversed you will blow an internal fuse. The instructions are quite clear on one thing: you are expected to remain near the charger while it is operating. With those provisos in mind, I think it is a pretty good charger.
The most attractive feature of this charger is that it doesn't care how many cells are connected in series for charging—it will charge from one to 12 cells in series from a 15 VDC source. Since most of you will be charging from an automobile which normally charges at a maximum of 14.4 VDC when the motor is running, better think of it in terms of one to 10 cells. But think how handy that is for charging electric airplane power packs (up to 10 cells in series). This charger handles practically all of your chores for you. It will charge your single-cell Ni-Cd, flight packs, transmitters, and electric power packs. I like it.
George M. Myers 70 Froehlich Farm Rd. Hicksville, NY 11801
When responding to advertisers, mention that you read about them in Model Aviation.
Transcribed from original scans by AI. Minor OCR errors may remain.

