
George M. Myers
Radio Technique
Basic Training
I'm teaching basic RC flying again, after a little layoff. My current student is Stan Harris, and his plane is the Goldberg Eagle which is powered by an OS Max .45. Stan built his airplane correctly, broke the engine at home, and cycled the radio on the workbench (by charging the batteries, then running them down again a couple of times while building the plane and making the radio installation). When he comes to the field, Stan brings a field box equipped with fuel, tools, spare glow plugs, spare props, etc. All of this is very important.
When we got to the field for the first training session, we found that only three test flights were required to make the final control-throw adjustments, set the trims, and take care of other little items that made the airplane ready for use as a trainer. The significant point is that the airplane hasn't been modified since those three test flights. This has simplified Stan's training, because we don't have to waste any time retesting the plane before each session. In fact, we don't even have to make needle-valve adjustments. A very high percentage of Stan's RC system's battery charge is spent on training time in the air.
I have faced far too many beginners who have come to the field unprepared, with the result that they went home again with a list of changes or modifications to be made. Consequently, half of the next session was wasted in test flights before we could get any training done. This kept happening until the inevitable crash, which put everything back to square one. Such students get a very low percentage of battery charge as training time.
I now think that the Goldberg Eagle is a pretty good first airplane. It is big enough to be seen, and it carries large enough wheels to push through the grass and lumps of an unprepared field. The big, flat-bottomed wing makes short takeoffs and gentle landings very easy. The .45 engine provides far more power than is needed (except when making takeoffs from unprepared fields, where "all the power you can get" is what you want). Half-throttle is plenty for inside loops, rudder rolls, and other basic flying.
When built with the recommended dihedral, the airplane responds best to rudder and elevator. Aileron rolls are extremely slow. At first I didn't like this handling characteristic. Now I think it is a pretty good idea, because beginners usually over-control in roll with the result that they get the airplane into unusual attitudes—then panic sets in. Having a very lethargic response to the ailerons gives the beginner time to see what is happening.
The plane is very sensitive in pitch, which makes knife-edge flight difficult. The lightly loaded wing simply refuses to quit flying, which makes stall demonstrations difficult and spins nearly impossible. Altogether, a comfortable plane for a beginner.
Don't wait for perfection. Make the student believe that you don't demand perfection from beginners. Look for evidence that the student understands and is trying. Then move on to the next maneuver.
My flight-training plan
My personal preference is exposing the student to the full range of the airplane's capabilities as soon as possible. I do that in the test flights (where I learn what the plane can do). I like to start training with Figure-8s (a level left-hand circle followed by a level right-hand circle, with the crossings in front of the student, upwind and going away).
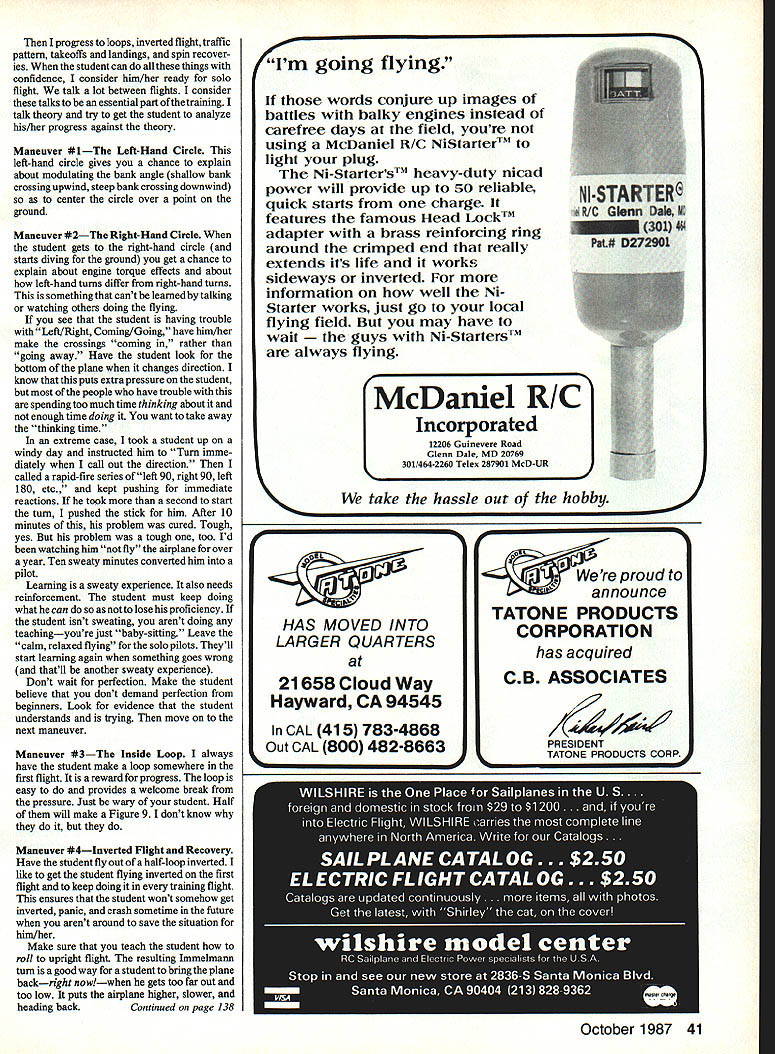
Maneuver #1 — The Left-Hand Circle
The left-hand circle gives a chance to explain about modulating bank angle: shallow bank crossing upwind, steep bank crossing downwind, center circle over a point on the ground.
Maneuver #2 — The Right-Hand Circle
When the student gets the right-hand circle and starts diving toward the ground, you get a chance to explain about engine torque effects and about how left-hand turns differ from right-hand turns. Something can't be learned by talking or watching others do the flying—you must see the student having trouble.
Left/Right, Coming/Going. Have him/her make crossings coming rather than going away. Have the student look at the bottom of the plane as it changes direction to know what puts extra pressure on the student. People have trouble spending too much time thinking about flying and not enough time doing. You want to take away the thinking.
In an extreme case, I took a student up on a windy day and instructed him to "Turn immediately when I call out the direction." Then I called a rapid-fire series of "left 90, right 90, left 180, etc.," and kept pushing for immediate reactions. If he took more than a second to start the turn, I pushed the stick for him. After 10 minutes of this, his problem was cured. Tough, yes. But his problem was a tough one, too. I'd been watching him "not fly" the airplane for over a year. Ten sweaty minutes converted him into a pilot.
Learning is a sweaty experience. It also needs reinforcement. The student must keep doing what he can do so as not to lose his proficiency. If the student isn't sweating, you aren't doing any teaching—you're just "baby-sitting." Leave the "calm, relaxed flying" for the solo pilots. They'll start learning again when something goes wrong (and that'll be another sweaty experience).
Maneuver #3 — The Inside Loop
I always have the student make a loop somewhere in the first flight. It is a reward for progress. The loop is easy to do and provides a welcome break from the pressure. Just be wary of your student. Half of them will make a Figure 9. I don't know why they do it, but they do.
Maneuver #4 — Inverted Flight and Recovery
Have the student fly out of a half-loop inverted. I like to get the student flying inverted on the first flight and to keep doing it in every training flight. This ensures that the student won't somehow get inverted, panic, and crash sometime in the future when you aren't around to save the situation for him/her.
Make sure that you teach the student how to roll to upright flight. The resulting Immelmann turn is a good way for a student to bring the plane back—right now—when he goes too far out and too low. It puts the airplane higher, slower, and heading back.
Second training session — Review the Fundamentals
This means that the student should do each maneuver at least once. As instructor, all you are looking for is confidence that the student can keep the airplane upright and level, and that he/she understands turns.
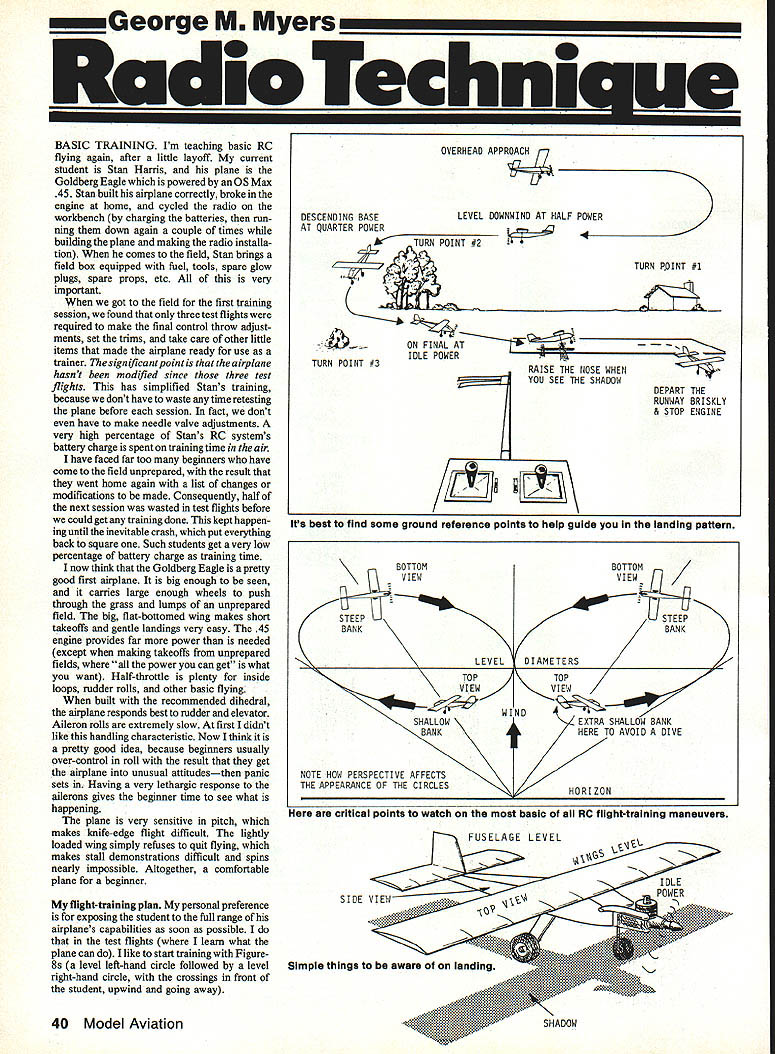
Maneuver #5 — The Traffic Pattern
Try to pick a time when you have the field to yourself. Demonstrate a low, rectangular traffic pattern, pointing out turning-point references (a house, a tree, a big rock, etc.). Point out the way the horizon changes. Comment on how horizon changes can trick you into thinking that you are climbing or descending when in fact you are flying dead level.
If the sun is bright, I tell the student to "Look for the shadow," which usually becomes noticeable when the plane is about three or four feet above the ground. Then I tell the student to "Lift the nose slightly, just before the wheels touch the shadow." Demonstrate a properly flared landing.
Have the student fly a higher pattern, while you teach him to trim the airplane for level flight at half-throttle on downwind, cut back to one-quarter throttle on the base leg and watch for a positive rate of sink, cut back to idle on final and concentrate on keeping the wings level. As the plane passes by, have the student add power to go around again. Have the student make several circuits of the traffic pattern.
Maneuver #6 — Takeoffs
If you are confident that the student can keep the wings level, land the airplane. Put the student behind the airplane for the first few takeoffs. Give him an aiming point at the far end of the runway (a tree, a chimney, etc.) and emphasize that you "Steer with your left hand." (I'm assuming the common Mode II control format, with throttle/rudder on the left stick.) As we all know, an airplane can be trimmed for automatic takeoffs, so the pilot will succeed so long as he/she doesn't interfere too much. Practice for a while, with the student making the takeoffs and the instructor making the landings.
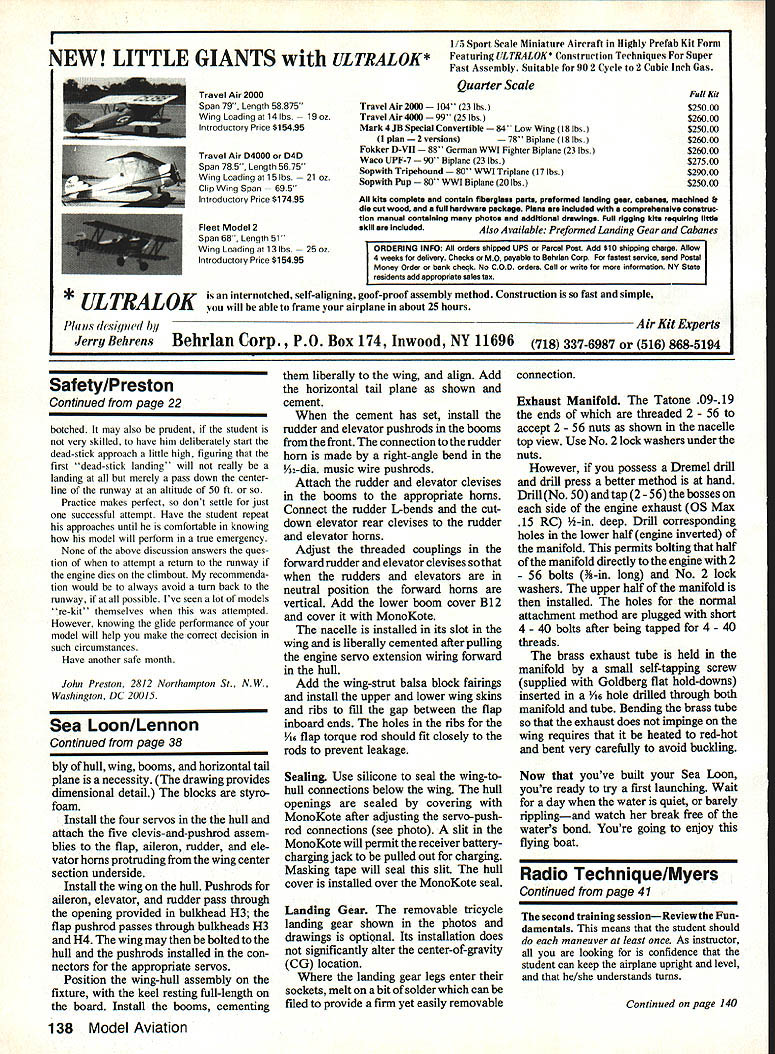
Maneuver #7 — Landings
After the fifth takeoff, guide your student through a landing. Then keep him making takeoffs and landings for a while; I prefer to teach landings coming toward the pilot, because the pilot can see both the airplane and the runway. You have to emphasize that the pilot must see the top of the airplane if he expects to have it land in front of him. It is also a good idea to point out that if the pilot keeps looking at a head-on view of the airplane, it will hit him in the head! Before the airplane lands, the pilot must see some side view.
To my mind, the most important thing you have to teach about landings is what to look for: correct heading, sink rate, wings level, top view, side view, shadow, flare (raise the nose slightly for touchdown).
I agree that speed is also important, but if the plane is going too fast it will simply bounce back into the air a few times. You have to teach your student to keep flying the plane until it is stationary on the ground with the engine stopped.
Along about the third landing, the student will have left/right trouble—depend on it. You will have to be alert to save the plane.
Third training session — Review the Seven Previous Maneuvers
This will take a while, but the student needs the practice.
Maneuver #8 — Stalls, Spins, and Recoveries
Demonstrate a stall and put the plane in a spin or spiral dive. Go through the recovery procedure:
- Throttle back
- Stick centered
Put the plane into a spin. Have the student make a half-dozen spin recoveries. Make sure that you spin the plane in both directions. Throw in a power dive or two. By now you know "what to do." The open question is, "Will he do it?"
There it is: Three sessions and solo. Does that mean the student is "crash-proof"? No way! Is he ready to send his plane into a sky full of five or six other planes dashing hither and yon? Not likely. But, if he keeps his wits about him, he will be able to get the plane up and back down again without damage to it, himself, or others. He'll want a lot of coaching and experience before he is ready to fly the Masters Pattern. As the FAA examiner told me when he signed off my pilot's license, "Now go learn to fly."
George M. Myers 70 Froehlich Farm Rd. Hicksville, NY 11801
Transcribed from original scans by AI. Minor OCR errors may remain.

