
Radio Technique
George M. Myers
RC in Rural America
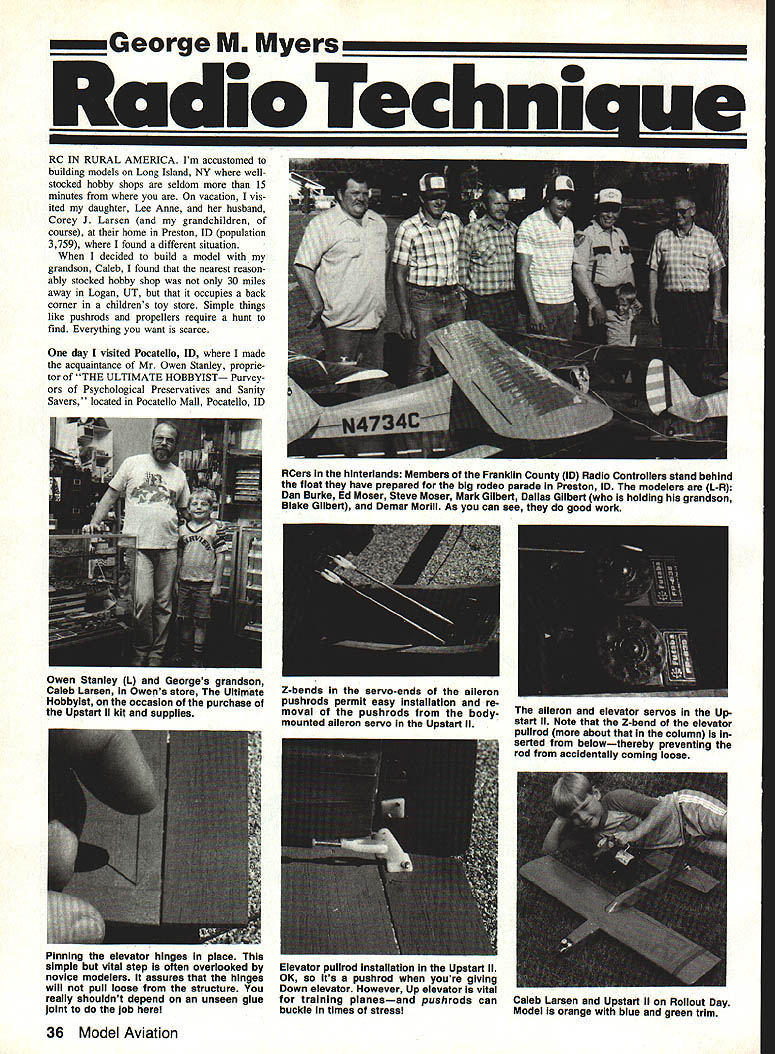
I'm accustomed to building models on Long Island, NY, where well-stocked hobby shops are seldom more than 15 minutes away. On vacation, I visited my daughter, Lee Anne, and her husband, Corey J. Larsen (and my grandchildren, of course), at their home in Preston, ID (population 3,759), where I found a different situation.
When I decided to build a model with my grandson, Caleb, I found that the nearest reasonably stocked hobby shop was not only 30 miles away in Logan, UT, but that it occupies a back corner in a children's toy store. Simple things like pushrods and propellers require a hunt to find. Everything you want is scarce.
One day I visited Pocatello, ID, where I met Mr. Owen Stanley, proprietor of "THE ULTIMATE HOBBYIST" — Purveyors of Psychological Preservatives and Sanity Savers, located in Pocatello Mall, Pocatello, ID. Owen is an interesting fellow, having been employed as a Vietnam combatant; a professor of Military Science, Communications, and Rhetoric.
The Ultimate Hobbyist
THE ULTIMATE HOBBYIST is dominated by a large war-game board (which usually is in active service) and by an HO railroad layout, which is growing. There are the usual plastic models and some RC cars and planes.
Owen sold me an Ace R/C, Inc. kit—an Upstart II—and a Cox Baby Bee .049 engine, with the necessary accessories such as fuel, propellers, glow heads, Hot Stuff, Devcon epoxy, spray-can Pactra Formula U paint, etc. (When you know that a 150-mile round trip will be required for forgotten items, you tend to buy all you need, plus spares, the first time.) I forgot the sandpaper.
Building the Upstart II
During construction of the Upstart II, I used the model to demonstrate to Caleb some important details I have learned over the years.
- Pinning the hinges is one of them. I can't remember how many times I have seen hinges pull out because the builder didn't push toothpicks or straight pins through the hinge tabs. Teach this when they are young.
- I trimmed the wing to a chord of 5-1/4 in., then glued the trailing-edge stock on so as to provide about 3° of "flap down" effect. We left the wing cores full length, resulting in a span of 35 in. after the tips were formed.
- I used a frozen pop stick for a front support on the wing and 1/4-in.-wide strips of plastic from a six-pack can binder for hinges, glued with Hot Stuff and pinned at each end with straight pins.
- I bought a Futaba Conquest four-channel AM radio. We used three servos (rudder, elevator, and aileron) and the 450 mAh battery pack. Note that I rubber-banded the receiver to the battery pack. It's better than letting them hammer one another in that crowded compartment.
- Finish: one coat of Formula U on the wood and two coats on the foam wing. Launch weight is 23 oz.
Control Linkages — "Pullrods" and Details
A common problem in many RC planes is pushrod buckling. Typically, a builder will have the elevator control horn on the bottom of the elevator. The result is that, just when you need it most (as in pulling out of a dive, or completing a loop), the pushrod buckles out of the way and you get only a part of the elevator deflection that you need. About 90% of the work your elevator pushrod will do is to raise the elevator up. Shouldn't that be the strong direction? I prefer calling it a "pullrod."
I used Sullivan Gold-N-Rod for the rudder and elevator pullrods. Important points:
- Glue the outer shell firmly to the airplane both at the servo end and where the shell exits the fuselage.
- Leave enough free length of the inner rod at the control surface end (about three inches) to accommodate motion and to permit changing the hole used on the control horn. Otherwise you'll get binding.
- Inside the fuselage, glue the shell to a firm support structure every foot along its length. Failure to do so invites buckling, control surface flutter, rattling in flight, and sloppy control response.
- At the control-horn end, use a Goldberg clevis on a piece of 2-56 threaded rod. At the servo end, insist on a Z-bend in the threaded rod.
Reasons and alternatives:
- It's easy to accidentally disconnect or unscrew a clevis at the servo end while making adjustments; the threaded rod that Sullivan supplies is just a bit larger than a 2-56 screw, so it holds better.
- If you don't have threaded rod, you can use bicycle spokes. Make sure you get the type that is necked down to 1/16 in. diameter about an inch from the threaded end. The 1/16-in. wire is easier to bend and fits servo holes.
- For common threads, the length of the inner rod between servo and control surface should be as long as possible.
Engine Work — Cox Baby Bee .049
None of what follows is new, having been covered extensively before by such experts as Eloy Marez. However, it's new if you haven't heard it before, so here is what I did to Caleb's Cox Baby Bee .049 engine to improve its performance.
Initial condition: I found tight spots and excessive internal friction. The crankshaft was so tight that I broached out some metal when tapping it out of the crankcase.
Engine rework steps:
- Polish the crankshaft:
- Use a slow drill motor to turn the shaft and wipe on fine white lacquer polishing compound.
- Check often. You want to see a light frost on the shiny shaft bearing areas.
- The dry, clean shaft should spin freely in the case; it will spin slower when wet with fuel.
- Don't overdo polishing or you'll get a lot of fuel blowing out behind the prop drive washer.
- Polish piston and cylinder:
- Spread a film of polishing compound on the piston and inside of the cylinder.
- Working by hand, the piston will eventually go halfway into the bore.
- Assemble the engine with the cylinder turned in only two turns, then run it a few seconds with the drill motor.
- As the engine loosens up, turn the cylinder in one turn more before seating it completely.
- Look for a light frost over most of the shiny parts of the piston. Don't overdo polishing or you will ruin the engine.
- Clean and check:
- After disassembling and thoroughly cleaning, the piston should fall to the bottom of the bore under its own weight.
- The assembled piston (no glow plug) should spin freely, except for a catch when the piston reaches the top of the bore — this is normal. Internal friction should be minimized.
- Improve air inlet:
- There was no screen at the backplate air inlet; the retaining wall was sticking up and impeding airflow. Cut it away, polish the inlet, and drill out the air tube to .075 in. diameter to admit more air.
- Reassemble:
- After more disassembly and cleaning, reassemble the engine with a thin film of fuel as lubricant.
Field results and notes:
- Before rework: I was seeing 13,000 rpm on a Cox grey 6 x 3 propeller using K&B Superconic 1000 fuel, after running six tanks of fuel through the engine. The black residue stopped coming out during the third tank.
- Conditions that reduced performance: heat (95°F), high humidity (80%), high altitude (4,500 ft above sea level). Density altitude was about 9,000 ft. These factors reduced the oxygen available to the engine and reduced local air pressure, so the airplane also needed to fly faster to generate lift.
- After engine rework: 16,000 rpm with the same head, prop, fuel, and no spring starter. This was with the Cox No. 325 (low-compression) head and one gasket washer. A high-compression head added another ~450 rpm.
- The Cox snap starter (catalog No. 333) works better than predecessors and only cuts performance about 350 rpm. I used it on Caleb's airplane because it makes starting very simple.
- After one flight, the engine stopped because bits of grass had gotten into the engine and were holding the reed valve open. I glued a piece of sponge to the firewall, covering the air inlet, to keep such debris out.
A note: you can only increase power by reducing internal friction or by getting more oxygen (as turbochargers do). An additional observation: electric propulsion systems don't lose power with increased altitude the way petrol engines do.
Flying Tests
After the engine work, the plane flew quite well. I was able to loop, roll, and do stall turns (all positive-G maneuvers). The fuel tank's pickup arrangement prevents inverted flying and negative-G maneuvers.
Community and Events
Looking for some flying buddies, I turned to Mark Gilbert of Fairview, ID, a neighbor. Mark is the guiding member of the Franklin County Radio Controllers and has built up a small hobby shop, as a service to the members, in his father's business, Gilbert's Wire Farm Equipment Sales & Service, on State Street, Fairview, ID.
Mark is making up a flatbed trailer fitted out to look like a runway and dressed with all of the RC airplanes that the local RC fliers could assemble. The float was one of about two dozen in the rodeo parade for three nights and was sent out to show RC aircraft to the public. Caleb's Upstart II added to the display. The quantity and variety of models displayed were impressive, considering the size of the village and the short time the members have been in the hobby.
I talked to some members of the PRCA (Professional Rodeo Cowboys Association), and their consensus was that the famous Preston Night Rodeo is one of the best in the country (besides being the oldest night rodeo in America).
Conclusion
Based on a sample of one, RC is flourishing in rural America, in spite of the difficulties. Looking back to the mid-Thirties, when I believe I was the only kid in rural Mattituck, NY who built model airplanes, nothing has changed except that most model airplanes are now RC instead of rubber-powered free-flight models.
George M. Myers 70 Froehlich Farm Rd., Hicksville, NY 11801.
Transcribed from original scans by AI. Minor OCR errors may remain.

