
Radio Technique
George M. Myers
70 Froehlich Farm Rd., Hicksville, NY 11801
ABSTRACT
More on Alaska trip, Lanier Laser on Gee Bee floats, Porta-Sol kit, DFS sailplane.
I said in my February 1989 column that I would take a Lanier Seabird with me on my trip to Alaska. But it turned out to be too bulky, so I made a last-minute decision to take a Lanier Laser instead. The Laser stored neatly out of the way on the ceiling of the van, on bungees. (Bungees are long, cloth-covered rubber bands, about 5/8 in. in diameter and fitted with hooks on the ends.) I'm back in New York again, after a wonderful summer in Alaska.
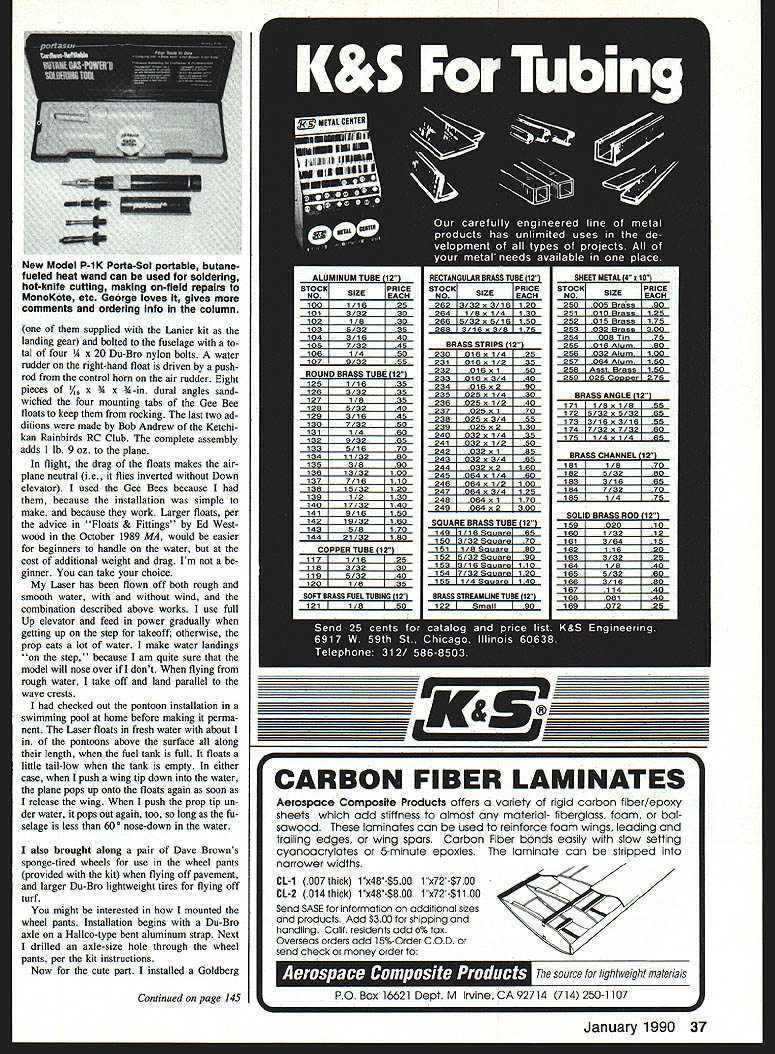
One of the smarter things I did in preparing for this trip was to remove the screws holding the interior moldings on the van's windows, one at a time, and slip on a swivel hanger meant for hanging pictures before putting each screw back. That gave me little wire loops all over the van for attaching bungees. If you drive a van, you know that when you set a pencil down somewhere it will go to every corner of the van within the next few miles. The more bungees you use, the better things will stay in place. (Stock #4SPH, B&R Specialty Hardware, P.O. Box 0095, Baldwin, NY 11510.) Find them in bubble cards, hanging in the picture hardware section. I clipped off the lug containing the outside hole for neater appearance.
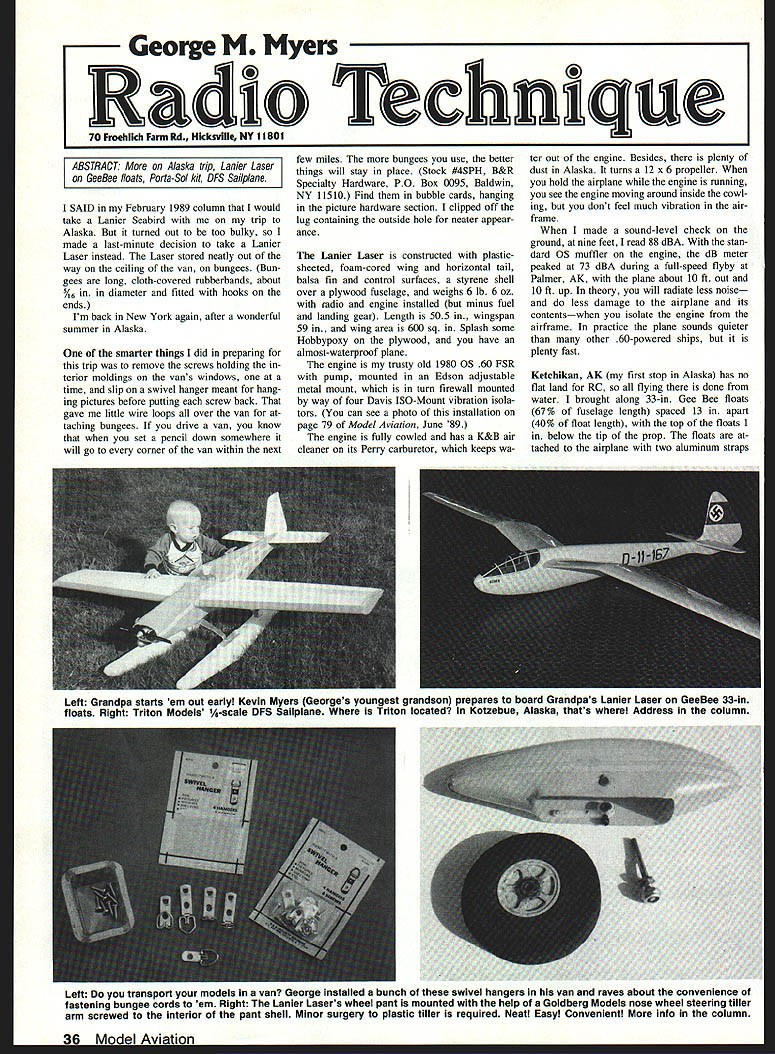
The Lanier Laser is constructed with plastic-sheeted, foam-cored wing and horizontal tail, balsa fin and control surfaces, a styrene shell over a plywood fuselage, and weighs 6 lb. 6 oz. with radio and engine installed (but minus fuel and landing gear). Length is 50.5 in., wingspan 59 in., and wing area is 600 sq. in. Splash some Hobbypoxy on the plywood, and you have an almost-waterproof plane.
The engine is my trusty old 1980 OS .60 FSR with pump, mounted in an Edson adjustable metal mount, which is in turn firewall-mounted by way of four Davis ISO-Mount vibration isolators. (You can see a photo of this installation on page 79 of Model Aviation, June '89.) The engine is fully cowled and has a K&B air cleaner on its Perry carburetor, which keeps water out of the engine. Besides, there is plenty of dust in Alaska. It turns a 12 x 6 propeller. When you hold the airplane while the engine is running, you see the engine moving around inside the cowling, but you don't feel much vibration in the airframe.
When I made a sound-level check on the ground, at nine feet, I read 88 dBA. With the standard OS muffler on the engine, the dB meter peaked at 73 dBA during a full-speed flyby at Palmer, AK, with the plane about 10 ft. out and 10 ft. up. In theory, you will radiate less noise — and less damage to the airplane and its contents — when you isolate the engine from the airframe. In practice the plane sounds quieter than many other .60-powered ships, but it is pretty fast.
Alaska trip and float installation
Ketchikan, AK (my first stop in Alaska) has no flat land for RC flying, so all flying there is done from water. I brought along 33-in. Gee Bee floats (67% of fuselage length) spaced 13 in. apart (40% of float length), with the top of the floats 1 in. below the tip of the prop. The floats are attached to the airplane with two aluminum straps.
My supplied Lanier kit landing gear bolted to the fuselage by four 1/4 x 20 Du-Bro nylon bolts. The water rudder on the right-hand float is driven by a pushrod to a control horn on the air rudder. Eight pieces of 1/16 x 3/4 x 4-in. dural angle, sandwiched to form four mounting tabs, keep the floats from rocking. The last two additions, made by Bob Andrew, Ketchikan Rainbirds RC Club, complete the assembly. The floats add 1 lb. 9 oz. to the plane; flight drag from the floats makes the airplane neutral, i.e., it flies inverted with down elevator used.
Gee Bee floats were chosen because installation is simple and because they work. Larger floats, per advice from "Floats & Fittings," Ed Westwood, October 1989 Model Aviation, would be easier for beginners to handle on the water at the cost of additional weight and drag. A beginner can take his choice.
The Laser has flown off both rough and smooth water. The wind and water combination described above works. Use full up elevator and feed power gradually when getting up on the step on takeoff; otherwise the prop eats a lot of water and you may nose over. When flying in rough water, take off and land parallel to the wave crests. I checked the pontoon installation in a swimming pool at home before making the Laser floats permanent. On fresh water, the pontoons float about 1 in. above the surface along the length with the fuel tank full; the floats are a little tail-low with the tank empty. In either case, push the wing down when taxiing.
Wheels and wheel pants
I also brought along a pair of Dave Brown's sponge‑tired wheels for use in the wheel pants (provided with the kit) when flying off pavement, and larger Du‑Bro lightweight tires for flying off turf.
You might be interested in how I mounted the wheel pants. Installation begins with a Du‑Bro axle on a Halbco‑type bent aluminum strap. Next I drilled an axle‑size hole through the wheel pants, per the kit instructions.
Now for the cute part. I installed a Goldberg nose‑wheel steering tiller arm inside the pant and screwed the tiller arm to the pant shell. Minor surgery to the plastic tiller was required. I mounted the tiller bar (normally used for nose‑wheel steering) on the outboard side of the wheel, but inside the pant. Then I attached it to the pant by way of #2 sheet metal screws, of the type normally used for mounting servos. Cutting off the excess screw length completed the installation.
Since I wanted the tiller arm flat against the wheel pant, I had to drill a new hole through the tiller‑bar plastic (after pushing out the metal wheel collar which is in the bore of the plastic tiller) to put the setscrew on the bottom, where you can easily get at it. Put the wheel collar back in place with the setscrew in the slot and make sure the wheel won't fall off. Finally, file a flat on the axle so that the wheel won't fall off immediately after the attaching screw becomes a little loose.
New Porta‑Sol kit
My pocket‑size Porta‑Sol butane‑fueled flameless soldering iron ("Radio Technique," February '88 issue of Model Aviation, page 38) proved to be a very handy tool on this trip. I used it for all sorts of things, like installing connectors, shrinking shrink‑tubing insulators, putting holes in plastic, etc. At one point I even remember using it to solder a wire back on the coil of a Quada for someone in a field somewhere. The fact that it burns cigarette‑lighter butane, can be lit with the sparker built into its cap, and is virtually windproof makes it usable almost anywhere.
Porta‑Sol now offers a better, more versatile kit, P.I.K., containing a black Porta‑Sol with four kinds of tools, tip cleaner, and hot stand in a handy box measuring 1.5 x 3 x 9 in. I like neat kits that put useful tools in easily stored packages, so I've added P.I.K. to my van.
The new kit features tools with plastic retaining screws that permit you to remove/install tools while they are hot. They are not interchangeable with the older, orange model, which had to be allowed to cool first. The new, internally heated tools, with a heat range equivalent to electric soldering irons of 10 to 60 watts, are very useful designs. Tools include:
- Standard 3/4 tip (same size as older model). Other tip sizes (.040, .7, 1/2, 1/16 in.) are available at $8.99 each.
- Hot knife: Integral design, much thicker than an X‑Acto blade. Not sharp, but a time‑saver for cutting plastic sheet, sailcloth, etc.
- Pencil torch: A tiny flame for fine soldering, etc.
- Hot air: A 3/32‑diameter source of hot air for use on shrink tubing, taking small wrinkles out of MonoKote, etc. I really like this tool, because the tip is small and has no exposed flame. You can get down inside small boxes with it. But don't touch the tip or sliding shutter after you have lit the fire!
As before, this kit is made available as a service to modelers by my friend, Les Shine, doing business as Bentley Electronics, 106 Wedgewood Drive, Hauppauge, NY 11788; telephone 1‑800/634‑6306. It is also available through SR Batteries. The P‑I‑K (without fuel), Stock #50A18107, can be shipped by air for $54.99. Fuel can be purchased at most cigar counters or shipped by surface (UPS). Ask for Colibri butane (3.4 fl. oz.), Stock #50A18106 at $3.99.
Scale sailplane kit
While visiting Kotzebue, AK (which is in a tiny village above the Arctic Circle and right on the Bering Sea 65 miles from Siberia), I made the acquaintance of Greg Harding, doing business as Triton Models, Box 1157, Kotzebue, AK 99752; telephone 1‑907/442‑2617. Kotzebue is just about the most out‑of‑the‑way place imaginable in which to find a model manufacturer. At the time, Greg was offering a nice fiberglass‑bodied, 1/6‑scale model of a 1937 DFS Reiher, which is a gull‑winged sailplane formerly flown by Hanna Reicher.
Hanna was one of Germany’s foremost aviatrixes and put her name in the history books when she flew a Focke‑Wulf twin‑rotor helicopter inside the Olympic Stadium in Berlin about 1939. Scale exclusists might want to give Greg a call. Time in Kotzebue is two hours earlier than Pacific Standard Time, so keep that in mind when you call (i.e., 8:00 a.m. in New York is 3:00 a.m. in Kotzebue).
Transcribed from original scans by AI. Minor OCR errors may remain.

