
Radio Technique
George M. Myers
A WHILE BACK I promised to discuss servo repairs. In the meantime one of the good local fliers (who also clerks in a hobby shop) was kind enough to look me up and tell me his story. It seems that when he read the January 1977 column his first impression was that such elementary ideas were a waste of good magazine space. Then, as he was exchanging his radio from one airplane to another he chanced to pull on the antenna. Guess where it parted? Right at the little button that was threaded on the antenna to keep it from being pulled too far out of the fuselage. It takes a real man to tell stories on himself, and I appreciate the way it boosted my own ego, too. Thanks, Roy!
Back to servos! In the January column we identified four servos that needed work (incidentally, tables 1 and 2 were reversed in the printing, but I'm sure that you noticed it). One was slow and sticky, the rest were jumpy or noisy. Let's start with Slow and Sticky. (Back in August, 1975, this column showed how to measure servo transit time. You might want to look it up.)
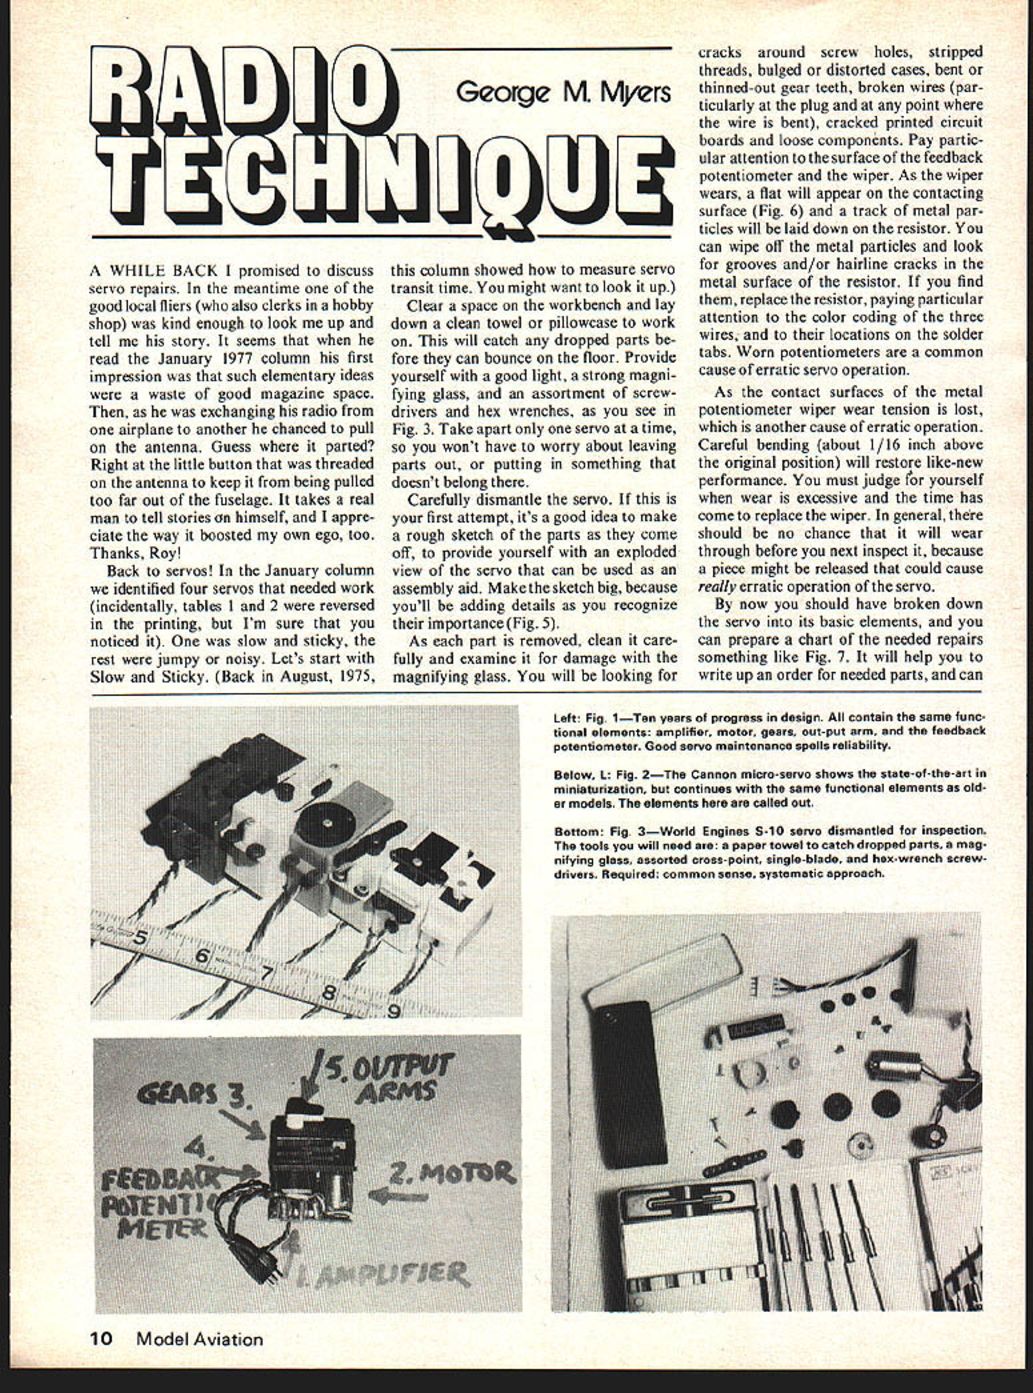
Clear a space on the workbench and lay down a clean towel or pillowcase to work on. This will catch any dropped parts before they can bounce on the floor. Provide yourself with a good light, a strong magnifying glass, and an assortment of screwdrivers and hex wrenches, as you see in Fig. 3. Take apart only one servo at a time, so you won't have to worry about leaving parts out, or putting in something that doesn't belong there.
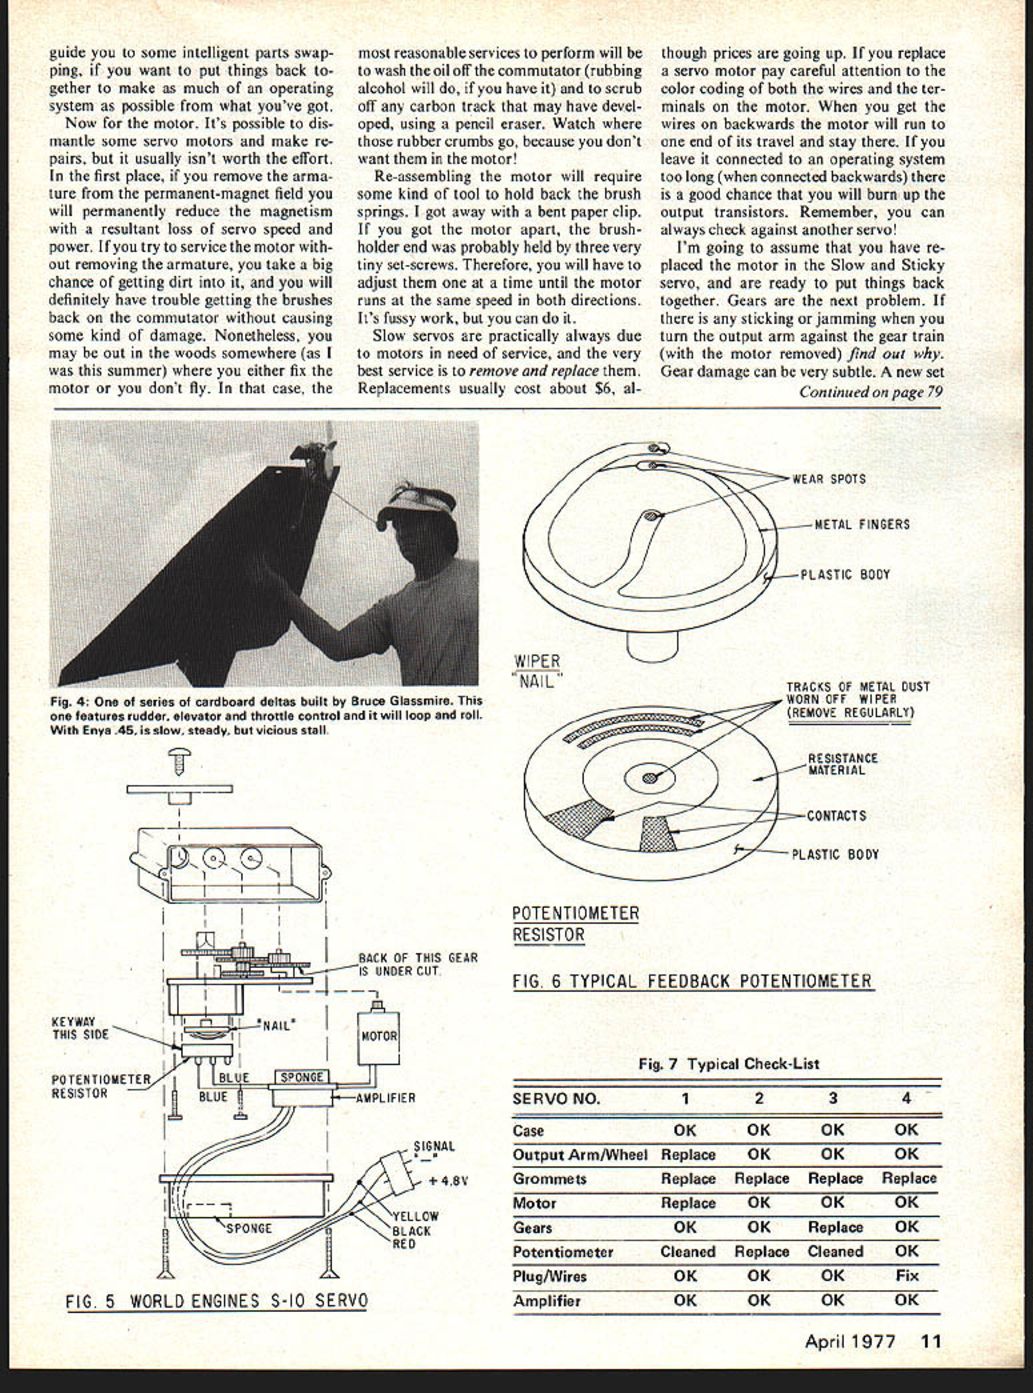
Carefully dismantle the servo. If this is your first attempt, it's a good idea to make a rough sketch of the parts as they come off, to provide yourself with an exploded view of the servo that can be used as an assembly aid. Make the sketch big, because you'll be adding details as you recognize their importance (Fig. 5).
As each part is removed, clean it carefully and examine it for damage with the magnifying glass. You will be looking for cracks around screw holes, stripped threads, bulged or distorted cases, bent or thinned-out gear teeth, broken wires (particularly at the plug and at any point where the wire is bent), cracked printed circuit boards and loose components. Pay particular attention to the surface of the feedback potentiometer and the wiper. As the wiper wears, a flat will appear on the contacting surface (Fig. 6) and a track of metal particles will be laid down on the resistor. You can wipe off the metal particles and look for grooves and/or hairline cracks in the metal surface of the resistor. If you find them, replace the resistor, paying particular attention to the color coding of the three wires, and to their locations on the solder tabs. Worn potentiometers are a common cause of erratic servo operation.
As the contact surfaces of the metal potentiometer wiper wear, tension is lost, which is another cause of erratic operation. Careful bending (about 1/16 inch above the original position) will restore like-new performance. You must judge for yourself when wear is excessive and the time has come to replace the wiper. In general, there should be no chance that it will wear through before you next inspect it, because a piece might be released that could cause really erratic operation of the servo.
By now you should have broken down the servo into its basic elements, and you can prepare a chart of the needed repairs, something like Fig. 7. It will help you to write up an order for needed parts, and can
Now, the motor. It's possible to dismantle some servo motors and make repairs, but usually it isn't worth the effort. In the first place, removing the armature from a permanent-magnet field will permanently reduce the magnetism, with the resultant loss of servo speed and power. If you try to service a motor and remove the armature, you take a big chance of getting dirt on the commutator and causing some kind of damage. Nonetheless, you may be out in the woods somewhere in summer and either have to fix the motor or not fly the case. Reasonable service tasks you can perform will wash oil off the commutator with rubbing alcohol, and you may have to scrub off a carbon track that has developed using a pencil eraser. Watch rubber crumbs, too, because you don't want them in the motor. Re-assembling the motor will require some kind of tool to hold back the brush springs if they get away — a bent paper clip will do. If you get the motor apart, the brush-holder end is probably held with three very tiny set-screws. Therefore you will have to adjust time until the motor runs the same speed both directions. Its fus It's fussy work, but you can do it.
Slow servos are practically always due to motors in need of service, and the very best service is to remove and replace them. Replacements usually cost about $6, although prices are going up. If you replace a servo motor pay careful attention to the color coding of both the wires and the terminals on the motor. When you get the wires on backwards the motor will run to one end of its travel and stay there. If you leave it connected to an operating system too long (when connected backwards) there is a good chance that you will burn up the output transistors. Remember, you can always check against another servo!
I'm going to assume that you have replaced the motor in the Slow and Sticky servo, and are ready to put things back together. Gears are the next problem. If there is any sticking or jamming when you turn the output arm against the gear train (with the motor removed) find out why. Gear damage can be very subtle. A new set
Radio Technique/Myers
of gears usually costs about $3, and replacing a doubtful set is cheap insurance. But George, you say, if I keep this up I'll have an all-new servo! Yep! But you want new performance, don't you? Which is more important to you, a gallon of fuel so you can fly with a bad servo, or a good servo?
Since you have a new motor and gears, the next item is the case that you put them in. Are you satisfied that it won't come apart in flight? Good! Let's install the feedback potentiometer.
The wiper assembly (called a "nail" in the trade) usually plugs into the plastic shaft which accepts the output wheel or arm at the opposite end. Its position, when the output arm is centered, determines the approximate position the resistor should take when placed in its cavity. A minor adjustment of either the nail or the resistor will be required after the servo is assembled, in order to get all servos centered at the same position. Some manufacturers assemble the potentiometers dry, while others use a special grease (obtainable from Ace R/C). I prefer the grease, but respect the arguments of those who don't. Conductive-plastic potentiometers are always assembled dry.
All that's left now is to stuff the amplifier in place and close up the case. Be very careful to replace all foam and plastic insulation plates, to avoid shorting something expensive. I have deliberately avoided discussing amplifier repairs. In the first place, IC (Integrated Circuit) amplifiers are essentially unrepairable. If you have amplifier trouble, the best thing is to replace the whole thing. Amplifier kits are available from Royal, Ace R/C, Heath and others, for those who like to tinker and save 2 or 3 dollars. Practically every manufacturer sells built-up replacement amplifiers for less than $20.
The repair of wires and plugs has been discussed in several previous columns. In the case of servos using molded plugs, the whole "pigtail" (plug and wires) is available for about $3. As you re-install the screws, please turn them counter-clockwise first, until you feel the threads engage. Then turn clockwise to complete the fastening. This avoids cross-threading, which is always a danger when working with plastics. All that's left to consider are the soft rubber grommets that are used to mount the servos. If they are lost, broken or have hardened, replace them. You will minimize potentiometer wear if you keep nice, soft grommets on the job.
In the above discussion we have considered many of the things that cause servos to become slow, jumpy or erratic. Basically, the things to look for (in order) are: loose and dirty plugs, wires with more than half the strands broken inside the insulation, dirty, worn or cracked potentiometer resistors, and potentiometer wipers that have lost tension; either through vibration or wear. Often we find that potentiometer problems in one servo will spread throughout the system to make other, marginal servos act jumpy.
Good maintenance is primarily a matter of common sense and systematic study. If you accept it as a necessary chore (just like wiping off the castor oil occasionally) and make time for it, you will be rewarded by long and reliable service from your equipment. Incidentally, change your batteries once a month, whether you are using them or not. More battery packs short out in winter storage than are ever damaged by over-charging.
That's all for this month, gang. Send your ideas for the column to . . .
George M. Myers, 70 Froehlich Farm Rd., Hicksville, NY 11801.
Transcribed from original scans by AI. Minor OCR errors may remain.

