
Radio Technique
George M. Myers
WE ASSUME that the interested reader of this column is neither an engineer nor a technician (although I'd like to hear from them in the event that they catch me in a mistake). We further assume that the reader, regardless of background, is primarily interested in prolonging the good times between visits to the Service Center for his RC system. Therefore, the following excerpt from the April 1975 issue of Flypaper, newsletter of the Greater Pittsburgh Aero Radio Control Society, exactly fits our model. (Editor: This item was published originally in the Competition Newsletter.) Written by Ken Reber, the Flypaper entitled it: "RC—What To Do If You Land In Water (Or) If You Dip It—Don't Duck It!" The story follows:
"A recent experience involving my plane in an unauthorized crash into a farm pond taught me a few things about RC gear I felt would be worth sharing. My plane went into the water on a Tuesday and was not recovered until Saturday, so I'd say it was soaked. My first impulse was to crate the whole wet mess (receiver, battery, servos) and mail it back to the manufacturer, but I was afraid this might take longer than I wanted. So, in an attempt to save my summer flying, I did the following, which has resulted in a radio working as good as new and at little cost to me.
Don't be afraid to tackle a wet radio. These things are sturdier than you'd imagine. My system was equipped with three GD 19-4 servos (similar to KPS-9) which use an air dielectric capacitor. I first removed all cases and covers, and set the parts in front of a dehumidifier to dry. This got rid of the moisture on the servo capacitors. I then wiped the receiver and boards carefully with a soft cloth and did a D.C. continuity check of all wires to the power plug. I then cleaned the plugs and sprayed them with tuner cleaner (available in TV repair shops). I tore the case off the battery pack, checked all internal connections, replaced the plug, repotted and sealed the battery. I then stuck it on a 12-hour charge.
When the receiver and servos are completely dry, brush thinner on the printed circuit boards to remove oxides. Wipe carefully with a soft cloth and do a D.C. continuity check of all wires to the power plug. Cleaned the plugs and sprayed them with tuner cleaner. The switch harness was then repaired, and the switch was sprayed with cleaner and exercised as were the plugs. Do your D.C. checks on this, also.
The servos were done last but took the most time. As mentioned earlier, the boards and plugs were cleaned and lubed. D.C. checks were made. The motors were taken out of the gear train and subjected to about five minutes running at 4.5 volts administered through a three-pen-cell battery pack. Switch the leads around and run backwards, also. The gears in the servos were removed and cleaned. If there is much rust, replace these pins. The entire system was reassembled and tested. As with any new system, a range check must be made and any faulty components replaced or repaired if they fail. Hope you never have to do this."
Batteries Again!
The late-April 1975 issue of Competition Newsletter contained an article by Fred Hulen, from Contacts, newsletter of the Kansas City RC Association. Fred found that cycling particular battery packs improved their capacities by values ranging from 0% to 34%. He also conducted tests which demonstrated self-discharge (no load on the batteries) reduced their capacities 12% to 32% in the 48 hours after they were removed from the charger. The biggest changes did not appear on the same set of batteries. The message is clear, memory is real, so cycle your batteries occasionally (discharge them to a level of .95 to 1.1 volts per cell), then give them a full initial charge per the manufacturer's instructions.
We all know what we should do about these things, but we all make excuses not to. To eliminate the excuse about recharging, I have been using a one-shot timer to control the battery charger for years. I plug in all my radios to their respective chargers each time I return from the field. It's part of the "clean them up and hang them up" procedure. Each charger is left plugged into the multi-outlet extension line that is plugged into the timer. Whenever the weather forecasts are good, and I have free time coming, the timer is started the day or night before the good times come. There is no need for great precision about the turn-on time, because the timer shuts everything down before overcharging sets in. If the weather turns bad, or I get busy, there's no worry about the charger which I might forget to shut off.
My Timer:
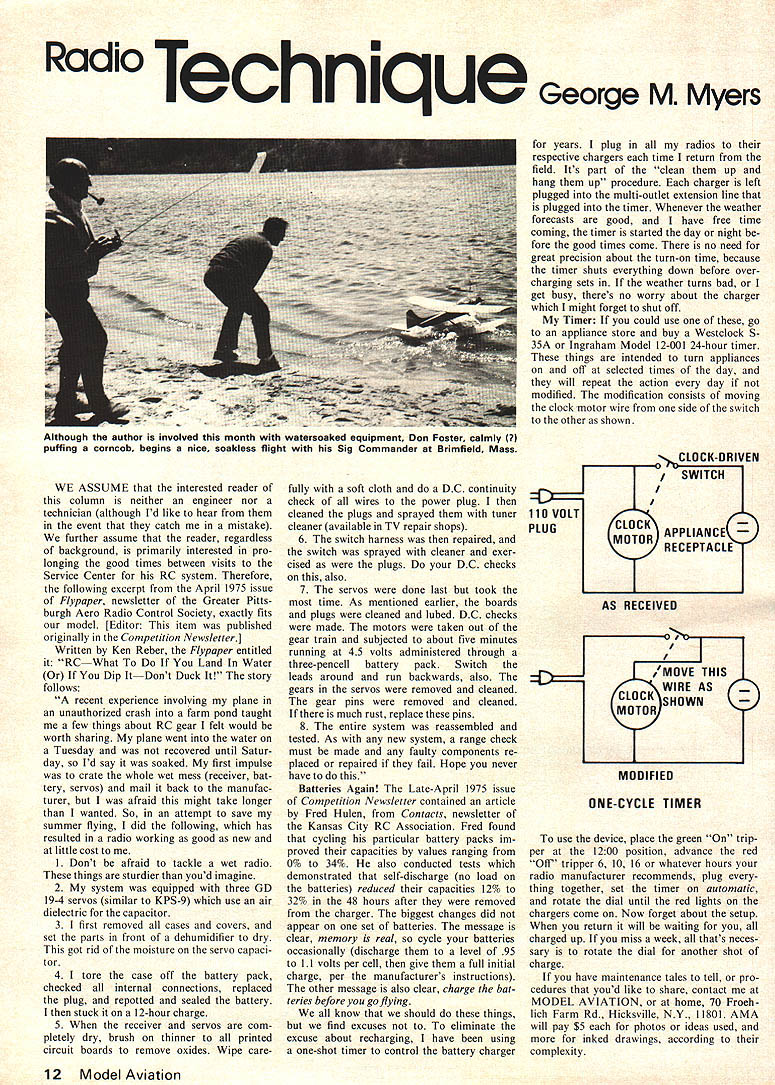
If you could use one of these, go to an appliance store and buy a Westclox S-35A or Ingraham Model 12-001 24-hour timer. These things are intended to turn appliances on and off at selected times of the day, and they will repeat the action every day if not modified. The modification consists of moving the clock motor wire from one side of the switch to the other as shown.
To use the device, place the green "On" tripper at the 12:00 position, advance the "Off" tripper 6, 10, 16 or whatever hours your radio manufacturer recommends, plug everything together, set the timer on automatic, and rotate the dial until the red lights on the charger come on. If you forget about the setup, when you return it will be waiting for you, all charged up. If you miss a week, all that's necessary is to rotate the dial for another shot of charge.
If you have maintenance tales to tell, or procedures that you'd like to share, contact me at MODEL AVIATION, or at home, 70 Froehlich Farm Rd., Hicksville, N.Y., 11801. AMA will pay $5 each for photos or ideas used, and more for inked drawings, according to their complexity.
Transcribed from original scans by AI. Minor OCR errors may remain.

