

Radio Technique — George Myers
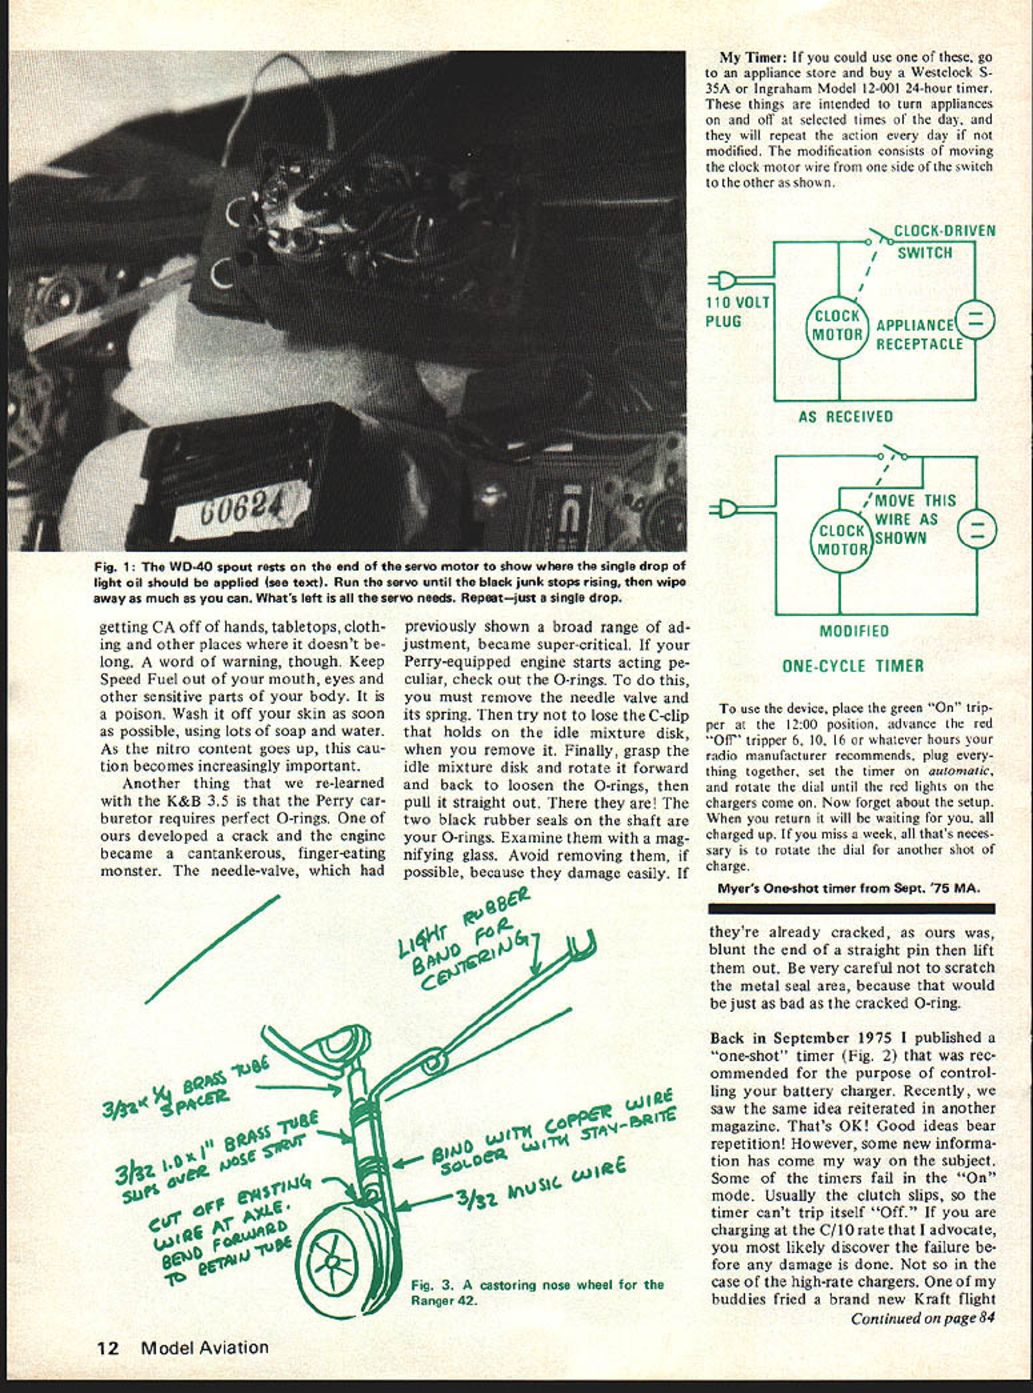
AS TIM checked his controls he heard a squeal coming from his elevator servo. If you have raced HO-sized electric cars, you've heard it, too. It's the sound a bearing makes when it runs dry. Rather than quit flying for the day, we opened up the servo and put a drop of WD-40 on the exposed end of the motor shaft, as shown in Fig. 1. (I apologize for the quality of the photo, but it was taken under field conditions.) You have to be very careful not to use too much oil, if you try this, because the brushes are only about 1/16th inch away, and oil on the brushes makes things worse. Anyway, we next ran the servo back and forth a few times and, as expected, saw some black junk rise up into the drop of oil. This is metal that wore off the bearing surface while it was squealing. We wiped it, and all excess oil, away. Then we closed up the servo and went back to flying. We've had a couple dozen flights on the plane since that time, with no re-occurrence of the problem.
The reason we were flying that day was to break in a new K&B 3.5cc engine that we had fitted to Tim's Sun-Fli 4-20. This engine and plane form a combination that we think can become the standard for all forms of pattern competition below the Masters level. The size is nice, because it's large enough to be seen, and to perform big, impressive maneuvers. At the same time it's small enough to fit in most cars without difficulty, and the cost of materials is significantly less than the usual pattern .60.
In addition, the slightly smaller size can perform the pattern in a much smaller air space. This means you can hold pattern competitions in smaller fields, or have more flight lines in the same field. Think about it!
While we were breaking in the K&B 3.5 (using a Zinger 8/5 prop and K&B Speed Fuel) we learned something else that you might find useful. To set the scene, it has been my practice to seal the edges of Monokote, Solarfilm and similar iron-on materials with cyanoacrylic adhesive (ZAP, Hot Stuff, etc.). Well, guess how we discovered that K&B Speed Fuel makes a good CA remover? Since then we have found it to be better than acetone or nail-polish remover for getting CA off hands, tabletops, clothing and other places it doesn't belong. A long-word warning though: keep Speed Fuel out of the mouth, eyes and other sensitive parts of the body — poison. Wash off skin as soon as possible using lots of soap and water. As nitro content goes up, caution becomes increasingly important.
Another thing re-learned: K&B 3.5 Perry carburetor requires perfect O-rings. When O-rings developed a crack the engine became a cantankerous, finger-eating monster. The needle-valve, previously showing a broad range of adjustment, became super-critical. If your Perry-equipped engine starts acting peculiar, check out the O-rings. You must remove the needle valve, its spring and the C-clip that holds the idle-mixture disk. Remove the idle-mixture disk, rotate it forward and back to loosen the O-rings, then pull straight out two black rubber seals from the shaft. Examine with a magnifying glass. Avoid removing them if possible, because they damage easily. If they're already cracked, as ours was, blunt the end of a straight pin then lift them out. Be very careful not to scratch the metal seal area, because that would be just as bad as the cracked O-ring.
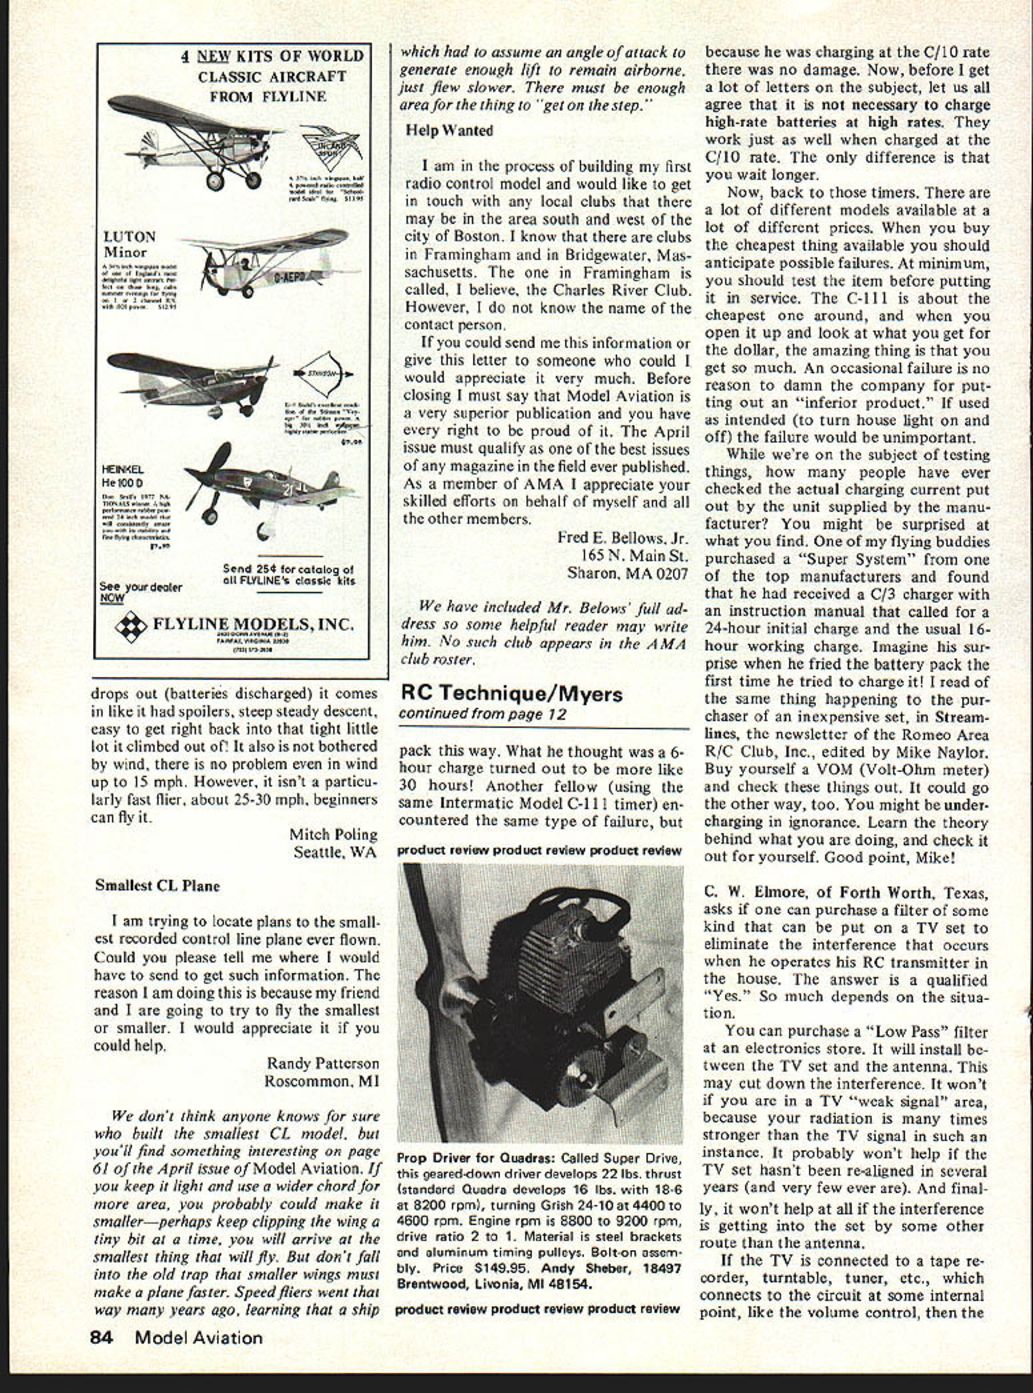
Back in September 1975 I published a "one-shot" timer (Fig. 2) that was recommended for the purpose of controlling your battery charger. Recently, we saw the same idea reiterated in another magazine. That's OK! Good ideas bear repetition! However, some new information has come my way on the subject. Some of the timers fail in the "on" mode. Usually the clutch slips, so the timer can't trip itself "off." If you are charging at the C/10 rate that I advocate, you most likely discover the failure before any damage is done. Not so in the case of the high-rate chargers. One of my buddies fried a brand new Kraft flight
My Timer
If you could use one of these, go to an appliance store and buy a Westclock S-35A or Ingraham Model 12-001 24-hour timer. These things are intended to turn appliances on and off at selected times of the day, and they will repeat the action every day if not modified. The modification consists of moving the clock motor wire from one side of the switch to the other as shown.
To use the device, place the green "On" tripper at the 12:00 position, advance the red "Off" tripper 6, 10, 16 or whatever hours your radio manufacturer recommends, plug everything together, set the timer on automatic, and rotate the dial until the red lights on the chargers come on. Now forget about the setup. When you return it will be waiting for you, all charged up. If you miss a week, all that's necessary is to rotate the dial for another shot of charge.
RC Technique/Myers continued from page 12
pack this way. What he thought was a 6-hour charge turned out to be more like 30 hours! Another fellow (using the same Intermatic Model C-111 timer) encountered the same type of failure, but because he was charging at the C/10 rate there was no damage. Now, before I get a lot of letters on the subject, let us all agree that it is not necessary to charge high-rate batteries at high rates. They work just as well when charged at the C/10 rate. The only difference is that you wait longer.
Now, back to those timers. There are a lot of different models available at a lot of different prices. When you buy the cheapest thing available you should anticipate possible failures. At minimum, you should test the item before putting it in service. The C-111 is about the cheapest one around, and when you open it up and look at what you get for the dollar, the amazing thing is that you get so much. An occasional failure is no reason to damn the company for putting out an "inferior product." If used as intended (to turn house lights on and off) the failure would be unimportant.
While we're on the subject of testing things, how many people have ever checked the actual charging current put out by the unit supplied by the manufacturer? You might be surprised at what you find. One of my flying buddies purchased a "Super System" from one of the top manufacturers and found that he had received a C/3 charger with an instruction manual that called for a 24-hour initial charge and the usual 16-hour working charge. Imagine his surprise when he fried the battery pack the first time he tried to charge it! I read of the same thing happening to the purchaser of an inexpensive set, in Streamlines, the newsletter of the Romeo Area R/C Club, Inc., edited by Mike Naylor. Buy yourself a VOM (Volt-Ohm meter) and check these things out. It could go the other way, too. You might be undercharging in ignorance. Learn the theory behind what you are doing, and check it out for yourself. Good point, Mike!
C. W. Elmore, of Forth Worth, Texas, asks if one can purchase a filter of some kind that can be put on a TV set to eliminate the interference that occurs when he operates his RC transmitter in the house. The answer is a qualified "Yes." So much depends on the situation.
You can purchase a "Low Pass" filter at an electronics store. It will install between the TV set and the antenna. This may cut down the interference. It won't if you are in a TV "weak signal" area, because your radiation is many times stronger than the TV signal in such an instance. It probably won't help if the TV set hasn't been re-aligned in several years (and very few ever are). And finally, it won't help at all if the interference is getting into the set by some other route than the antenna.
If the TV is connected to a tape recorder, turntable, tuner, etc., which connects to the circuit at some internal point, like the volume control, then the interference is getting into the set that way. The cure is to have the set serviced and possibly add filters to the inputs. If the set is cable connected there's usually a low-pass filter at the service entrance. If not, insist that the cable company install one. If all else fails, set up an adequate ground for the antenna or move the transmitter farther away. Interference can easily get in at that point. This is particularly true if the shielded wire making the connection is broken, or if the connections are dirty. You have to check out these possibilities before making a decision. Ultimately, the simple solution is to keep your transmitter antenna collapsed as much as possible, and to seek out the locations and alignments of the antenna that produce the least interference.
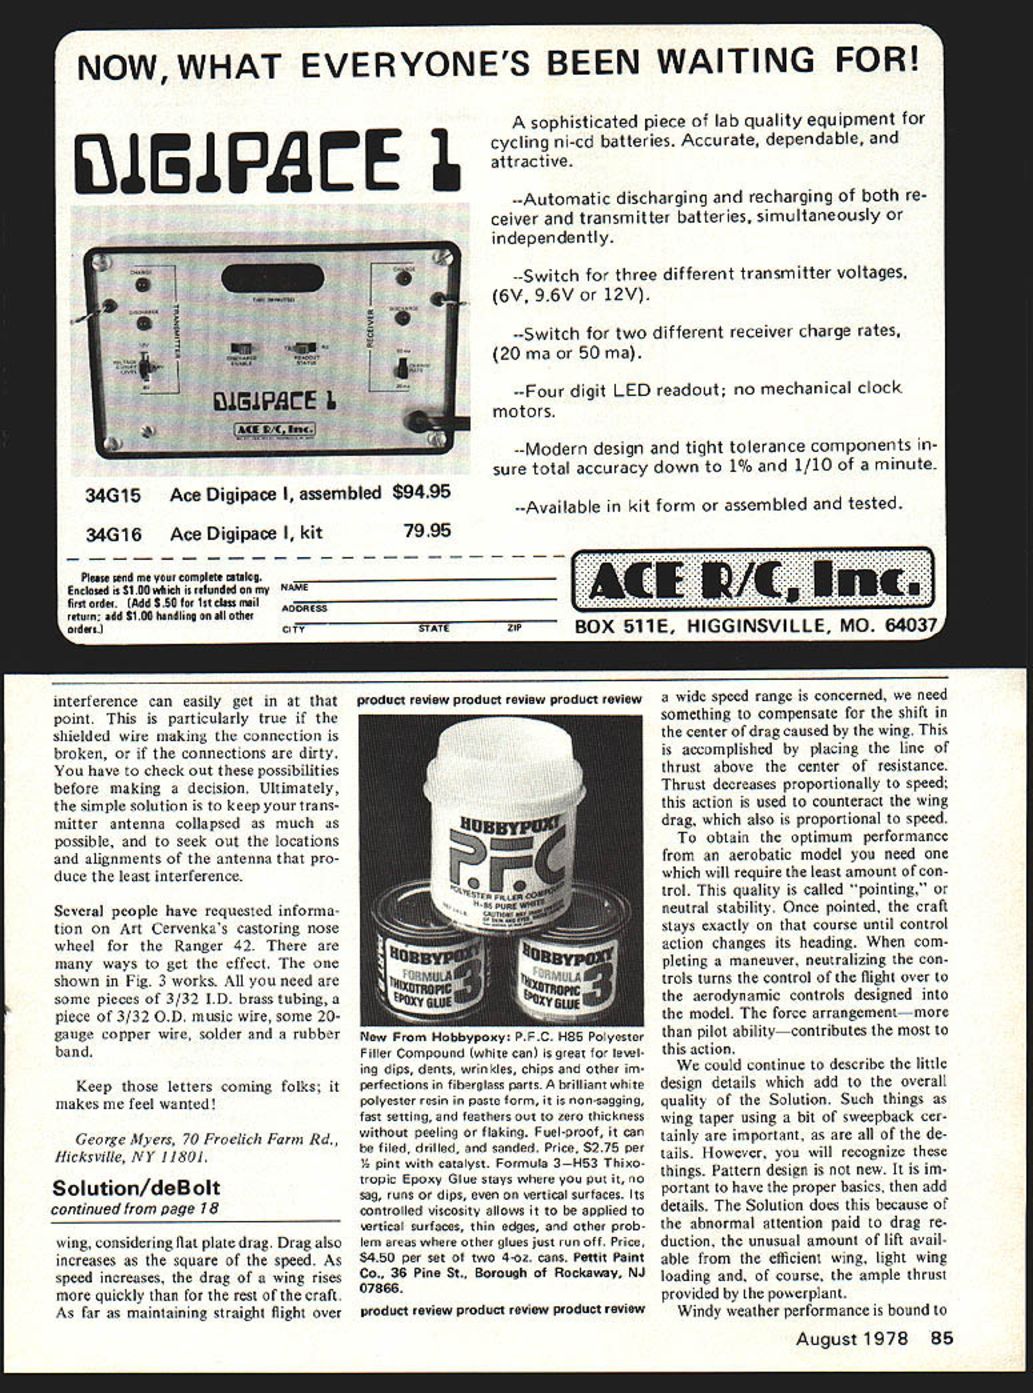
Several people have requested information on Art Cervenka's castoring nose wheel for the Ranger 42. There are many ways to get the effect. The one shown in Fig. 3 works. All you need are some pieces of 3/32 I.D. brass tubing, a piece of 3/32 O.D. music wire, some 20-gauge copper wire, solder and a rubber band.
Keep those letters coming folks; it makes me feel wanted!
George Myers, 70 Froelich Farm Rd., Hicksville, NY 11801.
Transcribed from original scans by AI. Minor OCR errors may remain.

