

Radio Technique
George Myers
Replacing Transmitter Batteries
Is it a rainy Saturday morning, looking at three transmitters and a $75 pile of new batteries? The thought occurs that almost anyone can change them, with a little of the right information to help.
First, know whether the batteries NEED to be changed. Here are some guidelines:
- If you have been using some kind of battery tester and the test time has dropped to half of what it was when the transmitter was new, it's time for a change. The same is true if your only test equipment is the panel meter on the transmitter.
- If your transmitter comes off charge with the meter needle pointing to the usual place, but it drops rapidly to a much lower value as soon as you put the transmitter in service, you have at least one bad cell. Further evidence will be the fact that the transmitter will operate for a long time with the meter pointing to the low reading. This might lead you to think the meter is defective, but you'd be wrong.
- Your charger may get a lot hotter than usual. A shorted cell in the pack can cause this.
- The obvious test is a voltmeter. Most transmitter battery packs contain eight nickel-cadmium cells and should read about 10 volts when charged. If you see 8.5 to 9 volts, check each cell in the pack to find the shorted cell. You might even find two.
- If you keep a log, expect to replace the batteries after about 250 charge cycles. If all you have is the bill of sale, look with suspicion at any pack going into its fourth year of service.
OK, you've decided to change the transmitter batteries. Clear a space on the workbench at least twice as large as you need. Put down a folded towel to protect the face of the transmitter. Select the proper size screwdriver for the screws holding the back on the transmitter and warm up the soldering iron.
Steps to replace the pack:
- Unscrew and remove the antenna. Turn it counterclockwise while holding the box steady. This will do you no good at all with Kraft and some other sets that use an antenna which must be pulled out of the case and then screwed in place to make a connection. If that's the situation you face, pull up the antenna and screw it in place.
- Check again that the set is turned off. It is very important that you do not open the back of a transmitter that is ON. You can short-circuit some very expensive parts before you get the back off and set it in a safe place.
- Remove the screws holding the circuit board if you have to get it out of the way to remove the battery pack. Here is another opportunity to damage something. I usually find the circuit board can be folded out of the way without unsoldering any wires. I always put a piece of foam rubber between the circuit board and the transmitter case when I do this, then tape the board in place to keep it from moving and knocking something out of line.
- Identify the battery-box lead connected to the plus end of the battery pack. It's usually red, but make sure. Mark it with a piece of tape if necessary.
Now it is time to remove the battery pack.
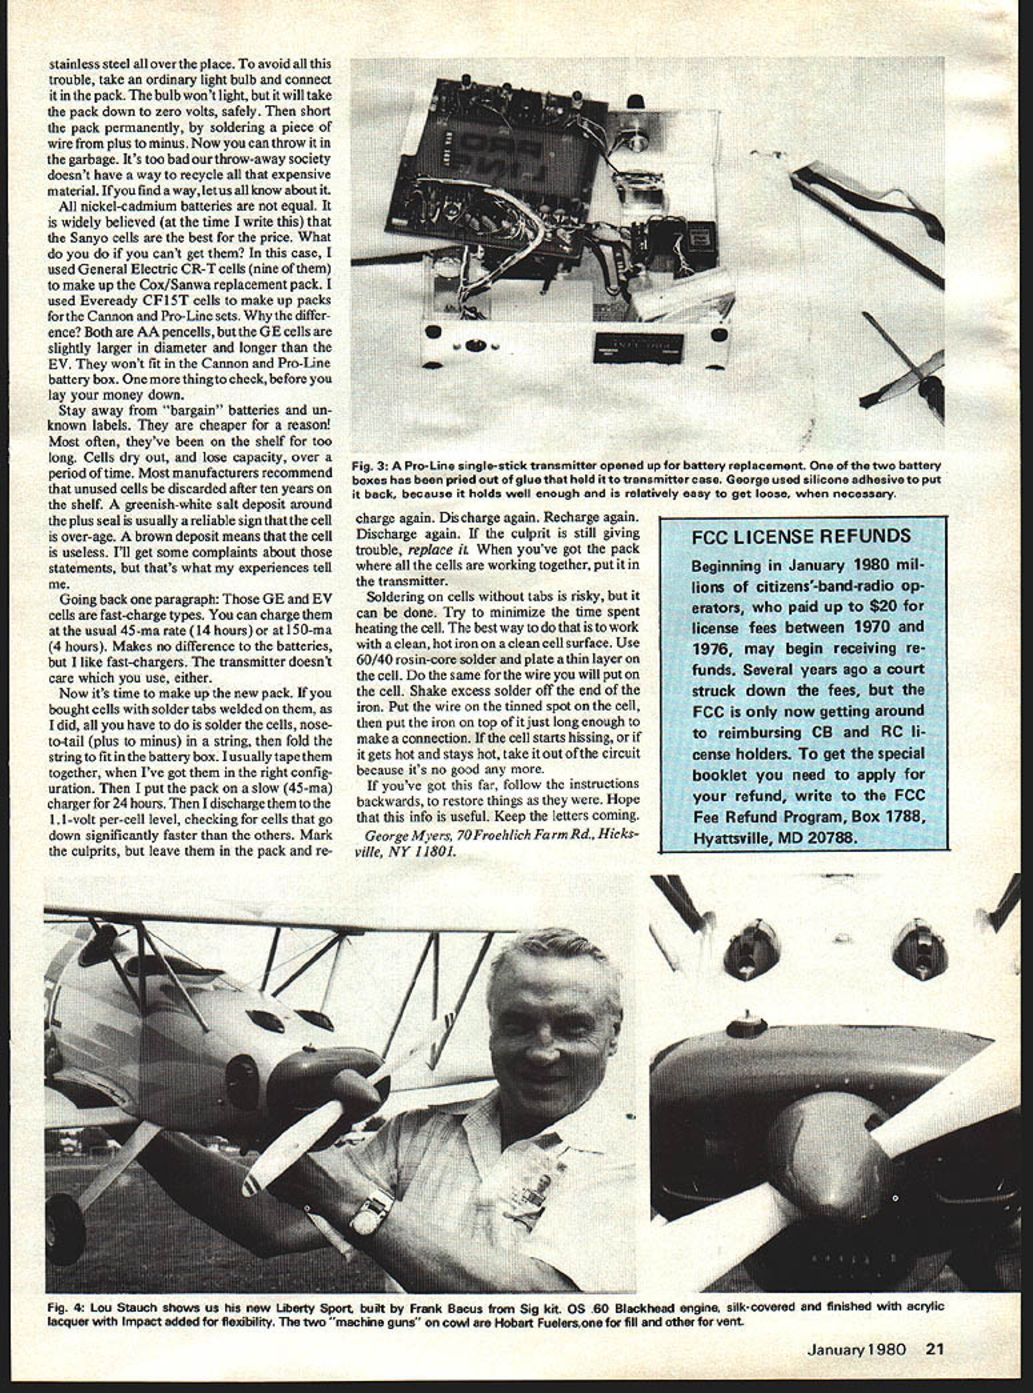
Every transmitter is different. As you can see from the pictures, the 1971 Pro-Line packs (two of them) were glued to the transmitter case, while the Cannon and Cox/Sanwa boxes are held with bolts and screws. Do what you must, carefully.
Open the battery box. Pro-Line was taped shut, Cannon held shut by bolts, Cox/Sanwa closed by either an adhesive or by melted plastic tabs. Whatever it was, it yielded to some careful prying with a knife blade.
Disconnect the wires soldered to the battery pack and remove the pack.
WARNING! The pack you have removed is DANGEROUS. If you let it get short-circuited by a piece of metal, such as the transmitter case or a screwdriver, things will get hot very fast. Chuck the pack in the garbage can where it can short circuit on a cat-food can and you've got a garbage fire. The heat may cause the cells to explode, throwing sharp-edged bits of stainless steel everywhere.
To avoid trouble, connect an ordinary light bulb across the pack. The bulb won't light, but it will take the pack down to zero volts safely. Then short the pack permanently by soldering a piece of wire from plus to minus. Now you can throw it in the garbage. It's too bad our throw-away society doesn't have a good way to recycle all that expensive material. If you find a way, let us all know about it.
All nickel-cadmium batteries are not equal. It is widely believed (at the time I write this) that Sanyo cells are the best for the price. What do you do if you can't get them? In this case I used General Electric CR-T cells (nine of them) to make up the Cox/Sanwa replacement pack. I used Eveready CF15T cells to make up packs for the Cannon and Pro-Line sets.
Why the difference? Both are AA pencil cells, but the GE cells are slightly larger in diameter and longer than the Eveready cells. They won't fit in the Cannon and Pro-Line battery box. One more thing to check before you lay your money down: stay away from "bargain" batteries and unknown labels. They are cheaper for a reason—most often they've been on the shelf too long. Cells dry out and lose capacity over time. Most manufacturers recommend unused cells be discarded after ten years on the shelf. A greenish-white salt deposit around the plus is usually a reliable sign the cell is over-age. A brown deposit means the cell is useless. I'll get some complaints about those statements, but that's what my experience tells me.
Those GE and Eveready cells are fast-charge types. You can charge them at the usual 45 mA rate (about 14 hours) or at 150 mA (about 4 hours). It makes no difference to the batteries, but I like fast chargers. The transmitter doesn't care which you use, either.
Making up the new pack:
- If you bought cells with solder tabs welded on them, all you have to do is solder the cells nose-to-tail (plus to minus) in a string, then fold the string to fit in the battery box. I usually tape them together when I have them in the right configuration. Then I put the pack on a slow (45 mA) charger for 24 hours.
- Discharge the pack to the 1.1-volt-per-cell level, checking for cells that go down significantly faster than the others. Mark the culprits but leave them in the pack and recharge again. Discharge again. Recharge again. Discharge again. If the culprit is still giving trouble, replace it. When you've got the pack where all the cells are working together, put it in the transmitter.
Soldering on cells without tabs is risky, but it can be done. Minimize the time spent heating the cell. The best way is to work with a clean, hot iron on a clean cell surface. Use 60/40 rosin-core solder and plate a thin layer on the cell. Do the same for the wire you will attach. Shake excess solder off the end of the iron. Put the wire on the tinned spot on the cell, then touch the iron on top of it just long enough to make a connection. If the cell starts hissing, or if it gets hot and stays hot, take it out of the circuit because it's no good anymore.
If you've got this far, follow the instructions backwards to restore things as they were. Hope this information is useful. Keep the letters coming.
George Myers 70 Froehlich Farm Rd. Hicksville, NY 11801
Transcribed from original scans by AI. Minor OCR errors may remain.

