
Radio Technique
By George Myers
Helicopter Time
After a few years of procrastination, I finally used a chunk of my modeling budget to purchase a helicopter — the Series 80 "Heliboy" by Schluter, with the necessary accessories. This has converted me directly into a beginner, again.
As a personal prediction, I believe helicopters will soon become dominant in the RC field, at least in metropolitan areas. Free flight gave way to U-control as flying fields became smaller. U-control gave way to RC as the technology improved to the point where small fields could be safely used for RC. The fields have continued to shrink, and many have disappeared. Balsa prices have zoomed over $100 per cubic foot. Inevitably, helicopter kit prices will compete directly with aircraft kit prices. When that happens, the switch to helicopters is assured. Model airplanes with propellers appeal to the World War I generation. My children would prefer models of jets, but the noise and flame of a realistic simulation don't belong in a small field in a residential community.
What else is new? Helicopters, that's what. The 240 Robert (on TV) is flown by a lady, no less, in a real cops-and-robbers activity. (How many remember Hanna Reitsch, who died just last year, was the lady who flew the Focke-Wulf twin-rotor helicopter in the Berlin Deutschland-Halle stadium in 1938? My thanks to Kurt Reupke for reminding me.) If you doubt that helicopters have captured the interest of our juniors, look at the opening scenes of the movie "Apocalypse Now" and try to assess the impact on young minds.
Enough of the sales pitch!
Radio installation and early lessons
I've been asked from time to time to say a few things about radio installations in helicopters. As a rank beginner, I didn't have much to say — until recently. Personal experience allows me to second some of the things others have said. For instance, when they say to use Loctite on every bolt, they mean every bolt. The first time I ran the engine, the throttle-stop screw fell out, jamnut still attached. I put that back in and then the screws holding the throttle body in the crankcase fell out. I had put Loctite on every screw in the airframe, as the instructions dictated. The instructions didn't say anything about the engine. Surprise!
The radio installation was made according to the kit instructions (Fig. 2), except that I put a drop of Hot Stuff on the tip of every screw that held a servo in place. None have moved. The radio antenna wasn't mentioned, so I ran it out the side of the cabin and back to the tip of the horizontal fin, where it was retained by a small rubber band, as in aircraft practice. As a precaution against fretting, I wrapped a cylinder of wing-sealing tape around the antenna at the point where it exits the cabin. It hasn't failed yet, but after observing the beating that the rotor imposes on the antenna, my next move will be to put it inside a load-bearing tube, such as the inner Nyrod. I've been told that antennas have been known to fail at the cabin end.
Adjustments and trim
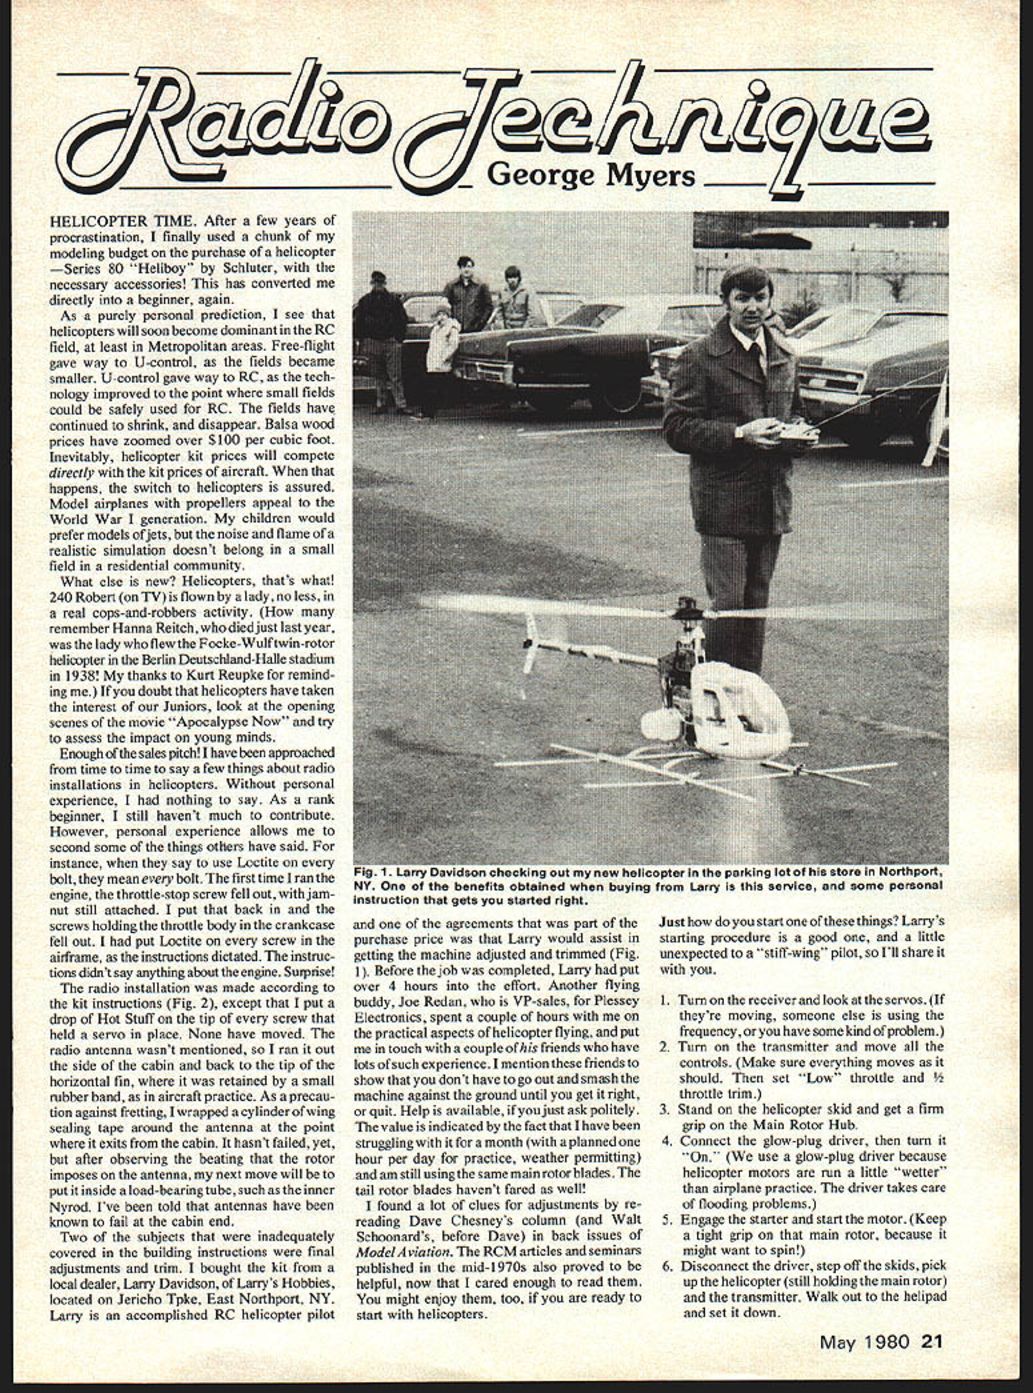
Two subjects that were inadequately covered in the building instructions were final adjustments and trim. I bought the kit from a local dealer, Larry Davidson of Larry's Hobbies, located on Jericho Turnpike, East Northport, NY. Larry is an accomplished RC helicopter pilot, and one of the agreements that was part of the purchase price was that Larry would assist in getting the machine adjusted and trimmed (Fig. 1). Before the job was completed, Larry had put over four hours into the effort.
Another flying buddy, Joe Redan, who is VP‑Sales for Plessey Electronics, spent a couple of hours with me on the practical aspects of helicopter flying, and put me in touch with a couple of his friends who have lots of such experience. I mention these friends to show that you don't have to go out and smash the machine against the ground until you get it right, or quit. Help is available if you just ask politely. The value is indicated by the fact that I have been struggling with it for a month (with a planned one hour per day for practice, weather permitting) and am still using the same main rotor blades. The tail rotor blades haven't fared as well!
I found a lot of clues for adjustments by rereading Dave Chesney's column (and Walt Schoonard's, from before Dave) in back issues of Model Aviation. The RCM articles and seminars published in the mid-1970s also proved helpful, now that I cared enough to read them. You might enjoy them too, if you are ready to start with helicopters.
Starting procedure
Just how do you start one of these things? Larry's starting procedure is a good one, and a little unexpected to a "stiff-wing" pilot, so I'll share it.
- Turn on the receiver and look at the servos. (If they're moving, someone else is using the frequency, or you have some kind of problem.)
- Turn on the transmitter and move all the controls. (Make sure everything moves as it should. Then set "Low" throttle and 1/2 throttle trim.)
- Stand on the helicopter skid and get a firm grip on the main rotor hub.
- Connect the glow‑plug driver, then turn it on. (We use a glow‑plug driver because helicopter motors are run a little "wetter" than airplane practice; the driver takes care of flooding problems.)
- Engage the starter and start the motor. (Keep a tight grip on that main rotor, because it might want to spin.)
- Disconnect the driver, step off the skids, pick up the helicopter (still holding the main rotor) and the transmitter. Walk out to the helipad and set it down.
- Run up the rotor, check tip tracking and control operations, and prepare to lift off.
Always lift off with the helicopter facing into the wind, if possible, to minimize weathervaning tendencies.
Training gear
Training gear of various types has been described, from hula-hoops to golf-balls-on-a-dowel. One of my flying buddies, Vince Pacifico, founder and president of the "Whitman Flyers," who is into everything imaginable (including restringing tennis rackets), offered me a bag of used tennis balls. My son, Tom, came up with something simpler: "Captain Crunch" breakfast cereal comes with a prize inside called "Spring Shot." The plastic ball that is part of the game pushes neatly over the end of a 5/16" dowel, is about the size of a golf ball but lighter, and the price is right. I've been holding the dowels on the skids of the helicopter with plastic tie-wraps, which are available at the electronic store and are made for bundling wires into cables. In all probability, the tie-wraps that come with garbage bags would do the job.
The frequency streamer on the end of the antenna is an accident looking for a place to happen. The rotor is bound to suck it onto something. If your club rules insist on a streamer, put it at the base of the antenna, near the box, or change the rule.
Since you are flying close to the transmitter, you may be tempted to operate with a partially collapsed antenna. This isn't clever. The output stage of your transmitter can easily burn out a transistor when underloaded that way.
Tail rotor troubleshooting
The tail rotor control did a lot of drifting. I would take the helicopter out of our nice warm house and start flying. Tail rotor trim would be normal. As the rig cooled down, the control would drift to the right. I blamed this on a servo reverser I was using. Removing the reverser caused the rotor to operate to the left. Aha! The problem is in the RC system. Leave the whole thing out in the car overnight to stabilize at the lower temperature. Now, if I can reset the tail rotor adjustments and they don't drift, the blame can be firmly placed on the RC system. Guess what? It not only didn't work, the drift went both ways.
Another flying buddy, Tom Hunt, figured that the tail rotor drive must be slipping. We kept changing the pitch of the tail rotor and we could see that the pitch changed while the rotor was turning, but we couldn't make the system behave. I took the tail rotor drive apart and found that one of the set screws had burned a path around the drive shaft. The Loctite was holding fine, but the set screw needs a big flat on the shaft to bear on. That's fixed now. Once more: don't guess — test!
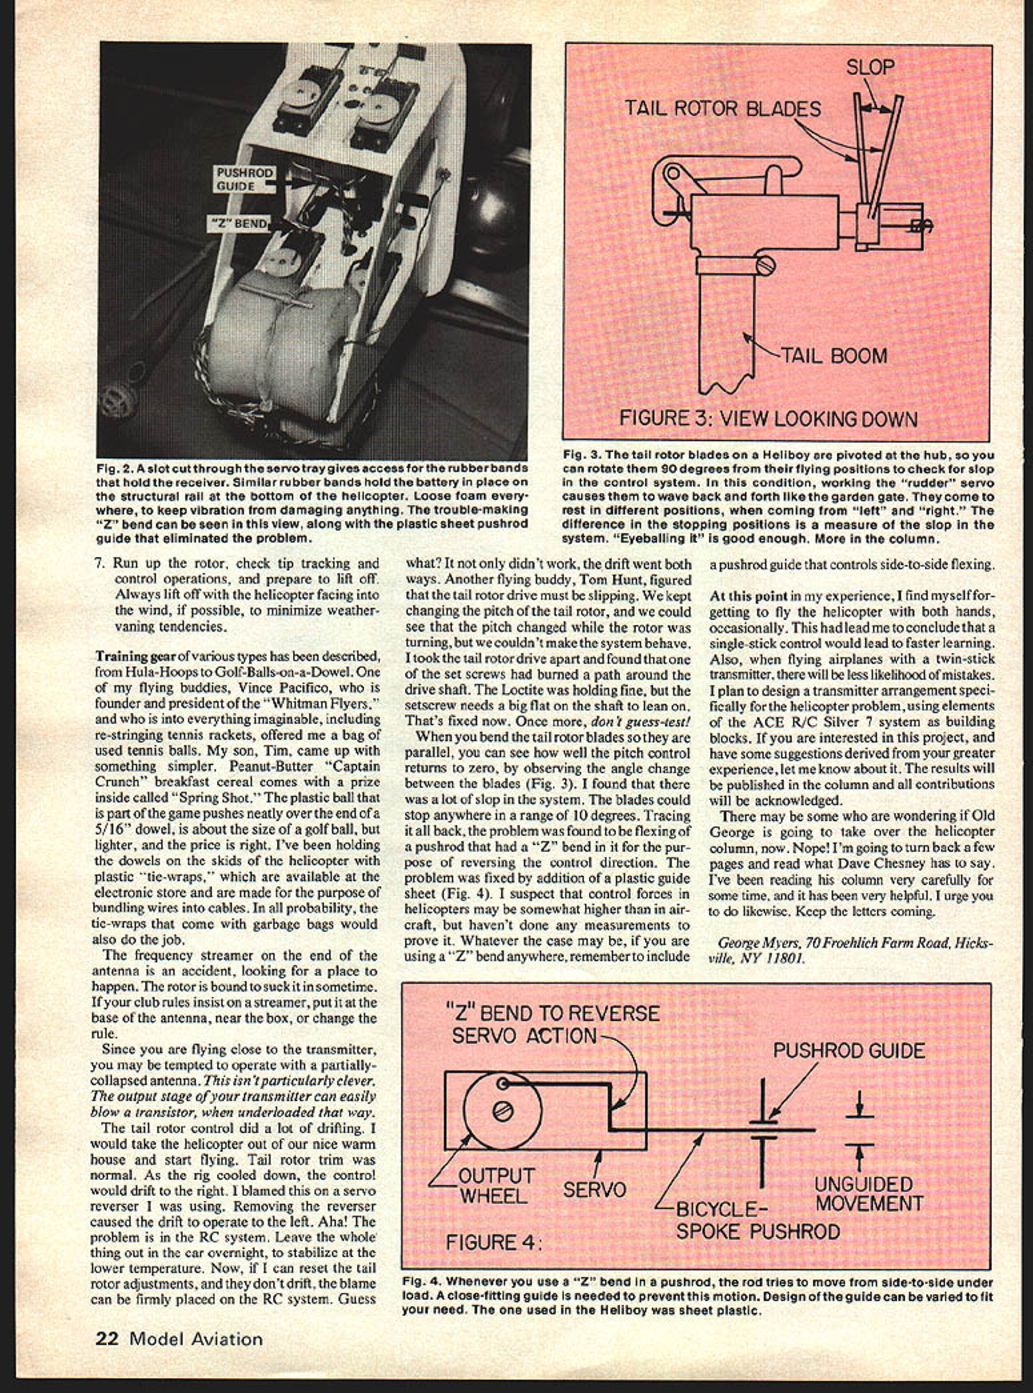
When you bend the tail rotor blades so they are parallel, you can see how well the pitch control returns to zero by observing the angle change between the blades (Fig. 3). I found that there was a lot of slop in the system. The blades could stop anywhere in a range of 10 degrees. Tracing it back, the problem was flexing of a pushrod that had a "Z" bend in it to reverse the control direction. The problem was fixed by the addition of a plastic guide sheet (Fig. 4). I suspect that control forces in helicopters may be somewhat higher than in an aircraft, but I haven't done any measurements to prove it. Whatever the case, if you are using a "Z" bend anywhere, remember to include a pushrod guide that controls side-to-side flexing.
Transmitter ideas and closing
At this point in my experience I find myself forgetting to fly the helicopter with both hands occasionally. This led me to conclude that a single-stick control might lead to faster learning. Also, when flying airplanes with a two-stick transmitter there will be less likelihood of mistakes. I plan to design a transmitter arrangement specific for the helicopter pilot, using elements of the ACE R/C Silver 7 system as building blocks. If you are interested in this project and have some suggestions derived from your greater experience, let me know about it. The results will be published in the column and all contributions will be acknowledged.
There may be some who are wondering if I'll take over the helicopter column now. Nope! I'm going to turn back a few pages and read what Dave Chesney has to say. I've been reading his column very carefully for some time, and it has been very helpful. I urge you to do likewise. Keep the letters coming.
George Myers 70 Froehlich Farm Road Hicksville, NY 11801
Transcribed from original scans by AI. Minor OCR errors may remain.

