
Radio Technique
George M. Myers
This month I want to talk about reader letters and useful gadgets. A parenthetical remark in a photo caption (pg. 42, MA, December 1983) seems to have attracted some interest: I referred to my use of a steel replacement for the plastic clutch in my Circus Hobbies Baron 20 helicopter. The magazine had only been in distribution a week when I received two letters and a couple of phone calls about the steel clutch.
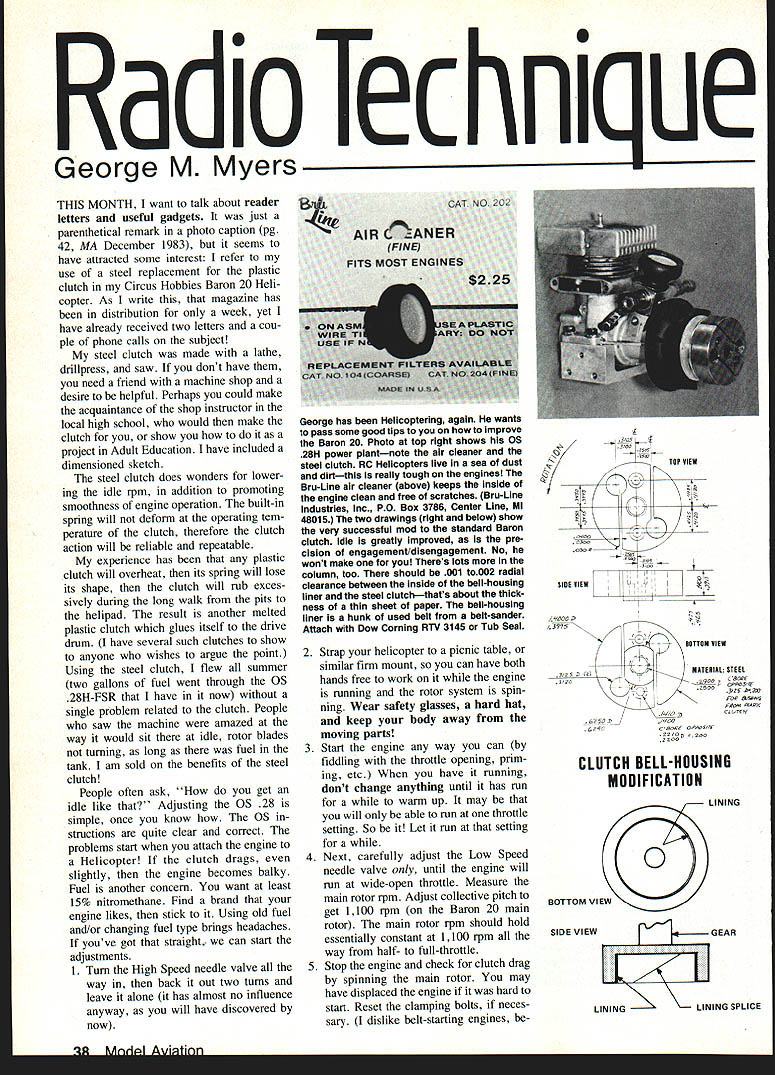
My steel clutch was made with a lathe, drill press, and saw. If you don't have those tools, you need a friend with a machine shop and the desire to be helpful. Perhaps make the acquaintance of the shop instructor at your local high school — he might make the clutch for you or show you how to do it as a project in Adult Education. I have included a dimensioned sketch.
The steel clutch does wonders for lowering idle RPM and for smoothing engine operation. The built-in spring will not deform at clutch operating temperature; therefore the clutch action is reliable and repeatable.
My experience has been that plastic clutches overheat, the spring loses its shape, and the clutch then rubs excessively during the long walk from the pits to the helipad. The result is another melted plastic clutch glued to the drive drum. Using a steel clutch, I flew all summer (about two gallons of fuel through the OS .28H-FSR) without a single clutch-related problem. People were amazed at the way the machine would sit at idle with the rotor blades turning. I am sold on the benefits of the steel clutch.
People often ask, "How do you get an idle like that?" Adjusting the OS .28 is simple once you know how. The OS instructions are clear and correct. Problems begin when you attach the engine to a helicopter — if the clutch drags, even slightly, the engine becomes balky. Fuel is another concern: use at least 15% nitromethane. Find a brand that your engine likes and stick with it. Old fuel or changing fuel type brings headaches. Once you have fuel and clutch sorted, follow these adjustments:
- Turn the high-speed needle valve all the way in, then back it out two turns and leave it alone — it has almost no influence in this setup.
- Strap your helicopter to a picnic table or similar firm mount so both hands are free while the engine and rotor system are spinning. Wear safety glasses and a hard hat; keep your body away from moving parts.
- Start the engine in your usual way (throttle fiddling, priming, etc.). When it is running, don't change anything until it has warmed up. You may initially be limited to one throttle setting — let it run at that setting until warmed.
- Carefully adjust the low-speed needle valve only, until the engine will run at wide-open throttle. Measure the main rotor RPM and adjust collective pitch to get 1,100 RPM on the Baron 20 main rotor. The main rotor RPM should hold essentially constant at about 1,100 RPM from half- to full-throttle.
- Stop the engine and check for clutch drag by spinning the main rotor. You may have displaced the engine during starting; reset clamping bolts if necessary. (I dislike belt-starting engines because the clamp often loosens.)
- I assume you are using the Beier mixer (Part No. KB2401). Set linkages and levers perpendicular: set pushrods and throttle linkage so the mixer bellcranks on both sides of the main frame are neutral when the servo arms are centered. Make sure the pushrods for pitch, roll, and yaw are perpendicular to the servo arms when the servos are at neutral.
Some readers may think I forgot engine adjustments while digressing on pushrods and bellcranks. Consider control: helicopter control inputs affect engine load. Listen to the engine while you hover. Alternate left/right rudder inputs change the load; correct control setup and trimming are necessary to minimize undesired engine speed changes.
Plastic Dip
One of my photos shows a material with many uses: Plastic Dip, a thick, viscous paint that creates a rubbery coating on most materials (including foam rubber — useful if you want a waterproof padded cell for your receiver).
- Use a rubber boot painted around the wire/plug intersection to reduce stress at the point where the wire exits the tiny servo plugs; this spreads the load and reduces the tendency for wires to fracture.
- Improve grip on chrome-plated tools (for example, three-jaw pliers) by dipping the handles as directed.
- Plastic Dip is slightly thinner than GE Tub-Seal and similar silicones and can be painted on with a brush; it will level a little while curing.
- Multilayer applications are permissible. Use lacquer thinner for thinning and cleanup.
- Available colors include bright red and yellow, at least as I know. Supplier: PDI, Inc., 1458 West County Rd. C, Saint Paul, MN 55113.
Electronic Kits — Chargers
A couple of interesting electronic kits have come across my desk.
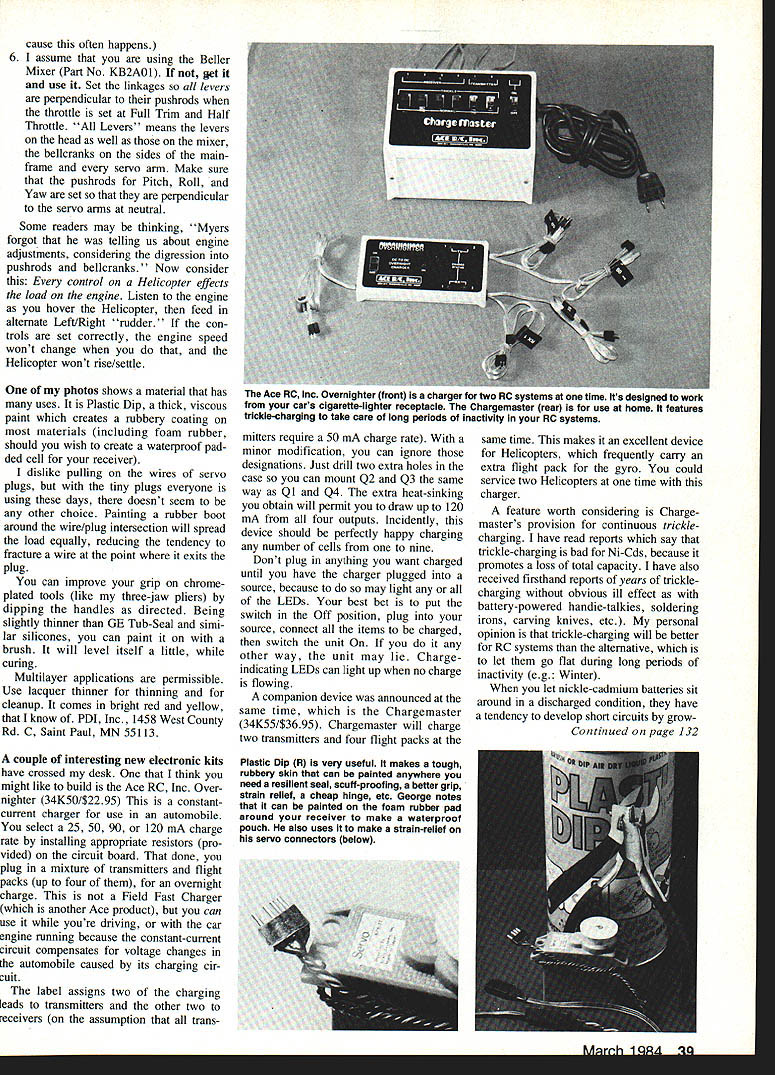
- Ace RC, Inc. Overnighter (34K50 / $22.95)
- A constant-current charger for use in an automobile. Select 25, 50, or 120 mA charge rates by installing resistors (provided) on the circuit board.
- You can plug in a mixture of transmitters and flight packs (up to four) for an overnight charge. It is not a Field Fast Charger, but you can use it while driving or with the car engine running because the constant-current circuit compensates for automotive voltage changes.
- The label assigns two outputs to transmitters and two to receivers (assuming transmitters require 50 mA). With a minor modification — drilling two extra holes in the case and mounting Q2 and Q3 the same way as Q1 and Q4 — you gain extra heat-sinking and can draw up to 120 mA from all four outputs. The device should handle charging any number of cells from one to nine.
- Do not plug in items you want charged until the charger is plugged into a source; otherwise LEDs may light misleadingly. Best procedure: switch Off, plug the charger into the source, connect all items to be charged, then switch the unit On. If you connect items first, the charge-indicating LEDs can light when no charge is flowing.
- Chargemaster (34K55 / $36.95)
- Charges two transmitters and four flight packs simultaneously — useful for helicopters that often carry an extra flight pack for the gyro. You could service two helicopters at once.
- Provides trickle-charging. There are reports that trickle-charging can reduce NiCd capacity, but there are also many firsthand reports of long-term trickle use without obvious ill effect (examples: battery-powered handle-tails, soldering irons, carving knives). My opinion: trickle-charging is preferable to letting packs go flat during long periods of inactivity (e.g., winter storage).
When you let nickel-cadmium batteries sit discharged, they have a tendency to develop internal conductive growths (dendrites) that can create short circuits and reduce usable capacity. Regular maintenance charging or controlled trickle charging is a reasonable way to avoid that problem.
Transcribed from original scans by AI. Minor OCR errors may remain.

