

Radio Technique
George M. Myers
Useful Tools
For as long as I have been playing with things electronic, the VOM (AC/DC Volt-Ohm Meter) has reigned as king of the electronic tools... the one essential tool. Occasionally one needs specialized instruments like an oscilloscope, bench power supply, servo cycler, battery tester, digital pulse meter, etc.; but you can do without all of them and still accomplish useful things if you have a VOM and the skill to use it.
Now I am about to describe a VAT (Volt/Amp/Tachometer), which is the first tool offered for RC use that presents a serious challenge to the supremacy of the VOM. My subject is the Accu-Tach 2 from Nor Cal Avionics, Inc., P. O. Box 70956, Sunnyvale, CA 94088. Accu-Tach 2 combines a digital DC centivoltmeter, a DC milliammeter, and an optical tachometer into one handy package that will fit neatly into anybody's field box.
All my life I've been farsighted, which is great for seeing a model at a distance, but not so good for reading a telephone book. The Accu-Tach 2 LCD display uses big, 3/8- by 1/2-inch numbers to display values between plus and minus 1999. I can read it without glasses, for which I am grateful (I hate to wear anything but safety and sunglasses). Perhaps you will find it easy to read also. The permissible viewing angle is good; the numbers can be read 45° off the perpendicular in all directions.
The Accu-Tach 2 will do the following:
- Measure DC (battery) voltage in the range (+/-) 1 thru 1999 centi-volts (call it +/- 20 VDC), while shunting the circuit under test with 600K-ohm resistance. This resistance is large enough to minimize circuit loading, so Accu-Tach 2 can be used while poking around inside receivers. The voltage range is fine for aligning receivers as well as for diagnosing troubles of all kinds likely to be encountered in transmitters, receivers, servos, and battery packs.
- Measure rpm in the range 10 to 35,000 rpm, optically (no dangerous contact with the rotating machinery is necessary). The range is adequate for all gasoline- and alcohol-fueled engines, whether at idle or at maximum rpm, as well as for electric motors such as are used to power model airplanes. The tachometer will satisfy the needs of customary sport and competition models, ducted fans, helicopters, etc.
- Measure DC current in the range (+/-) 1 thru 1999 mA (call it +/- 2 amps). This range nicely fits all kinds of RC uses, such as measuring charging currents and measuring discharge currents typical of transmitters, servos, and full RC systems.
- Measure battery pack voltage under load (nominal 200 mA). Again, the range is +/- 20 volts, with a minimum indication of 10 mV.
So much for the capabilities. Now let's look at some applications.
Tachometer
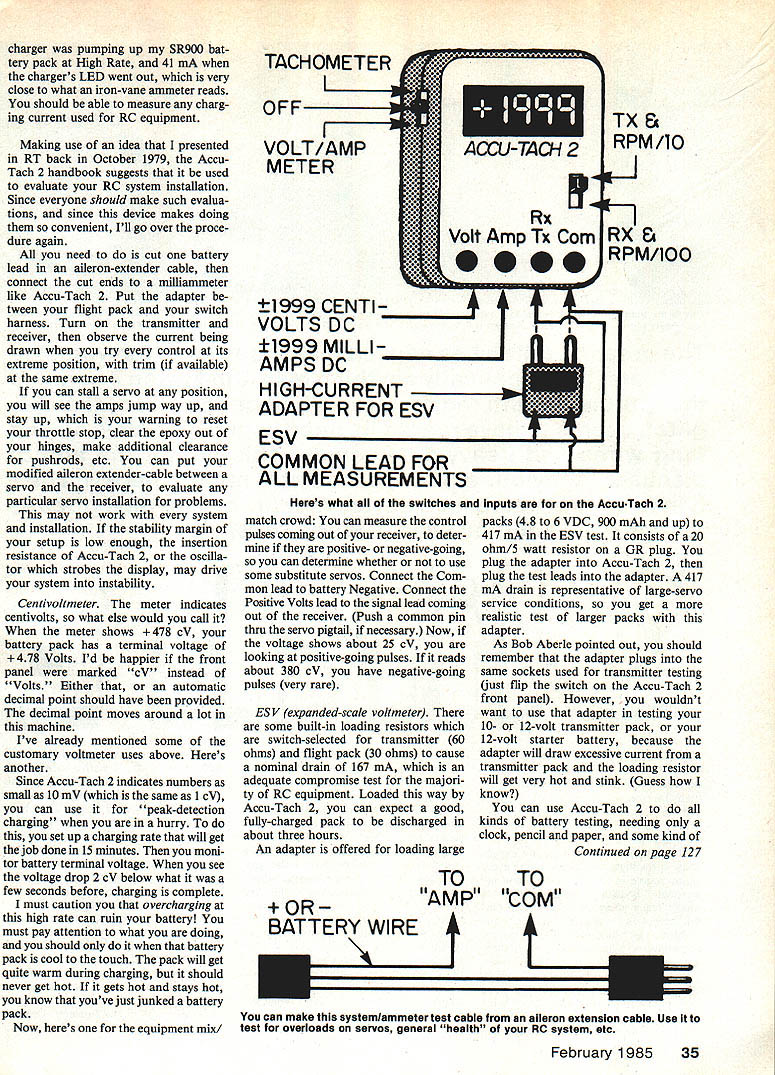
Push the switch on the left side of the case toward the tachometer eye in the top of the case; point the eye toward a whirling propeller (keeping a six-inch clearance), and read rpm. Two measuring ranges are provided: rpm/10 and rpm/100. The counter works to 70,000 pulses per minute, which is good for 35,000 rpm on a two-bladed propeller. The display-scaling circuitry is set up for use on a two-bladed propeller. Point it at a two-bladed prop and read the correct rpm in the range 10 to 35,000 rpm (divided by either 10 or 100, depending on the front-panel switch position you chose).
If you are using a single-bladed prop, multiply the number indicated by a factor of 2. If your prop has three blades, multiply the indicated number by 3. If your prop has four blades, multiply by 4, etc. (As you can see, in every case the multiplier is found by using two divided by the number of blades.) It's a little fussy about how the propeller is illuminated and how you point the lens, but I've always been able to find some position that will read properly.
Milliammeter
The panel is marked "Amps," but the meter indicates directly in milliamps, which is the range of most interest to RC'ers. By measuring voltage drop across the meter while a current was running through it, I calculated a series insertion of 0.105 ohm (+/- 5%).
The ammeter is limited to a maximum of two amps because the internal circuitry is set up that way, and because the display is limited to 1999 counts. ICs are notoriously intolerant of overloads. Bob Aberle's suggestion made the red lead a fused ammeter lead by inserting a Radio Shack Inline Mini Fuse Holder (No. 270-1238) used with a two-amp fuse (No. 270-1244). This increases the insertion resistance to about 0.45 ohm, which may be too much for some tests, but it's handy. I've already blown a couple of fuses, and my Accu-Tach 2 still works, so it must be a good idea. Thanks, Bob.
As an example of its use, Accu-Tach 2 indicated 680 mA when my MEN C/50-4 charger was pumping up my SR900 battery pack at High Rate, and 41 mA when the charger's LED went out, which is very close to what an iron-vane ammeter reads. You should be able to measure any charging current used for RC equipment.
Making use of an idea that I presented in RT back in October 1979, the Accu-Tach 2 handbook suggests that it be used to evaluate your RC system installation. Since everyone should make such evaluations, and since this device makes doing them so convenient, I'll go over the procedure again.
All you need to do is cut one battery lead in an aileron-extender cable, then connect the cut ends to a milliammeter like Accu-Tach 2. Put the adapter between your flight pack and your switch harness. Turn on the transmitter and receiver, then observe the current being drawn when you try every control at its extreme position, with trim (if available) at the same extreme.
If you can stall a servo at any position, you will see the amps jump way up and stay up, which is your warning to reset your throttle stop, clear the epoxy out of your hinges, make additional clearance for pushrods, etc. You can put your modified aileron extender cable between a servo and the receiver to evaluate any particular servo installation for problems.
This may not work with every system and installation. If the stability margin of your setup is low enough, the insertion resistance of Accu-Tach 2, or the oscillator which strobes the display, may drive your system into instability.
Centivoltmeter
The meter indicates centivolts, so what else would you call it? When the meter shows +478 cV, the battery pack has a terminal voltage of +4.78 volts. I'd be happier if the front panel were marked "cV" instead of "Volts." Either that, or an automatic decimal point should have been provided. The decimal point moves around a lot in this machine.
I've already mentioned some customary voltmeter uses above. Here's another.
Since Accu-Tach 2 indicates numbers as small as 10 mV (which is the same as 1 cV), you can use it for "peak-detection charging" when you are in a hurry. To do this, set up a charging rate that will get the job done in 15 minutes. Then monitor battery terminal voltage. When you see the voltage drop 2 cV below what it was a few seconds before, charging is complete.
I must caution you that overcharging at this high rate can ruin your battery! You must pay attention to what you are doing, and you should only do it when that battery pack is cool to the touch. The pack will get quite warm during charge, but it should never get hot. If it gets hot and stays hot, you know that you've just junked a battery pack.
Here's one for the equipment mix-and-match crowd: you can measure the control pulses coming out of your receiver to determine if they are positive- or negative-going, so you can determine whether or not to use some substitute servos. Connect the Common lead to battery negative. Connect the Positive Volts lead to the signal lead coming out of the receiver (push a common pin through the servo pigtail, if necessary). If the voltage shows about 25 cV, you are looking at positive-going pulses. If it reads about 380 cV, you have negative-going pulses (very rare).
ESV (Expanded-Scale Voltmeter)
There are some built-in loading resistors which are switch-selected for transmitter (60 ohms) and flight pack (30 ohms) to cause a nominal drain of 167 mA, which is an adequate compromise test for the majority of RC equipment. Loaded this way by Accu-Tach 2, you can expect a good, fully charged pack to be discharged in about three hours.
An adapter is offered for loading larger packs (4.8 to 6 VDC, 900 mAh and up) to 417 mA in the ESV test. It consists of a 20 ohm/5 watt resistor on a GR plug. You plug the adapter into Accu-Tach 2, then plug the test leads into the adapter. A 417 mA drain is representative of average service conditions, so you get a more realistic test of larger packs with this adapter.
As Bob Aberle pointed out, remember that the adapter plugs into the same sockets used for transmitter testing (just flip the switch on the Accu-Tach 2 front panel). However, you wouldn't want to use that adapter in testing your 10- or 12-volt transmitter pack, or your 12-volt starter battery, because the adapter will draw excessive current from a transmitter pack and the loading resistor will get very hot and stink. (Guess how I know?)
You can use Accu-Tach 2 to do all kinds of battery testing, needing only a clock, pencil and paper, and some kind of load (if you are testing a glow battery or starter battery) to complete the test kit.
Other Ideas and Limitations
I've only mentioned a few of the uses of Accu-Tach 2. With a little effort, you can find many others. One item that might offer some difficulty will be figuring out how to measure resistance in ohms. Unfortunately, you won't find any simple way to do it. The meter's sensitivity is too low, therefore the currents you would have to put through the item under test would be destructive, unless you want to build some kind of external power supply, amplifier, and decade switch. By the time you get that done, you will have spent more than the price of a pretty good VOM. So King VOM hangs on to a portion of his realm!
The Accu-Tach 2 comes without any clip leads, so you have to make your own. I used General Radio (GR) twin banana plugs and some patch cords salvaged from an old piece of test gear that was being discarded. You might have to buy them somewhere, but Radio Shack offers several options (including GR plugs), so that's no problem.
I prefer a unit which has a wire stand on the back of the case that holds it at a convenient viewing angle, so I made one.
One characteristic of the Accu-Tach 2 that I don't like is its long settling time. It uses all of five seconds to reach its final reading. When you are accustomed to the instantaneous response of a d'Arsonval meter, five seconds seems like a very long time. On the other hand, the delay really isn't critical unless you are trying to trap some transient phenomenon. When you are trying to do that, you probably should be using an oscilloscope or strip-chart recorder.
Till we meet again.
George M. Myers 70 Froehlich Farm Rd., Hicksville, NY 11801 (your friendly AMA Frequency Committee Chairman)
P.S. Do you know who your friendly District Frequency Coordinator is? Are you having interference problems? Tell him (your DFC) about them. GMM.
Transcribed from original scans by AI. Minor OCR errors may remain.

