

RAIN CROW 2
Reid A. Hull
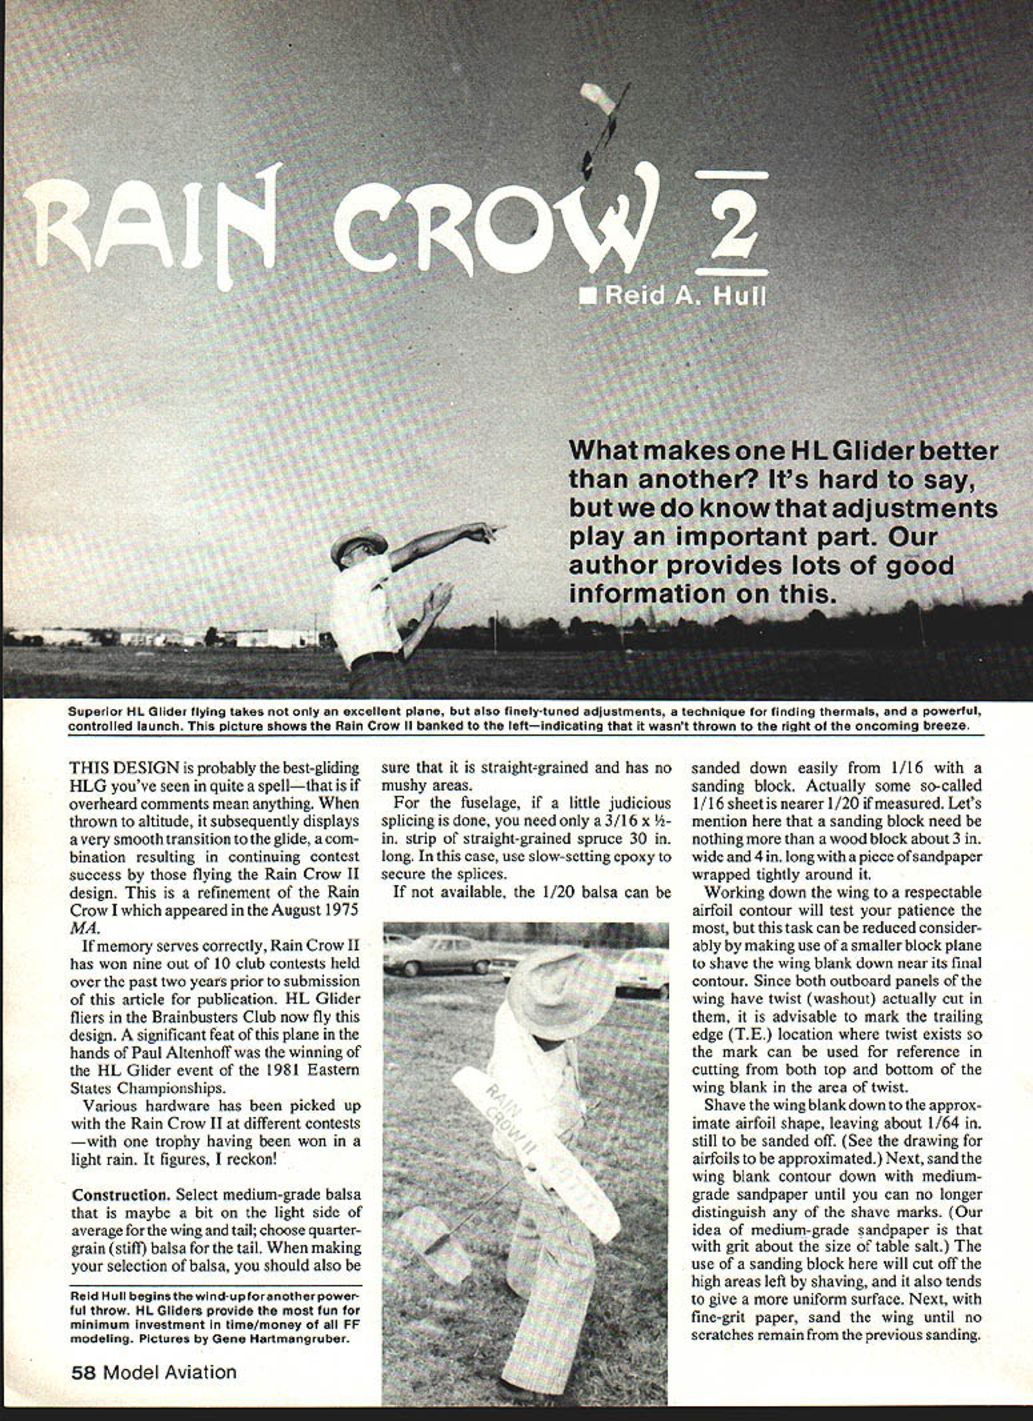
What makes one HL Glider better than another? It's hard to say, but adjustments play an important part. The Rain Crow II is a refinement of the Rain Crow I (August 1975 MA) and, when thrown to altitude, displays a very smooth transition to the glide. That combination has resulted in continuing contest success for those flying this design. Rain Crow II reportedly won nine out of ten club contests over a two-year period prior to this article, and HL Glider fliers in the Brainbusters Club now fly this design. A significant feat was Paul Altenhoff's win of the HL Glider event at the 1981 Eastern States Championships. Various hardware has been picked up with the Rain Crow II at different contests — one trophy was even won in a light rain.
Construction
Materials mentioned:
- Medium-grade balsa (a bit on the light side of average) for wing and tail.
- Quarter-grain (stiff) balsa for the tail.
- 3/16 x 1/2-in. strip of straight-grained spruce, 30 in. long, for the fuselage (splice as needed).
- Slow-setting epoxy for spruce splices.
- Sandpaper (medium-, fine-, extra-fine grit) and a sanding block.
- Sanding sealer, clear dope (optionally mixed with ~20% color dope).
- Cement for tail and wing attachment.
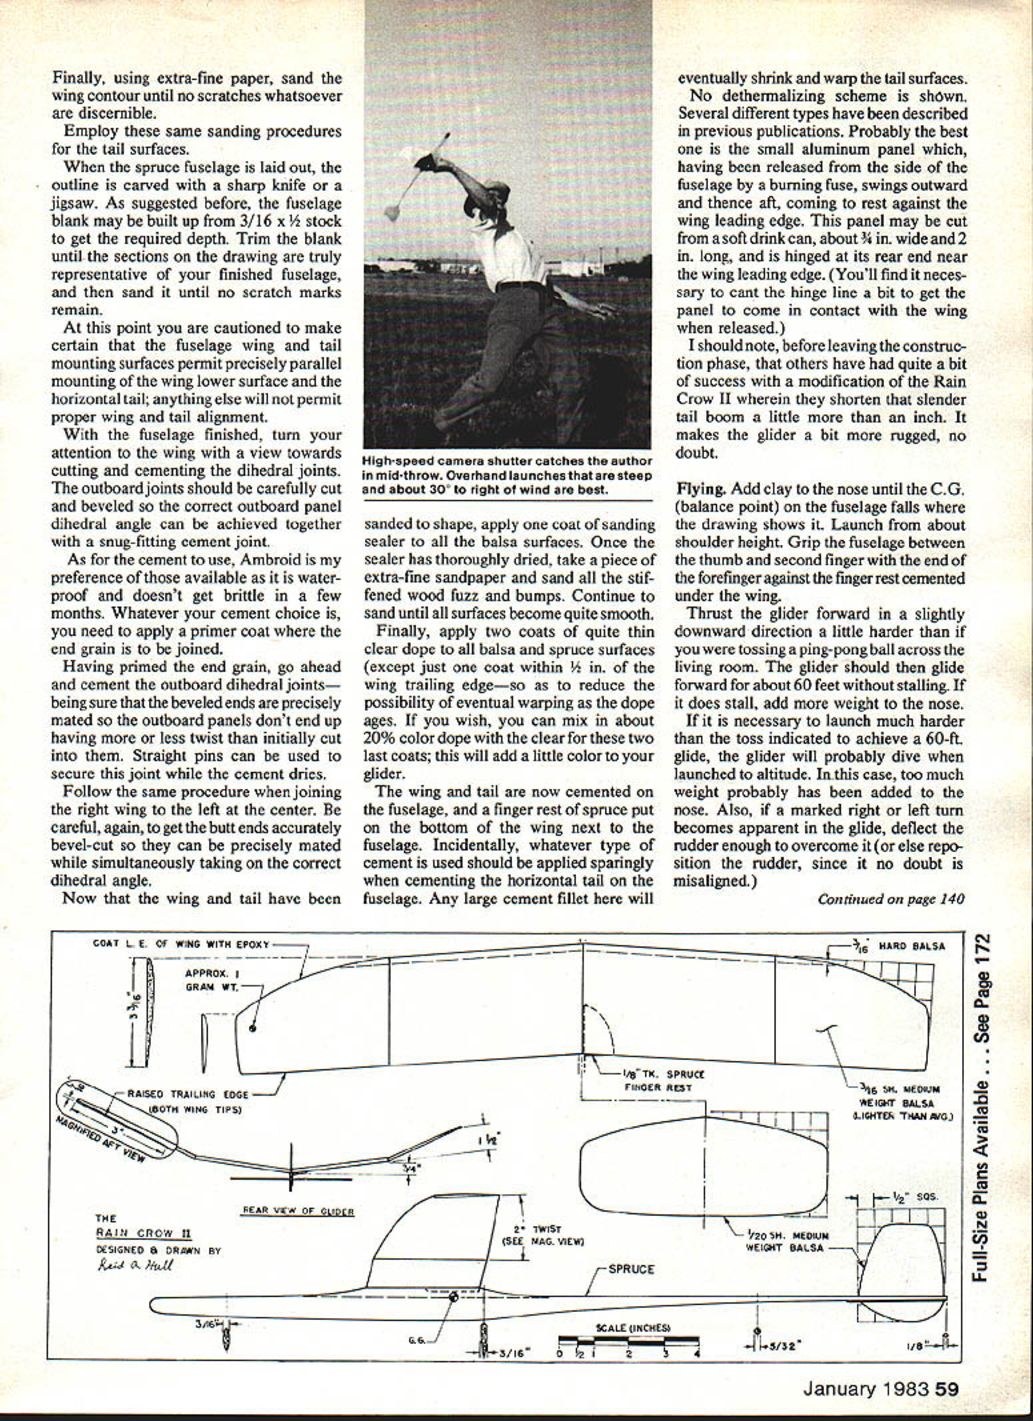
Select straight-grained balsa with no mushy areas. For the fuselage, if you splice judiciously you need only the 3/16 x 1/2-in. spruce strip; use slow-setting epoxy for the splices. If 1/20-in. balsa is not available, 1/16-in. sheet can be sanded down to the desired thickness with a sanding block. Some so-called 1/16-in. sheet measures nearer 1/20 in. A sanding block can be nothing more than a wood block about 3 in. wide and 4 in. long with a piece of sandpaper wrapped tightly around it.
Working the wing to a respectable airfoil contour tests patience, but you can reduce the work by using a small block plane to shave the wing blank near its final contour. Since both outboard panels have twist (washout) cut into them, mark the trailing edge (T.E.) location where twist exists so you can use the mark as a reference when cutting from both top and bottom of the wing blank in that area.
Shave the wing blank down to the approximate airfoil shape, leaving about 1/64 in. still to be sanded off (see the drawing for airfoils to be approximated). Next, sand the wing blank contour with medium-grade sandpaper until you can no longer distinguish the shave marks; our idea of medium-grade sandpaper is grit about the size of table salt. Using a sanding block will remove high areas left by shaving and tends to give a uniform surface. Then, with fine-grit paper, sand the wing until no scratches remain from the previous sanding.
When sanded to shape, apply one coat of sanding sealer to all balsa surfaces. Once the sealer has thoroughly dried, take extra-fine sandpaper and sand off any stiffened wood fuzz and bumps until all surfaces are quite smooth.
Finally, apply two coats of quite thin clear dope to all balsa and spruce surfaces (except apply just one coat within 1/8 in. of the wing trailing edge to reduce the possibility of eventual warping as the dope ages). If desired, mix about 20% color dope with the clear for these last two coats to add a little color.
Cement the wing and tail on the fuselage, and glue a spruce finger rest to the bottom of the wing next to the fuselage. Apply whatever cement you use sparingly when attaching the horizontal tail; a large cement fillet here will eventually shrink and warp the tail surfaces.
No dethermalizing scheme is shown here, but several have been described elsewhere. Probably the best is a small aluminum panel released from the side of the fuselage by a burning fuse; it swings outward and aft and comes to rest against the wing leading edge. This panel may be cut from a soft-drink can, about 3/4 in. wide and 2 in. long, hinged at its rear end near the wing leading edge. You may need to cant the hinge line a bit to get the panel to contact the wing when released.
A common modification is shortening the slender tail boom a little more than an inch, which makes the glider somewhat more rugged.
Flying
Add clay to the nose until the C.G. (balance point) on the fuselage falls where the drawing shows. Launch from about shoulder height. Grip the fuselage between the thumb and second finger with the end of the forefinger against the finger rest under the wing.
Thrust the glider forward in a slightly downward direction a little harder than if tossing a ping-pong ball across the living room. The glider should then glide forward for about 60 feet without stalling. If it stalls, add more weight to the nose. If you must launch much harder than that toss to achieve a 60-ft. glide, the glider will probably dive when launched to altitude — too much nose weight has probably been added. If a marked right or left turn appears in the glide, deflect the rudder enough to overcome it or reposition the rudder if misaligned.
Once the glider is balanced and trimmed for a long, smooth glide (possibly with a nearly invisible left turn), proceed to launching to a modest altitude. Bank the glider with the right wing tip about 6 in. lower than the left, and launch a bit to the right of any oncoming breeze to prevent a violent stall when the launching speed tapers off. Use about half of your full-power launch. The glider should make about half a full circle, gaining altitude and reaching about 20 ft. It should then slowly drop its nose and go into a smooth glide circle.
Base judgments on several flights, since air currents vary. If ever-tightening left glide circles regularly occur, add a bit of right rudder. If opening the glide circle to about 100 ft. diameter with the rudder doesn't cure the tightening (and leads to a diving tendency), lower the leading edge (L.E.) of the horizontal tail a very small amount. Soften the tail's cement joint about 1/8 in. from the L.E. and insert a cement-coated spruce wedge no more than 1/32 in. at its thickest end. If Ambroid was used to cement the tail, it can be softened with acetone; if white glue was used, it can only be softened with water, which will cause the tail to warp — a catastrophe. You can cut the tail loose, but this is difficult if the cement joint has hardened.
After satisfactory flight characteristics are obtained for 20-ft. launches, try harder launches with less bank; these should be steeper, approaching 45° inclination. More of an overhand launch will work better, and you should find a respectable transition from launch to glide still possible with some trimming.
If, despite launching to the right of an oncoming breeze, you witness a violent stall or loop at the peak of the launch, add a bit of weight to the left wing tip and/or lower the T.E. of the horizontal tail about 1/64 in. by cementing a tiny wedge between it and the fuselage. A bit of corrective right rudder may be necessary to prevent a spiral dive, but it should be minuscule. Small rudder changes can be facilitated by dampening the T.E. area on the side opposite the direction you want the T.E. deflected — your lips become very convenient when dampening tail surfaces is desirable.
When fairly hard launches yield nearly flawless performance, try your hardest launches — almost purely overhead steep launches at about 30° to the right of any oncoming breeze. Expect to need practice; a perfect flight takes a lot of practice and often fine trimming with rudder deflections so tiny as to be nearly invisible. If hard launches seem to yield modest stalls, try bending the T.E. of the horizontal tail up a bit; this will cause the glider to keep to the right in a steep Immelmann-like launch, slipping to the right rather than stalling at the end.
A near-overhand launch yields the most consistency, which is essential in competition. To compete effectively, you must be able to put your glider into a thermal on most official flights. Learn to sense thermals — a tiny rise in temperature or a calm spell on a breezy day are good clues. (If you want to avoid thermals, boomers are scarce when only two hours of daylight remain.)
Well, happy thermal chasing, and keep 'em flyin' — Rain Crows, that is!
Transcribed from original scans by AI. Minor OCR errors may remain.

