


RC Electric Floatplanes - Part 2
Mitch Poling
LAST MONTH we covered what makes a good electric floatplane. Now let's cover the other details that are good to know before that first takeoff. The following are practical tips on antennas, waterproofing, power control, takeoff and landing technique, float setup, motor/prop parameters, and retrieval.
Antenna and radio reception
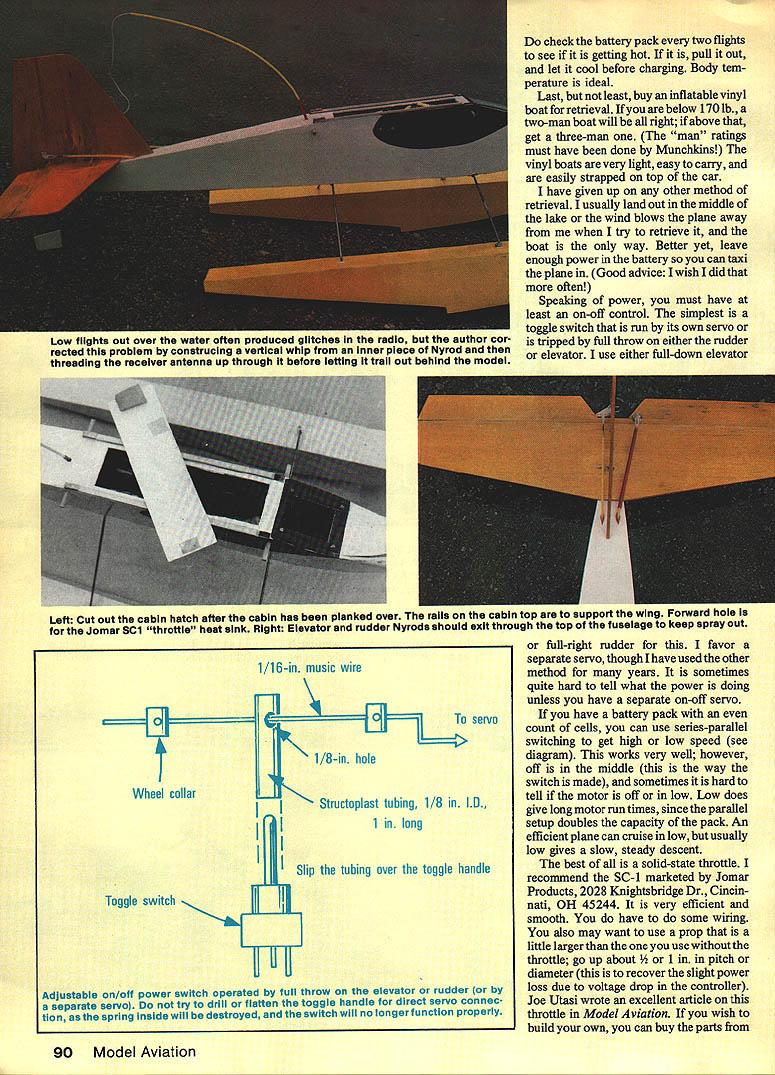
- I often flew low and far out on the water and noticed radio glitches. A vertical antenna cured the problem.
- I use a piece of inner Nyrod set vertically through the fin and run the antenna wire up it. Running the antenna to the top of the vertical fin will work equally well.
Waterproofing and control runs
- Use Nyrod for control connections; it helps waterproof the plane.
- Route elevator and rudder controls out the top of the fuselage rather than the sides to keep spray out.
- Mount servos with servo tape and position them about 1/2 in. off the floor; keep the receiver off the floor as well. If the receiver gets wet the radio can become uncontrollable.
- If the radio does get wet, remove plastic cases and let everything dry at room temperature. The same applies to the motor and battery.
Cabin hatch, charging and small details
- I like a removable cabin hatch: plank the cabin top with sheet balsa, then cut out the hatch. Leave rails at the sides so dihedral-type wings sit squarely.
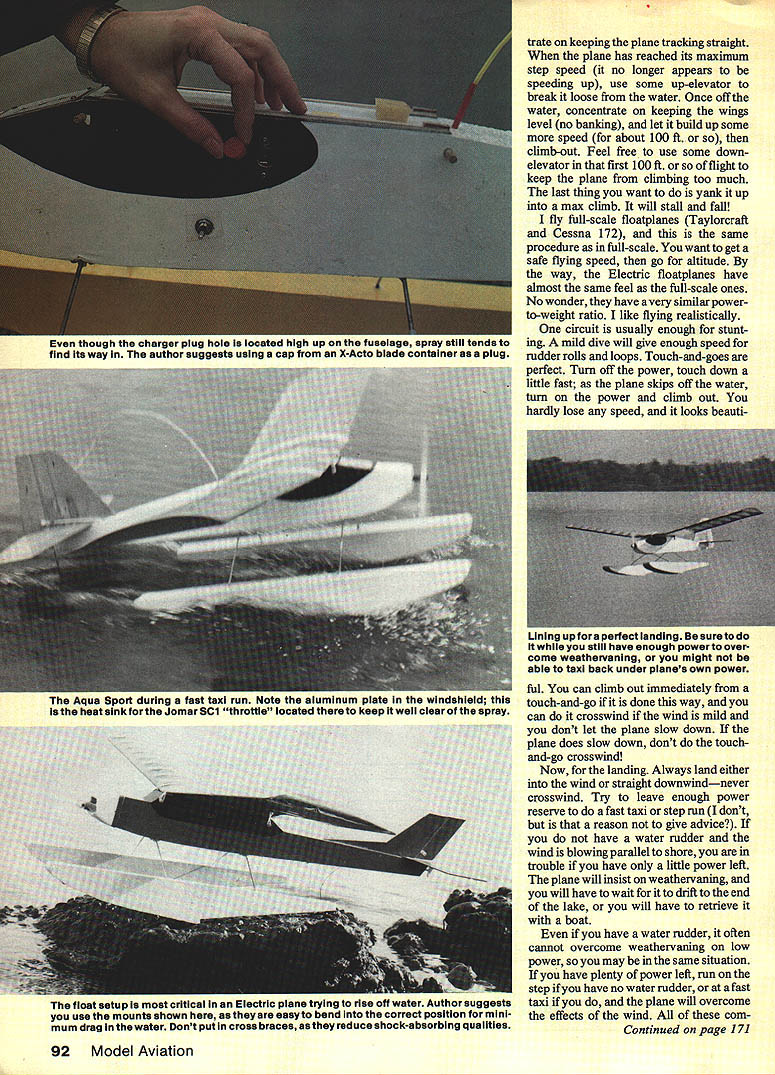
- For charging use a Radio Shack–type power/charge jack mounted inside the cabin. Cover the hole with a small plastic plug (for example, from an X-Acto #11 container).
- Protect toggle-switch handles with slip tubing (1/8 in. recommended) so the switch mechanism is not damaged by a direct servo connection.
Servos, receiver, and fusing
- Mount servos on a tray so water does not pool and use servo tape for a secure installation.
- I strongly recommend a fuse in the motor circuit — I use a 20-amp spade-type fuse. Without a fuse you risk a runaway motor if the radio fails; a blown fuse will stop the motor and save the plane.
- If you fly in fresh water, wetting generally causes no permanent damage. If you fly in salt water, rinse electronics and the motor with fresh water before drying.
Cooling and battery care
- I do not provide cooling holes for the power pack or motor because spray will find its way inside; I fly in a cool climate and this has not been a problem.
- Check the battery pack after two flights. If it is getting hot, remove it and let it cool to room temperature before charging.
- Allow wet components to dry at room temperature — typically a day is enough.
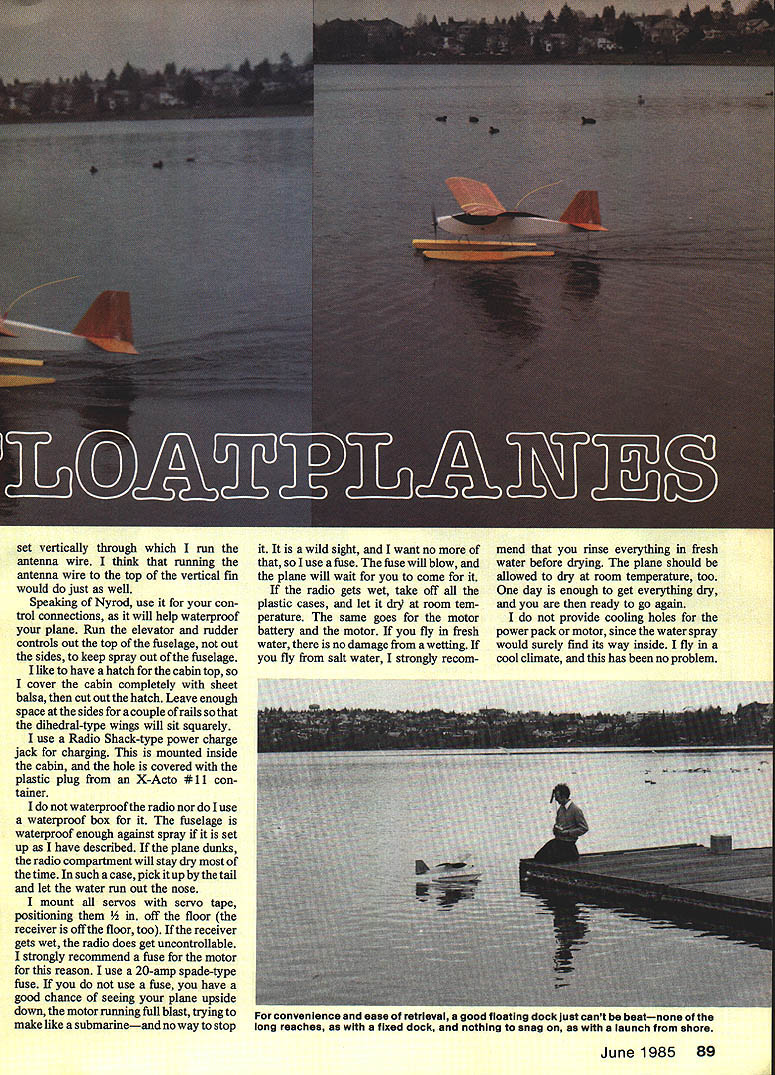
Retrieval: docks and boats
- A floating dock or an easy beach launch is ideal. Avoid spots with trees near the shore; never take off toward trees.
- If a dock is on pilings, fit a loop of string under the wing rubber bands so you can lower the plane into the water or hook it for retrieval.
- Buy an inflatable vinyl boat for retrieval. A two-man (≈170 lb rating) boat is adequate for most pilots; three-man ratings give more margin. Light vinyl boats are easy to carry and strap to a car.
- Better yet, leave enough power in the battery so the plane can taxi back.
Power control options
- You must have at least an on-off control for the motor. The simplest is a toggle switch operated by its own servo or tripped by full throw on rudder or elevator.
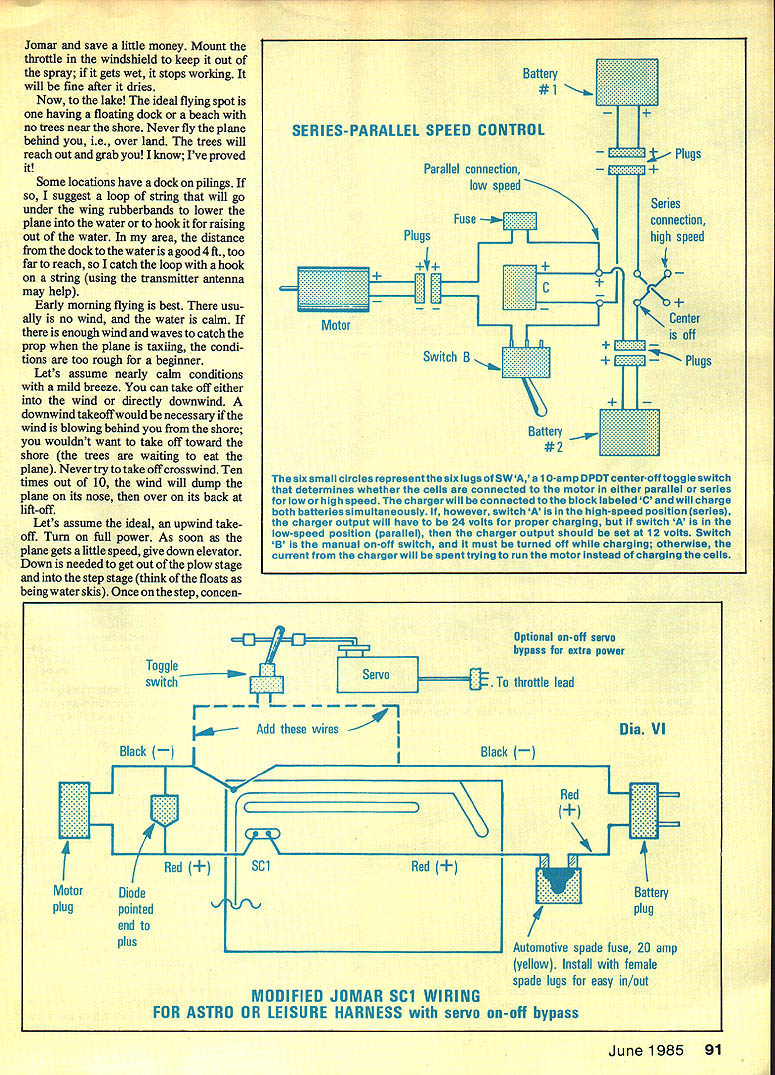
- Series-parallel switching for even-count cell packs provides high/low speed: low gives longer run times (parallel doubles capacity) but can result in a slow, steady descent. Off is typically the middle position on these switches, so it can be hard to tell if the motor is off or in low.
- The best option is a solid-state throttle. I recommend the SC-1 marketed by Jomar Products (very efficient and smooth). You may need to do some wiring and possibly move up about 1/8 to 1 in. in prop pitch or diameter to recover slight voltage drop in the controller.
- Mount the throttle out of the spray (for example, in the windshield area). If it gets wet it will stop working until it dries.
Takeoff procedure
- Best conditions are early morning with calm water and little wind.
- Ideal takeoff: into the wind. You can take off downwind if necessary (for example, when wind is blowing from the shore), but never attempt a crosswind takeoff.
- Procedure for an upwind takeoff:
- Apply full power and get the plane moving.
- As the speed builds give down elevator to get out of the plow stage and onto the step (treat the floats like water skis).
- Concentrate full power on the step; when step speed is reached, use up-elevator to break loose from the water and rotate to climb.
- Keep the wings level after lift-off and build speed for about 100 ft. before a climb-out. You can use a little down-elevator in the first 100 ft. to avoid an excessive climb that could stall the model.
Keeping straight and avoiding skids
- If the plane skids (does not track straight) as it nears takeoff, do not try to lift off. Turn off the power, let it stop, and retry. Skids are especially dangerous on downwind takeoffs.
- V-bottom floats may be less prone to skidding, but I prefer floats that give good glassy-water takeoffs.
- If skidding persists on an upwind takeoff you may actually have a crosswind; stop and try again.
Float setup and alignment
- Floats should be parallel or have a slight toe-in (fronts slightly closer together than rears).
- Float bottoms can be flat, curved, or canted inward slightly so the outer edge is off the water when the inner edge touches.
- If the float fronts are not at the correct angle, the plane may not lift:
- Check float angle: front of floats should be about 0° to 1½° down relative to the stabilizer.
- If that doesn't work, shim up the front of the wing in small increments (3/32 in. at a time).
- If all else fails, hand-launch to check general flight trim and power. If it flops back into the water, there is not enough power — check weight, motor, battery, and wiring.
Float mounts and structure
- I use very simple float mounts: two music-wire U-shape braces or struts. This setup is easy to adjust and has springy shock absorption.
- Avoid excessive cross-bracing and rigid structure — extra bracing adds weight, drag, and rigidity, which transfers shock to the fuselage on hard landings.
- Check float alignment periodically; hard landings can bend mounts out of alignment.
In-flight handling, stunting and touch-and-goes
- Concentrate on keeping the plane tracking straight and the wings level.
- One circuit is usually enough for stunting. Mild dives give enough speed for rudder rolls and loops.
- Touch-and-go technique: turn off power, touch down a little fast, then as the plane skips off the water turn on power and climb out. You lose very little speed and the maneuver looks good.
- You can perform touch-and-goes crosswind only if the wind is mild and you do not let the plane slow down too much.
Landing and taxiing
- Always land into the wind or straight downwind — never crosswind.
- Try to leave enough power reserve to taxi in fast or run on the step. If you have little power left and no water rudder or inadequate thrust, the plane will weathervane and may drift to the end of the lake.
- A water rudder helps but often cannot overcome weathervaning at very low power.
- Work up to more advanced aerobatics carefully; sport models with fixed flaps won't execute super-square corners. Landings are normally as smooth as takeoffs with the available wing and tail area for control.
Motor, prop and weight parameters (guidelines)
- If the model will not get off the water, check power and weight first. Typical general guidelines:
- .049-size motor: aim for a plane weight around 42 oz or less, prop roughly 7–8 in. diameter, and RPMs in the neighborhood of 11,000 or better.
- .15-size motor: aim for a plane weight around 5 lb or less, prop in the 8x4 or 9x4 range, and RPMs around 11,500 or better on an 8x4.
- If you are close to target RPMs but performance is lacking, experiment with props — different brands and blade shapes have significant performance differences.
Troubleshooting common problems
- Skid: stop, check float alignment and toe-in, verify you are not in a crosswind, and retry.
- Poor takeoff or persistent sinking: check float angle relative to stabilizer, verify wing incidence (shim the wing small amounts if necessary), and verify power-to-weight ratio.
- Runaway motor: a fuse in the motor lead will prevent an uncontrollable motor-on dunk.
Final notes and contact
- I have been flying electric floatplanes for eight years and have learned these practical solutions through experience. If you have questions or want to share your results, write to me care of Model Aviation.
- Fly better electrically — fly floats!
Transcribed from original scans by AI. Minor OCR errors may remain.

