
RC Flying Today
George M. Myers 70 Froehlich Farm Road, Hicksville, NY 11801
ABSTRACT
- WACO 10-550 electric sailplane and Kevlar/epoxy finishing tips.
- RCD, Inc. "MOM" control mixer.
- RCD, Inc. Apollo 24 servo characteristics.
PROBLEMS
I have problems. I need a plane that can travel and perform well in practically any situation.
Equipped with floats and wheels, the Laser manufactured by Lanier R/C served me well on my Alaskan trip (see Model Aviation, February 1990). But carrying liquid fuel in my van is such a nuisance! It manages to ooze out, no matter how I store it. If I give away leftover fuel, I have to buy more at the next stop. Another nuisance is oil dripping from unexpected places.
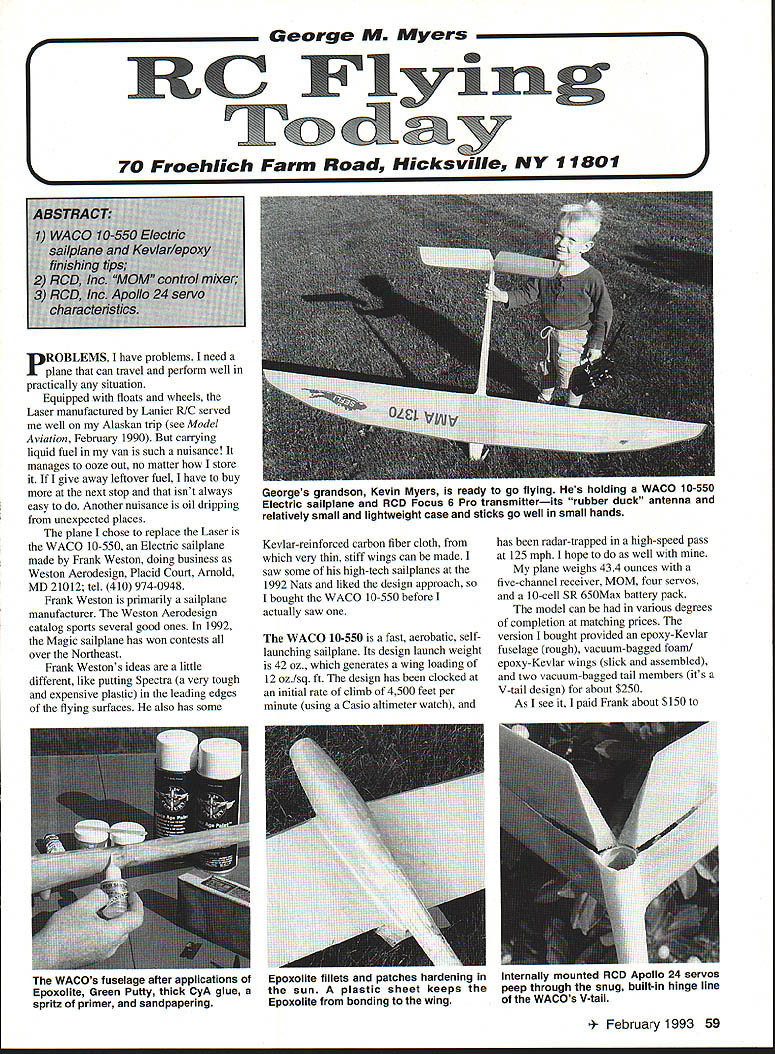
The plane I chose to replace the Laser is the WACO 10-550, an electric sailplane made by Frank Weston, doing business as Weston Aerodesign, Placid Court, Arnold, MD 21012; tel. (410) 974-0948.
Frank Weston is primarily a sailplane manufacturer. The Weston Aerodesign catalog sports several good designs. In 1992, the Magic sailplane won contests all over the Northeast.
Frank Weston's ideas are a little different, like putting Spectra (a very tough and expensive plastic) in the leading edges of the flying surfaces. He also has some Kevlar-reinforced carbon-fiber cloth, from which very thin, stiff wings can be made. I saw some of his high-tech sailplanes at the 1992 Nats and liked the design approach, so I bought the WACO 10-550 before I actually saw one.
The WACO 10-550 is a fast, aerobatic, self-launching sailplane. Its design launch weight is 42 oz., which generates a wing loading of 12 oz./sq. ft. The design has been clocked at an initial rate of climb of 4,500 feet per minute (using a Casio altimeter watch), and has been radar-trapped in a high-speed pass at 125 mph. I hope to do as well with mine.
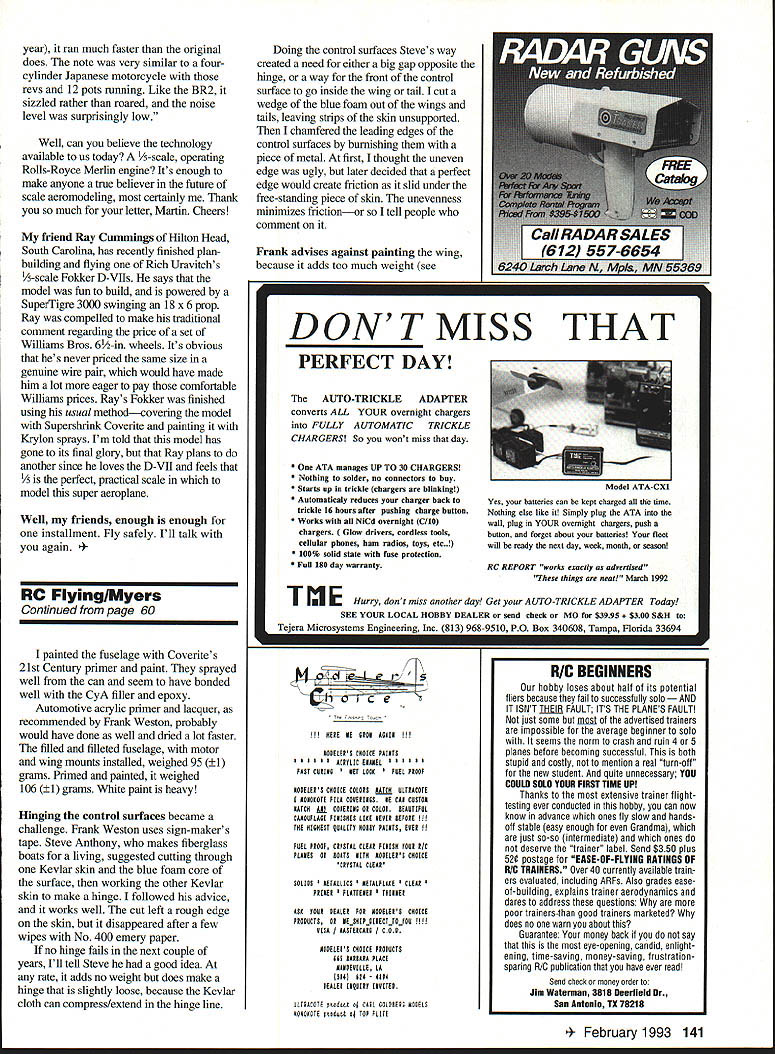
My plane weighs 43.4 ounces with a five-channel receiver, MOM, four servos, and a 10-cell SR 650Max battery pack.
The model can be had in various degrees of completion at matching prices. The version I bought provided an epoxy-Kevlar fuselage (rough), vacuum-bagged foam/epoxy-Kevlar wings (slick and assembled), and two vacuum-bagged tail members (it's a V-tail design) for about $250.
As I see it, I paid Frank about $150 to have the pieces in place; others didn't.
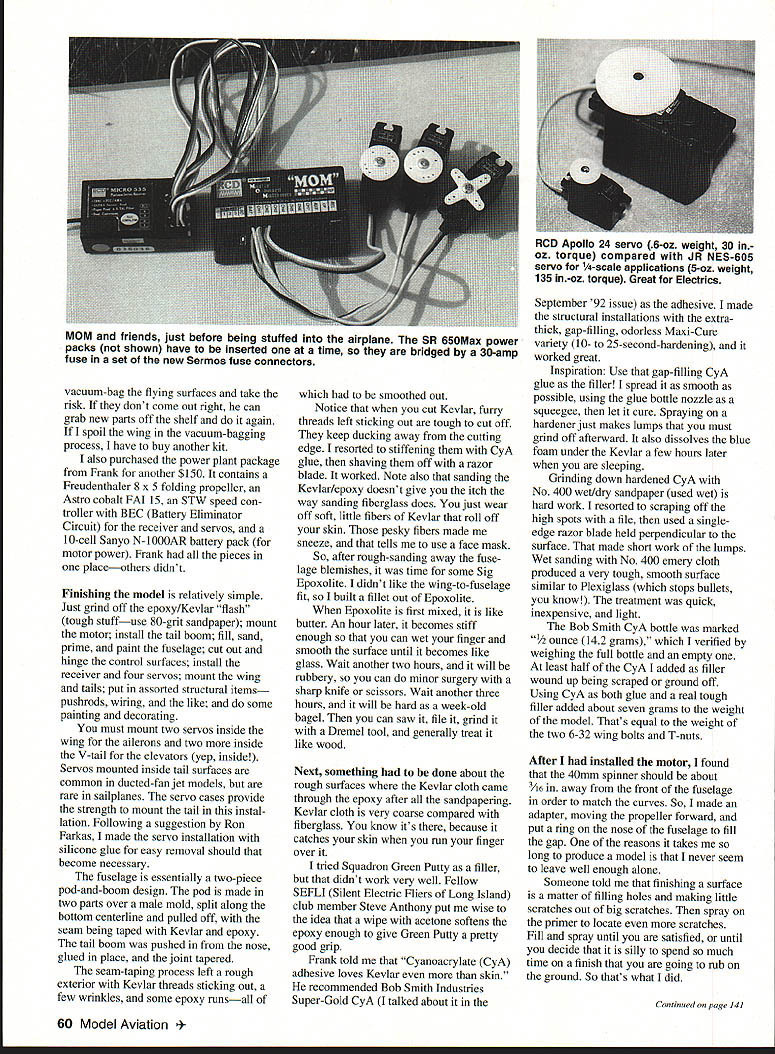
Finishing the model is relatively simple: grind off epoxy/Kevlar flash (tough stuff — use 80-grit sandpaper); mount motor; install tail boom; fill; sand; prime; paint fuselage; cut out and hinge control surfaces; install receiver and four servos; mount wing and tails; install assorted structural items, pushrods, wiring; and do painting and decorating.
I had to mount two servos inside the wing for the ailerons and two inside the V-tail for the elevators — yes, inside. Servos mounted inside tail surfaces are common in ducted-fan jet models, rare in sailplanes. Servo cases provide strength for the tail installation. Following a suggestion Ron Farkas made, silicone glue makes servo installation easy to remove should it become necessary.
The fuselage is essentially a two-piece pod-and-boom design. The pod is made in two parts over a male mold split along the bottom centerline. It was pulled off, the seam being taped. The Kevlar/epoxy tail boom was pushed into the nose and glued in place. The joint tapered; the seam-taping process left a rough exterior. Kevlar threads were sticking out, there were a few wrinkles and some epoxy runs — all smoothed out.
Cutting Kevlar leaves furry threads that are tough to cut off; I stiffened them with cyanoacrylate (CyA) glue and shaved them off with a razor blade. Note that sanding Kevlar/epoxy doesn't give the itch the way sanding fiberglass does; the little fibers wear off. Kevlar fibers can roll off the skin and make you sneeze — use a face mask.
After rough-sanding away fuselage blemishes, Sig Epoxolite didn't give a good wing-to-fuselage fit, so I built a fillet out of Epoxolite. Epoxolite is first mixed like butter. An hour later it becomes stiff enough that you can wet your finger and smooth the surface until it becomes like glass. Wait another two hours and it will be rubbery, so you can do minor surgery with a sharp knife or scissors. Wait another three hours and it will be hard as a week-old bagel. Then you can saw it, file it, grind it with a Dremel tool, and generally treat it like wood.
Next, something had to be done about the rough surfaces where the Kevlar cloth came through the epoxy after all the sandpapering. Kevlar cloth is very coarse compared with fiberglass — you know it's there because it catches your skin when you run your finger over it.
I tried Squadron Green Putty as a filler, but that didn't work very well. Fellow SEFLI (Silent Electric Fliers of Long Island) club member Steve Anthony put me wise to the idea that a putty with acetone softens the epoxy enough to give Green Putty a pretty good grip.
Frank told me that "cyanoacrylate (CYA) adhesive loves Kevlar even more than skin." He recommended Bob Smith Industries Super-Gold CYA. I made the structural installations with the extra-thick, gap-filling, odorless Maxi-Cure variety (10- to 25-second hardening), and it worked great.
Inspiration: use that gap-filling CYA glue as the filler! I spread it as smooth as possible, using the glue bottle nozzle as a squeegee, then let it cure. Spraying on a hardener just makes lumps that you must grind off afterward; it also dissolves the blue foam under the Kevlar a few hours later when you are sleeping.
Grinding down hardened CYA with No. 400 wet/dry sandpaper (used wet) is hard work. I resorted to scraping off the high spots with a file, then used a single-edge razor blade held perpendicular to the surface. That made short work of the lumps. Wet sanding with No. 400 finally produced a very tough, smooth surface similar to Plexiglass. The treatment was quick, inexpensive, and light.
The Bob Smith CYA bottle was marked "1/2 ounce (14.2 grams)," which I verified by weighing the full bottle and an empty one. At least half of the CYA I added as filler wound up being scraped or ground off. Using CYA as both a glue and a real tough filler added about seven grams to the weight of the model. That's equal to the weight of the two 6-32 wing bolts and T-nuts.
After I had installed the motor, I found that the 40 mm spinner should be about 3/16 in. away from the front of the fuselage in order to match the curves. So I made an adapter, moving the propeller forward and putting a ring on the nose of the fuselage to fill the gap. One of the reasons it takes me so long to produce a model is that I never seem to leave well enough alone.
Someone told me that finishing a surface is a matter of filling holes and making little scratches out of big scratches. Then spray on primer to locate even more scratches. Fill and spray until you are satisfied, or until you decide that it is silly to spend so much time on a finish that you are going to rub on the ground. So that's what I did.
I painted the fuselage with Coverite's 21st Century primer and paint. They sprayed well from the can and seem to have bonded well with the CYA filler and epoxy. Automotive acrylic primer and lacquer, as recommended by Frank Weston, probably would have done as well and dried a lot faster.
The filled and filleted fuselage, with motor and wing mounts installed, weighed 95 (±1) grams. Primed and painted, it weighed 105 (±1) grams. White paint is heavy!
Hinging the control surfaces became a challenge. Frank Weston uses sign-maker's tape. Steve Anthony, who makes fiberglass boats for a living, suggested cutting through one Kevlar skin and the blue foam core of the surface, then working the other Kevlar skin to make a hinge. I followed his advice, and it works well. The cut left a rough edge on the skin, but it disappeared after a few coats of filler and some No. 400 emery paper.
If no hinge fails in the next couple of years, I'll tell Steve he had a good idea. At any rate, it adds no weight but does make a hinge that is slightly loose, because the Kevlar cloth can compress/extend in the hinge line.
Doing the control surfaces Steve's way created a need for either a big gap opposite the hinge or a way for the front of the control surface to go inside the wing or tail. I cut a wedge of the blue foam out of the wings and tails, leaving strips of the skin unsupported. Then I chamfered the leading edges of the control surfaces by burnishing them with a piece of metal. At first I thought the uneven edge was ugly, but later decided that a perfect edge would create friction as it slid under the free-standing piece of skin. The unevenness minimizes friction — or so I tell people who comment on it.
Frank advises against painting the wing because it adds too much weight. But I just had to add some stick-on graphics from AMP Graphics, Inc. (see photo). Clyde Geist, proprietor of AMP, is a superb modeler, artist, photographer, and all-around good guy. A while back you may have read an article in Model Airplane News describing his electrified green Eindecker. You will see examples of AMP graphics on cars, vans, boats, and most SEFLI airplanes. (AMP Graphics, Inc., P.O. Box 242, Blue Point, NY 11715; tel.: (516) 363-5205.)
When I finished decorating, I waxed the whole thing with RainDance automobile polish to keep the plane slick and clean.
I'VE GOT A NEW MOM!
RCD, Inc. sells an electronic unit made exclusively for them in England. They call it MOM, and it gives a basic radio all the mixing tricks of a computer radio. You can take a plain four- to seven-channel transmitter and fly a V-tail sailplane with crow ailerons and flaps, couple the rudder with the ailerons for smooth turns, automatically crank in a little down and right whenever the throttle awakens the motor, and couple flaps with elevator to provide trim adjustments as necessary. The MOM unit lives in the airplane and has a static memory, so you can remove the receiver battery without losing your setup.
My MOM for the WACO 10-550 is guided by an RCD Focus Pro 6 transmitter. The Pro has servo reversing on all six channels and span adjustments on four of them, but that's it. MOM does the other tricks. Its list price is $129.
A VERY INTERESTING SERVO
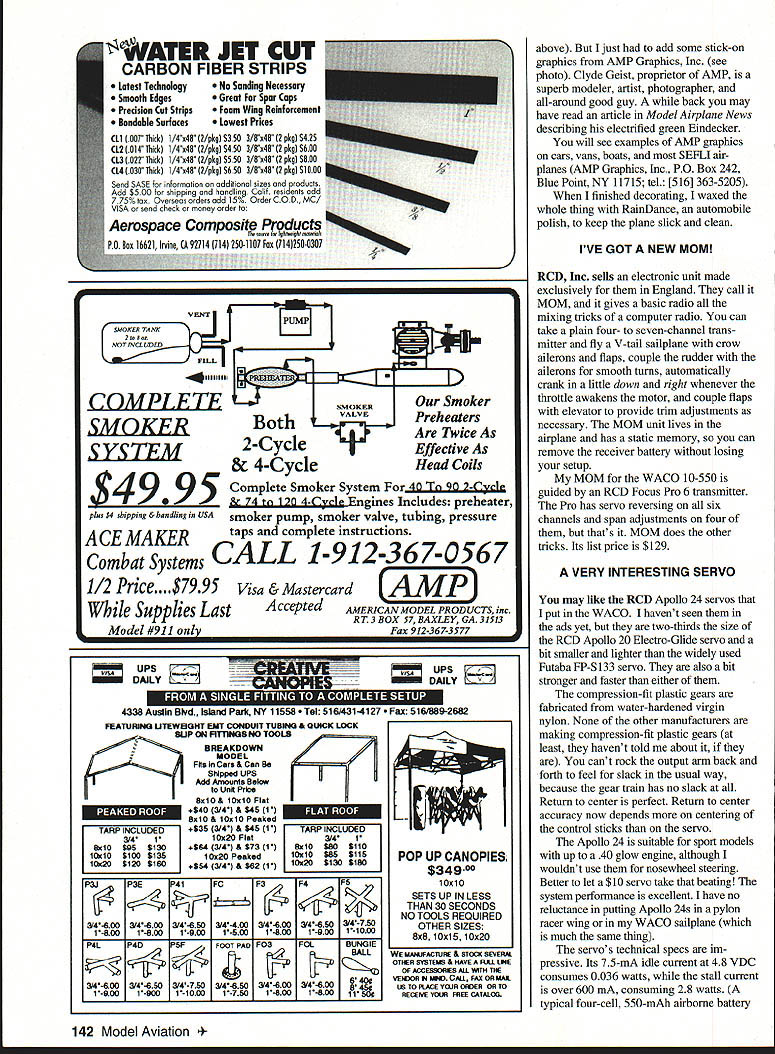
You may like the RCD Apollo 24 servos that I put in the WACO. I haven't seen them in the ads yet, but they are two-thirds the size of the RCD Apollo 20 Electro-Guide servo and a bit smaller and lighter than the widely used Futaba FP-S133 servo. They are also a bit stronger and faster than either of them.
The compression-fit plastic gears are fabricated from water-hardened virgin nylon. None of the other manufacturers are making compression-fit plastic gears (at least, they haven't told me about it, if they are). You can't rock the output arm back and forth to feel for slack in the usual way, because the gear train has no slack at all. Return-to-center is perfect. Return-to-center accuracy now depends more on centering of the control sticks than on the servo.
The Apollo 24 is suitable for sport models with up to a .40 glow engine, although I wouldn't use them for nose-steering. Better to let a $10 servo take that beating! The system performance is excellent. I have no reluctance in putting Apollo 24s in a pylon racer wing or in my WACO sailplane (which is much the same thing).
Apollo 24 specifications and notes
- Idle current: 7.5 mA at 4.8 VDC (≈ 0.036 W).
- Stall current: over 600 mA at 4.8 VDC (≈ 2.8 W).
- Torque: 30 in.-oz. at 4.8 V.
- Speed: 60° of output rotation in 0.15 seconds.
- Dimensions: 1.10 × 1.11 × 0.54 in.
- Weight: 0.61 oz.
- Performance: almost 50 in.-oz. of torque per ounce of weight; about 400° of output wheel rotation per second. (Most servos produce 25–30 in.-oz./oz. and 250°–300°/sec.)
- Metal gears are available for the Apollo 24; those will assemble with some slack.
- Safe supply: will stand up to 6 volts.
- List price: $44.95 each.
RC Flying/Myers
Transcribed from original scans by AI. Minor OCR errors may remain.

