
Rebel Revisited
John Spalding Hobie Steele
IN THE EARLY days of Citizens Band Radio, RC kit manufacturers began to tool up for what became the largest market aeromodeling has ever known. One of the first was Harold "Pappy" deBolt of deBolt Model Engineering Company in Williamsville, N.Y. (near Buffalo) who had a solid background in Control Line with a real stable of outstanding CL kits.
deBolt's first was the "Live Wire" Trainer, a bulky box designed primarily to hold the heavy batteries and 465-megacycle equipment of early days. It was somewhat heavy itself, and contained a lot of balsa which Hal strove to reduce in the Rebel.
Although similar to the Trainer, the Rebel was more streamlined and had a lighter structure which reduced all-up weight. It also flew like a veritable dream! For its day, the Rebel seemed almost too good to be true. Personal experience with an early pair of them included many hundreds of flights using radios ranging from Ed Lorenz's two-tuber through John Worth's "Simple Simul" Galloping Ghost and even into reed systems. We decided to revisit the Rebel to see how it stacked up today.
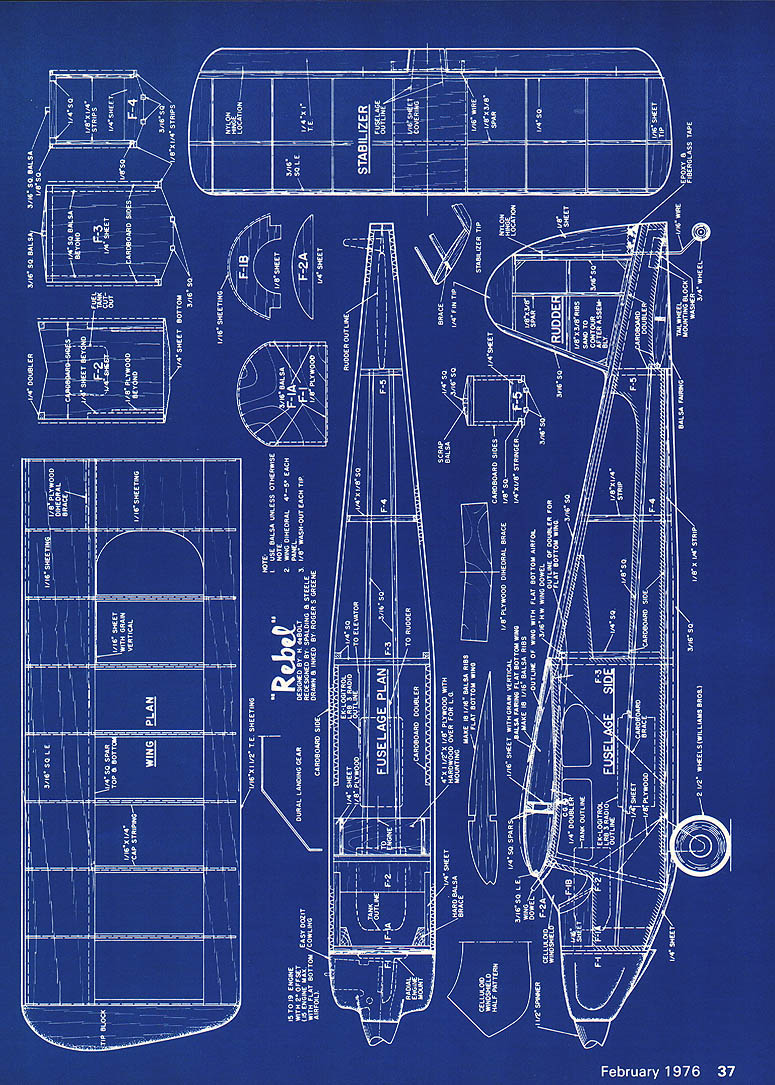
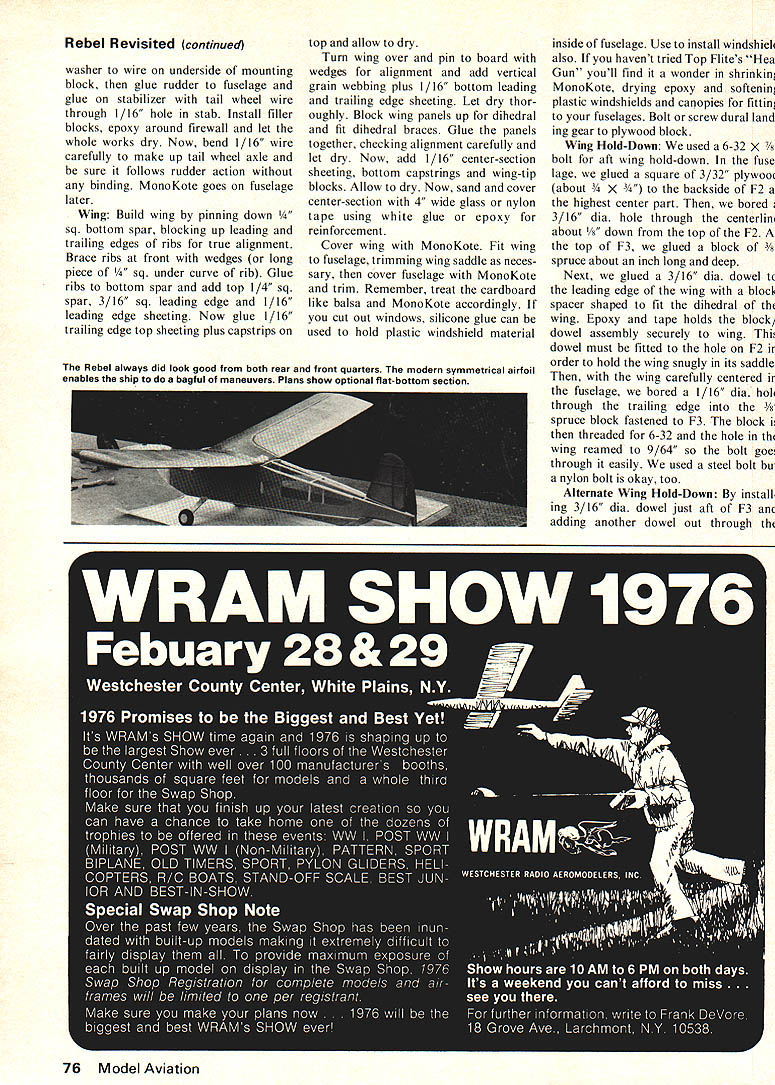
Attacking a set of original Rebel plans (for which we're indebted to Harold deBolt) from the standpoint of modern construction and performance, we ended up with a sleek, symmetrical airfoiled, tail-dragger using the latest techniques in construction for quick and inexpensive building. The new Rebel is a composite of tradition and avant-garde, with all the outstanding flight characteristics of the original plus a little better wind penetration and less fuselage bulk. Topped off with a fiberglass cowling, the Rebel looks as great as any cabin job at the field today and handles really well.
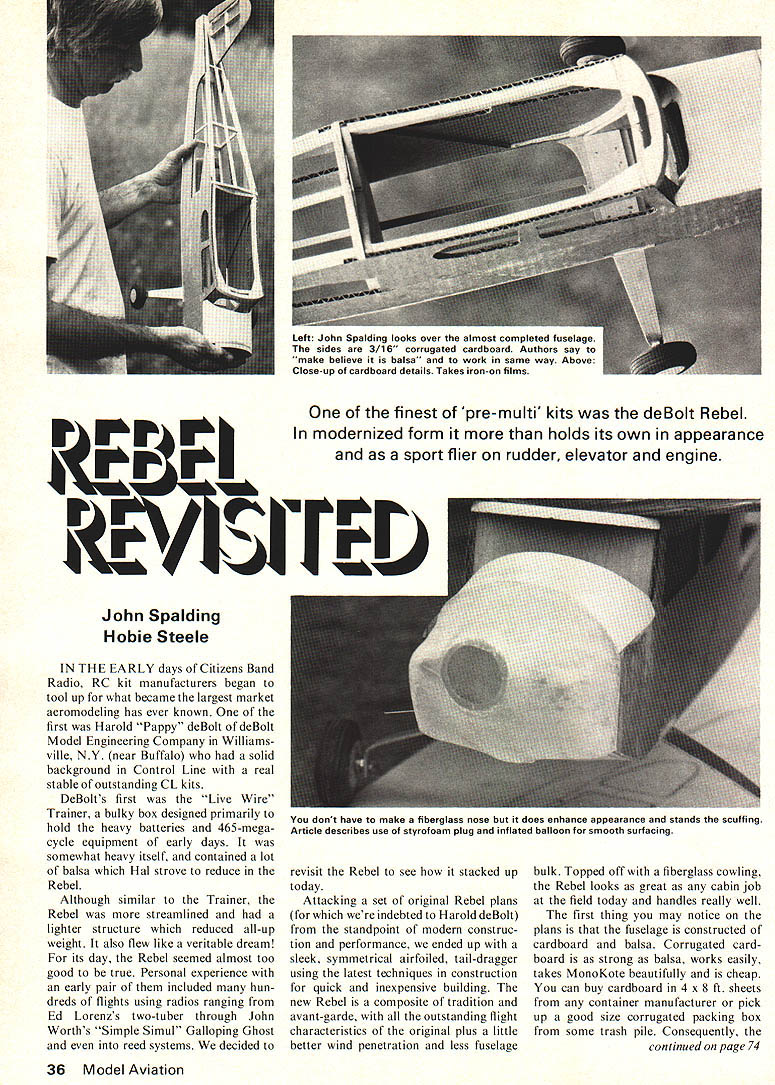
The first thing you may notice on the plans is that the fuselage is constructed of cardboard and balsa. Corrugated cardboard is as strong as balsa, works easily, takes MonoKote beautifully and is cheap. You can buy cardboard in 4 x 8 ft. sheets from any container manufacturer or pick up a good size corrugated packing box from some trash pile. Consequently, the No extractable article text on this page — the scanned page contains only blueprints/plan drawings and associated captions; there is no continuing article body text to transcribe. Material ranges in price from very reasonable to free. When working with the cardboard, forget that it's cardboard—pretend it's 3/16" balsa and build accordingly.
Wing and stab are conventional balsa construction, although a foam wing could be cut and sheathed with non-corrugated poster board if you're into that sort of thing. The Rebel is easy to build and flies like a dream. Stabilizer: Cut out ribs and assemble on spar for fit. Note center ribs are smaller for center-section planking. Pin on flat surface, blocking up leading and trailing edges for perfect alignment. Glue leading and trailing edges to ribs and then the ribs to the spar. Add center sheeting on top and let the entire assembly dry. Turn over and sheet the bottom of center-section and add built-up tips with gussets as shown on plans. When dry, sand smoothly. Cover the stab with MonoKote now if you like—except on top side in the center, where it will be glued to the bottom of the fuselage. Elevator is made of balsa sheet or tapered trailing-edge stock.
Fuselage: Cut out sides from corrugated cardboard plus all doublers and bulkheads as specified. (Windows may be cut out or simulated using Trim MonoKote later.) Now glue doublers to the sides using bulkheads F1A, F2 and F3 as spacers, but do not glue the formers to sides yet. Add plywood doubler at F2 and glue 1/4" sq. uprights aft of F3. Don't forget to glue tail doubler in place and allow the whole assembly to dry.
Over a centerline drawn on your building board, assemble the fuselage sides to F2 and F3 (mark F2 and F3 with centerlines for alignment); block up and check alignment with a square (or a draftsman's triangle). Allow to dry thoroughly.
Add landing gear plywood plate and wing saddle gussets to the fuselage assembly, then glue in F1A and filler pieces just aft of it. F1B and F2A can also be glued in place and allowed to dry. Now pull sides together at tail and glue in F6, F5 and F4 in that order. Be certain to maintain alignment over the centerline for a true fuselage. Leave to dry. Next, add 3/16" sq. bottom stringers, top 1/4" sq. and 1/8" sq. stringers from wing trailing edge and fuselage tail.
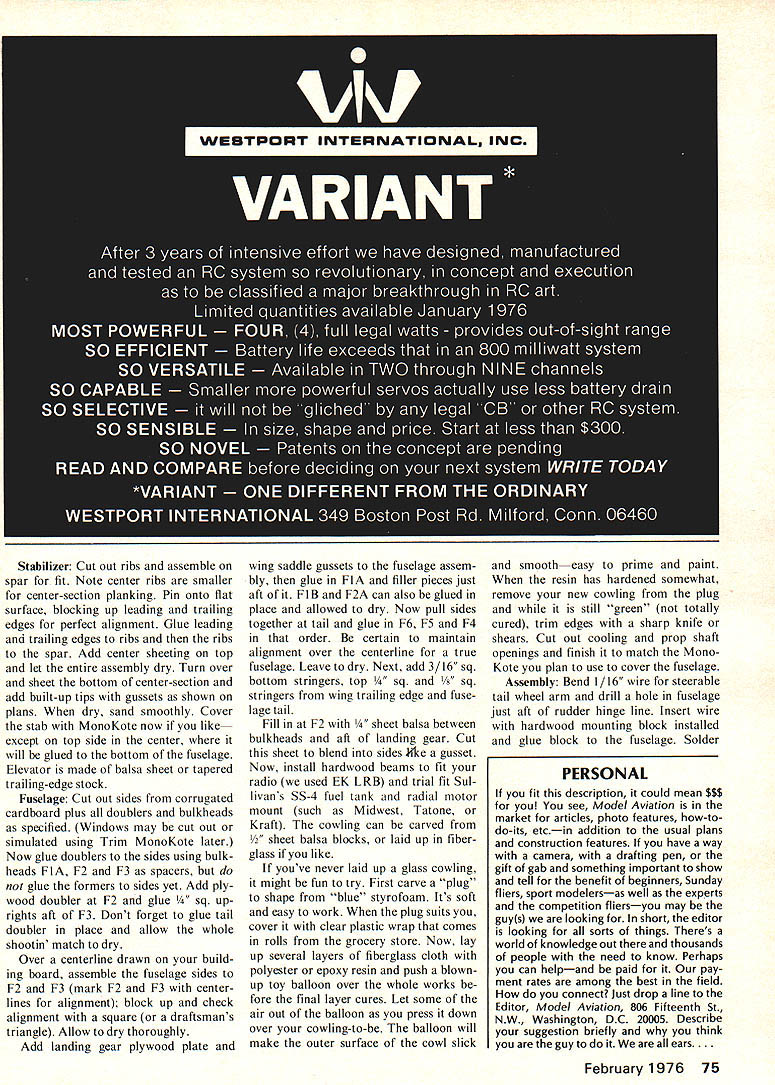
Fill in at F2 with 1/8" sheet balsa between bulkheads and aft of landing gear. Cut this sheet to blend into sides like a gusset. Now, install hardwood beams to fit your radio (we used EK LRB) and fit Sullivan's SS-4 fuel tank and radial motor mount (such as Midwest, Tatone, or Kraft). The cowling can be carved from 3/16" sheet balsa blocks, or laid up in fiberglass if you like.
If you've never laid up a glass cowling, it might be fun to try. First carve a "plug" to shape from "blue" styrofoam. It's soft and easy to work. When the plug suits you, cover it with clear plastic wrap. Now lay up several layers of fiberglass cloth with polyester or epoxy resin and push a blown-up balloon over the whole works before the final layer cures. Let some of the air out of the balloon as you press it down over your cowling-to-be. The balloon will make the outer surface of the cowl slick and smooth—easy to prime and paint. When the resin has hardened somewhat, remove your new cowling from the plug and while it is still "green" (not totally cured), trim edges with a sharp knife or shears. Cut out cooling and prop shaft openings and finish it to match the MonoKote you plan to use to cover the fuselage.
ASSEMBLY: Bend 1/16" wire for steerable tailwheel arm and drill a hole in fuselage just aft of rudder hinge line. Insert wire with hardwood mounting block installed and glue block to the fuselage. Solder wheel mounting as required and install tailwheel assembly. Wing: Build wing by pinning down 1/4" sq. bottom spar, blocking up leading and trailing edges of ribs for true alignment. Brace ribs at front with wedges (or long piece of 1/4" sq. under curve of rib). Glue ribs to bottom spar and add top 1/4" sq. spar, 3/16" sq. leading edge and 1/16" leading edge sheeting. Now glue 1/16" trailing edge top sheeting plus clasp strips on top and allow to dry.
Turn wing over and pin to board with wedges for alignment and add vertical grain webbing plus 1/16" bottom leading and trailing edge sheeting. Let dry thoroughly. Block wing panels up for dihedral and fit dihedral braces. Glue the panels together, checking alignment carefully and let dry. Now, add 1/16" center-section sheeting, bottom capstrips and wing-tip blocks. Allow to dry. Now sand and cover center-section with 4" wide glass or nylon tape using white glue or epoxy for reinforcement.
Cover wing with MonoKote. Fit wing to fuselage, trimming wing saddle as necessary, then cover fuselage with MonoKote and trim. Remember, treat the cardboard like balsa and MonoKote accordingly. If you cut out windows, silicone glue can be used to hold plastic windshield material inside of fuselage. Use to install windshield also. If you haven't tried Top Flite's "Heat Gun" you'll find it a wonder in shrinking MonoKote, drying epoxy and softening plastic windshields and canopies for fitting to your fuselages. Bolt or screw dural landing gear to plywood block.
Wing Hold-Down: Use a 6-32 x 3/8 bolt for main wing hold-down. In the fuse, glue a square of 3/32" plywood (about 3/4" x 3/4") to the backside of F2 at the highest center part. Then, we bored a 3/16" dia. hole through the centerline about 1/8" down from the top of the F2. Aft of the top of F3, we glued a block of 3/32" spruce about an inch long and deep.
Next, we glued a 3/16" dia. dowel to the leading edge of the wing with a block or spacer shaped to fit the dihedral of the wing. Epoxy and tape holds the block/dowel assembly securely to wing. This dowel must be fitted to the hole on F2 in order to hold the wing snugly in its saddle. Then, with the wing carefully centered in the fuselage, we bored a 1/16" dia. hole through the trailing edge into the spruce block fastened to F3. The block is then threaded for 6-32 and the hole in the wing reamed to 9/64" so the bolt goes through it easily. We used a steel bolt but a nylon bolt is okay, too.
Alternate Wing Hold-Down: By installing a 3/16" dia. dowel just aft of F3 and adding another dowel out through the windshield, rubber bands may be used to hold the wing on. Beef up F2 where the dowel is glued to it, of course.
Final Set-Up: Hinge rudder and elevator. Use good, easy working hinges, like Goldberg's, so control surfaces work smoothly with no binding. Install Sullivan SS-4 fuel tank and your engine. Add your favorite pushrod set-up. We used nylon/steel Kwik-rods with our EK Brick. Use Goldberg short nylon horns on rudder and elevator. Throttle pushrod should clear fuel tank so that no binding will interfere with smooth and positive engine control. 2 1/2" Williams Brothers wheels are installed to dural landing gear with bolts.
For new fliers, set rudder pushrod clevis in outmost or center hole of (short) horn. Elevator is small enough to keep you out of trouble so the center hole of (short) elevator horn is fine for first flights. Be certain your Rebel balances at CG indicated on plan. This is important! Add lead if necessary to balance.
We've flown the new Rebel on both .15 and .19 engines. With a .19, it's a bomb so a .15 is the most comfortable powerplant and she's even light enough to fly on a .09 rudder only. But with a .15 or .19 and rudder/elevator plus motor control (REM), it will perform along with most any modern trainer and do quite a respectable Class A pattern. (If you build a flat-bottom wing version, the biggest engine is a .15.)
Set all controls neutral and clear off the kitchen table. Now prop up the Rebel's tail until stab is level with the table at the leading and trailing edges. Do this by measuring from table top to center of stabilizer leading edge and center of trailing edge with a ruler. When both measurements are the same, set the stab level. Now measure from table top to center of wing trailing edge and then to the center of the wing leading edge. The center of the leading edge should be 1/8" higher (no more, no less) than the center of the trailing edge. This gives the proper decalage (angular difference between wing and stab) and should produce about 4 degrees downthrust built right into the Rebel without visibly "tilting" the engine.
Flying: Although the new Rebel is a smooth, sweet flying beauty with no "funny" characteristics, any new pilot should have an expert take her off the first few times. If the trim's a little wrong, be patient and she'll fly like a dream. You'll have no trouble with control.
Hold full up elevator to taxi out and into the wind. Now advance the throttle, holding a smidgen of right rudder and about one-half up elevator. The tail will rise and your Rebel will accelerate across the field into the wind (tail-draggers always "weathervane" into the wind).
When she's ready, your Rebel will lift off into her true element—the freedom of flight!
Try a few gentle turns until you're comfortable with her, then wing out your Rebel. We promise you'll be pleasantly surprised at the way she handles. Always land into the wind, flare out smoothly until she slows up enough to drop in on three points. Don't land too fast. Your new Rebel penetrates wind nicely, but she's somewhat of a floater so slow 'er up a bit on final to a nice flare. Although she can be snap-rolled and spins nicely if asked, she won't try any "funnies" (like tip stalling) on her own.
Now enjoy! You've got an up-to-the-minute version of a fine deBolt original and you'll have many pleasant flying hours.
(Editor's Note: Wing and stabilizer kits, consisting of the flat-bottomed wing section and standard stabilizer, are available for $12.00 from the DeBolt Model Engineering Co., 3833 Harlem Rd., Buffalo, N.Y. 14215.)
Transcribed from original scans by AI. Minor OCR errors may remain.

