

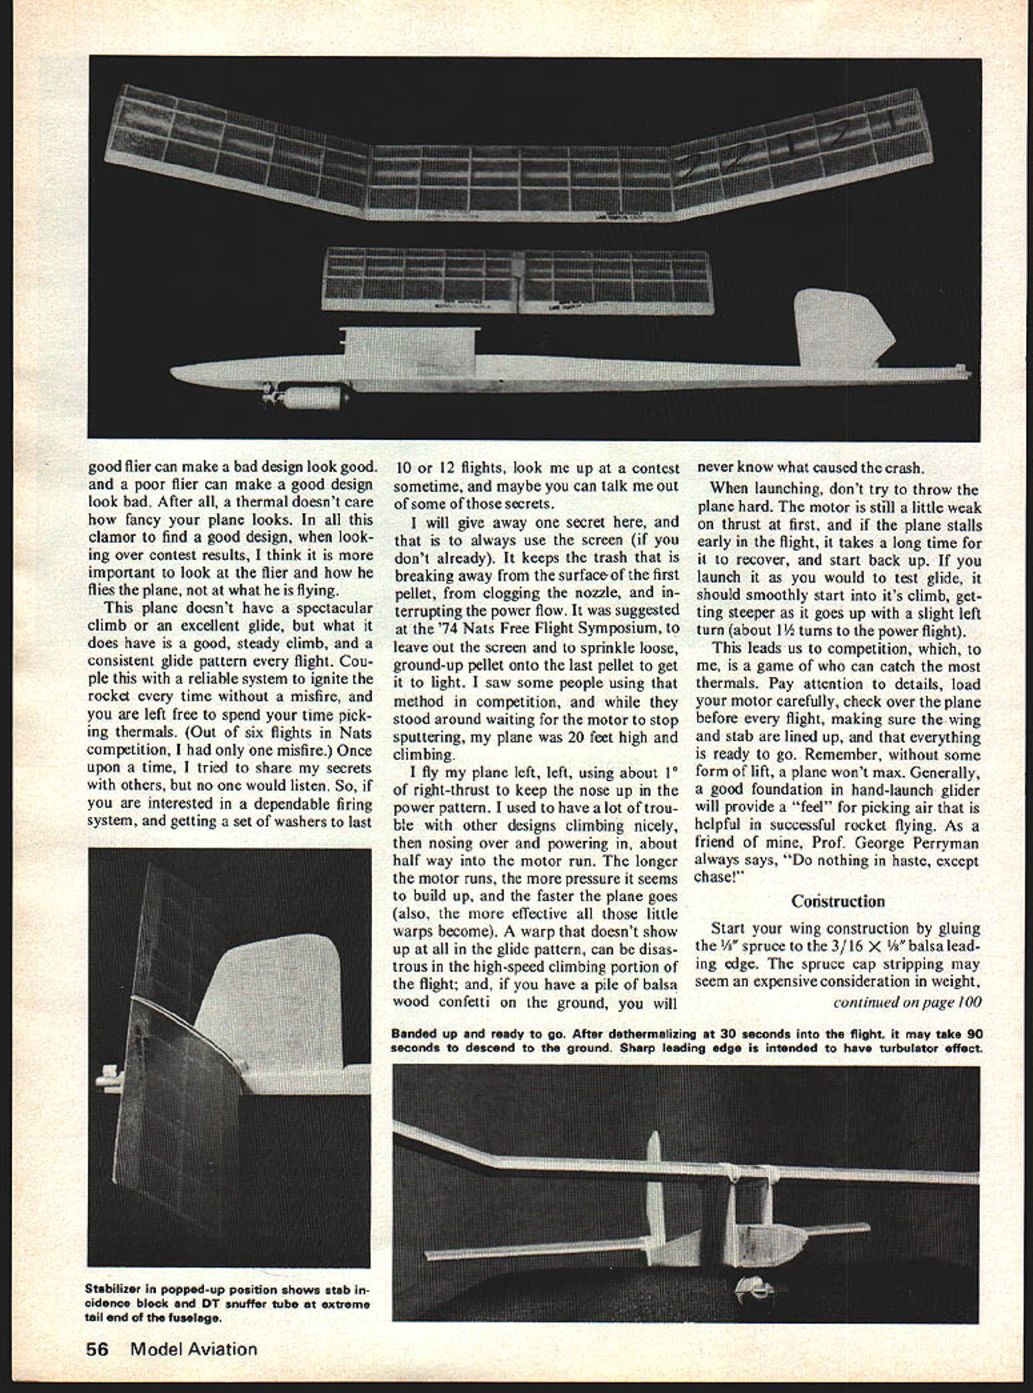
Rockette
Bill Jenkins
DID YOU EVER dream of designing your own model, test flying it a few times, then taking it to the Nationals, and winning it? Well, that's exactly what happened to me.
I was looking for a good rocket to round out my fleet of free flights, when I saw R. F. Tanner flying his rocket in Clarksdale, Miss., on Memorial Day, '72. To my surprise, I learned he was living here in Memphis at the time, so I got in touch with him to take a look at his model. Using some of his basic ideas, I stretched out his design, changed the airfoil and dihedral, to come up with the Rockette. It took only about two weeks to build without plans, my only guide being a "feel" of what I wanted, and some fundamental dimensions. In fact, I have spent more hours on this article than I did on the building of the model!
When finished, the Rockette's "extensive testing" program consisted of four flights, three of which were trimming flights to check power and glide patterns. It flew so well right off the board, I could sense it had even greater potential than I had imagined.
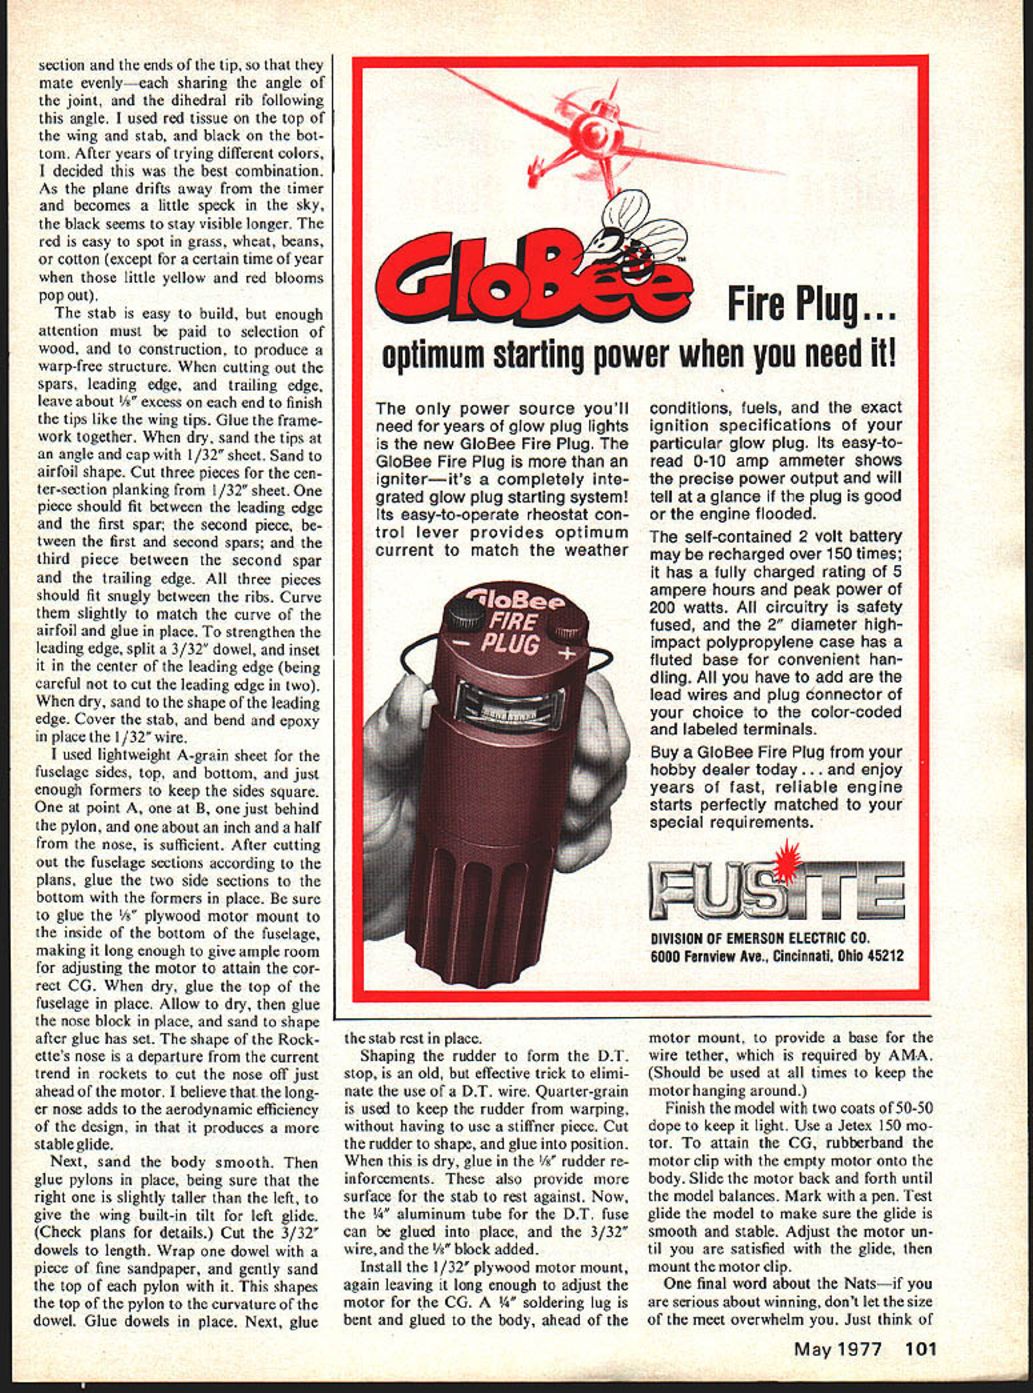
The fourth flight took place in a bean field in Arkansas, where there is plenty of room to chase, and thermals are abundant. The main thing I needed to know now was how it would ride a thermal. I found out on the first attempt, when I launched it into a boomer, and it got as high as some of my gas ships get on their 10-sec. motor runs. It kept climbing in a stable glide circle with no stalling or tendency to dive. D.T.'d after 30 seconds, then took about a minute and a half to come down (which gives you some idea of how high it was). After that flight, I packed it up and decided not to fly it again, at the risk of damaging or losing it before the Nationals.
So, after only four test flights, the Rockette won first place at the '72 Nats. Truly, a Cinderella story for any free-flighter! When it was first built in 1972, the model was intended only to fly at the Nationals, but I had no idea it would hold up as well as it has through these last three years of contests. Somehow, it has managed to escape airplane-eating trees, and getting lost in high grass. In fact, much of the time, I have been able to catch it before it touched the ground! Circumstances prevented my making the '73 Nats, but at Lake Charles in '74, the Rockette took second place, and has won a few other local contests along the way.
In building the Rockette, you want to keep it light, and as warp-free as possible. The less warps, the smoother it will move through the air to give better performance. Choosing the right wood for the job is the trick to good building. The hobby shop owner will give you a wary look while you plow through all his wood, but a little care in choosing light, straight, well-grained wood will pay big rewards in a strong, light, competitive airplane. Then, it is up to you to pick good air to win at a contest; and that is the way it should be.
This model is fairly easy to build, and has simple, uncluttered lines. I have never been a believer in fancy-looking models being able to fly any better than plain ones. A good flier can make a bad design look good, and a poor flier can make a good design look bad. After all, a thermal doesn't care how fancy your plane looks. In all this clamor to find a good design, when looking over contest results, I think it is more important to look at the flier and how he flies the plane, not at what he is flying.
This plane doesn't have a spectacular climb or an excellent glide, but what it does have is a good, steady climb, and a consistent glide pattern every flight. Couple this with a reliable system to ignite the rocket every time without a misfire, and you are left free to spend your time picking thermals. (Out of six flights in Nats competition, I had only one misfire.) Once upon a time, I tried to share my secrets with others, but no one would listen. So, if you are interested in a dependable firing system, and getting a set of washers to last 10 or 12 flights, look me up at a contest sometime, and maybe you can talk me out of some of those secrets.
I will give away one secret here, and that is to always use the screen (if you don't already). It keeps the trash that is breaking away from the surface of the first pellet, from clogging the nozzle, and interrupting the power flow. It was suggested at the '74 Nats Free Flight Symposium, to leave out the screen and to sprinkle loose, ground-up pellet onto the last pellet to get it to light. I saw some people using that method in competition, and while they stood around waiting for the motor to stop sputtering, my plane was 20 feet high and climbing.
I fly my plane left, left, using about 1° of right-thrust to keep the nose up in the power pattern. I used to have a lot of trouble with other designs climbing nicely, then nosing over and powering in, about half way into the motor run. The longer the motor runs, the more pressure it seems to build up, and the faster the plane goes (also, the more effective all those little warps become). A warp that doesn't show up at all in the glide pattern, can be disastrous in the high-speed climbing portion of the flight; and, if you have a pile of balsa wood confetti on the ground, you will never know what caused the crash.
When launching, don't try to throw the plane hard. The motor is still a little weak on thrust at first, and if the plane stalls early in the flight, it takes a long time for it to recover, and start back up. If you launch it as you would to test glide, it should smoothly start into its climb, getting steeper as it goes up with a slight left turn (about 1½ turns to the power flight).
This leads us to competition, which, to me, is a game of who can catch the most thermals. Pay attention to details, load your motor carefully, check over the plane before every flight, making sure the wing and stab are lined up, and that everything is ready to go. Remember, without some form of lift, a plane won't max. Generally, a good foundation in hand-launch glider will provide a "feel" for picking air that is helpful in successful rocket flying. As a friend of mine, Prof. George Perryman always says, "Do nothing in haste, except chase!"
Construction
Start your wing construction by gluing the 1/8" spruce to the 3/16 x 1/8" balsa leading edge. The spruce cap stripping may seem an expensive consideration in weight,
Rockette/Jenkins
but it is intended to protect the leading edge from nicks and dents. Also, while gluing it to the balsa leading edge, it gives you a chance to straighten out any warps, so that you have a straight leading edge to work with. I sand the shape of the leading edge before gluing the framework together, to keep from putting stress on the 1/32" ribs. The Rockette's leading edge is sanded at a sharper angle than other airfoils I have seen, and this seems to give it a slight turbulator effect.
To keep the wing light, 1/32" ribs are used, except for the three center ribs and the dihedral ribs, which are 1/16" for strength. When building, block up the trailing edge 1/32", so it will better follow the line of the undercamber. Glue the ribs to the leading and trailing edges and insert the top spars. When dry, turn the framework over and glue in the bottom spar. It may seem unusual for the bottom spar to lie flat, but I always have trouble getting the tissue to follow the undercamber, and this gives the tissue more surface to adhere to.
To make the wing tip, allow the spars to extend past the last rib about 1/8", then sand them off at an angle, capping the wing tips with a light sheet of 1/32". Sand to airfoil shape. I finished the tips before gluing the dihedral joints, because it is easier to handle the tip by itself. The dihedral joint is made by sanding the ends of the center section and the ends of the tip, so that they mate evenly—each sharing the angle of the joint, and the dihedral rib following this angle. I used red tissue on the top of the wing and stab, and black on the bottom. After years of trying different colors, I decided this was the best combination. As the plane drifts away from the timer and becomes a little speck in the sky, the black seems to stay visible longer. The red is easy to spot in grass, wheat, beans, or cotton (except for a certain time of year when those little yellow and red blooms pop out).
The stab is easy to build, but enough attention must be paid to selection of wood, and to construction, to produce a warp-free structure. When cutting out the spars, leading edge, and trailing edge, leave about 1/8" excess on each end to finish the tips like the wing tips. Glue the framework together. When dry, sand the tips at an angle and cap with 1/32" sheet. Sand to airfoil shape. Cut three pieces for the center-section planking from 1/32" sheet. One piece should fit between the leading edge and the first spar; the second piece, between the first and second spars; and the third piece between the second spar and the trailing edge. All three pieces should fit snugly between the ribs. Curve them slightly to match the curve of the airfoil and glue in place. To strengthen the leading edge, split a 3/32" dowel, and inset it in the center of the leading edge (being careful not to cut the leading edge in two). When dry, sand to the shape of the leading edge. Cover the stab, and bend and epoxy in place the 1/32" wire.
I used lightweight A-grain sheet for the fuselage sides, top, and bottom, and just enough formers to keep the sides square. One at point A, one at B, one just behind the pylon, and one about an inch and a half from the nose, is sufficient. After cutting out the fuselage sections according to the plans, glue the two side sections to the bottom with the formers in place. Be sure to glue the 1/8" plywood motor mount to the inside of the bottom of the fuselage, making it long enough to give ample room for adjusting the motor to attain the correct CG. When dry, glue the top of the fuselage in place. Allow to dry, then glue the nose block in place, and sand to shape after glue has set. The shape of the Rockette's nose is a departure from the current trend in rockets to cut the nose off just ahead of the motor. I believe that the longer nose adds to the aerodynamic efficiency of the design, in that it produces a more stable glide.
Next, sand the body smooth. Then glue pylons in place, being sure that the right one is slightly taller than the left, to give the wing built-in tilt for left glide. (Check plans for details.) Cut the 3/32" dowels to length. Wrap one dowel with a piece of fine sandpaper, and gently sand the top of each pylon with it. This shapes the top of the pylon to the curvature of the dowel. Glue dowels in place. Next, glue the stab rest in place.
Shaping the rudder to form the D.T. stop, is an old, but effective trick to eliminate the use of a D.T. wire. Quarter-grain is used to keep the rudder from warping, without having to use a stiffer piece. Cut the rudder to shape, and glue into position. When this is dry, glue in the 1/8" rudder reinforcements. These also provide more surface for the stab to rest against. Now, the 3/64" aluminum tube for the D.T. fuse can be glued into place, and the 3/32" wire, and the 1/8" block added.
Install the 1/32" plywood motor mount, again leaving it long enough to adjust the motor for the CG. A 1/4" soldering lug is bent and glued to the body, ahead of the motor mount, to provide a base for the wire tether, which is required by AMA. (Should be used at all times to keep the motor hanging around.)
Finish the model with two coats of 50-50 dope to keep it light. Use a Jetex 150 motor. To attain the CG, rubberband the motor clip with the empty motor onto the body. Slide the motor back and forth until the model balances. Mark with a pen. Test glide the model to make sure the glide is smooth and stable. Adjust the motor until you are satisfied with the glide, then mount the motor clip.
One final word about the Nats—if you are serious about winning, don't let the size of the meet overwhelm you. Just think of
Rockette
Did you ever dream of designing your own model, test-flying it a few times, then taking Nationals-winning? Well, that's exactly what happened. Looking good among the fleet of free flights, I saw R. F. Tanner flying a Rocket in Clarksdale, Miss., Memorial Day '72. To my surprise, I learned he was living in Memphis. I got in touch with him to take a look at the model.
Using some basic ideas, I stretched out the design, changed the airfoil and dihedral, and came up with the Rockette. It took about two weeks to build out—plans guiding but being flexible to what I wanted. Some fundamental dimensions were kept, in fact I have spent hours in the article doing the building. When the model was finished, the Rockette's extensive testing program consisted of four flights—three trimming flights to check power-glide patterns. It flew well right off the board; I could sense greater potential than I had imagined.
The fourth flight took place in a bean field in Arkansas—plenty of room to chase thermals and abundant lift. The main thing needed to know now was whether it would ride a thermal. I found out on the first attempt: the launch was a boomer, got high on its power run—some gas ships get 10-second motor runs—kept climbing, then settled into a stable glide, circling with no stalling tendency or dive. The D.T. fired after 30 seconds and it took about a minute and a half to come down, which gives some idea how high it had climbed.
After that flight I packed up and decided not to fly again for fear of damaging or losing it before Nationals. So, after four test flights, the Rockette won first place at the '72 Nats. Truly a Cinderella story for a free fighter first built in 1972. The model was intended to fly Nationals; I had no idea it would hold up so well. It has through the last three years of contests. Somehow it has managed to escape airplane-eating trees and getting lost in high grass; in fact, much of the time I have been able to catch it before it touched ground.
Circumstances prevented making the '73 Nats at Lake Charles. In '74 the Rockette took second place, and it has won a few other local contests along the way.
When building the Rockette, you want to keep it light and as warp-free as possible—less warps, smoother movement through the air, and better performance. Choosing the right wood for the job is a trick. A cautious hobby shop owner will give you a wary look if you plow through wood with little care, but choosing light, straight, well-grained wood will pay big rewards: a strong, light competitive airplane. Pick good balsa and you can win contests. The model should be fairly easy to build; it has simple, uncluttered lines. I have never been a believer that fancy-looking models fly better—plain ones often perform best. Thermals don't care how fancy a plane looks; a good flier can make a bad design look good and a poor flier can make a good design look bad.
Looking over contest results, I think it's important to look at how the flier flies the plane. A flying plane doesn't have to have a spectacular climb and an excellent glide; what it does need is a good, steady climb and a consistent glide pattern. Couple that with a reliable ignition system and you'll ignite at the right time. I had one misfire out of six flights at a Nats competition.
Once upon a time I tried to share secrets with others and no one would listen, so I'm interested in a dependable firing system. After getting set with washers and for the last 10–12 flights, when you look up at the contest sometime maybe you can talk out some secrets. I'll give away one secret: always use a screen. If you don't already, it keeps trash from breaking away on the surface of the first pellet and clogging the nozzle, interrupting power flow. It was suggested at the '74 Nats Free Flight Symposium to leave out the screen and sprinkle loose ground-up pellet onto the last pellet to get a lighter load; I saw some people using this method in competition and they stood around waiting for the motor to stop sputtering while the plane was 20 feet high and still climbing.
For trim, I use about 10° right thrust to keep the nose up—this power pattern worked for me. I have had a lot of trouble with other designs climbing nicely then nosing over and overpowering about halfway through the motor run. With longer motor runs, pressure seems to build up faster and the plane goes higher. Small warps that don't show up in the glide pattern can be disastrous in the high-speed climbing portion of the flight and leave a pile of balsa wood confetti on the ground. You will never know exactly what caused the crash.
When launching, don't try to throw the plane hard if the motor is still a little weak in thrust; the first plane stalls early in the flight and takes a long time to recover and start back up. Launches should be tested by glide: the model should smoothly start its climb, getting steeper as it goes up, with a slight left turn of about one turn in the power flight. That power pattern leads us into the competition game.
Transcribed from original scans by AI. Minor OCR errors may remain.

