
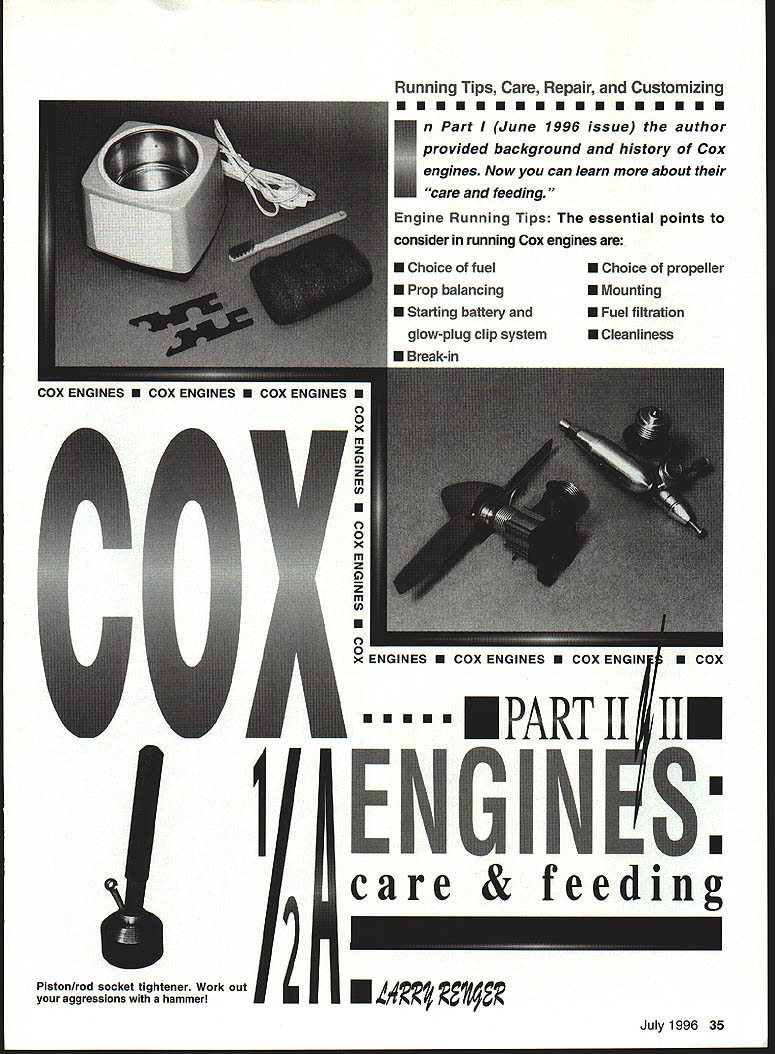

Running Tips, Care, Repair, and Customizing
In Part I (June 1996 issue) the author provided background and history of Cox engines. Now you can learn more about their "care and feeding."
Engine Running Tips:
The essential points to consider in running Cox engines are:
- Choice of fuel
- Prop balancing
- Starting battery and glow-plug clip system
- Break-in
- Choice of propeller
- Mounting
- Fuel filtration
- Cleanliness
Fuels:
Cox recommends use of a minimum of 15% nitromethane—mixed by volume, not weight. No cheating here!
Cox fuels have 18% oil—all of it castor oil. Cox engines do not seem to like pure synthetic oils; at least half of the oil in the fuel should be castor. Note that Cox fuels are very good, but not magic. There are other equivalent fuels of top quality. I only run Cox fuels because I know exactly what is in them.
There does not seem to be an upper limit to how much nitromethane you can run in any Cox engine. I usually run Cox Racing (30%), and when interested in peak performance will switch to Aerodyne 500+P—a 50%-nitro mix with propylene oxide added. If I were competing, I would probably go all the way up to 65% nitro.
Remember that once you run an engine for a while on high-nitro fuel, it will be heat-cycled to run that way, and will lose power when you drop back to lower-nitro fuels. The ideal is to break an engine in on the fuel you intend to run forever.
There is a balance that must be met for top performance. It is necessary to hit the correct combination of fuel, propeller, compression ratio, weather conditions, and glow plug element heat to get the ultimate performance out of an engine. Only a tachometer is accurate enough for this kind of experimentation. In general, high nitro goes with small props, cold plugs, and low compression. The benefit is maximum power output. Low nitro needs more heat and higher compression; the payoff is more lugging power and greater fuel efficiency.
Propellers:
This ties in with fuel choice. You must select the correct prop for the type of flying you are doing, and then break the engine in to run on that prop. Choice of brand is up to you; if balanced correctly, no prop will damage the engine unless it allows rpm above the structural "redline" for that engine.
Some engines, like the Killer Bees, are tuned to only run small props and high-nitro fuel. The run will be very erratic on other combinations. Select the correct engine for the airplane and the correct prop and fuel for that combination.
A safe bet in props are the Cox 5×3 or 6×3 sizes. One or the other will do well for 80% of all situations. For competition, several other choices seem to have been established by consistent winning ways:
- The Texaco events typically use props of large size, starting with the 7×3.5 and 8×4 props.
- Nostalgia Free Flight fliers seem to prefer very small props like the Tomado 5×3 and APC 5.5×2.
- Mouse Racers and 1/2A Combat fliers seem to like the Tornado 5×4.
Prop Balancing
This is very important in running Cox engines. Small models need all the power they can get, and an engine will put out more oomph (technical term) if it is running smoothly. In addition to the extra power, the engine and airplane will last longer!
I prefer the Top Flite magnetic balancer; it is head-and-shoulders better than the rest. Second-best is the large-wheel variety typified by Du-Bro. Generally, anything is better than nothing; though balancing across a knife blade is really close to worse-than-nothing. Balancers will never wear out, and can be used for every engine and prop you own.
Mounting
The more solidly an engine is mounted, the faster it will run. Soft mounts are intended to reduce noise and damage to the airframe. A soft mount always costs rpm, and is unnecessary on a small engine.
Use the correct size screws with as large a head as possible to spread the loads out. Very important: the mounting surface must be flat! Any mounting distortion will at least cost you power, and at worst may trash the engine.
Starting Battery and Clips
The starting system you use should provide a medium-orange glow in the glow plug filament at all times. If your plug just has a little visible glow at the bottom of the element, you are guaranteed to have a hard-starting engine. Plugs take a high current flow, and a poor battery, thin wires, and dirty or weakly attached clip will cause lots of grief.
A glow-driver system is the best because it will adapt to weather, battery charge, flooding, etc., and still fire up your engine. A glow driver will even overcome poor wiring or connections to some extent.
The simplest system I find effective is a pair of alkaline D-cells soldered in parallel. The cable to the clip should be lamp cord, and the clip must be clean and provide both friction and spring force to assure high current flow.
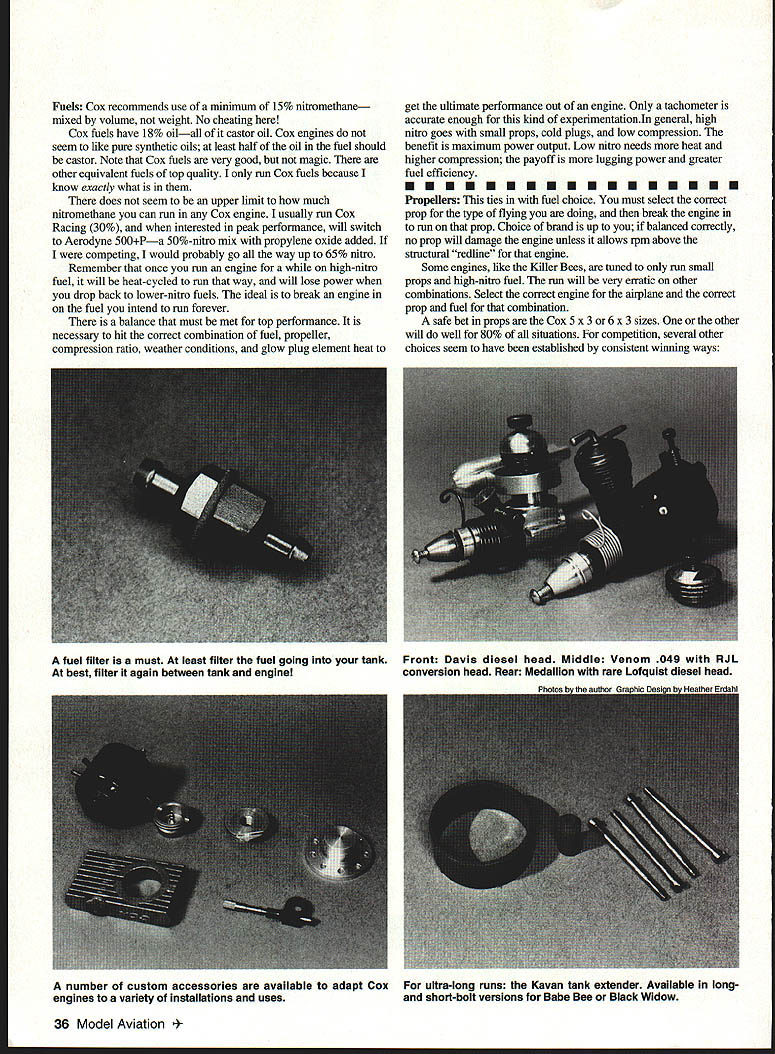
Fuel Filtration
Yes, filter your fuel—without qualification. The fuel passages in a Cox engine are tiny. It takes almost nothing to plug up a needle valve, and that will either prevent running or make the run erratic. The ideal is to filter the fuel from can to tank, and again between tank and engine. Cox fuel cans have a built-in filter.
Break-In
Break-in is a process of both polishing the parts to mate with each other, and "stress-relieving" the parts by heat-cycling them. As with prop and fuel, break-in technique depends on the use of the engine. Casual flying requires only a casual break-in; full performance requires closer attention. For sport flying, you need only run the engine rich (by opening the needle valve to add more fuel to the fuel/air mixture) for a minute, then begin leaning it out (by closing the needle valve somewhat) a bit at a time.
Listen for the engine attempting to "sag off" from overheating. If it is suddenly slowing down, richen it up and let it cool for a few moments before leaning it out again. As soon as it will hold a solid two-cycle peak, it is ready to fly.
You will find that the engine will gain performance over a period of time. You probably sacrifice a small amount of peak performance, but for sport flying, who cares?
To get peak performance out of an engine in competition, you may need to do a bit more careful break-in. The first phase is to let the parts polish themselves a bit to avoid galling or scuffing. I like to do this by using a low-nitro fuel (15%), a slightly smaller prop than planned, and run it a bit on the rich side. The plan is to get the rpm close to the final planned range, but with the engine lightly loaded and running cool.
About five minutes of running this way should give all the surfaces an initial polish, and clean out any assembly oil that may have been left in the engine during manufacturing. You are attempting to minimize heat and stress on this initial run.
The reason for running the engine at the speed you finally hope to achieve is to have the inertial vibration levels correct. That is, the "rockin'-and-rollin'" are happening the same as if you were running flat-out.
At this point, you need to begin to heat-cycle the engine to get the parts to their final "relaxed" shape. I recommend switching to the final nitro and prop for this type of running. This part of the run seems like the sport break-in, but intensified.
Start your engine and lean it out to a scream. Immediately back off to a rich setting. Re-lean the engine, and run it at high speed for a few moments longer. Continue this process of longer and longer peaks until the engine will hold full, steady high rpm with no tendency to sag.
Each time you peak the engine, it builds heat, and the metal moves a bit. The wear factor goes up as the engine repolishes itself and extra heat is generated. This is the reason that an engine will suddenly try to sag off lean. Too much heat!
The more heating and cooling cycles, and the longer the heat periods you run, the closer the metal will settle into its final shape. It is a continuous re-fitting process that cannot be achieved at the factory. During the break-in process, never let the engine go off lean! Don't just let the engine run by itself. Break-in is a boring process that requires constant attention.
Again, when the engine is under maximum stress, you want the rpm to be roughly where you will finally run the engine. A properly broken-in engine will be easier to start, will last longer, and will be less sensitive to needle-valve setting. Basically, the engine has "blueprinted" itself.
(At Cox we tried grinding an engine to the precise fit and piston/cylinder tapers that a really good-running, well-broken-in engine had. The result was awful! As soon as the engine was run, it promptly changed shape, and wore into some other fit that didn't work as well.)
Cleanliness!
As with fuel filtration, this is a must with small engines. A 1/2A engine has half of a larger engine's clearance between piston and cylinder! That makes the dust and dirt twice as big!
If you hit the dirt with your engine, take it home and clean it properly. The alternative is that you will lose a significant amount of performance (and most of your engine's life) in the first part of the next run!
Engine Care
Cleaning:
To clean an engine, remove the backplate, head, cylinder, and piston—without rotating the crankshaft. Usually it is not necessary to pull the crankshaft from the case, but if it is a rotary engine, and you crashed in really fine dust, tear the engine down completely. Use a good solvent like denatured alcohol, kerosene, or model fuel. Use brushes and paper towels to physically remove the dirt; just sloshing a part in solvent is only somewhat effective.
If it is necessary to remove the crankshaft, here is the removal and reassembly procedure:
Removal:
The screw size for the crankshaft is 5-40 (1/2-inch length). This is not commonly found at hobby shops, but it is a standard hardware size. Purchase some hex-head 5-40 machine screws (1/2-inch long) and a matching hex wrench. After removing the backplate, cylinder, and piston from the engine, insert one of the screws into the shaft as far as it will go.
Place the crankcase rear-end down on a sheet of cardboard on a cement floor (cement for solid backing; cardboard so the crankcase won't be marred). Whup that puppy with a hammer until the shaft slides free of the drive washer. Keep that screw just for removing shafts.
Reinstallation:
This is a bit more tricky. After thoroughly cleaning and oiling the parts, slip the shaft into the engine, and gently reassemble the thrust washer (if used) and prop drive plate onto the shaft.
Get the drive plate started into the same grooves as used in the original assembly; then use a stack of washers and one of the hex screws to pull the plate all the way down to the stop on the shaft. Recheck that the drive plate runs true (no wobble). Note that I specify a hex-head screw because it requires no pushing to be turned. I got a screwdriver three stitches deep into the palm of my hand while trying this with a standard slotted screw. Be warned!
While the engine is apart, examine all the parts for damage and wear. If needed, use a piston reset tool to tighten up the piston ball socket. This is a good time to consider removing accumulated varnish from the cylinder walls (see below).
Reassemble the engine with a good grade of oil. WD-40, Marvel Mystery Oil, and 3-In-One all seem to work OK. After-run oils should be good. My preference is Break-Free—a gun oil with Teflon particles in it. I won't say for sure it is an improvement, but how can a bit of Teflon hurt?
Varnish Removal:
As an engine runs, a certain amount of burned oil will accumulate on the cylinder walls. This "varnish" does two things: it reduces the clearance between cylinder and piston, which may generate heat; and it tends to get sticky as it heats up. The result is an engine that suddenly has a difficult time being run up to peak rpm and holding it. It seems exactly as though the engine was unbroken-in.
To remove the varnish coating, remove the cylinder head, head gasket, and cylinder from the engine. Get a pad of 000-grade steel wool. Wrap a strip of the steel wool around a clean dowel and scour the inside of the cylinder bore until it is completely bright and shiny again. It is very difficult to harm a cylinder bore with this technique; the steel wool is softer than the steel in the cylinder, but it's much harder than the varnish.
Clean the cylinder in solvent. Use a brush to assure that all the residue and wool hairs have been removed. Then reassemble the engine as above.
Piston Resetting:
This is a technique that allows you to tighten the fit between the conrod ball and the socket in the piston. Allowing the fit to get too loose can cause vibration, inaccurate timing, and breakage. I find that the socket usually needs only be tightened once (at most, twice) in the life of an engine. The metal eventually wears very smooth and work-hardens itself, so the fit eventually remains constant.
When using the socket-setter, use the hammer gently at first, and keep moving the position of the tool around on the socket. The key is to tighten the socket as evenly as possible. Keep checking the resulting fit, which is achieved when there is no noticeable "slop" between the ball and socket, but there is no bind.
Clean the piston and rod, then oil the socket before reassembling the engine.
Storage:
I keep my engines in a sealed metal box. Prior to storage, they get a liberal dousing inside and out with oil (again, my favorite is Break-Free). It would be an excellent idea to have a bag of desiccant in with the engines to stop rust.
Miscellaneous Thoughts:
- Keep all the screws tight. Plastic can cold-flow; check that screws remain snugly tight. On Tee Dee and Medallion engines, check that the carburetor body retaining nut (the silver ring behind the prop drive) is snug.
- Air leaks in one place or another are the source of most starting problems. Glow heads loosen up by themselves; check the tightness every run. If a gasket looks worn or torn, replace it. Look at any plastic parts for cracks. The rubber Hycar washers on the back of the tank can harden, and should be replaced if they look suspicious. Backplates on the rotary-valve engines can also loosen themselves.
- Castor oil gums up when the engine is not used; expect to have to clean out the fuel system, and run a full tank through the engine at slow speed, when you fire it up again.
- Fuel absorbs water at an amazing rate; keep your fuel can sealed well even between flights.
Engine Repair:
There isn't really much you can repair on any model engine. Generally it is a situation of finding the problem and replacing the parts. If your hobby shop can't get parts from their distributor, tell them that Cox has a no-minimum policy on part purchases for dealers. In addition, you can purchase parts direct from Cox through Customer Service. The toll-free hot line is (800) 451-0339.
Some things worth knowing about servicing your engines:
- You can free up an old, gunky engine by warming it with a film-shrinking iron, or by boiling it in water.
- You can clean almost anything off an old engine by boiling it in dishwasher detergent.
- All the screws on Cox engines are standard sizes—2-56, 3-48, 4-40, 5-40, etc. None of the other threads are used by anyone else; Customer Service has a list of those thread definitions if you just have to have them.
- Glow heads can be bad for a variety of reasons. The most obvious is when they don't glow. It is also possible for the upper seals to leak, or for the element to have an aluminum coating fused to it. This will limit the ability to catalyze the combustion process. If in doubt, look at the element under a microscope. If the element is not shiny like jewelry, it is probably shot.
- It is usually a good idea to keep pistons and cylinders as matched pairs. Once the parts have broken in together, why lose that fit? For sport flying you can mix them, but performance will vary wildly.
Customizing
Any modification to a Cox engine voids your warranty! Read this section at your own risk.
Several modifications are mentioned that can work if done right, but will always make the engine warranty kaput.
There are two types of engine rework:
- The best type is to simply assemble the engine you need for a specific application from the correct set of parts.
- The second type is "hop-up" or tuning.
I will deal with these topics separately.
Custom Setups:
The trick here is to understand what you need for your application, and then to know what parts are available to let you achieve the result. A few standard applications and how to get there are given below.
- Control Line Stunt: Here you need an engine of good power, but the key is to achieve the ultimate in steady running. It is usually necessary to muffle the engine, too. One example uses the crankcase, crankshaft, cylinder, and piston from the Killer Bee. To smooth out the run and increase ability to run a large prop, the standard ready-to-fly or "product" backplate is substituted for the bored-out one provided with the Killer Bee. To achieve steady run under varied loads and provide extra cooling, the head from the Texaco engine is substituted for the high-compression head normally found on a Killer Bee.
Another setup started as a Tee Dee R/C .05. The control-line venturi was substituted for the RC carburetor, and a Texaco head was substituted for the same reasons as before. In addition, a steadier run can be achieved by tapping the muffler for pressure to the tank. If still more power is needed, drill out the venturi to a bigger diameter, and use the side tap on the engine per the free flight engine instructions.
- Diesel: Several diesel-type conversions are possible. Two heads that are currently available are from RJL (Box 5, Sierra Madre CA 91025) and Davis Diesel (Box 141, Milford CT 06460). The RJL uses an O-ring seal; the Davis uses Teflon disks as a destructible seal. The RJL has a lock arm to fix the compression lever; the Davis uses a spring system and knob. Both work just fine, and both will instantly void your warranty on the engine.
The keys to successful diesel operation are to pick adequately strong components and to use absolutely fresh fuel with a high ether content. Small diesels need lots of ether—up to 50%! The engines shown are the Venom and the Medallion. The crankshafts on these engines are the least likely to break under the mistreatment dished out by diesel operation.
Since the goal of running a diesel is to get long duration and swing large props, the ideal engine would be the Venom front end and a Texaco tank and backplate. The Venom will punch out the power and be durable; the Texaco tank and backplate have a small venturi for maximum duration and smooth running at low speeds.
A couple of words about using mufflers and exhaust restrictors for RC throttling: As mentioned in the first engine article, there is a thing we do on our exhaust ports called sub-piston induction (SPI). The piston uncovers the bottom of the exhaust port at top-dead-center, and some air is allowed to go under the piston into the crankcase. This is used on open-exhaust engines to get the last little bit of performance.
SPI is instant death when running a muffler or exhaust restriction throttle system. If you are going to use a muffler, be sure to select a cylinder with no SPI. When using a muffler with SPI, the exhaust gas is pumped down into the crankcase. This is good for more than 2,000 to 3,000 lost rpm.
- Longer Runs: In addition to running as a diesel, there are a couple of techniques to get longer engine-run times. The first is to use the tank from the Dragonfly. It has 11 cc capacity, compared to the Black Widow/Venom/Texaco capacity of 8 cc. In addition, there is a tank extender from Kavan (available through Hobby Lobby International, 5614 Franklin Pike Circle, Brentwood TN 37027; Tel.: (615) 373-1444).
- Different Heads: There are at least four manufacturers of heads to allow you to use standard glow plugs or special glow plugs in Cox built-in heads. These parts may be used for economy in sport engines, or higher performance in competition, depending on the unit selected.
The RJL and Charlie's conversions allow the use of short, regular plugs. There are Globe and Galbreath heads that allow use of GloBee inserts or Nelson plugs. You pay your money, get out the tachometer, and start experimenting to find what is best. (GloBee heads are available from a number of distributors; Galbreath heads are available from Doug Galbreath, 3408 Topsail Pl., Davis CA 95616.)
Hop-Ups:
The most practical hop-up for the average individual is to carefully tune the combination of head, gasket, nitro content, and prop to match the airplane. This will get you 90% of the way there. The next-most-effective procedure is to set up a pressure fuel system and drill out the venturi to allow more air to enter the engine. That will get you to 98% of maximum possible performance.
Beyond that, you get into the "pro" stuff. Serious engine hop-up involves lots of experimentation and scrapped parts. Experience, testing, patience, and a deep wallet are the main requirements for success. It is not for the casual modeler or one who doesn't record the results of experiments.
Here is where you really are on your own! Any of this stuff will void your warranty. And more often than not, you will hook-up an engine rather than hop it up. An entire new article by an expert in 1/2A engine hop-ups would be needed to really cover the subject. All I will do is describe the types of true modifications people do.
Hop-ups usually start with custom fitting of parts by selection or tapping techniques. Then people modify timing of the cylinder ports and crankshaft ports. Shimming the cylinder up or down to achieve timing changes is one way this is done. Another technique for timing changes is to actually machine the dimensions of the parts differently.
Extreme hop-ups involve engine redesign to use such things as full Schnuerle porting or ball bearings. People machine their own cylinders, crankcases, and tuned-pipe systems. It depends on what you want, and how much time, expertise, and money you have.
Conclusions
First: You can have a terrific amount of fun with small engines, and Cox is the leader worldwide. There are currently about a dozen Cox .049 variations to suit most of the possible needs in the hobby. If the exact combination you need isn't available, you can put together what you want.
Second: To get satisfactory performance from small engines, they need more care than big engines—not less. They rarely get the kind of careful attention they need. Think of flying a 1/4A engine after a crash, with just a slosh of fuel to hose off the dirt, as similar to pouring a cup of sand down the Weber carbs on a Ferrari.
Third: For best performance, what you need to do is easy, sensible stuff. Here is 95% of what you need to know, in a nutshell:
- Cleanliness!
- Have a realistic understanding of what the engines can do; don't overprop or overrev them.
- Select the right engine for the airplane.
- Choose your fuel to be high enough in nitro and oil content.
These few items will make you seem to be an instant expert!
The point of the hobby is to have fun! Learning how to get the most out of your engines will make it a lot easier to have that fun.
I hope this pair of articles has provided the basics you need, and piqued your interest in learning more about these fascinating bits of running jewelry.
Larry Renger 13182 Sutton St. Cerritos, CA 90703
Transcribed from original scans by AI. Minor OCR errors may remain.

