
Safety Comes First
John Preston
Boron fibers: Pro and Con. An on-board battery-tester for RC. Increase the reliability of your RC system's on-off switch. More.
Boron fibers: Pro and Con
In the June 1985 Safety column I discussed whether models containing boron filament should be banned from AMA-sanctioned competitions because of safety allegations. I asked readers two questions:
- Should models containing boron be outlawed from all AMA competition categories?
- Should models containing boron be outlawed from certain AMA competition categories? If so, which categories?
Thirteen readers responded to these questions and one additional reader sent a letter on how to safely handle boron filament. Of the 13 who voted, nine did not want boron banned at all; four responded "yes" to question No. 1 (models containing boron should not be permitted in any AMA competition category). In general, readers preferred to make their own decisions about personal safety rather than have such materials banned by rule. If any members of the AMA Safety Committee are reading this column, the vote among respondents was to keep boron because of the possible competitive advantage it can bring due to its light weight combined with high strength.
Below are excerpts and handling tips from two readers who use boron and who commented on safe practices.
Handling boron filament — H. A. Farrar
H. A. Farrar (and his son) opposed banning boron despite having experienced splinters. Excerpts from H.A.'s letter:
"Boron is deposited on a 0.0005-in. tungsten filament, to a diameter of 0.004 in. It is relatively stiff, hard, and BRITTLE. A boron/epoxy laminate is best machined (trimmed) with diamond-grit cutting tools (essentially a grinding operation). The individual filaments cannot be cut. The blade breaks them, somewhat similar to cutting piano wire with diagonal cutters. The problem is that, unlike wire, in addition to the desired break, a secondary break occurs approximately 0.06 in. away from the desired break (in either direction, depending) and it is that little, unobserved piece that gets into your hand or foot and does not come out. The diameter and stiffness of the filament permit it to function like a needle; its brittleness can leave a piece inside the flesh."
He also commented that hand-lay-up of boron/epoxy tape is often better performed bare-handed, because gloves can actually assist small segments penetrating the skin. The filaments are dark and virtually invisible except on a plain, light-colored surface.
Handling boron filament — Harley Michaelis
Harley Michaelis (LSF No. 023) described early bungled experiences and offered detailed precautions and techniques that greatly reduced risk in later work. His recommendations cover storage, dispensing, preparation, handling, and bonding:
- Dispensing and storage
- To store the reel, make a shallow box about the reel diameter. Mount a 1/4-in. dowel centered in the box so the reel turns on it.
- Drill a hole at one edge of the box for the end of the boron to pass through for dispensing.
- Alternatively, tape the end into a plastic jug and run a dowel through the jug to act as a dispenser; support the jug so the wire can be pulled off smoothly.
- Work area and visibility
- Lay plans or white paper under the structure as a light background to make the dark boron visible.
- Work with good lighting and wear eye protection.
- Breaking lengths and catching shards
- Break off lengths with smooth-jawed pliers while holding a hand covered with white Kleenex over the pliers to catch tiny shards.
- After each break, inspect the Kleenex, the white background, and the pliers for shards. Use masking tape to pick up any stray bits.
- Keep the work surface and tools frequently inspected for stray shards; pick them up with masking tape.
- Aligning and positioning filaments
- Lay lengths by other pieces with one set of ends raised on a shim.
- Pick up the desired number of filaments as a group between thumb and forefinger of one hand; let them dangle and stroke them with the other thumb/forefinger to get them side-by-side.
- Pins can be placed in the structure to help position the filaments.
- Lay the group on the structure and smooth from the center toward the ends until all filaments are straight and side-by-side.
- Tacking and bonding
- Use a small dab of thin cyanoacrylate (CA) glue at the center of the group to tack the filaments in place.
- After tacking, secure the filaments with masking tape or other means until permanently bonded.
- When applying additional drops of CA, work from the center toward the ends, allowing each drop to wick and cure before applying the next to avoid excess glue. Do not use accelerator (it can cause bumps).
- Bare fingers should never touch the boron while the glue is wicking; if filaments must be touched, use a contoured piece of Tupperware or backing from covering film to protect fingers.
- Laminating in D-box construction
- To maximize spar strength, boron must be encased. In a D-box panel, apply filaments to the bottom sheeting, add the bottom spar to sandwich the filaments, then add the webbing and top spar. Apply filaments to the top spar and sandwich with top sheeting.
- Use a slow CA or epoxy for the laminations and hold under a straightedge while curing.
Harley concluded: "These procedures have made the boron relatively easy and safe to work with. The D-box wings are certainly stiffer and contribute to safety by virtue of less likelihood of collapse under stress."
Carbon fibers
One last word on "exotic" materials: carbon fibers are generally much safer to handle than boron. Although a reader reported being pierced by carbon fibers (April 1985 Safety column), experts say carbon fibers are an order of magnitude safer. Running a finger along the edge of a carbon fiber/epoxy laminate is about as hazardous as running a finger along the edge of rough-sawn plywood — smart people simply don't do that.
Battery pack reliability and switch rewiring
Most RC modelers will agree that the battery pack is the most vulnerable component of a model's radio control system. Without battery power, the model will not respond.
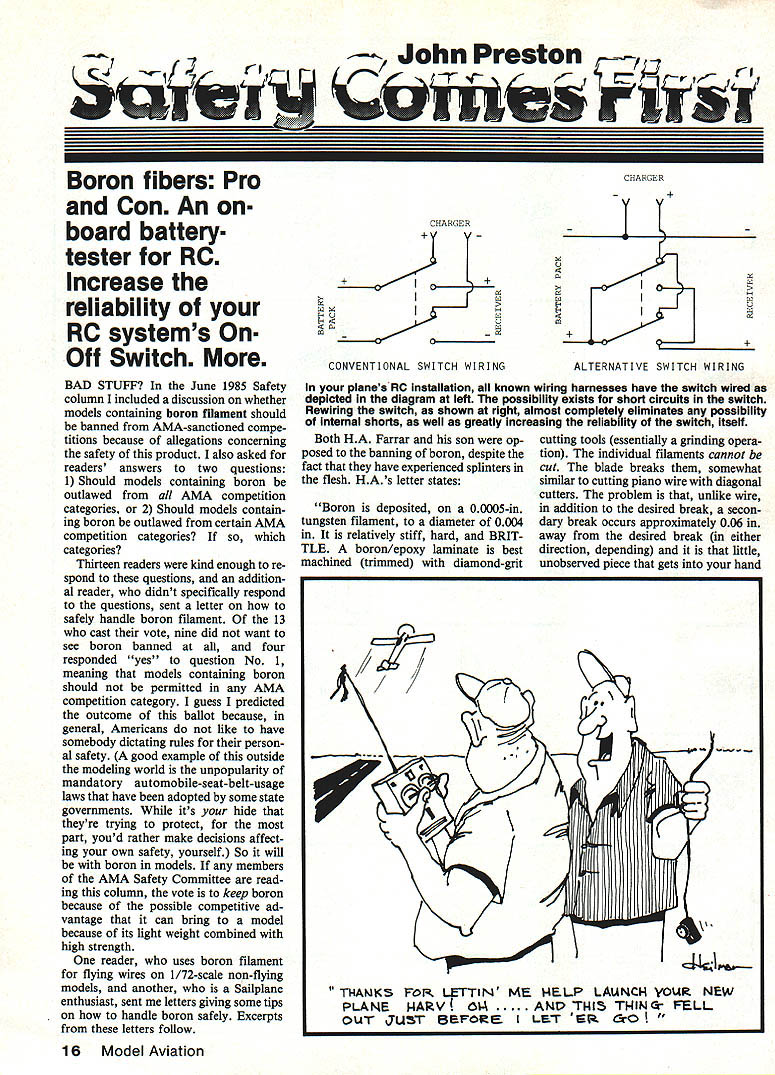
A letter from Jesse Aronstein described a product (Batt-Chek RX-1) for checking on-board battery state of charge — see the next section. Jesse also suggested a way to reduce the possibility of short circuits in the flight-pack switch and to increase switch contact reliability. His wiring recommendation:
- Route only one side of the battery power through the switch. This reduces the probability of a short occurring in the switch.
- Wire the two poles of a double-pole switch in parallel. In normal operation one set of switch contacts is redundant; it provides a backup in case the other set has poor or no contact.
This method reduces short risk and improves reliability. (An electrical schematic was shown in the magazine; refer to that for wiring detail.)
Batt-Chek RX-1 (Protune)
Jesse Aronstein also described Batt-Chek (marketed by Protune Corporation), a small on-board low-battery warning device:
- Size and weight: less than 1/2 ounce; approximately 1-1/2 x 3/4 x 1/2 inch.
- Indicates battery condition with two bright LEDs and a press-to-test pushbutton that gives three-level indication under a 0.1 A load:
- OK: Green LED On (battery pack exceeds 4.95 V).
- GETTING LOW: Red and Green LEDs On (battery pack between 4.8 V and 4.95 V).
- DANGER: Red LED On (battery pack less than 4.8 V).
- Because it is intended for permanent installation, users are more likely to check battery condition before each flight.
- Mounting: comes with adhesive-backed foam tape to attach inside the fuselage; two small holes in the fuselage allow LEDs to protrude. Alternatively, mount behind an instrument panel with the press-to-test button accessible.
- Price and contact: lists for $14.95. Available from Protune Corp., 50 Pasture Lane, Poughkeepsie, NY 12603; phone (914) 462-6452.
Throttle "fail-safe" on power loss
In February 1985 I reported a 1/4-scale flyaway caused by unintentional ejection of the battery pack on takeoff. I noted I didn't know of a device that would automatically close the throttle upon loss of battery power. Jim Tagg and Associate Editor Ross McMullen pointed me to George Myers' "Radio Technique" column (January 1983), which suggested a simple mechanical approach:
- Use a throttle with very low friction and a ball-bearing, coreless-motor throttle servo.
- Set the throttle with a spring working toward the throttle-closed position. When battery voltage is removed, the spring can overpower the servo (coreless servos often offer almost no resistance when power is off), allowing the engine to stop.
- Caveat: constantly running the spring against the servo may reduce servo life; tests over time are needed to determine significance.
If readers have comments or improvements on making a throttle "fail-safe" on electrical power loss, please send them to George Myers (not to me).
Radio interference
A final comment concerns radio interference. Several readers asked which RC channels should be avoided because of interference from other channels. I don't have a definitive answer, but George Myers discussed interference in his "Radio Technique" column (April 1985) and referenced earlier columns on the topic. If you have questions about interference:
- Check back issues of Model Aviation for George Myers' columns.
- Contact your District Frequency Coordinator; these appointees are intended to pinpoint local problems. Their names and addresses are listed at the head of your District VP's column in the AMA News section.
Have another safe month.
John Preston 12235 Tildenwood Dr., Rockville, MD 20852.
Transcribed from original scans by AI. Minor OCR errors may remain.

