
Safety Starter Cart
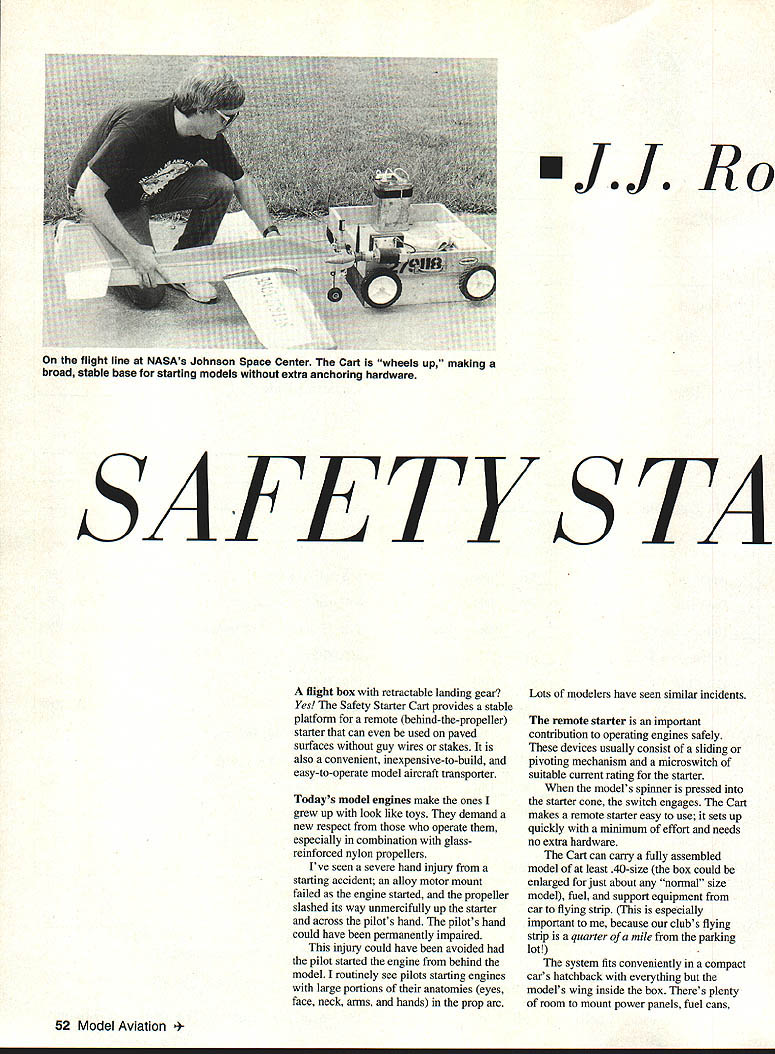
A flight box with retractable landing gear? Yes. The Safety Starter Cart provides a stable platform for a remote (behind‑the‑propeller) starter that can be used on paved surfaces without guy wires or stakes. It is also a convenient, inexpensive-to-build, and easy-to-operate model aircraft transporter.
Today's model engines are far more powerful than older designs and demand respect from those who operate them, especially when paired with glass‑reinforced nylon propellers. I have seen a severe hand injury caused when an alloy motor mount failed as the engine started and the propeller slashed across the starter and the pilot's hand. That injury could have been avoided had the pilot started the engine from behind the model.
I routinely see pilots starting engines with large portions of their bodies (eyes, face, neck, arms, and hands) in the prop arc. The remote starter is an important safety device. These remotes usually consist of a sliding or pivoting mechanism and a microswitch rated for the starter current; when the spinner is pressed into the starter cone, the switch engages.
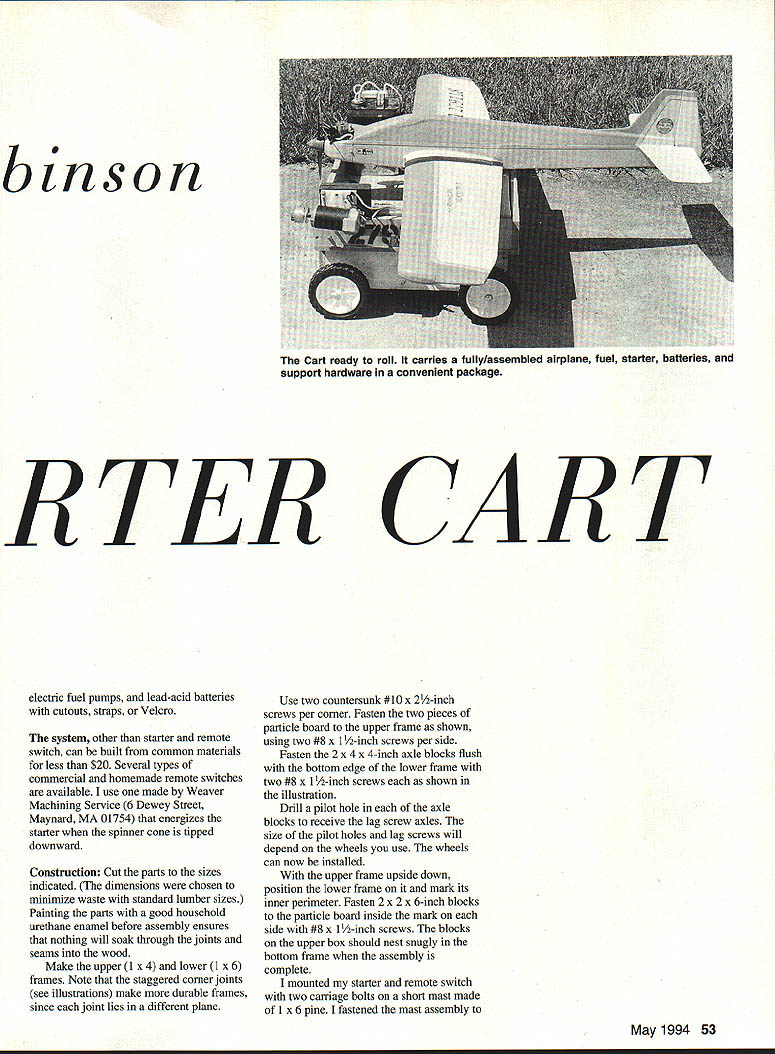
The Cart makes a remote starter easy to use; it sets up quickly with minimal effort and needs no extra hardware. It can carry a fully assembled model of at least .40‑size (the box could be enlarged for larger models), fuel, and support equipment from car to flying strip — especially useful when the strip is a long walk from the parking area. The system fits conveniently in a compact car's hatchback with everything but the wing inside the box. There's plenty of room to mount power panels, fuel cans, electric fuel pumps, lead‑acid batteries, cutouts, straps, Velcro, and the starter/remote switch.
Remote starter/remote switches can be built from common materials for less than $20. Several types, both commercial and homemade, are available. One example is a unit made by Weaver Machining Service (6 Dewey Street, Maynard, MA 01754) that energizes the starter when the spinner cone is tipped downward.
Construction
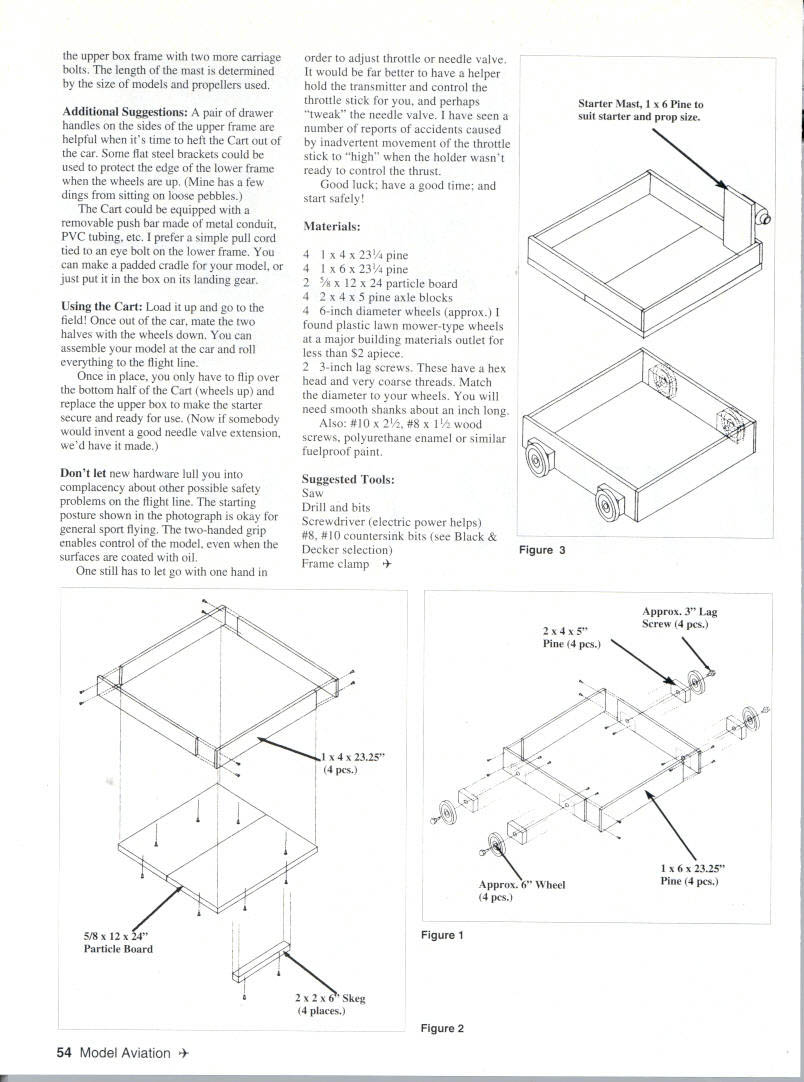
- Cut the parts to the sizes indicated. The dimensions are chosen to minimize waste from standard lumber sizes. Painting parts with a good household urethane enamel before assembly ensures fuel and oil will not soak through joints and seams into the wood.
- Make the upper frame from 1×4 stock and the lower frame from 1×6 stock. Use staggered corner joints — these are stronger because each joint lies in a different plane. Use two countersunk #10 x 2½‑inch screws per corner.
- Fasten the two pieces of particle board to the upper frame using two #8 x 1½‑inch screws per side.
- Fasten 2×4×5‑inch axle blocks flush with the bottom edge of the lower frame using two #8 x 1½‑inch screws each. Drill pilot holes in the axle blocks to receive the lag‑screw axles; the pilot hole size and lag screw diameter will depend on the wheels you use. The wheels can now be installed.
- With the upper frame upside down, position the lower frame on it and mark the lower frame's inner perimeter. Fasten 2×2×6‑inch blocks of particle board inside the marked sides using #8 x 1½‑inch screws. The blocks in the upper box should nest snugly into the bottom frame when the Cart halves are assembled.
- Mount the starter/remote switch to the mast assembly using two carriage bolts. The mast can be made from 1×6 pine; the mast length is determined by the size of models and propellers used.
Additional Suggestions
- A pair of drawer handles on the sides of the upper frame makes it easier to lift the Cart out of the car.
- Flat steel brackets can protect the edge of the lower frame from dings caused by loose pebbles when the wheels are up.
- The Cart can be equipped with a removable push bar made from metal conduit, PVC tubing, etc.; a simple pull cord tied to an eye bolt in the lower frame also works well.
- Make a padded cradle for the model or simply place the box over the model's landing gear.
Using the Cart
- Load the Cart and transport it to the field. Mate the two halves with the wheels down, assemble the model, and roll everything to the flight line.
- Once in place, flip over the bottom half (wheels up), replace the upper box, and make the starter secure and ready to use.
Don't let new hardware lull you into complacency about other possible safety problems on the flight line. The flight‑line starting posture shown in typical photographs is acceptable for general sport flying; a two‑handed grip enables control. However, one hand still must let go to adjust throttle or needle valve. It is better to have a helper hold the transmitter and control the throttle stick for you and perhaps "tweak" the needle valve. There have been accident reports caused by inadvertent movement of the throttle stick to "high" when the holder wasn't ready.
Good luck — have a good time, and start safely!
Materials
- 4 — 1 x 4 x 23.25" pine
- 4 — 1 x 6 x 23.25" pine
- 2 — 5/8" x 12" x 24" particle board
- 4 — 2 x 4 x 5" pine axle blocks
- 4 — 6‑inch diameter wheels (approx.). Plastic lawn‑mower‑type wheels are inexpensive.
- 2 — 3‑inch lag screws with hex head and coarse threads; match diameter to your wheels. You will need smooth shanks about 1" long.
- Also: #10 x 2½" screws, #8 x 1½" wood screws, polyurethane enamel or similar fuelproof paint.
Suggested Tools
- Saw
- Drill and bits
- Screwdriver (electric power helps)
- #8 and #10 countersink bits
- Frame clamp
Transcribed from original scans by AI. Minor OCR errors may remain.

