

Sandpaper Science: For Small Models
Paul McIlrath
If you're a horror-movie fan, you know about the versatility of the modern chain saw. Sandpaper, the tool you buy in a sheet, has been with us longer, but it's equally versatile. A check of the how-to folders at the hardware store shows that sandpaper can do anything from grinding rust off an old Volkswagen to polishing an expensive coffee table. What the folders don't tell you is how to work on 1/32 balsa or two-pound-density foam.
The soft materials and fragile structures of small models require original methods, but they also open up unique possibilities. A creative modeler can use sandpaper not only for smoothing a model's exterior but for major cutting and shaping operations as well. Sandpaper can replace the handyman's lathe, router, sander—and, yes, even the chain saw.
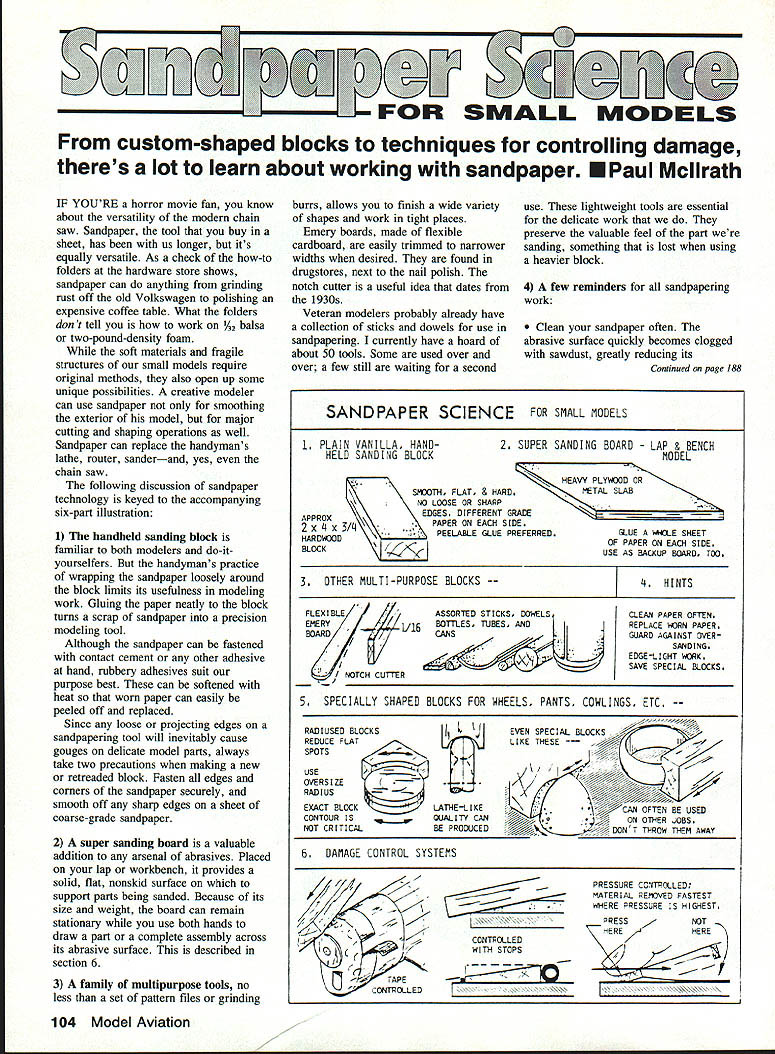
The following discussion of sandpaper technology is keyed to the accompanying six-part illustration.
1. The handheld sanding block
The handheld sanding block is familiar to both modelers and do-it-yourselfers. But the handyman's practice of wrapping the sandpaper loosely around the block limits its usefulness in modeling. Gluing the paper neatly to the block turns a scrap of sandpaper into a precision modeling tool.
Although the sandpaper can be fastened with contact cement or any other adhesive at hand, rubbery adhesives suit our purpose best. These can be softened with heat so that worn paper can easily be peeled off and replaced.
Since any loose or projecting edges on a sanding tool will inevitably cause gouges on delicate model parts, always take two precautions when making a new or retreaded block: fasten all edges and corners of the sandpaper securely, and smooth off any sharp edges on a sheet of coarse-grade sandpaper.
2. The super sanding board
A super sanding board is a valuable addition to any arsenal of abrasives. Placed on your lap or workbench, it provides a solid, flat, nonskid surface on which to support parts being sanded. Because of its size and weight, the board can remain stationary while you use both hands to draw a part or a complete assembly across its abrasive surface. This technique is described in section 6.
3. Multipurpose small tools
A family of multipurpose tools—no less useful than a set of pattern files or grinding burrs—allows you to finish a wide variety of shapes and work in tight places. Emery boards, made of flexible cardboard, are easily trimmed to narrower widths when desired; they are found in drugstores next to the nail polish. The notch cutter is a useful idea that dates from the 1930s.
Veteran modelers probably already have a collection of sticks and dowels for sanding. I currently have a hoard of about 50 tools. Some are used repeatedly; a few still are waiting for a second use. These lightweight tools are essential for delicate work. They preserve the valuable feel of the part we're sanding—something that is lost when using a heavier block.
4. General reminders for sanding work
- Clean your sandpaper often. The abrasive surface quickly becomes clogged with sawdust, greatly reducing its effectiveness.
- A toothbrush with the bristles chopped off to about 1/16 in. works well.
- You can also try duct tape: press a layer of tape over the abrasive surface, rub it in forcefully, and strip it off. Cleaning can give new life to paper you thought was worn out.
- Though regular cleaning can stretch the life of sandpaper, eventually the abrasive will dull with use. Interrupting a job to retread a block can be a nuisance, but the work will go faster and the result will be neater.
- Jobs that involve rounding and smoothing benefit from edge lighting. Turn off the uniform fluorescent lighting and work in front of a single lamp or unshaded bulb. Hold the part so the light strikes its surface at a very flat angle; high and low spots will be strongly accented, making precision work much easier.
- Foam plastic and sandpaper work well together. Uniform textured foam (not the beaded kind) makes beautiful cowlings, pants, headrests, etc., and is strong enough to be used for most sanding blocks. Try it.
5. Custom sanding blocks
Custom sanding blocks can produce parts that look as if they were made with a lathe or router. The block is specially shaped to match the desired contour of the finished part.
Shape your balsa or foam blank using whatever cutting and sanding tools you have at hand, then finish it to final form with the custom block. The spinner and cowlings in the illustration are being finished with special blocks.
While a custom tool can produce beautifully precise parts, sometimes that approach isn't possible—and often it isn't necessary. For example, both blocks used to round the wheel blank must incorporate some clearance to prevent binding on the blank. This means the radius of the tool must be somewhat larger than that of the finished part, making an exact fit neither practical nor necessary. The same blocks might be useful on wheels of several different sizes; they might also be used for the preliminary shaping of blanks for the cowling or spinner.
Not only can the same tool be used on several different parts, but several different tools can be used in succession to make a single part.
Another way to enhance your blocks' versatility is to hold them at an angle to the part being shaped. The sketches show block and blank in parallel alignment for simplification, but holding the tool obliquely changes the shape of the contacting abrasive surface and produces the same effect as a block with a different contour.
6. Damage control systems
"How do you avoid sanding areas you don't want to sand?"
If the cowling has been covered with 1/32 sheet and the nose block must be blended in without damaging the thin sheeting, an easy solution is to protect the endangered area with a strip of masking tape. Larger areas can be protected with a piece or two of stiff paper taped in place. If the structure is so soft or flimsy that it might be damaged by pulling off the tape, try presticking the tape to a dusty workbench or a woolly sweater to weaken the adhesive a little.
For some jobs, it's best to apply the tape to a section of the sandpaper block rather than to the model. The masked-off portion of the block can then slide over the vulnerable area without abrading it.
Another way to prevent oversanding is to use a stop or guide. Tapering the trailing edge of a hand-launched glider wing to a thin—but not-too-thin—edge is difficult. A stop can make it precise and foolproof.
Position the wing blank with the trailing edge set back a short distance from the edge of the workbench or backup board. As long as your sandpaper block overhangs the edge of the board, there's no way it can take an unwanted bite out of the trailing edge. Adjust the setback distance to produce the desired trailing-edge thickness.
Indoor fliers use stops to sand a strip to an accurate, predetermined thickness. The technique involves positioning the balsa blank, straddled by a pair of wires or metal strips of the desired thickness, on the work surface, then block-sanding it until the block bottoms out on the metal stops.
A variation uses a small wire and a larger tube as stops to produce a strip with a tapered cross section, such as trailing-edge stock. While the nonskid surface of a sanding board is helpful, you'll probably also need to tape or clamp the metal stops to the work surface—unless you have three hands.
Attempting to support a flimsy wing or tail assembly in one hand while attacking it with a sandpaper block in the other is a sure invitation to disaster. Slide the surface to be sanded across a sanding board, letting your fingertips supply both the sanding pressure and the sliding force. This technique concentrates the sanding action in the small areas directly beneath your fingertips and minimizes the damaging forces that common sanding methods sometimes produce.
The job shown in the sketch is a tricky one; practice this technique on a variety of flat, rugged surfaces before attempting delicate work. The following step-by-step description applies equally to easy or difficult jobs:
- Invert the wing section on the sanding board.
- Apply fingertip pressure at several places along the trailing edge, and draw—don't push—the part across the abrasive surface.
- Make a stroke or two, then move your fingertips to a new position on the trailing edge.
- After a few passes, inspect the work to see which areas need more sanding and which should be avoided.
- Reposition your fingertips accordingly, make another pass or two, and again inspect your work. If the ribs have unwanted flat spots, protect them with strips of masking tape before resuming.
With a little practice you'll learn to do quick, accurate, damage-free work—even on delicate structures.
These tools and techniques certainly aren't new. Perhaps you already use some—or even all—of them. If not, give them a try. You may discover hidden talent in the old-fashioned paper that thinks it's a tool.
Transcribed from original scans by AI. Minor OCR errors may remain.

