
Savoia-Marchetti S.M.92
Mark Fineman
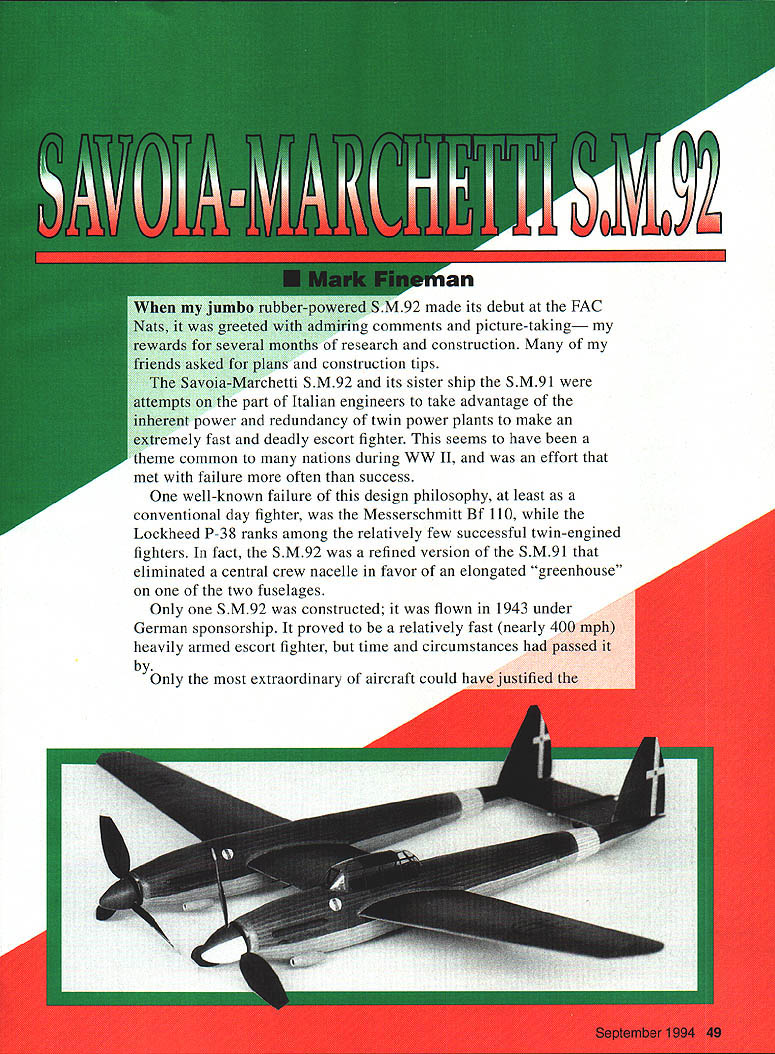
When my jumbo rubber-powered S.M.92 made its debut at the FAC Nats, it was greeted with admiring comments and picture-taking—my reward for several months of research and construction. Many friends asked for plans and construction tips.
The Savoia-Marchetti S.M.92 and its sister ship the S.M.91 were attempts by Italian engineers to take advantage of the inherent power and redundancy of twin power plants to produce an extremely fast and deadly escort fighter. This theme was common to many nations during WWII and was an effort that met with failure more often than success.
One well-known failure of this design philosophy, at least as a conventional day fighter, was the Messerschmitt Bf 110, while the Lockheed P-38 ranks among the relatively few successful twin-engined fighters. The S.M.92 was a refined version of the S.M.91 that eliminated a central crew nacelle in favor of an elongated "greenhouse" on one of the two fuselages.
Only one S.M.92 was constructed; it was flown in 1943 under German sponsorship. It proved to be a relatively fast (nearly 400 mph), heavily armed escort fighter, but time and circumstances had passed it by.
Only the most extraordinary of aircraft could have justified the mechanical complexity and appetite for scarce Daimler-Benz DB 605 engines required by the S.M.92. Although it never saw production, the S.M.92 provides an excellent basis for a rubber-powered model.
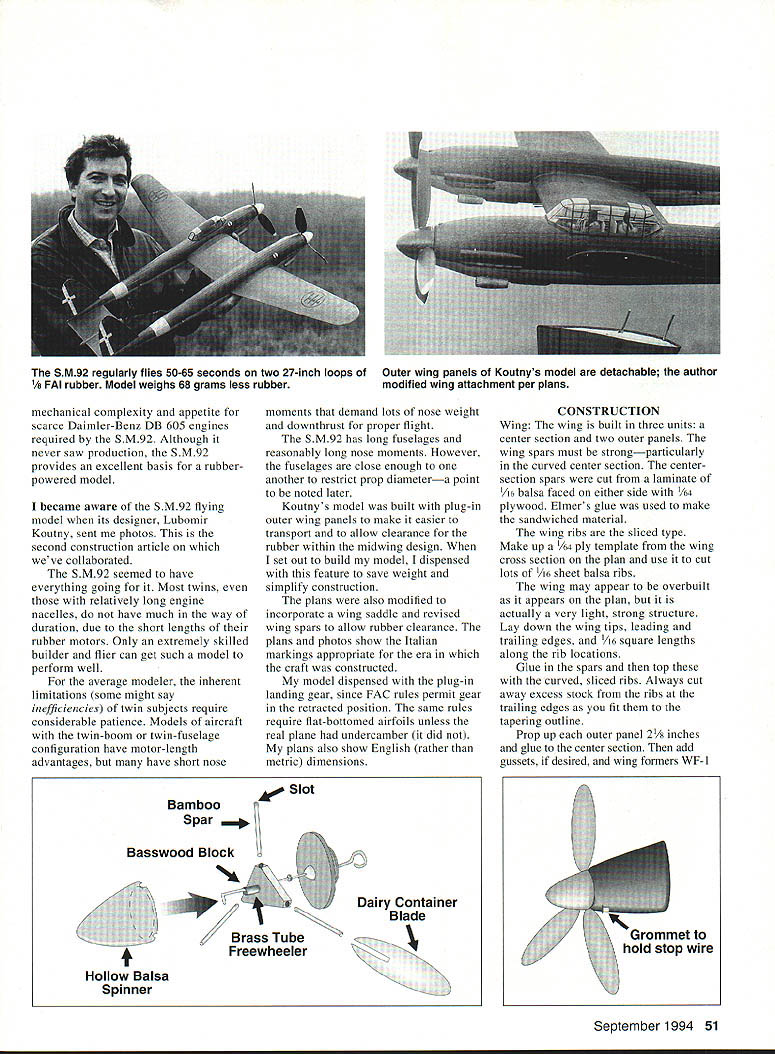
I became aware of the S.M.92 flying model when its designer, Lubomir Koutny, sent me photos. This is the second construction article on which we've collaborated.
The S.M.92 seemed to have everything going for it. Most twins, even those with relatively long engine nacelles, do not have much duration due to the short lengths of their rubber motors. Only an extremely skilled builder and flier can get such a model to perform well.
For the average modeler, the inherent limitations (some might say inefficiencies) of twin subjects require considerable patience. Models of aircraft with the twin-boom or twin-fuselage configuration have motor-length advantages, but many have short nose moments that demand lots of nose weight and downthrust for proper flight.
The S.M.92 has long fuselages and reasonably long nose moments. However, the fuselages are close enough to one another to restrict prop diameter—a point to be noted later.
Koutny's model was built with plug-in outer wing panels to make it easier to transport and to allow clearance for the rubber within the midwing design. When I set out to build my model, I dispensed with this feature to save weight and simplify construction.
The plans were also modified to incorporate a wing saddle and revised wing spars to allow rubber clearance. The plans and photos show Italian markings appropriate for the era in which the craft was constructed.
My model dispensed with the plug-in landing gear, since FAC rules permit gear in the retracted position. The same rules require flat-bottomed airfoils unless the real plane had undercamber (it did not). My plans also show English (rather than metric) dimensions.
CONSTRUCTION
Wing
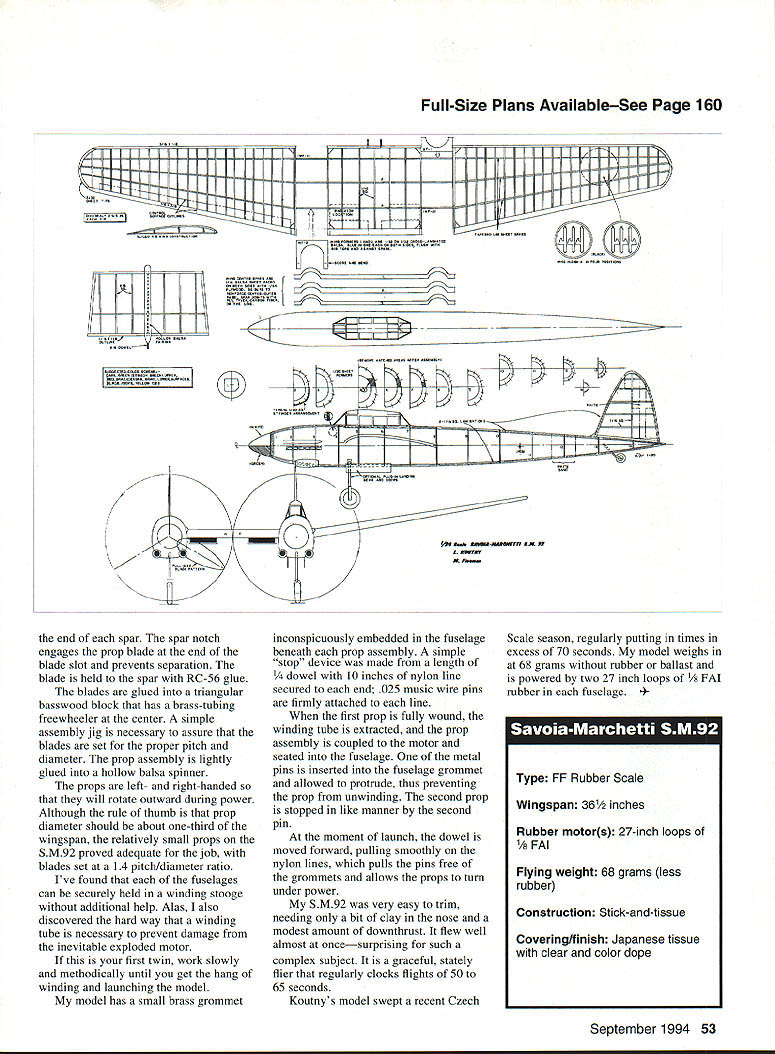
The wing is built in three units: a center section and two outer panels. The wing spars must be strong—particularly in the curved center section. The center-section spars were cut from a laminate of 1/4" balsa faced on either side with 1/64" plywood. Elmer's glue was used to make the sandwiched material.
The wing ribs are the sliced type. Make up a 1/64" ply template from the wing cross section on the plan and use it to cut lots of 1/16" sheet balsa ribs.
The wing may appear overbuilt as it appears on the plan, but it is actually a very light, strong structure. Lay down the wing tips, leading and trailing edges, and 1/16" square lengths along the rib locations.
Glue in the spars and then top these with the curved, sliced ribs. Always cut away excess stock from the ribs at the trailing edges as you fit them to the tapering outline.
Prop up each outer panel 2-1/2" and glue to the center section. Then add gussets, if desired, and wing formers WF-1.
Fuselages
The fuselages are identical. Although built using the familiar half-shell construction technique, stringers follow Czech practice—laying down many narrow 1/20" sq. stringers directly atop formers. Except for former 1, the formers are notched. This technique produces a light, strong fuselage with smooth contours.
Transfer former patterns to balsa, being sure to mark main stringer locations. Begin the fuselage by pinning down the upper and lower keels and laminating two 1/16" stringers. Glue formers to keels, checking for square with the work surface. The first stringer should follow the centerline; then add those at the main stringer locations, frequently checking to avoid waviness.
Glue in a wing saddle, then add the stringers between the main locations; study the detailed plan for former 2. When dry, remove the completed fuselage half from the plan, add the complementary former halves, wing saddle, and remaining stringers.
It is a good idea to fill in with sheet between stringers in the area between formers 1 and 2 to strengthen the nose and add a bit of structural weight to the area. When fuselage construction is finished, cut away the former areas where the wing will pass.
Tail Surfaces
These are built directly over the plan. The vertical tail surfaces have outlines formed by laminating two 1/16" sq. stringers. Soak the stringers in hot water with a few drops of household ammonia added, then rinse and laminate the stringers around a waxed cardboard form. Pin this assembly to the building board and allow to dry overnight.
You may also want to add 1/16" x 1/32" capstrips to the tail surfaces for added strength and rigidity. These must be sanded to a thin symmetrical cross-section before covering.
Color, Markings, and Details
Aside from a few black-and-white photos, little could be found regarding the aircraft's markings. The plan shows Italian livery of approximately 1943, but the craft was also flown in German markings.
The upper surfaces were likely a forest green (Pactra Cessna gray). Paint was sprayed onto the covered and clear-doped model with an artist's mouth atomizer; spray several light coats rather than one thick one. The color separation line is straight, making masking with drafting tape quite easy.
The white fuselage bands and tail crosses were created by masking off those areas with drafting tape before spraying, which allowed the underlying white tissue to remain exposed. The black wing insignia were sprayed through carefully cut adhesive-backed masks, but black tissue insignia would also work. Note that the stylized blades of the wing insignia face outboard.
The various scoops and radiators were made from carved and hollowed balsa. The tail fairing (to which a rearward-firing cannon muzzle and tail wheel are affixed) is also made of hollow balsa block. Applying some matte black paint to the finished scoop and radiator intakes adds a nice touch of realism.
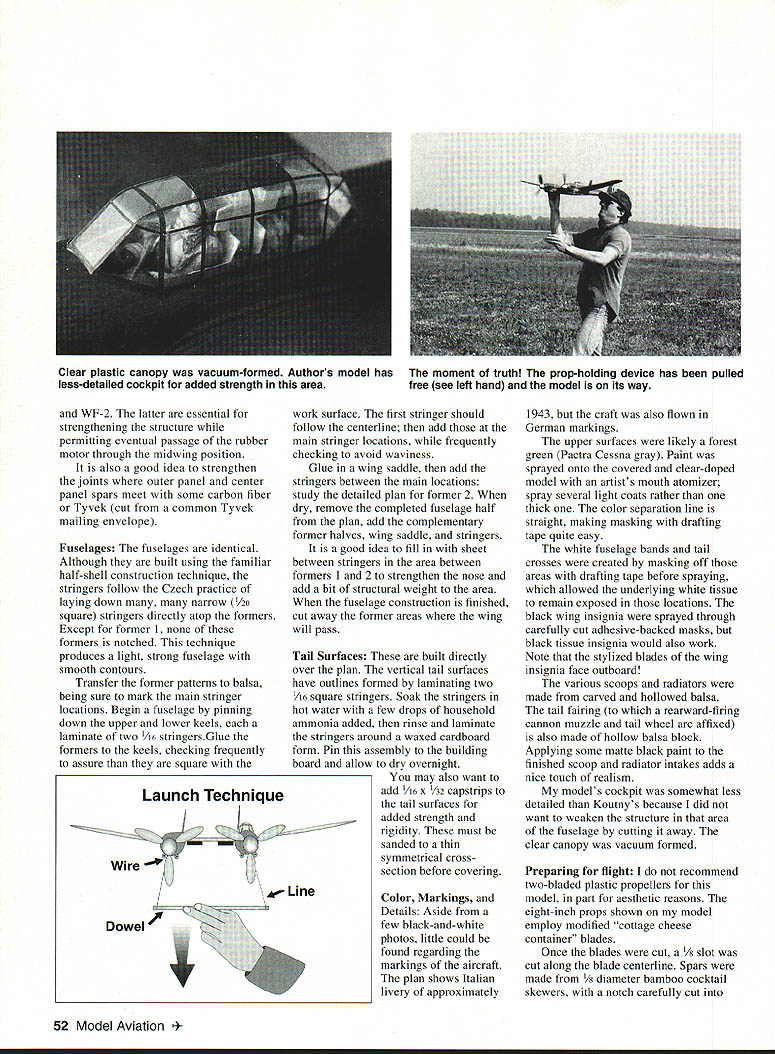
My model's cockpit was somewhat less detailed than Koutny's because I did not want to weaken the structure in that area of the fuselage by cutting it away. The clear canopy was vacuum-formed.
Preparing for Flight
I do not recommend two-bladed plastic propellers for this model, in part for aesthetic reasons. The eight-inch props shown on my model employ modified "cottage cheese container" blades.
Once the blades were cut, a 1/8" slot was cut along the blade centerline. Spars were made from 1/8" diameter bamboo cocktail skewers, with a notch carefully cut into the spar end. The spar notch engages the prop blade at the end of the blade slot and prevents separation. The blade root was wrapped with thread, CA-glued, and set into a hollow balsa spinner. The blade is held to the spar with RC-56 glue.
The blades are glued into a triangular brasswood block that houses a brass-tubing freewheeler at the center. A simple assembly jig is necessary to assure that the blades are set for the proper pitch and diameter. The prop assembly is lightly glued into a hollow balsa spinner.
The props are left- and right-handed so that they will rotate outward during power. Although the rule of thumb is that prop diameter should be about one-third of the wingspan, the relatively small props on the S.M.92 proved adequate for the job, with blades set at a 1.4 pitch/diameter ratio.
I've found that each fuselage can be securely held in the catch crutch without additional help. Alas, I also discovered the hard way that a winding tube is necessary to prevent damage from the inevitable exploded motor. If this is your first twin, work slowly and methodically until you get the hang of winding and launching the model.
My model has a small brass grommet inconspicuously embedded in the fuselage beneath each prop assembly. A simple "stop" device was made from a length of 1/4" dowel with 10 inches of nylon line secured to each end; .025" music wire pins are firmly attached to each line.
- When the first prop is fully wound, the winding tube is extracted, and the prop assembly is coupled to the motor and seated into the fuselage.
- One of the metal pins is inserted into the fuselage grommet and allowed to protrude, preventing the prop from unwinding.
- The second prop is stopped in like manner by the second pin.
- At the moment of launch, the dowel is moved forward, pulling smoothly on the nylon lines, which pulls the pins free of the grommets and allows the props to turn under power.
My S.M.92 was very easy to trim, needing only a bit of clay in the nose and a modest amount of downthrust. It flew well almost at once—surprising for such a complex subject. It is a graceful, stately flier that regularly clocks flights of 50 to 65 seconds.
Koutny's model swept a recent Czech Scale season, regularly putting in times in excess of 70 seconds. My model weighs 68 grams without rubber or ballast and is powered by two 27-inch loops of 1/8" FAI rubber, one in each fuselage.
SPECIFICATIONS
- Type: FF Rubber Scale
- Wingspan: 36 1/2 inches
- Rubber motor(s): 27-inch loops of 1/8" FAI rubber
- Flying weight: 68 grams (less rubber)
- Construction: Stick-and-tissue
- Covering/finish: Japanese tissue with clear and color dope
Transcribed from original scans by AI. Minor OCR errors may remain.

